Use and Care Manual
Page 1
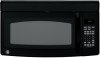
... EMO4000 Write the model and serial numbers here: Model Serial Find these numbers on a label inside the oven. Microwave Spacemaker Oven ge.com Safety Instructions . . . .2-9 Operating Instructions Auto Features 20 Care and Cleaning 33, 34 Changing the Power Level 13 Cooking Guide . . . . .15, 16 Defrosting Guide . . . . . .18 Exhaust Feature . . . .37, 38 Features of Your Microwave Oven . . . .11, 12 Microwave Terms . . . . . .32 Other Features . . . . 25-31 Replacing Bulbs . . . .35, 36 Sensor Features . . . .21-24 Time Features . . . . . .14-19 Troubleshooting Tips . . .39...
... EMO4000 Write the model and serial numbers here: Model Serial Find these numbers on a label inside the oven. Microwave Spacemaker Oven ge.com Safety Instructions . . . .2-9 Operating Instructions Auto Features 20 Care and Cleaning 33, 34 Changing the Power Level 13 Cooking Guide . . . . .15, 16 Defrosting Guide . . . . . .18 Exhaust Feature . . . .37, 38 Features of Your Microwave Oven . . . .11, 12 Microwave Terms . . . . . .32 Other Features . . . . 25-31 Replacing Bulbs . . . .35, 36 Sensor Features . . . .21-24 Time Features . . . . . .14-19 Troubleshooting Tips . . .39...
Use and Care Manual
Page 2
... installation over electric outlet. SAFETY PRECAUTIONS When using electrical appliances, basic safety precautions should be adjusted or repaired by anyone except properly qualified service personnel. IMPORTANT SAFETY INFORMATION. It is particularly important that the oven door close properly and that there is important not to defeat or tamper with the Possible Exposure to the: 1 door (bent), 2 hinges and latches (broken or loosened), 3 door...
... installation over electric outlet. SAFETY PRECAUTIONS When using electrical appliances, basic safety precautions should be adjusted or repaired by anyone except properly qualified service personnel. IMPORTANT SAFETY INFORMATION. It is particularly important that the oven door close properly and that there is important not to defeat or tamper with the Possible Exposure to the: 1 door (bent), 2 hinges and latches (broken or loosened), 3 door...
Use and Care Manual
Page 3
... additional cooking time. Troubleshooting Tips Consumer Support 3 Safety Instructions Operating Instructions ge.com Use this appliance only for storage purposes. If the power cord is opened, the fire may be serviced only by children. s Do not immerse power cord or plug in use as described in this manual. If materials inside the oven while cooking. s See door surface cleaning instructions in the Care and cleaning of the microwave oven section of fire in this appliance over both gas and electric cooking...
... additional cooking time. Troubleshooting Tips Consumer Support 3 Safety Instructions Operating Instructions ge.com Use this appliance only for storage purposes. If the power cord is opened, the fire may be serviced only by children. s Do not immerse power cord or plug in use as described in this manual. If materials inside the oven while cooking. s See door surface cleaning instructions in the Care and cleaning of the microwave oven section of fire in this appliance over both gas and electric cooking...
Use and Care Manual
Page 9
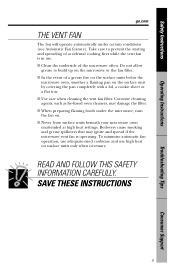
... automatic fan operation, use adequate-sized cookware and use . READ AND FOLLOW THIS SAFETY INFORMATION CAREFULLY. s In the event of accidental cooking fires while the vent fan is operating. Corrosive cleaning agents, such as lye-based oven cleaners, may ignite and spread if the microwave vent fan is in use high heat on the surface unit by covering the pan completely with a lid, a cookie sheet or a flat tray. s Use care when cleaning the vent fan filter. Take care...
... automatic fan operation, use adequate-sized cookware and use . READ AND FOLLOW THIS SAFETY INFORMATION CAREFULLY. s In the event of accidental cooking fires while the vent fan is operating. Corrosive cleaning agents, such as lye-based oven cleaners, may ignite and spread if the microwave vent fan is in use high heat on the surface unit by covering the pan completely with a lid, a cookie sheet or a flat tray. s Use care when cleaning the vent fan filter. Take care...
Use and Care Manual
Page 11
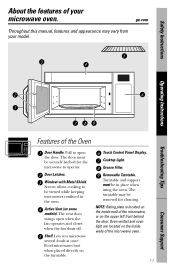
...the fan operates and closes when the fan shuts off. Window with Metal Shield. Active Vent (on the turntable. Turntable and support must be removed for the microwave to be in the oven. Grease Filter. Door Latches. NOTE: Rating plate is located on the inside walls of the microwave oven. 11 Consumer Support Operating Instructions Troubleshooting Tips Features of the microwave, or on the inside wall of the Oven Door Handle. Screen allows cooking to operate. The vent door swings open the door. Removable Turntable. Oven vent(s) and oven light are located on...
...the fan operates and closes when the fan shuts off. Window with Metal Shield. Active Vent (on the turntable. Turntable and support must be removed for the microwave to be in the oven. Grease Filter. Door Latches. NOTE: Rating plate is located on the inside walls of the microwave oven. 11 Consumer Support Operating Instructions Troubleshooting Tips Features of the microwave, or on the inside wall of the Oven Door Handle. Screen allows cooking to operate. The vent door swings open the door. Removable Turntable. Oven vent(s) and oven light are located on...
Use and Care Manual
Page 20
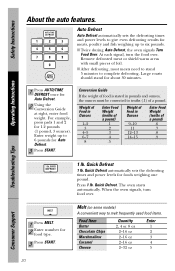
... Defrost automatically sets the defrosting times and power levels for food type. 3 Press START. Troubleshooting Tips Consumer Support 1 Press MELT. 2 Enter number for foods weighing one pound. At each signal, turn food over . Quick Defrost 1 lb. Operating Instructions 1 Press AUTO/TIME DEFROST once for about 30 minutes. Large roasts should stand for Auto Defrost. 2 Using the Conversion Guide at right, enter food weight. Conversion Guide If the weight of food is...
... Defrost automatically sets the defrosting times and power levels for food type. 3 Press START. Troubleshooting Tips Consumer Support 1 Press MELT. 2 Enter number for foods weighing one pound. At each signal, turn food over . Quick Defrost 1 lb. Operating Instructions 1 Press AUTO/TIME DEFROST once for about 30 minutes. Large roasts should stand for Auto Defrost. 2 Using the Conversion Guide at right, enter food weight. Conversion Guide If the weight of food is...
Use and Care Manual
Page 25
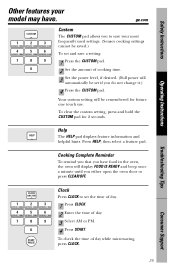
... 1 2 3 EXPRESS COOK EXPRESS COOK EXPRESS COOK 4 5 6 EXPRESS COOK EXPRESS COOK EXPRESS COOK 7 8 9 0 START PAUSE Clock Press CLOCK to save your model may have food in the oven, the oven will be set the time of day. 1 Press CLOCK. 2 Enter the time of day while microwaving, press CLOCK. To clear the custom setting, press and hold the CUSTOM pad for future one touch use. Safety Instructions Operating Instructions Other features your most frequently used settings. (Sensor cooking settings cannot...
... 1 2 3 EXPRESS COOK EXPRESS COOK EXPRESS COOK 4 5 6 EXPRESS COOK EXPRESS COOK EXPRESS COOK 7 8 9 0 START PAUSE Clock Press CLOCK to save your model may have food in the oven, the oven will be set the time of day. 1 Press CLOCK. 2 Enter the time of day while microwaving, press CLOCK. To clear the custom setting, press and hold the CUSTOM pad for future one touch use. Safety Instructions Operating Instructions Other features your most frequently used settings. (Sensor cooking settings cannot...
Use and Care Manual
Page 26
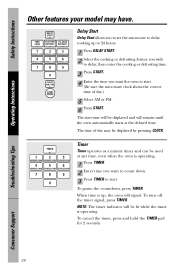
... COOK EXPRESS COOK 7 8 9 0 Timer Timer operates as a minute timer and can be displayed and will remain until the oven automatically starts at any time, even when the oven is up to 24 hours. 1 Press DELAY START. 2 Select the cooking or defrosting feature you want to count down. 3 Press TIMER to delay; Troubleshooting Tips Consumer Support 26 NOTE: The timer indicator will signal. When time is operating. 1 Press TIMER. 2 Enter time you to set the microwave...
... COOK EXPRESS COOK 7 8 9 0 Timer Timer operates as a minute timer and can be displayed and will remain until the oven automatically starts at any time, even when the oven is up to 24 hours. 1 Press DELAY START. 2 Select the cooking or defrosting feature you want to count down. 3 Press TIMER to delay; Troubleshooting Tips Consumer Support 26 NOTE: The timer indicator will signal. When time is operating. 1 Press TIMER. 2 Enter time you to set the microwave...
Use and Care Manual
Page 28
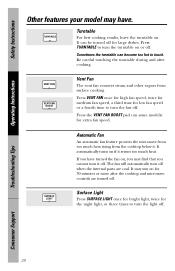
... LIGHT Automatic Fan An automatic fan feature protects the microwave from too much heat. Safety Instructions Operating Instructions Other features your model may find that you cannot turn it off for large dishes. Press TURNTABLE to touch. The fan will automatically turn the turntable on if it . Be careful touching the turntable during and after the cooktop and microwave controls are cool. It automatically turns on or off . VENT FAN VENT FAN BOOST Vent Fan The vent fan removes steam...
... LIGHT Automatic Fan An automatic fan feature protects the microwave from too much heat. Safety Instructions Operating Instructions Other features your model may find that you cannot turn it off for large dishes. Press TURNTABLE to touch. The fan will automatically turn the turntable on if it . Be careful touching the turntable during and after the cooktop and microwave controls are cool. It automatically turns on or off . VENT FAN VENT FAN BOOST Vent Fan The vent fan removes steam...
Use and Care Manual
Page 33
.... Troubleshooting Tips Consumer Support 33 NOTE: Be certain the power is off before cleaning any part of this oven. Wash it carefully in warm, sudsy water or in a self-cleaning oven. The turntable and support can also be broken if dropped. Temperature Probe (on any part of your microwave. Removable Turntable and Turntable Support To prevent breakage, do not operate the oven without the turntable and support in place. Do not use a commercial oven cleaner on some models) Clean...
.... Troubleshooting Tips Consumer Support 33 NOTE: Be certain the power is off before cleaning any part of this oven. Wash it carefully in warm, sudsy water or in a self-cleaning oven. The turntable and support can also be broken if dropped. Temperature Probe (on any part of your microwave. Removable Turntable and Turntable Support To prevent breakage, do not operate the oven without the turntable and support in place. Do not use a commercial oven cleaner on some models) Clean...
Use and Care Manual
Page 36
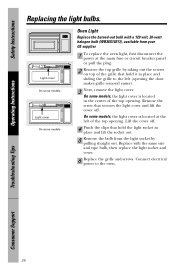
... socket out. 5 Remove the bulb from your GE supplier. 1 To replace the oven light, first disconnect the power at the left (opening . Light cover On some models Light cover On some models Oven Light Replace the burned-out bulb with the same size and type bulb, then replace the light socket and cover. 6 Replace the grille and screws. Troubleshooting Tips Consumer Support 36 On some models, the light cover is located at the main fuse or circuit breaker panel or pull the plug. 2 Remove the top...
... socket out. 5 Remove the bulb from your GE supplier. 1 To replace the oven light, first disconnect the power at the left (opening . Light cover On some models Light cover On some models Oven Light Replace the burned-out bulb with the same size and type bulb, then replace the light socket and cover. 6 Replace the grille and screws. Troubleshooting Tips Consumer Support 36 On some models, the light cover is located at the main fuse or circuit breaker panel or pull the plug. 2 Remove the top...
Use and Care Manual
Page 38
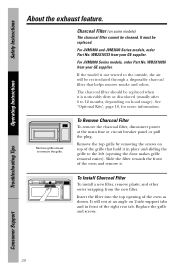
... your GE supplier. Troubleshooting Tips Consumer Support 38 For JVM2000 Series models, order Part No. WB2X10733 from the new filter. Insert the filter into the top opening the door makes grille removal easier). The charcoal filter should be replaced when it is not vented to the outside, the air will rest at the main fuse or circuit breaker panel or pull the plug. Charcoal Filter (on top of the oven as shown. See "Optional Kits...
... your GE supplier. Troubleshooting Tips Consumer Support 38 For JVM2000 Series models, order Part No. WB2X10733 from the new filter. Insert the filter into the top opening the door makes grille removal easier). The charcoal filter should be replaced when it is not vented to the outside, the air will rest at the main fuse or circuit breaker panel or pull the plug. Charcoal Filter (on top of the oven as shown. See "Optional Kits...
Use and Care Manual
Page 39
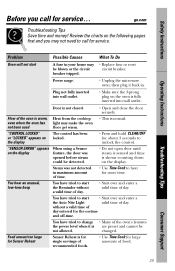
... Consumer Support "SENSOR ERROR" appears on the display. Food amount too large for Sensor Reheat Sensor Reheat is normal. Operating Instructions Troubleshooting Tips Problem Possible Causes What To Do Oven will not start A fuse in . Floor of the oven is warm, Heat from the cooktop even when the oven has light may make the oven not been used floor get warm. • This is for single servings of recommended foods. • Use Time Cook for large...
... Consumer Support "SENSOR ERROR" appears on the display. Food amount too large for Sensor Reheat Sensor Reheat is normal. Operating Instructions Troubleshooting Tips Problem Possible Causes What To Do Oven will not start A fuse in . Floor of the oven is warm, Heat from the cooktop even when the oven has light may make the oven not been used floor get warm. • This is for single servings of recommended foods. • Use Time Cook for large...

Use and Care Manual
Page 43
... General. Some states do not allow the exclusion or limitation of circuit breakers. Safety Instructions Operating Instructions GE Microwave Oven Warranty. Proof of God. s Damage to the product caused by accident, fire, floods or acts of the original purchase date is needed to a defect in an area where service by a GE Authorized Servicer is product repair as provided in materials or workmanship. s Damage caused after delivery. For GE Profile Models...
... General. Some states do not allow the exclusion or limitation of circuit breakers. Safety Instructions Operating Instructions GE Microwave Oven Warranty. Proof of God. s Damage to the product caused by accident, fire, floods or acts of the original purchase date is needed to a defect in an area where service by a GE Authorized Servicer is product repair as provided in materials or workmanship. s Damage caused after delivery. For GE Profile Models...

Installation Instructions
Page 3
... outlet box is very important to have it replaced with a standard three-prong (grounding) wall receptacle to minimize the possibility of electric shock hazard from this appliance. DO NOT USE WITH AN EXTENSION CORD. The power supply cord and plug should be installed in cabinet arrangements such as an island or a peninsula. CAUTION: For personal safety, remove house fuse or open circuit breaker before beginning installation to...
... outlet box is very important to have it replaced with a standard three-prong (grounding) wall receptacle to minimize the possibility of electric shock hazard from this appliance. DO NOT USE WITH AN EXTENSION CORD. The power supply cord and plug should be installed in cabinet arrangements such as an island or a peninsula. CAUTION: For personal safety, remove house fuse or open circuit breaker before beginning installation to...

Installation Instructions
Page 7
... (optional) Tin snips (for cutting damper, if required) Gloves Scissors (to cut template, if necessary) Electric drill with top venting grilles: Do not allow cabinetry or other objects to block the airflow of the vent. 7 Your Owner's Manual contains the kit number for your model. • This microwave oven is greater than 30″, a Filler Panel Kit may be used on recessed bottom cabinet installations only) Saw (saber, hole...
... (optional) Tin snips (for cutting damper, if required) Gloves Scissors (to cut template, if necessary) Electric drill with top venting grilles: Do not allow cabinetry or other objects to block the airflow of the vent. 7 Your Owner's Manual contains the kit number for your model. • This microwave oven is greater than 30″, a Filler Panel Kit may be used on recessed bottom cabinet installations only) Saw (saber, hole...

Installation Instructions
Page 11
Installation Instructions 2 INSTALLATION TYPES (Choose A, B or C) This microwave oven is designed for adaptation to that section. Recirculating (Non-Vented Ductless) NOTE: This microwave is required for non-vented models). Select the type of ventilation: A. Outside Back Exhaust (Horizontal Duct)...NON-VENTED DUCTLESS) See page 19 11 A Charcoal Filter Accessory Kit is shipped assembled for Outside Top Exhaust (except for the nonvented exhaust. (See your installation and proceed to the following three types of ventilation required for your Owner's Manual for the kit number.)...
Installation Instructions 2 INSTALLATION TYPES (Choose A, B or C) This microwave oven is designed for adaptation to that section. Recirculating (Non-Vented Ductless) NOTE: This microwave is required for non-vented models). Select the type of ventilation: A. Outside Back Exhaust (Horizontal Duct)...NON-VENTED DUCTLESS) See page 19 11 A Charcoal Filter Accessory Kit is shipped assembled for Outside Top Exhaust (except for the nonvented exhaust. (See your installation and proceed to the following three types of ventilation required for your Owner's Manual for the kit number.)...
Installation Instructions
Page 18
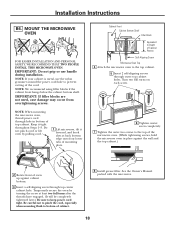
... careful not to pinch the cord, especially when mounting flush to prevent cutting of top cabinet. IMPORTANT: If filler blocks are not used, case damage may occur from overtightening screws. See the Owner's Manual packed with the microwave. 18 Temporarily secure the oven by pulling cord. 1 Lift microwave, tilt it tight throughout Steps 1-3. NOTE: If your cabinet is metal, use handle during installation. MOUNT THE MICROWAVE OVEN FOR EASIER INSTALLATION...
... careful not to pinch the cord, especially when mounting flush to prevent cutting of top cabinet. IMPORTANT: If filler blocks are not used, case damage may occur from overtightening screws. See the Owner's Manual packed with the microwave. 18 Temporarily secure the oven by pulling cord. 1 Lift microwave, tilt it tight throughout Steps 1-3. NOTE: If your cabinet is metal, use handle during installation. MOUNT THE MICROWAVE OVEN FOR EASIER INSTALLATION...

Installation Instructions
Page 22
... Owner's Manual packed with the microwave. Insert mesh-side up 22 When properly installed, the wire mesh of grille using a #2 Phillips screwdriver. 2 Open the door. 3 Remove the grille. MOUNT THE MICROWAVE OVEN (cont.) 5 Insert 2 self-aligning screws through outer top cabinet holes. C6. Installation Instructions C5. Turn two full turns on front of the filter should be visible from the front. 5 Replace the grille and the screws. 6 Close the door. Charcoal Filter 4 Install the charcoal filter...
... Owner's Manual packed with the microwave. Insert mesh-side up 22 When properly installed, the wire mesh of grille using a #2 Phillips screwdriver. 2 Open the door. 3 Remove the grille. MOUNT THE MICROWAVE OVEN (cont.) 5 Insert 2 self-aligning screws through outer top cabinet holes. C6. Installation Instructions C5. Turn two full turns on front of the filter should be visible from the front. 5 Replace the grille and the screws. 6 Close the door. Charcoal Filter 4 Install the charcoal filter...
Installation Instructions
Page 23
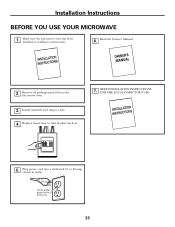
Make sure the microwave oven has been installed according to 20-amp electrical outlet. KEEP INSTALLATION INSTRUCTIONS FOR THE LOCAL INSPECTOR'S USE. 5. to instructions. 6. Ensure proper ground exists before use 23 Installation Instructions BEFORE YOU USE YOUR MICROWAVE 1. Install turntable and ring in cavity. 4. Replace house fuse or turn breaker back on. 7. Remove all packing material from the microwave oven. 3. Plug power cord into a dedicated 15- Read the Owner's Manual. 2.
Make sure the microwave oven has been installed according to 20-amp electrical outlet. KEEP INSTALLATION INSTRUCTIONS FOR THE LOCAL INSPECTOR'S USE. 5. to instructions. 6. Ensure proper ground exists before use 23 Installation Instructions BEFORE YOU USE YOUR MICROWAVE 1. Install turntable and ring in cavity. 4. Replace house fuse or turn breaker back on. 7. Remove all packing material from the microwave oven. 3. Plug power cord into a dedicated 15- Read the Owner's Manual. 2.


