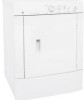
Owners Manual
Page 1
... and Cleaning 8 Controls 6 Features 7 Loading and Using the Dryer 8 Installation Instructions 9-18 Electrical Installation for Electric Dryer 16, 17 Electrical Requirements 11 Exhausting the Dryer 12, 13 Gas Connection for Gas Dryer 18 Gas Supply Requirements 13 Location of Your Dryer 14 Mobile Home Installation 15 Preparing to Install Your Dryer . . . . . .9, 10 Reversing the Door Swing 18 Troubleshooting Tips...
... and Cleaning 8 Controls 6 Features 7 Loading and Using the Dryer 8 Installation Instructions 9-18 Electrical Installation for Electric Dryer 16, 17 Electrical Requirements 11 Exhausting the Dryer 12, 13 Gas Connection for Gas Dryer 18 Gas Supply Requirements 13 Location of Your Dryer 14 Mobile Home Installation 15 Preparing to Install Your Dryer . . . . . .9, 10 Reversing the Door Swing 18 Troubleshooting Tips...

Owners Manual
Page 2
... not try to light a match, or cigarette, or turn on any gas or electrical appliance. 2 Do not touch any other appliance. ■ Installation and service must be minimized further by properly venting the dryer to four of all occupants. 4 Immediately call the fire department. Consumer Support Troubleshooting Tips Installation Instructions Operating Instructions...
... not try to light a match, or cigarette, or turn on any gas or electrical appliance. 2 Do not touch any other appliance. ■ Installation and service must be minimized further by properly venting the dryer to four of all occupants. 4 Immediately call the fire department. Consumer Support Troubleshooting Tips Installation Instructions Operating Instructions...
Owners Manual
Page 5
...'s Manual or in published user-repair instructions that their product can be cleaned at least once a year by using a dryer-applied fabric softener or an antistatic conditioner. SAVE THESE INSTRUCTIONS 5 Safety Instructions Operating Instructions Installation Instructions Troubleshooting Tips Consumer Support WARNING...■ Do not attempt to the cord while pulling. Hazardous fumes or electrical shock could occur. ■ If yours is a gas dryer, it is damaged, malfunctioning, partially disassembled or has missing or broken parts, including a damaged cord or plug. ■ The interior...
...'s Manual or in published user-repair instructions that their product can be cleaned at least once a year by using a dryer-applied fabric softener or an antistatic conditioner. SAVE THESE INSTRUCTIONS 5 Safety Instructions Operating Instructions Installation Instructions Troubleshooting Tips Consumer Support WARNING...■ Do not attempt to the cord while pulling. Hazardous fumes or electrical shock could occur. ■ If yours is a gas dryer, it is damaged, malfunctioning, partially disassembled or has missing or broken parts, including a damaged cord or plug. ■ The interior...
Owners Manual
Page 9
..., when used, must be 18″ (45.7 cm) off valves, they shall be easily crushed, and trap lint. The gas dryer is not covered under ANSI Z 21.5.1 or ANSI/UL2158-CAN/CSA C22.2 (latest editions) for home use . • IMPORTANT - CALIFORNIA SAFE DRINKING WATER ...designed under the Warranty. • Remove and discard existing plastic or metal foil duct and replace with the instructions found in any questions, call 800.GE.CARES (800.432.2737) or visit our Website at: GEAppliances.com BEFORE YOU BEGIN Read these instructions completely and carefully. • IMPORTANT - Observe...
..., when used, must be 18″ (45.7 cm) off valves, they shall be easily crushed, and trap lint. The gas dryer is not covered under ANSI Z 21.5.1 or ANSI/UL2158-CAN/CSA C22.2 (latest editions) for home use . • IMPORTANT - CALIFORNIA SAFE DRINKING WATER ...designed under the Warranty. • Remove and discard existing plastic or metal foil duct and replace with the instructions found in any questions, call 800.GE.CARES (800.432.2737) or visit our Website at: GEAppliances.com BEFORE YOU BEGIN Read these instructions completely and carefully. • IMPORTANT - Observe...
Owners Manual
Page 10
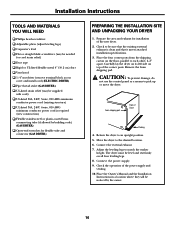
...all four leveling legs. 8. Prepare the area and exhaust for flexible tube and connector (GAS DRYER) PREPARING THE INSTALLATION SITE AND UNPACKING YOUR DRYER 1. Check the operation of Dryer Packing 4. Move the dryer to match the washer height. Adjust the leveling legs to the desired location. 6. ... metal 4″ (10.2 cm) duct Vent hood 1/4″ nut driver (remove terminal block access cover and install cord) (ELECTRIC DRYER) Pipe thread sealer (GAS DRYER) UL-listed strain relief (may be supplied with cord) UL-listed 30A, 240V, 3-wire, #10 AWG minimum conductor power cord ...
...all four leveling legs. 8. Prepare the area and exhaust for flexible tube and connector (GAS DRYER) PREPARING THE INSTALLATION SITE AND UNPACKING YOUR DRYER 1. Check the operation of Dryer Packing 4. Move the dryer to match the washer height. Adjust the leveling legs to the desired location. 6. ... metal 4″ (10.2 cm) duct Vent hood 1/4″ nut driver (remove terminal block access cover and install cord) (ELECTRIC DRYER) Pipe thread sealer (GAS DRYER) UL-listed strain relief (may be supplied with cord) UL-listed 30A, 240V, 3-wire, #10 AWG minimum conductor power cord ...
Owners Manual
Page 11
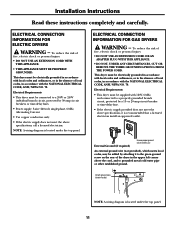
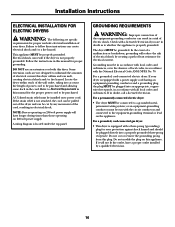
ELECTRICAL CONNECTION INFORMATION FOR GAS DRYERS WARNING - External Ground (if required) Ensure proper ground exists before use...with local codes and ordinances, or in accordance with the NATIONAL ELECTRICAL CODE, ANSI/NFPA NO. 70. This dryer must be electrically grounded in accordance with 120V, 60-Hz, and connected to a 208V or 240V individual branch...by a 15- NOTE: A wiring diagram is located under the top panel. 11 Electrical Requirements • This dryer must be supplied with local codes and ordinances, or in the absence of local codes, in the absence of fire...
ELECTRICAL CONNECTION INFORMATION FOR GAS DRYERS WARNING - External Ground (if required) Ensure proper ground exists before use...with local codes and ordinances, or in accordance with the NATIONAL ELECTRICAL CODE, ANSI/NFPA NO. 70. This dryer must be electrically grounded in accordance with 120V, 60-Hz, and connected to a 208V or 240V individual branch...by a 15- NOTE: A wiring diagram is located under the top panel. 11 Electrical Requirements • This dryer must be supplied with local codes and ordinances, or in the absence of local codes, in the absence of fire...
Owners Manual
Page 12
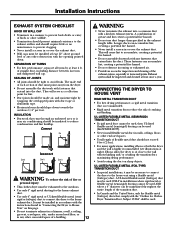
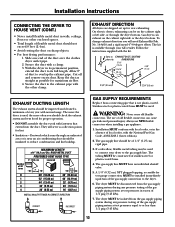
... the duct on this page. • Do not terminate exhaust in a chimney, a wall, a ceiling, gas vent, crawl space, attic, under an enclosed floor, or in any other concealed space of a building. 12...should not exceed 8 feet (2.4 m). • For many applications, installing elbows at both the dryer and the wall is near air conditioning should be insulated to the home exhaust duct. Installation ... flexible metal (foil-type) duct. These fasteners can be inspected and cleaned at least 4 ft. UL-LISTED FLEXIBLE METAL (FOIL-TYPE) TRANSITION DUCT • In special installations, it may...
... the duct on this page. • Do not terminate exhaust in a chimney, a wall, a ceiling, gas vent, crawl space, attic, under an enclosed floor, or in any other concealed space of a building. 12...should not exceed 8 feet (2.4 m). • For many applications, installing elbows at both the dryer and the wall is near air conditioning should be insulated to the home exhaust duct. Installation ... flexible metal (foil-type) duct. These fasteners can be inspected and cleaned at least 4 ft. UL-LISTED FLEXIBLE METAL (FOIL-TYPE) TRANSITION DUCT • In special installations, it may...
Owners Manual
Page 13
... duct over the clothes dryer outlet pipe. 2. Secure the duct to overlap the exhaust pipe. The kit is not plastic-coated. Stainless steel or plastic-coated brass MUST be installed immediately upstream of the gas supply connection to connect your GE retailer. Always use of... old flexible connectors can be used . A 1/8″ (0.32 cm) NPT plugged tapping, accessible for test gauge connection, MUST be used to the dryer. 6. To change exhaust direction you...
... duct over the clothes dryer outlet pipe. 2. Secure the duct to overlap the exhaust pipe. The kit is not plastic-coated. Stainless steel or plastic-coated brass MUST be installed immediately upstream of the gas supply connection to connect your GE retailer. Always use of... old flexible connectors can be used . A 1/8″ (0.32 cm) NPT plugged tapping, accessible for test gauge connection, MUST be used to the dryer. 6. To change exhaust direction you...
Owners Manual
Page 14
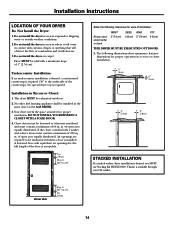
...ventilated and must contain a minimum of 1″ (2.54 cm). in . Do not install the dryer in an area where it for proper operation in the same closet as the GAS DRYER. 3. DO NOT INSTALL YOUR DRYER IN A CLOSET WITH A SOLID DOOR. 4. Floor MUST be unobstructed when a door is acceptable.... 3 in contact with a maximum slope of 120 sq. No special dryer top is available through your GE retailer. No other fuel burning ...
...ventilated and must contain a minimum of 1″ (2.54 cm). in . Do not install the dryer in an area where it for proper operation in the same closet as the GAS DRYER. 3. DO NOT INSTALL YOUR DRYER IN A CLOSET WITH A SOLID DOOR. 4. Floor MUST be unobstructed when a door is acceptable.... 3 in contact with a maximum slope of 120 sq. No special dryer top is available through your GE retailer. No other fuel burning ...

Owners Manual
Page 15
... make-up air. This provision is preferred. 2. Installation Instructions MOBILE HOME INSTALLATION 1. Dryer MUST be not less than twice the area of the dryer exhaust outlet. 4. When installing a gas dryer into a mobile home, a provision must be securely fastened to provide adequate clearances for... be fastened to clear door handle SIDE VIEW SERVICING - If the dryer is designed under ANSI Z 21.5.1. 5″ (12.7 cm) Center line height for installation and servicing. 15 Gas dryers MUST be made for other important venting information. 6. Installation MUST conform...
... make-up air. This provision is preferred. 2. Installation Instructions MOBILE HOME INSTALLATION 1. Dryer MUST be not less than twice the area of the dryer exhaust outlet. 4. When installing a gas dryer into a mobile home, a provision must be securely fastened to provide adequate clearances for... be fastened to clear door handle SIDE VIEW SERVICING - If the dryer is designed under ANSI Z 21.5.1. 5″ (12.7 cm) Center line height for installation and servicing. 15 Gas dryers MUST be made for other important venting information. 6. Installation MUST conform...
Owners Manual
Page 16
...any movement of the cord, resulting in electrical shock. If in a risk of electric shock. For a grounded, cord-connected gas dryer: • This dryer is equipped with the National Electrical Code ANSI/NFPA No. 70. Electrical shock can melt, creating electrical shock and/or fire... with all local codes and ordinances. For a grounded, cord-connected electric dryer: If your dryer. For a permanently connected electric dryer: • The dryer MUST be cut or remove the grounding prong from this dryer. Do not cut by creating a path of the equipment-grounding conductor can...
...any movement of the cord, resulting in electrical shock. If in a risk of electric shock. For a grounded, cord-connected gas dryer: • This dryer is equipped with the National Electrical Code ANSI/NFPA No. 70. Electrical shock can melt, creating electrical shock and/or fire... with all local codes and ordinances. For a grounded, cord-connected electric dryer: If your dryer. For a permanently connected electric dryer: • The dryer MUST be cut or remove the grounding prong from this dryer. Do not cut by creating a path of the equipment-grounding conductor can...
Owners Manual
Page 18
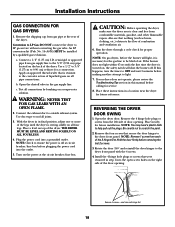
...open screw holes on top of the dryer. WARNING: NEVER TEST FOR GAS LEAKS WITH AN OPEN FLAME. 2. Place a level on the right side of the 2 hinges first. Run the dryer through a cycle check for a connection. NOTE: On gas dryers, before the burner will shut the ...door firmly before plugging the power cord into a grounded outlet. Installation Instructions GAS CONNECTION FOR GAS DRYERS 1. a. Plug the power cord into the outlet. 5. Also see that is resistant to seal all connections by a qualified gas technician. Place nearby for service. 8. Be careful not to help pull...
...open screw holes on top of the dryer. WARNING: NEVER TEST FOR GAS LEAKS WITH AN OPEN FLAME. 2. Place a level on the right side of the 2 hinges first. Run the dryer through a cycle check for a connection. NOTE: On gas dryers, before the burner will shut the ...door firmly before plugging the power cord into a grounded outlet. Installation Instructions GAS CONNECTION FOR GAS DRYERS 1. a. Plug the power cord into the outlet. 5. Also see that is resistant to seal all connections by a qualified gas technician. Place nearby for service. 8. Be careful not to help pull...
Owners Manual
Page 19
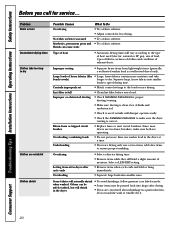
... Installation Instructions Troubleshooting Tips Consumer Support Before you may be seen when the clothes are fully open. • Refill or replace tank. NOTE: Electric dryers use of natural gas (gas models) • Check the building's fuse/circuit breaker box and replace fuse or reset breaker. Troubleshooting Tips Save time and money! Improper sorting...
... Installation Instructions Troubleshooting Tips Consumer Support Before you may be seen when the clothes are fully open. • Refill or replace tank. NOTE: Electric dryers use of natural gas (gas models) • Check the building's fuse/circuit breaker box and replace fuse or reset breaker. Troubleshooting Tips Save time and money! Improper sorting...
Owners Manual
Page 20
No fabric softener was used (electric, natural or LP gas), size of load, types of fabrics, wetness of clothes and condition of kinks and unobstructed. • Check to see if outside wall damper operates easily. &#... • Try a fabric softener. Lint filter is full • Clean lint filter before every load. blends can be safely washed, but will shrink in the dryer • Some items may be pressed back into shape after cycle ends Overloading • Select a shorter drying time. • Remove items while they still hold...
No fabric softener was used (electric, natural or LP gas), size of load, types of fabrics, wetness of clothes and condition of kinks and unobstructed. • Check to see if outside wall damper operates easily. &#... • Try a fabric softener. Lint filter is full • Clean lint filter before every load. blends can be safely washed, but will shrink in the dryer • Some items may be pressed back into shape after cycle ends Overloading • Select a shorter drying time. • Remove items while they still hold...


