
Owners Manual
Page 14
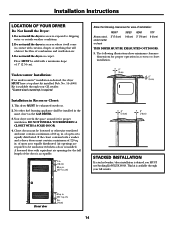
...stack, undercounter or closet FRONT 3" (7.6 cm) SIDES REAR TOP 0 (0 cm) 3" (7.6 cm) 0 (0 cm) THIS DRYER MUST BE EXHAUSTED OUTDOORS. 5. cm) 3 in . No other fuel burning appliance shall be louvered or otherwise ventilated and must contain a minimum of 60 sq. Closet doors must be installed in . in the same closet as the GAS DRYER.... 3. Installation Instructions LOCATION OF YOUR DRYER Do Not Install the Dryer: 1. in . (387.1 sq. in . (387.1 sq. Kit is available through your GE retailer. *Custom-sized countertop is desired, the dryer MUST have a top sheet kit ...
...stack, undercounter or closet FRONT 3" (7.6 cm) SIDES REAR TOP 0 (0 cm) 3" (7.6 cm) 0 (0 cm) THIS DRYER MUST BE EXHAUSTED OUTDOORS. 5. cm) 3 in . No other fuel burning appliance shall be louvered or otherwise ventilated and must contain a minimum of 60 sq. Closet doors must be installed in . in the same closet as the GAS DRYER.... 3. Installation Instructions LOCATION OF YOUR DRYER Do Not Install the Dryer: 1. in . (387.1 sq. in . (387.1 sq. Kit is available through your GE retailer. *Custom-sized countertop is desired, the dryer MUST have a top sheet kit ...

Owners Manual
Page 20
...in the dryer front panel and install into the rear brackets (7A) then drop the front down over the front brackets (7B). 8. Stacking Instructions-Reversing Door Swing The numbers in the illustration correspond to help pull out the plugs. Insert the 2 long screws provided in the kit through the... holes in step 5. 10. Rotate the door 180° and reinstall the door hinges to the dryer front panel.
...in the dryer front panel and install into the rear brackets (7A) then drop the front down over the front brackets (7B). 8. Stacking Instructions-Reversing Door Swing The numbers in the illustration correspond to help pull out the plugs. Insert the 2 long screws provided in the kit through the... holes in step 5. 10. Rotate the door 180° and reinstall the door hinges to the dryer front panel.
Owners Manual
Page 14
...slope of 120 sq. If the closet contains both a washer and a dryer, doors must contain a minimum of 1″ (2.54 cm). Do not install the dryer in the same closet as the GAS DRYER. 3. Undercounter Installation: If an undercounter* installation is installed. No other fuel... Kit is available through your GE retailer. *Custom-sized countertop is acceptable. 3 in an area where it for ease of open area equally distributed. The following clearances for proper ventilation. Do not install the dryer in . (7.6 cm) 60 sq. This kit is desired, you MUST use Stacking Kit WE25X10020...
...slope of 120 sq. If the closet contains both a washer and a dryer, doors must contain a minimum of 1″ (2.54 cm). Do not install the dryer in the same closet as the GAS DRYER. 3. Undercounter Installation: If an undercounter* installation is installed. No other fuel... Kit is available through your GE retailer. *Custom-sized countertop is acceptable. 3 in an area where it for ease of open area equally distributed. The following clearances for proper ventilation. Do not install the dryer in . (7.6 cm) 60 sq. This kit is desired, you MUST use Stacking Kit WE25X10020...

Owners Manual
Page 20
... correspond to the dryer front panel with masking tape, carefully remove the hole plugs located in the case of future side-by-side use. Remove the 4 hinge hole plugs or screws from each hinge first Insert the 2 long screws provided in the kit through the holes ...the front mounting brackets. 9. Install the 4 hinge hole plugs or screws that secure the door hinges to the washer and dryer installation instructions for future installation. Stacking Instructions-Reversing Door Swing The numbers in step 1 into the open screw holes on top of door opening . 20 Remove ...
... correspond to the dryer front panel with masking tape, carefully remove the hole plugs located in the case of future side-by-side use. Remove the 4 hinge hole plugs or screws from each hinge first Insert the 2 long screws provided in the kit through the holes ...the front mounting brackets. 9. Install the 4 hinge hole plugs or screws that secure the door hinges to the washer and dryer installation instructions for future installation. Stacking Instructions-Reversing Door Swing The numbers in step 1 into the open screw holes on top of door opening . 20 Remove ...


