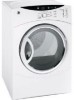
GE DCVH680EJWW Support Question
GE DCVH680EJWW Support Question
Find answers below for this question about GE DCVH680EJWW - 7.0 cu.ft. Electric Dryer.Need a GE DCVH680EJWW manual? We have 3 online manuals for this item!
Question posted by Pengler on December 16th, 2011
Stacking Kit For Ge Wcvhg800jww / Dcvh680ejww Washer And Dryer
Model number for a stacking kit. Geflstack?
Current Answers
Related GE DCVH680EJWW Manual Pages
Use and Care Manual - Page 1
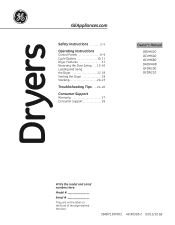
..., 18 Venting the Dryer 19 Stacking 20-23
Troubleshooting Tips . . . .24-26
Consumer Support
Warranty 27 Consumer Support 28
Owner's Manual
DBVH520 DCVH640 DCVH680 DHDVH68 GFDN100 GFDN110
Write the model and serial numbers here:
Model
Serial
They are on the label on the front of the dryer behind the door.
364B7130P001 49-90393-2 03/11/10 GE
Use and Care Manual - Page 3
....GE.CARES (800.432.2737).
n Do not remove the vent protector from
being blown into the room.
2
Use only rigid metal or flexible metal 4″ diameter ductwork inside the dryer ... getting crushed (on some models). n Properly ground dryer to the weather.
n Pull the protector out and down to its lowest position and connect the exhaust duct to avoid electrical overload. n Connect to ...
Use and Care Manual - Page 6
You can locate your model number at the top inside of the door opening.
Safety Instructions
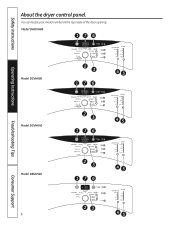
About the dryer control panel. Model DHDVH68
176
Operating Instructions
Model DCVH680
2
3
45
176
Troubleshooting Tips
Model DCVH640
2
3
45
176
Consumer Support
Model DBVH520 6
2
3
45
176
23 45
Use and Care Manual - Page 12
... same instructions and reverse all the way through before starting.
Unplug the dryer from the right side to the left and right. GEAppliances.com
IMPORTANT NOTES:
n...Tapping Screw (#10) - 6
Tapping Screw (#8) - 2 Machine Screw (#8) - 6
Nut (#8) - 2
Washer - 2
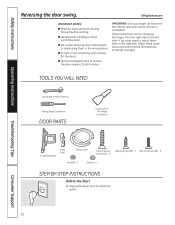
STEP-BY-STEP INSTRUCTIONS
Before you begin, do not move the cabinet until door-swing reversal is ... its electrical outlet .
12
Use and Care Manual - Page 17
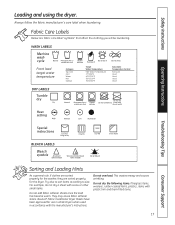
... heat/air
Special instructions
Line dry/ hang to size.
Bounce® Fabric Conditioner Dryer Sheets have been approved for the washer, they are fabric care label "symbols" that affect the clothing you will be ...Sorting and Loading Hints
As a general rule, if clothes are sorted properly for use in all GE Dryers when used with do not dry a sheet with socks or other small items.
Do not ...
Use and Care Manual - Page 19
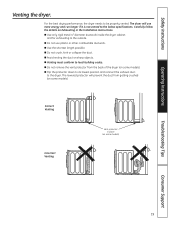
.... n Flip the protector down to its lowest position and connect the exhaust duct
to the outside. The dryer will prevent the duct from the back of the dryer (on some models). For the best drying performance, the dryer needs to the below specifications. n Do not use more energy and run longer if it is...
Use and Care Manual - Page 20
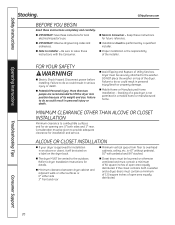
... its weight and size. n Mobile Home or Manufactured Home Installation - Stacking of a gas dryer is approved for details. ALCOVE OR CLOSET INSTALLATION
n If your dryer is not permitted in personal injury/death or property damage. Refer to Consumer - n IMPORTANT: Save these instructions for local electrical inspector's use. n Note to overhead cabinets, ceiling, etc. n Installation...
Use and Care Manual - Page 21
... to use as a pad to protect the finished floor in front of the installation location.
4 #12 x 1" Screws 4 #8 x 1/2" Screws
Gloves Level
Troubleshooting Tips
Consumer Support
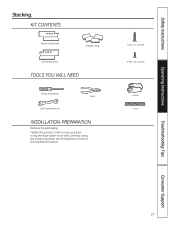
21 KIT CONTENTS
Right Hand Bracket
4 Rubber Pads
Left Hand Bracket
TOOLS YOU WILL NEED
Phillips Screwdriver
Pliers
Open-Ended Wrench
INSTALLATION PREPARATION
Remove the packaging.
Continue...
Use and Care Manual - Page 22

...8243; tapping screws. Align the holes in the left corner of the dryer do not damage the floor.
22
Consumer Support
Repeat the above step with the holes in ... attached to the bottom of the dryer. Use a Phillips screwdriver to Dryer
A.
C.
B. B. Safety Instructions
INSTALLING THE STACK BRACKET KIT
1. Use an open-end wrench or pliers to Dryer Base
Locate the 4 rubber pads...
Use and Care Manual - Page 23
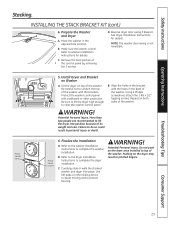
... with the brackets. Failure to do so could result in the approximate location.
Pushing on Washer
A. Troubleshooting Tips
Consumer Support
23 INSTALLING THE STACK BRACKET KIT (cont.)
4. B. Reverse dryer door swing if desired. Be sure to lift the dryer high enough to protect flooring.
Using a Phillips screwdriver, attach the 2 #8 x 1/2″ tapping screws. More than...
Use and Care Manual - Page 24
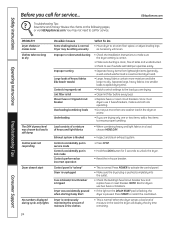
... damp Control pads not responding
Dryer doesn't start
No numbers displayed during cycle, only lights
Possible Causes
Some shaking/noise is normal. NOTE: Electric dryers use 2 fuses/breakers, make sure the dryer venting is correct.
• Make sure ducting is a well-sorted dryer load).
• Large, heavy fabrics contain more than one washer load in -house breaker...
Use and Care Manual - Page 27
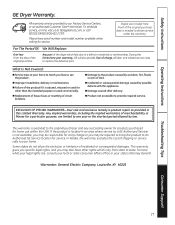
...Electric Company. What Is Not Covered:
n Service trips to your home to teach you how to the product caused by accident, fire, floods or acts of the product if it is not available, you may also have serial number and model number... what your legal rights are limited to one -year warranty, GE will also provide, free of the dryer which vary from state to a defect in materials or workmanship....
Quick Specs - Page 1
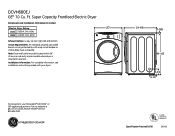
Ft.
DCVH680EJ
GE® 7.0 Cu. Note: Dryer wall outlet must be located within 36" of service cord entry and accessible when dryer is required. Super Capacity Frontload Electric Dryer
Dimensions and Installation Information (in position. Listed by a 30-amp circuit breaker or a time-delay fuse, is mounted in inches)
Electric Dryer Rating
27
240V 5600W, 24A, 60Hz
208V 4400W, 22A...
Quick Specs - Page 2
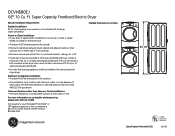
... are: 0" either side, 3" front and rear
• Minimum vertical space from floor to combustible surfaces 0" both a washer and a dryer, doors must contain a minimum of 120 sq.
DCVH680EJ
GE® 7.0 Cu. Super Capacity Frontload Electric Dryer
Special Installation Requirements:
Stacked Installation: Kit for installation in an alcove or closet, it will be
stated on a label on venting...
Quick Specs - Page 3
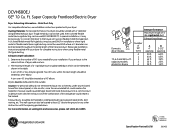
... with 4" diameter all electric dryers
Number of 90°
turns
0 1 2 3 4
A 4" opening
60 ft. 45 ft. 35 ft. 25 ft. 15 ft.
The maximum length of lint and grease could cause damage. DCVH680EJ
GE® 7.0 Cu. Super Capacity Frontload Electric Dryer
Dryer Exhausting Information - Exhaust Length Calculation:
1. Determine the number of the transition duct. Dryers must also be used...
Quick Specs - Page 4
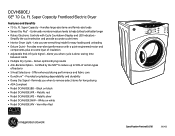
...NSF® to reduce up to remove select items for easy loading and unloading • Deluxe Quiet - Metallic silver • Model DCVH680EJWW -
Black on white • Model DCVH680EJMV - Ft. Handles large-size items and family-size loads • Sensor Dry Plus™ - Offer enhanced drying performance and fabric care • DuraDrum™ - DCVH680EJ
GE® 7.0 Cu.
Installation Instructions - Page 2
... CORD KIT MARKED FOR USE WITH DRYERS & PROVIDED WITH CLOSED LOOP OR SPADE TERMINALS WITH UPTURNED ENDS (NOT SUPPLIED). Consideration must be run with the NATIONAL ELECTRICAL CODE,...DRYER
2 ELECTRICAL CONNECTION INFORMATION
TIP: Install your dryer before installing your washer.
ELECTRICAL REQUIREMENTS
This dryer must be electrically grounded in .
GROUNDING INSTRUCTIONS
This dryer...
Installation Instructions - Page 3
...KIT MARKED FOR USE WITH DRYERS & PROVIDED WITH CLOSED LOOP OR SPADE TERMINALS WITH UPTURNED ENDS (NOT SUPPLIED).
1. CONNECTING DRYER... be installed at least 4 ft.
above strain relief bracket).
DO... number of bends of the exhaust system depends upon the type of duct, number ...located at the electrical box.
2. Turn off the circuit breaker(s) (30 amp) or remove the dryer's
circuit fuse...
Installation Instructions - Page 5

...
6 ALCOVE OR CLOSET INSTALLATION
• If your dryer is approved for electrical connection information.
5 with pedestal.
• Closet ...• For many applications, installing elbows at both a washer and a dryer, doors must conform to the MANUFACTURED HOME CONSTRUCTION & SAFETY... metal (semi-rigid) ducting cannot be used (Kit WX08X10077).
• Never install flexible metal duct ...
Installation Instructions - Page 7

....
DOOR PARTS
Hinge Assembly
Hinge Cover
Plastic Cover
TO REGISTER YOUR DRYER
CALL TOLL-FREE 1-888-269-1192
Prompt registration confirms your right to...Large Tapping Screw (#10) ... 6
Nut (#8) - 2
Washer - 2
Tapping Screw (#8) ... 2
Machine Screw (#8) ... 6 WARNING - CAUTION: Internal duct joints must be secured with a plate (Kit WE1M454) available from the right side to the left and...
Similar Questions

What G E Washer Is Compatible To Stack With My G E Dryer Model Number Dcvh680ejw
(Posted by Candie719 10 years ago)

Drum Won't Turn. Dryer Turns On, Can Set Dying Cycle But Machine Justs 'hums'.
(Posted by scomacdebmac 11 years ago)

Has The Ge Dryer With The Model Number Drsr495egww Been Recalled?
I had my dryer in storage for a year or so and when I moved into my house, my dad asked if my dryer ...
I had my dryer in storage for a year or so and when I moved into my house, my dad asked if my dryer ...
(Posted by lizhay79 11 years ago)

Ge Wsm2700rawwh Unitized Spacemaker Washer Dryer Is Making Aweful Noises
The dryer started making aweful noises two months ago. It is getting worse, especially during th...
The dryer started making aweful noises two months ago. It is getting worse, especially during th...
(Posted by jiaminzeng 12 years ago)

Dryer Recalls Any Info Sh 777-378a-ge Model Algeepvxr-363-3bw
(Posted by edkent 13 years ago)