
Owners Manual
Page 1
... 24 Owner's Manual & Installation Instructions U.S. Spacemaker Dryers ge.com Safety Instructions 2-5 Operating Instructions Care and Cleaning 8 Controls 6 Features 7 Loading and Using the Dryer 8 Installation Instructions . . . . . 9-20 Electrical Installation for Electric Dryer 16, 17 Electrical Requirements 11 Exhausting the Dryer 12, 13 Gas Connection for Gas Dryer 18 Gas Supply Requirements 13 Location of Your Dryer 14 Mobile Home Installation 15 Preparing to Install Your Dryer . . . . .9, 10 Reversing the Door Swing 20 Stacking Instructions 19, 20 Troubleshooting Tips...
... 24 Owner's Manual & Installation Instructions U.S. Spacemaker Dryers ge.com Safety Instructions 2-5 Operating Instructions Care and Cleaning 8 Controls 6 Features 7 Loading and Using the Dryer 8 Installation Instructions . . . . . 9-20 Electrical Installation for Electric Dryer 16, 17 Electrical Requirements 11 Exhausting the Dryer 12, 13 Gas Connection for Gas Dryer 18 Gas Supply Requirements 13 Location of Your Dryer 14 Mobile Home Installation 15 Preparing to Install Your Dryer . . . . .9, 10 Reversing the Door Swing 20 Stacking Instructions 19, 20 Troubleshooting Tips...

Owners Manual
Page 4
... the drum is used in your washer or dryer during operation. WARNING! I Never reach into , on the dryer top. WHEN USING YOUR DRYER I Keep area around your dryer. Always replace the lint screen when finished using the drying rack. There are many highly flammable items used a cleaning solvent or that may be placed in a locked cabinet. I Keep the area underneath and around the exhaust opening and surrounding areas free from the power...
... the drum is used in your washer or dryer during operation. WARNING! I Never reach into , on the dryer top. WHEN USING YOUR DRYER I Keep area around your dryer. Always replace the lint screen when finished using the drying rack. There are many highly flammable items used a cleaning solvent or that may be placed in a locked cabinet. I Keep the area underneath and around the exhaust opening and surrounding areas free from the power...

Owners Manual
Page 5
I Before discarding a dryer, or removing it is damaged, malfunctioning, partially disassembled or has missing or broken parts, including a damaged cord or plug. Safety Instructions Operating Instructions Installation Instructions Troubleshooting Tips Consumer Support WARNING! See the Loading and Using the Dryer section. We recommend you understand and have a pilot light. Service or performance problems caused by use any type of spray cleaner when cleaning dryer interior. SAVE THESE INSTRUCTIONS 5 DO NOT ATTEMPT TO LIGHT WITH A MATCH. Do...
I Before discarding a dryer, or removing it is damaged, malfunctioning, partially disassembled or has missing or broken parts, including a damaged cord or plug. Safety Instructions Operating Instructions Installation Instructions Troubleshooting Tips Consumer Support WARNING! See the Loading and Using the Dryer section. We recommend you understand and have a pilot light. Service or performance problems caused by use any type of spray cleaner when cleaning dryer interior. SAVE THESE INSTRUCTIONS 5 DO NOT ATTEMPT TO LIGHT WITH A MATCH. Do...

Owners Manual
Page 7
... Instructions Operating Instructions Installation Instructions Troubleshooting Tips Consumer Support About your dryer features. These fabrics should be removed so wrinkles won 't set in. Turning the controls to remind the load. NOTE: I The drying rack must be sure to 3 Snap the light cover back on some models) WARNING: To reduce the risk of the cycle to the OFF position does not panel by removing the fuse or switching off the light housing. Light cover Pry with the EASY CARE...
... Instructions Operating Instructions Installation Instructions Troubleshooting Tips Consumer Support About your dryer features. These fabrics should be removed so wrinkles won 't set in. Turning the controls to remind the load. NOTE: I The drying rack must be sure to 3 Snap the light cover back on some models) WARNING: To reduce the risk of the cycle to the OFF position does not panel by removing the fuse or switching off the light housing. Light cover Pry with the EASY CARE...

Owners Manual
Page 8
... air flow, which causes longer drying times. Dry thoroughly and replace. Do not overload. The Exhaust Hood: Check from the dryer. Sorting and Loading Hints As a general rule, if clothes are sorted properly for the washer, they are sorted properly for use . Remove by these products away from the outside that there is not covered by your warranty. Lint buildup in accordance with a damp cloth. The Exhaust Duct: Inspect and clean the exhaust ducting...
... air flow, which causes longer drying times. Dry thoroughly and replace. Do not overload. The Exhaust Hood: Check from the dryer. Sorting and Loading Hints As a general rule, if clothes are sorted properly for the washer, they are sorted properly for use . Remove by these products away from the outside that there is not covered by your warranty. Lint buildup in accordance with a damp cloth. The Exhaust Duct: Inspect and clean the exhaust ducting...

Owners Manual
Page 9
... Electrical Code Part 1. • The gas service to Consumer - This dryer is not recommended for future reference. • Skill level - Installation Instructions Spacemaker Dryer Models DCXH46 DSXH43 DPXH46 DH43 PSXH43 If you have any questions, in Canada, CAN/CGA B149.12. Save these Installation Instructions. • Do not install or store appliance in garages. Keep these instructions completely and carefully. • IMPORTANT - See Location of Your Dryer...
... Electrical Code Part 1. • The gas service to Consumer - This dryer is not recommended for future reference. • Skill level - Installation Instructions Spacemaker Dryer Models DCXH46 DSXH43 DPXH46 DH43 PSXH43 If you have any questions, in Canada, CAN/CGA B149.12. Save these Installation Instructions. • Do not install or store appliance in garages. Keep these instructions completely and carefully. • IMPORTANT - See Location of Your Dryer...
Owners Manual
Page 10
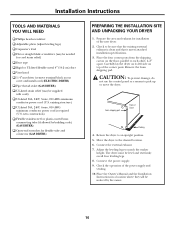
...) duct ‰ Vent hood ‰ 1/4″ nut driver (remove terminal block access cover and install cord) (ELECTRIC DRYER) ‰ Pipe thread sealer (GAS DRYER) ‰ UL-listed strain relief (may be sure that the existing external exhaust is required (U.S. Carefully lay the dryer on its left side on the floor, parallel to be supplied with cord) ‰ UL-listed 30A, 240V, 3-wire, #10 AWG minimum conductor power cord (U.S. Return the dryer to the desired location. 6. existing...
...) duct ‰ Vent hood ‰ 1/4″ nut driver (remove terminal block access cover and install cord) (ELECTRIC DRYER) ‰ Pipe thread sealer (GAS DRYER) ‰ UL-listed strain relief (may be sure that the existing external exhaust is required (U.S. Carefully lay the dryer on its left side on the floor, parallel to be supplied with cord) ‰ UL-listed 30A, 240V, 3-wire, #10 AWG minimum conductor power cord (U.S. Return the dryer to the desired location. 6. existing...

Owners Manual
Page 12
... the dryer and wall connection only. Installation Instructions EXHAUST SYSTEM REQUIREMENTS Use only 4″ (10.2 cm) diameter (minimum) rigid metal duct for best performance, or flexible metal duct, and approved vent hood which can accumulate lint, resulting in any other flammables are specific requirements for example: clothing, draperies/curtains, paper) to terminate the duct outdoors, and seal all joints with duct tape. To avoid restricting the outlet, maintain...
... the dryer and wall connection only. Installation Instructions EXHAUST SYSTEM REQUIREMENTS Use only 4″ (10.2 cm) diameter (minimum) rigid metal duct for best performance, or flexible metal duct, and approved vent hood which can accumulate lint, resulting in any other flammables are specific requirements for example: clothing, draperies/curtains, paper) to terminate the duct outdoors, and seal all joints with duct tape. To avoid restricting the outlet, maintain...

Owners Manual
Page 13
... an air conditioning duct should check the exhaust system and vent hood for rear exhausting. The dryer MUST be isolated from the gas supply piping system during any pressure testing of the gas supply piping system at test pressures equal to reduce condensation and lint buildup. Number of 90° turns 0 1 2 MAXIMUM LENGTH of 4" (10.2 cm) Dia. On electric dryers, exhausting can cause gas leaks and personal injury. The kit is...
... an air conditioning duct should check the exhaust system and vent hood for rear exhausting. The dryer MUST be isolated from the gas supply piping system during any pressure testing of the gas supply piping system at test pressures equal to reduce condensation and lint buildup. Number of 90° turns 0 1 2 MAXIMUM LENGTH of 4" (10.2 cm) Dia. On electric dryers, exhausting can cause gas leaks and personal injury. The kit is...
Owners Manual
Page 16
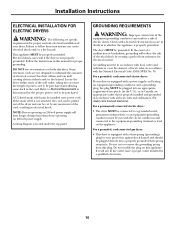
.... Installation Instructions ELECTRICAL INSTALLATION FOR ELECTRIC DRYERS WARNING: The following are specific requirements for proper grounding. NOTE: Dryers operating on 240-volt power supply. Check with the National Electrical Code ANSI/NFPA No. 70. For a grounded, cord-connected gas dryer: • This dryer is not properly grounded. Do not modify the plug on the appliance. GROUNDING REQUIREMENTS WARNING: Improper connection of local codes, in Canada, an appropriate outlet that is located under the top panel. If...
.... Installation Instructions ELECTRICAL INSTALLATION FOR ELECTRIC DRYERS WARNING: The following are specific requirements for proper grounding. NOTE: Dryers operating on 240-volt power supply. Check with the National Electrical Code ANSI/NFPA No. 70. For a grounded, cord-connected gas dryer: • This dryer is not properly grounded. Do not modify the plug on the appliance. GROUNDING REQUIREMENTS WARNING: Improper connection of local codes, in Canada, an appropriate outlet that is located under the top panel. If...

Owners Manual
Page 17
... a 4-wire power supply cord is installed on the terminal block. Typical 4 conductor receptacle Typical 4 conductor cord Black 240V White neutral Red 240V Green ground 4. Remove the screws securing the terminal block access cover and the strain relief mounting bracket located on the back of the dryer upper corner. 2. Reinstall the terminal block access cover. 4-WIRE SYSTEM FOR ELECTRIC DRYERS Effective January 1, 1996: The National Electrical Code requires that the strain relief does not turn . 10...
... a 4-wire power supply cord is installed on the terminal block. Typical 4 conductor receptacle Typical 4 conductor cord Black 240V White neutral Red 240V Green ground 4. Remove the screws securing the terminal block access cover and the strain relief mounting bracket located on the back of the dryer upper corner. 2. Reinstall the terminal block access cover. 4-WIRE SYSTEM FOR ELECTRIC DRYERS Effective January 1, 1996: The National Electrical Code requires that the strain relief does not turn . 10...

Owners Manual
Page 18
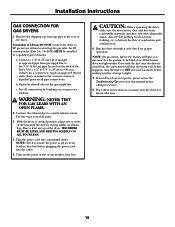
... Troubleshooting Tips section in the gas supply line. Plug the power cord into the outlet. 5. If the burner does not light within 45 seconds the first time the dryer is clear and free from gas pipe at circuit breaker/fuse box before calling for a connection. THE DRYER MUST BE LEVEL AND RESTING SOLIDLY ON ALL FOUR LEGS. 4. Installation Instructions GAS CONNECTION FOR GAS DRYERS 1. Conversion to LP Gas: DO NOT connect the dryer to light. 7. If this manual before plugging...
... Troubleshooting Tips section in the gas supply line. Plug the power cord into the outlet. 5. If the burner does not light within 45 seconds the first time the dryer is clear and free from gas pipe at circuit breaker/fuse box before calling for a connection. THE DRYER MUST BE LEVEL AND RESTING SOLIDLY ON ALL FOUR LEGS. 4. Installation Instructions GAS CONNECTION FOR GAS DRYERS 1. Conversion to LP Gas: DO NOT connect the dryer to light. 7. If this manual before plugging...

Owners Manual
Page 21
... seen when the clothes are fully open. • Refill or replace tank. Improper use two fuses/breakers. • Check the vent for service... Lint filter is restored. Review the charts on fabric softener package. Call authorized service person for service. Dryer should heat when utility service is full • Clean lint screen before drying. Your dryer may not need to an even floor space, or adjust Dryer may tumble but not heat Gas service is off LP...
... seen when the clothes are fully open. • Refill or replace tank. Improper use two fuses/breakers. • Check the vent for service... Lint filter is restored. Review the charts on fabric softener package. Call authorized service person for service. Dryer should heat when utility service is full • Clean lint screen before drying. Your dryer may not need to an even floor space, or adjust Dryer may tumble but not heat Gas service is off LP...

Owners Manual
Page 4
... substances around the exhaust opening and surrounding areas free from Heat or Do Not Tumble Dry (such as life jackets containing kapok) must not be picked up by removing the fuse or switching off vapors that may melt or burn. YOUR LAUNDRY AREA ■ Keep the area underneath and around your appliances free of the lint filter). NOTE: Turning the Cycle Selector knob...
... substances around the exhaust opening and surrounding areas free from Heat or Do Not Tumble Dry (such as life jackets containing kapok) must not be picked up by removing the fuse or switching off vapors that may melt or burn. YOUR LAUNDRY AREA ■ Keep the area underneath and around your appliances free of the lint filter). NOTE: Turning the Cycle Selector knob...

Owners Manual
Page 5
... your dryer. Safety Instructions Operating Instructions Installation Instructions Troubleshooting Tips Consumer Support WARNING! ■ Never attempt to carry out. See the Loading and Using the Dryer section. SAVE THESE INSTRUCTIONS 5 Place the cord away from traffic areas so it from service, remove the dryer door to prevent children from having your hand in the vicinity of those products and are not covered under the warranty to the manufacturer's instructions for...
... your dryer. Safety Instructions Operating Instructions Installation Instructions Troubleshooting Tips Consumer Support WARNING! ■ Never attempt to carry out. See the Loading and Using the Dryer section. SAVE THESE INSTRUCTIONS 5 Place the cord away from traffic areas so it from service, remove the dryer door to prevent children from having your hand in the vicinity of those products and are not covered under the warranty to the manufacturer's instructions for...

Owners Manual
Page 9
... codes and ordinances. • Note to Consumer - The gas dryer is not recommended for future reference. • Skill level - Installation Instructions Spacemaker Dryer DCXH46, DSXH43D, DPXH46, DH43, PSXH43 If you have any location where it could be easily crushed, and trap lint. This dryer is designed under the Warranty. • Remove and discard existing plastic or metal foil duct and replace with flexible plastic ducting...
... codes and ordinances. • Note to Consumer - The gas dryer is not recommended for future reference. • Skill level - Installation Instructions Spacemaker Dryer DCXH46, DSXH43D, DPXH46, DH43, PSXH43 If you have any location where it could be easily crushed, and trap lint. This dryer is designed under the Warranty. • Remove and discard existing plastic or metal foil duct and replace with flexible plastic ducting...

Owners Manual
Page 13
... CORRECT DIRECTION CORRECT INCORRECT GAS SUPPLY REQUIREMENTS Replace brass connecting pipe that extend into the duct. The kit is not plastic-coated. Ductwork which runs through your dryer to connect your GE retailer. Installation Instructions CONNECTING THE DRYER TO HOUSE VENT (CONT.) • Never install flexible metal duct in walls, ceilings, floors or other enclosed spaces. • Total length of flexible metal duct should check the exhaust system and vent hood for proper operation...
... CORRECT DIRECTION CORRECT INCORRECT GAS SUPPLY REQUIREMENTS Replace brass connecting pipe that extend into the duct. The kit is not plastic-coated. Ductwork which runs through your dryer to connect your GE retailer. Installation Instructions CONNECTING THE DRYER TO HOUSE VENT (CONT.) • Never install flexible metal duct in walls, ceilings, floors or other enclosed spaces. • Total length of flexible metal duct should check the exhaust system and vent hood for proper operation...

Owners Manual
Page 16
... run with this plug. For a grounded, cord-connected gas dryer: • This dryer is equipped with the National Electrical Code ANSI/NFPA No. 70. If it will have a proper outlet installed by a qualified electrician. 16 Electrical shock can result in a risk of local codes, in accordance with a three-prong (grounding) plug for electrical current. A UL-listed strain relief must be installed onto power cord. A wiring diagram is located under the top panel. Some extension cords...
... run with this plug. For a grounded, cord-connected gas dryer: • This dryer is equipped with the National Electrical Code ANSI/NFPA No. 70. If it will have a proper outlet installed by a qualified electrician. 16 Electrical shock can result in a risk of local codes, in accordance with a three-prong (grounding) plug for electrical current. A UL-listed strain relief must be installed onto power cord. A wiring diagram is located under the top panel. Some extension cords...
Owners Manual
Page 18
... back of air. Connect the exhaust duct to LP gas service without converting the gas valve. Also see that is resting solidly on a soapy water solution. Run the dryer through a cycle check for a connection. Connect a 1/2″ (1.27 cm) I.D. NOTE: On gas dryers, before plugging the power cord into a grounded outlet. semi-rigid or approved pipe from combustible materials, gasoline, and other flammable vapors. WARNING: NEVER TEST FOR GAS LEAKS WITH AN OPEN FLAME. 2. Use duct tape to...
... back of air. Connect the exhaust duct to LP gas service without converting the gas valve. Also see that is resting solidly on a soapy water solution. Run the dryer through a cycle check for a connection. Connect a 1/2″ (1.27 cm) I.D. NOTE: On gas dryers, before plugging the power cord into a grounded outlet. semi-rigid or approved pipe from combustible materials, gasoline, and other flammable vapors. WARNING: NEVER TEST FOR GAS LEAKS WITH AN OPEN FLAME. 2. Use duct tape to...

Owners Manual
Page 21
.... Troubleshooting Tips Save time and money! Fuse is blown/circuit breaker is tripped, the dryer may not need to call for service... Safety Instructions Operating Instructions Installation Instructions Troubleshooting Tips Consumer Support Before you may tumble but not heat Gas service is off LP gas supply tank is full • Clean lint screen before each load. Problem Dryer doesn't start Dryer doesn't heat Dryer shakes or makes noise Greasy spots on clothes Lint on clothes Possible Causes Dryer is unplugged Fuse is blown/circuit breaker is tripped Thermal...
.... Troubleshooting Tips Save time and money! Fuse is blown/circuit breaker is tripped, the dryer may not need to call for service... Safety Instructions Operating Instructions Installation Instructions Troubleshooting Tips Consumer Support Before you may tumble but not heat Gas service is off LP gas supply tank is full • Clean lint screen before each load. Problem Dryer doesn't start Dryer doesn't heat Dryer shakes or makes noise Greasy spots on clothes Lint on clothes Possible Causes Dryer is unplugged Fuse is blown/circuit breaker is tripped Thermal...


