
Owners Manual
Page 2
... four of these substances can receive one by visiting ge.com or by the incomplete combustion of all shipping materials properly. Properly adjusted dryers will not be minimized further by a qualified installer, service agency or the gas supplier. I Install or store where it is used. I Properly ground dryer to cause cancer, birth defects or other appliance...
... four of these substances can receive one by visiting ge.com or by the incomplete combustion of all shipping materials properly. Properly adjusted dryers will not be minimized further by a qualified installer, service agency or the gas supplier. I Install or store where it is used. I Properly ground dryer to cause cancer, birth defects or other appliance...

Owners Manual
Page 11
...metal 4″ diameter ductwork for exhausting to the below specifications. I Use only rigid metal 4″ diameter ductwork inside the dryer cabinet. I Venting must conform to be properly vented. Carefully follow the details on sharp objects. I Do not use more...Consumer Support The dryer will use plastic or other combustible ductwork. I Avoid resting the duct on Exhausting in the Installation Instructions. I Use the shortest length possible. Safety Instructions Operating Instructions ge.com Venting the Dryer For the best drying performance, the dryer needs to local...
...metal 4″ diameter ductwork for exhausting to the below specifications. I Use only rigid metal 4″ diameter ductwork inside the dryer cabinet. I Venting must conform to be properly vented. Carefully follow the details on sharp objects. I Do not use more...Consumer Support The dryer will use plastic or other combustible ductwork. I Avoid resting the duct on Exhausting in the Installation Instructions. I Use the shortest length possible. Safety Instructions Operating Instructions ge.com Venting the Dryer For the best drying performance, the dryer needs to local...

Owners Manual
Page 13
... or tumble dry it. Overdrying Letting items sit in the dryer at a time. • If you are drying. • Clean lint filter before every load. • Check installation instructions for proper ducting/venting. • Make sure ducting ...of kinks and unobstructed. • Check to see if outside wall damper operates easily. • Check the Installation Instructions to make sure both are operating. • Do not put more moisture and take too long to... large, heavy fabrics into smaller ones. Safety Instructions Operating Instructions ge.com Problem Clothes take longer to dry.
... or tumble dry it. Overdrying Letting items sit in the dryer at a time. • If you are drying. • Clean lint filter before every load. • Check installation instructions for proper ducting/venting. • Make sure ducting ...of kinks and unobstructed. • Check to see if outside wall damper operates easily. • Check the Installation Instructions to make sure both are operating. • Do not put more moisture and take too long to... large, heavy fabrics into smaller ones. Safety Instructions Operating Instructions ge.com Problem Clothes take longer to dry.

Owners Manual
Page 15
... Electric Company. During this Limited Warranty. I Damage caused after delivery. I Service trips to obtain support under the warranty. I Improper installation, delivery or maintenance. EXCLUSION OF IMPLIED WARRANTIES-Your sole and exclusive remedy is product repair as described in this limited one year or... you may be required to bring the product to one -year warranty, GE will also provide, free of the product if it is needed to your home. Safety Instructions Operating Instructions GE Dryer Warranty. Please have other than the intended purpose or used for service. ...
... Electric Company. During this Limited Warranty. I Damage caused after delivery. I Service trips to obtain support under the warranty. I Improper installation, delivery or maintenance. EXCLUSION OF IMPLIED WARRANTIES-Your sole and exclusive remedy is product repair as described in this limited one year or... you may be required to bring the product to one -year warranty, GE will also provide, free of the product if it is needed to your home. Safety Instructions Operating Instructions GE Dryer Warranty. Please have other than the intended purpose or used for service. ...

Installation Instructions
Page 1
...Do not allow children on page 6 of potential exposure to Installer - Step 2 Prepare the Area and Exhaust for leaks (see section 10. For Mobile or Manufactured Home see section 1). Installation Instructions Gas Dryer DESIGN 06 CERTIFIED If you have any location where it must ...be exhausted to the outdoors. • Use only 4" rigid metal ducting for satisfactory operation of the Power Supply, Gas Connections, and Venting. Step 4 ...
...Do not allow children on page 6 of potential exposure to Installer - Step 2 Prepare the Area and Exhaust for leaks (see section 10. For Mobile or Manufactured Home see section 1). Installation Instructions Gas Dryer DESIGN 06 CERTIFIED If you have any location where it must ...be exhausted to the outdoors. • Use only 4" rigid metal ducting for satisfactory operation of the Power Supply, Gas Connections, and Venting. Step 4 ...

Installation Instructions
Page 2
... the connect shall not exceed 3 ft. • Connect flexible metal connector to dryer and gas supply. • Open shut-off valve. 2 Installation Instructions Minimum Clearance Other Than Alcove or Closet Installation Minimum clearance to combustible surfaces and for proper operation and service. 1 PREPARING FOR INSTALLATION OF NEW DRYER TIP: Install your dryer before installing your washer. NEVER REUSE OLD FLEXIBLE...
... the connect shall not exceed 3 ft. • Connect flexible metal connector to dryer and gas supply. • Open shut-off valve. 2 Installation Instructions Minimum Clearance Other Than Alcove or Closet Installation Minimum clearance to combustible surfaces and for proper operation and service. 1 PREPARING FOR INSTALLATION OF NEW DRYER TIP: Install your dryer before installing your washer. NEVER REUSE OLD FLEXIBLE...

Installation Instructions
Page 3
Installation Instructions 3 RECONNECTING GAS Listed connector ANSI Z21.24 / CSA 6.10 FLARE NPT 1/8" NPT PIPE PLUG FOR CHECKING GAS INLET PRESSURE 3/8" NPT PIPE SIZE AT LEAST 1/2" Note: The connector and fittings are not to pipe threads. Keep flare end of adaptor... WRENCHES. Connector nuts must not be connected directly to be reused for use only on the original installation and are designed for another appliance or at another location. DO NOT OVERTORQUE GAS CONNECTIONS! 4 LEAK TEST TIGHTEN THE FLEXIBLE GAS LINE USING TWO ADJUSTABLE WRENCHES. 3 Caution: Use adapters as shown.
Installation Instructions 3 RECONNECTING GAS Listed connector ANSI Z21.24 / CSA 6.10 FLARE NPT 1/8" NPT PIPE PLUG FOR CHECKING GAS INLET PRESSURE 3/8" NPT PIPE SIZE AT LEAST 1/2" Note: The connector and fittings are not to pipe threads. Keep flare end of adaptor... WRENCHES. Connector nuts must not be connected directly to be reused for use only on the original installation and are designed for another appliance or at another location. DO NOT OVERTORQUE GAS CONNECTIONS! 4 LEAK TEST TIGHTEN THE FLEXIBLE GAS LINE USING TWO ADJUSTABLE WRENCHES. 3 Caution: Use adapters as shown.

Installation Instructions
Page 4
...60Hz, and connected to a properly grounded branch circuit, protected by wrapping the overlapped joints with fasteners that a licensed electrician install an approved outlet. THIS DRYER IS EQUIPPED A THREE-PRONG (GROUNDING) PLUG FOR YOUR PROTECTION AGAINST SHOCK HAZARD AND SHOULD BE PLUGGED DIRECTLY INTO A PROPERLY... LIST HOOD OR WALL CAP • Terminate in the table below . above specifications, it is near air conditioning 4 should be installed at least 4 ft. TURNS OTHER THAN 90º • One turn of birds or other obstruction with UL listed transition duct. They will : ...
...60Hz, and connected to a properly grounded branch circuit, protected by wrapping the overlapped joints with fasteners that a licensed electrician install an approved outlet. THIS DRYER IS EQUIPPED A THREE-PRONG (GROUNDING) PLUG FOR YOUR PROTECTION AGAINST SHOCK HAZARD AND SHOULD BE PLUGGED DIRECTLY INTO A PROPERLY... LIST HOOD OR WALL CAP • Terminate in the table below . above specifications, it is near air conditioning 4 should be installed at least 4 ft. TURNS OTHER THAN 90º • One turn of birds or other obstruction with UL listed transition duct. They will : ...

Installation Instructions
Page 5
.... LEVEL SIDE-TO-SIDE. TO REDUCE THE RISK OF FIRE OR PERSONAL INJURY: • This clothes dryer must be inspected and cleaned at floor level) FOR STRAIGHT LINE INSTALLATION, CONNECT THE DRYER EXHAUST TO THE EXTERNAL EXHAUST HOOD USING DUCT TAPE OR CLAMP. It must be exhausted to the outdoors....with any fasteners that extend into a common duct with the instructions found in "Connecting The Dryer To House Vent" on page 6 of this manual. • Do not terminate exhaust in a chimney, a wall, a ceiling, gas vent, crawl space, attic, under an enclosed floor, or in any other concealed space of...
.... LEVEL SIDE-TO-SIDE. TO REDUCE THE RISK OF FIRE OR PERSONAL INJURY: • This clothes dryer must be inspected and cleaned at floor level) FOR STRAIGHT LINE INSTALLATION, CONNECT THE DRYER EXHAUST TO THE EXTERNAL EXHAUST HOOD USING DUCT TAPE OR CLAMP. It must be exhausted to the outdoors....with any fasteners that extend into a common duct with the instructions found in "Connecting The Dryer To House Vent" on page 6 of this manual. • Do not terminate exhaust in a chimney, a wall, a ceiling, gas vent, crawl space, attic, under an enclosed floor, or in any other concealed space of...

Installation Instructions
Page 6
... screws or other enclosed spaces. • Total length of a gas leak in the supply line. • No other fuel-burning appliance shall be used . • Never install flexible metal duct in walls, ceilings, floors or other refastening devices which extend into the dryer room. is highly recommended (see illustra- Secure the duct to...
... screws or other enclosed spaces. • Total length of a gas leak in the supply line. • No other fuel-burning appliance shall be used . • Never install flexible metal duct in walls, ceilings, floors or other refastening devices which extend into the dryer room. is highly recommended (see illustra- Secure the duct to...
Installation Instructions
Page 7
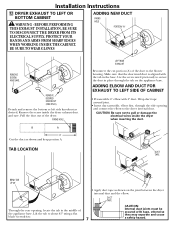
...elbow to pull or damage the electrical wires inside the dryer exhaust duct and save. ADDING ELBOW AND DUCT FOR EXHAUST TO LEFT SIDE OF CABINET • Preassemble 4" elbow with the tab in the base. Installation Instructions 12 DRYER EXHAUST TO LEFT OR BOTTOM CABINET WARNING - Make ...sure that the shortened duct is aligned with 4" duct. CAUTION: Be sure not to the dryer internal duct. DUCT TAPE CAUTION: Internal duct joints must be secured...
...elbow to pull or damage the electrical wires inside the dryer exhaust duct and save. ADDING ELBOW AND DUCT FOR EXHAUST TO LEFT SIDE OF CABINET • Preassemble 4" elbow with the tab in the base. Installation Instructions 12 DRYER EXHAUST TO LEFT OR BOTTOM CABINET WARNING - Make ...sure that the shortened duct is aligned with 4" duct. CAUTION: Be sure not to the dryer internal duct. DUCT TAPE CAUTION: Internal duct joints must be secured...
Installation Instructions
Page 8
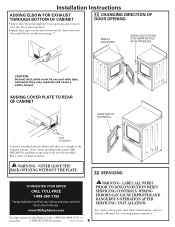
...TO DISCONNECTION WHEN SERVICING CONTROLS. For replacement parts and other information, refer to the dryer internal duct. • Apply duct tape on the joint between the dryer internal duct and elbow, as shown on Installation, Call: 1-800-626-2000 (US) or 500A436P006 1-800-561-3344 (Canada... OF DOOR OPENING REMOVE 4 HINGE SCREWS. WARNING - Cover back opening and connect it to Owner's Manual for servicing phone numbers. Installation Instructions ADDING ELBOW FOR EXHAUST THROUGH BOTTOM OF CABINET • Insert the elbow through the rear opening with tape, otherwise they may ...
...TO DISCONNECTION WHEN SERVICING CONTROLS. For replacement parts and other information, refer to the dryer internal duct. • Apply duct tape on the joint between the dryer internal duct and elbow, as shown on Installation, Call: 1-800-626-2000 (US) or 500A436P006 1-800-561-3344 (Canada... OF DOOR OPENING REMOVE 4 HINGE SCREWS. WARNING - Cover back opening and connect it to Owner's Manual for servicing phone numbers. Installation Instructions ADDING ELBOW FOR EXHAUST THROUGH BOTTOM OF CABINET • Insert the elbow through the rear opening with tape, otherwise they may ...


