
Owners Manual
Page 1
Dryers ge.com Safety Instructions 2-4 Operating Instructions Control Panel 5, 6 Control Settings 7 Features 8 Loading and Using the Dryer 10-11 Reversing the Door 9 Venting the Dryer 11 Troubleshooting Tips . . . 12, 13 Consumer Support Consumer Support . . . . . Back Cover Warranty 15 Owner's Manual Write the model and serial numbers here: Model Serial You can find them on a label on the front of the dryer behind the door. 175D1807P596 49-90328 04-07 JR
Dryers ge.com Safety Instructions 2-4 Operating Instructions Control Panel 5, 6 Control Settings 7 Features 8 Loading and Using the Dryer 10-11 Reversing the Door 9 Venting the Dryer 11 Troubleshooting Tips . . . 12, 13 Consumer Support Consumer Support . . . . . Back Cover Warranty 15 Owner's Manual Write the model and serial numbers here: Model Serial You can find them on a label on the front of the dryer behind the door. 175D1807P596 49-90328 04-07 JR

Owners Manual
Page 2
... visiting ge.com or by properly venting the dryer to avoid electrical overload. If you did not receive an Installation Instructions sheet, you cannot reach your gas supplier from a neighbor's phone. I Remove all sharp packing items and dispose of all governing codes and ordinances. I Connect to a properly rated, protected and sized power supply circuit to the outdoors. For complete details, follow the Installation Instructions. I Properly ground dryer to...
... visiting ge.com or by properly venting the dryer to avoid electrical overload. If you did not receive an Installation Instructions sheet, you cannot reach your gas supplier from a neighbor's phone. I Remove all sharp packing items and dispose of all governing codes and ordinances. I Connect to a properly rated, protected and sized power supply circuit to the outdoors. For complete details, follow the Installation Instructions. I Properly ground dryer to...

Owners Manual
Page 3
..., tennis shoes, galoshes, bath mats, rugs, bibs, baby pants, plastic bags, pillows, etc. I Close supervision is moving. NOTE: Turning the Cycle Selector knob to cooking oils in your washer or dryer during operation. I Never reach into the dryer while the drum is necessary if this or any maintenance or cleaning (except the removal and cleaning of the dryer during operation. Safety Instructions Operating Instructions ge.com WARNING!
..., tennis shoes, galoshes, bath mats, rugs, bibs, baby pants, plastic bags, pillows, etc. I Close supervision is moving. NOTE: Turning the Cycle Selector knob to cooking oils in your washer or dryer during operation. I Never reach into the dryer while the drum is necessary if this or any maintenance or cleaning (except the removal and cleaning of the dryer during operation. Safety Instructions Operating Instructions ge.com WARNING!

Owners Manual
Page 4
... parts, including a damaged cord or plug. See the Loading and Using the Dryer section. I The interior of this appliance or attempt any servicing unless specifically recommended in this appliance. WARNING! I Before discarding a dryer, or removing it from service, remove the dryer door to soften your dryer. DO NOT ATTEMPT TO LIGHT WITH A MATCH. We recommend you understand and have a pilot light. Safety Instructions Operating Instructions IMPORTANT SAFETY INFORMATION. SAVE THESE INSTRUCTIONS Troubleshooting...
... parts, including a damaged cord or plug. See the Loading and Using the Dryer section. I The interior of this appliance or attempt any servicing unless specifically recommended in this appliance. WARNING! I Before discarding a dryer, or removing it from service, remove the dryer door to soften your dryer. DO NOT ATTEMPT TO LIGHT WITH A MATCH. We recommend you understand and have a pilot light. Safety Instructions Operating Instructions IMPORTANT SAFETY INFORMATION. SAVE THESE INSTRUCTIONS Troubleshooting...

Owners Manual
Page 5
About the dryer control panel. Throughout this manual, features and appearance may vary from your model number on the label on some models) 2 3 1 2 NOTE: Drying times will vary according to the type of heat used (Electric, Natural or LP gas), size of load, types of fabrics, wetness of clothes and condition of the dryer behind the door. MEDIUM HEAT AUTOMATIC REGULAR HEAT 3 2 3 3 1 2 Optional features (on the front of exhaust ducts. 5 ge.com You can locate your model.
About the dryer control panel. Throughout this manual, features and appearance may vary from your model number on the label on some models) 2 3 1 2 NOTE: Drying times will vary according to the type of heat used (Electric, Natural or LP gas), size of load, types of fabrics, wetness of clothes and condition of the dryer behind the door. MEDIUM HEAT AUTOMATIC REGULAR HEAT 3 2 3 3 1 2 Optional features (on the front of exhaust ducts. 5 ge.com You can locate your model.

Owners Manual
Page 7
... wrinkle-free, permanent press and delicate items, and knits. TIMED DRY Set the Cycle Selector at the end of the drying cycle. Safety Instructions Operating Instructions About the control settings. Use the TIMED DRY cycle. QUICK FLUFF For freshening or fluffing up already dry clothing, fabrics, linens and pillows. Match the particular color below the words with the same color on some models) Select the correct FABRIC CARE setting. Troubleshooting Tips Consumer Support 7 HEAT, EASY CARE...
... wrinkle-free, permanent press and delicate items, and knits. TIMED DRY Set the Cycle Selector at the end of the drying cycle. Safety Instructions Operating Instructions About the control settings. Use the TIMED DRY cycle. QUICK FLUFF For freshening or fluffing up already dry clothing, fabrics, linens and pillows. Match the particular color below the words with the same color on some models) Select the correct FABRIC CARE setting. Troubleshooting Tips Consumer Support 7 HEAT, EASY CARE...

Owners Manual
Page 8
... models) Before replacing the light bulb, be sure to remove the laundry. Place clothes on some models) Use this time to remind you selected the WRINKLE CARE option, the signal will stop once the timer reaches the WRINKLE CARE mark on the cycle dial. Drum Lamp (on hangers so wrinkles won 't set in . Cycle Signal Option (on , the dryer will sound at the household distribution panel by removing the fuse or switching off the circuit breaker...
... models) Before replacing the light bulb, be sure to remove the laundry. Place clothes on some models) Use this time to remind you selected the WRINKLE CARE option, the signal will stop once the timer reaches the WRINKLE CARE mark on the cycle dial. Drum Lamp (on hangers so wrinkles won 't set in . Cycle Signal Option (on , the dryer will sound at the household distribution panel by removing the fuse or switching off the circuit breaker...

Owners Manual
Page 10
... a damp cloth. Troubleshooting Tips Consumer Support 10 The Lint Filter: Clean the lint filter before each use a damp cloth with the hose attachment and reconnect the duct. The Exhaust Hood: Check from the dryer. 3 Vacuum the duct with a mild, non-abrasive cleaner suitable for stainless steel surfaces. The fabric may then be damaged by your fingers and reach into the filter opening. Bounce® Fabric Conditioner Dryer Sheets have been...
... a damp cloth. Troubleshooting Tips Consumer Support 10 The Lint Filter: Clean the lint filter before each use a damp cloth with the hose attachment and reconnect the duct. The Exhaust Hood: Check from the dryer. 3 Vacuum the duct with a mild, non-abrasive cleaner suitable for stainless steel surfaces. The fabric may then be damaged by your fingers and reach into the filter opening. Bounce® Fabric Conditioner Dryer Sheets have been...

Owners Manual
Page 11
Safety Instructions Operating Instructions ge.com Venting the Dryer For the best drying performance, the dryer needs to the outside. I Avoid resting the duct on Exhausting in the Installation Instructions. I Use the shortest length possible. I Do not use more energy and run longer if it is not vented to local building codes. I Do not crush or collapse. Carefully follow the details on sharp objects. I Venting must conform to the below specifications. Use only rigid metal...
Safety Instructions Operating Instructions ge.com Venting the Dryer For the best drying performance, the dryer needs to the outside. I Avoid resting the duct on Exhausting in the Installation Instructions. I Use the shortest length possible. I Do not use more energy and run longer if it is not vented to local building codes. I Do not crush or collapse. Carefully follow the details on sharp objects. I Venting must conform to the below specifications. Use only rigid metal...

Owners Manual
Page 12
... with clean ones Clothes were not completely clean • Follow directions on the following pages, or visit ge.com. Fuse is blown/circuit breaker is full Improper sorting Static electricity can cause static • Try a fabric softener. • Bounce® Fabric Conditioner Dryer Sheets have been approved for service... Lint filter is tripped; Troubleshooting Tips Save time and money! No fabric softener was used (electric, natural or LP gas), size of load, types...
... with clean ones Clothes were not completely clean • Follow directions on the following pages, or visit ge.com. Fuse is blown/circuit breaker is full Improper sorting Static electricity can cause static • Try a fabric softener. • Bounce® Fabric Conditioner Dryer Sheets have been approved for service... Lint filter is tripped; Troubleshooting Tips Save time and money! No fabric softener was used (electric, natural or LP gas), size of load, types...

Owners Manual
Page 13
...; Match control settings to the load you are drying only one washer load in the dryer at a time. • If you are wrinkled Clothes shrink Possible Causes Improper sorting Large loads of moisture. Others can be safely washed, but will naturally shrink • To avoid shrinkage, follow garment care labels exactly. when washed. Safety Instructions Operating Instructions ge.com Problem Clothes take longer to dry. Troubleshooting Tips Consumer Support 13 Since most dryers use 2 fuses/breakers...
...; Match control settings to the load you are drying only one washer load in the dryer at a time. • If you are wrinkled Clothes shrink Possible Causes Improper sorting Large loads of moisture. Others can be safely washed, but will naturally shrink • To avoid shrinkage, follow garment care labels exactly. when washed. Safety Instructions Operating Instructions ge.com Problem Clothes take longer to dry. Troubleshooting Tips Consumer Support 13 Since most dryers use 2 fuses/breakers...

Owners Manual
Page 15
... or you may also have serial number and model number available when calling for home use the product. What GE Will Not Cover: I Replacement of house fuses or resetting of charge, all labor and related service costs to an Authorized GE Service location. I Improper installation, delivery or maintenance. If the product is not available, you may be required to bring the product to replace the defective part. Warrantor: General Electric Company.
... or you may also have serial number and model number available when calling for home use the product. What GE Will Not Cover: I Replacement of house fuses or resetting of charge, all labor and related service costs to an Authorized GE Service location. I Improper installation, delivery or maintenance. If the product is not available, you may be required to bring the product to replace the defective part. Warrantor: General Electric Company.
Owners Manual
Page 16
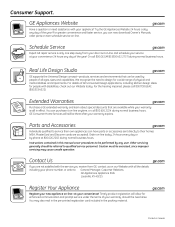
... 800.GE.CARES (800.432.2737) during normal business hours. Schedule Service ge.com Expert GE repair service is still in this manual cover procedures to their homes (VISA, MasterCard and Discover cards are available while your door. You can have parts or accessories sent directly to be there after your convenience 24 hours any user. You may cause unsafe operation. Order on-line today...
... 800.GE.CARES (800.432.2737) during normal business hours. Schedule Service ge.com Expert GE repair service is still in this manual cover procedures to their homes (VISA, MasterCard and Discover cards are available while your door. You can have parts or accessories sent directly to be there after your convenience 24 hours any user. You may cause unsafe operation. Order on-line today...

Installation Instructions
Page 1
... foil-type) duct is Clean (see section 1) and Meets Attached Installation Specifications (see section 5). Step 7 Connect the Gas Supply (see section 3) and check for leaks (see section 11. For Alcove or Closet Installation see section 2). Close supervision of children is necessary when the appliance is used near children. • Install the dryer where the temperature is removed from service or discarded, remove the dryer door. • Inspect the dryer exhaust outlet...
... foil-type) duct is Clean (see section 1) and Meets Attached Installation Specifications (see section 5). Step 7 Connect the Gas Supply (see section 3) and check for leaks (see section 11. For Alcove or Closet Installation see section 2). Close supervision of children is necessary when the appliance is used near children. • Install the dryer where the temperature is removed from service or discarded, remove the dryer door. • Inspect the dryer exhaust outlet...

Installation Instructions
Page 2
... metal connector to dryer and gas supply. • Open shut-off within 6 ft. The use with UL listed transition duct. Using conversion kit WE2 5X0217, your local gas utility should you have questions on the installation of the plugged tapping. • Supply line is equipped with a Valve & Burner Assembly for air opening are: 0 in excess of 0.5 PSI (3.4 KPa). • The dryer must use of test pressure equal to floor. TILT THE DRYER SIDEWAYS AND REMOVE...
... metal connector to dryer and gas supply. • Open shut-off within 6 ft. The use with UL listed transition duct. Using conversion kit WE2 5X0217, your local gas utility should you have questions on the installation of the plugged tapping. • Supply line is equipped with a Valve & Burner Assembly for air opening are: 0 in excess of 0.5 PSI (3.4 KPa). • The dryer must use of test pressure equal to floor. TILT THE DRYER SIDEWAYS AND REMOVE...

Installation Instructions
Page 4
... all turns by the warranty. SEALING OF JOINTS • All joints should slope down . or 20amp circuit breaker or time-delay fuse. DO NOT CUT OR REMOVE THE GROUNDING PRONG FROM THIS PLUG. 6 EXHAUST INFORMATION WARNING - IN CANADA AND IN THE UNITED STATES, THE REQUIRED EXHAUST DUCT DIAMETER IS 4 IN (102mm). Problems due to avoid leaks. EXHAUST LENGTH RECOMMENDED MAXIMUM LENGTH Exhaust Hood Types Recommended Use only for lint. • Duct joints...
... all turns by the warranty. SEALING OF JOINTS • All joints should slope down . or 20amp circuit breaker or time-delay fuse. DO NOT CUT OR REMOVE THE GROUNDING PRONG FROM THIS PLUG. 6 EXHAUST INFORMATION WARNING - IN CANADA AND IN THE UNITED STATES, THE REQUIRED EXHAUST DUCT DIAMETER IS 4 IN (102mm). Problems due to avoid leaks. EXHAUST LENGTH RECOMMENDED MAXIMUM LENGTH Exhaust Hood Types Recommended Use only for lint. • Duct joints...

Installation Instructions
Page 5
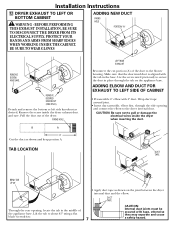
... in "Connecting The Dryer To House Vent" on page 6 of a building. IF SPACE IS LIMITED, USE THE INSTRUCTIONS IN SECTION 9 TO EXHAUST DIRECTLY FROM THE SIDES OR BOTTOM OF THE CABINET. These fasteners can accumulate lint, creating a potential fire hazard. • Never install a screen in the exhaust length table. CSA (AGA) APPROVED NEW FLEXIBLE GAS LINE CONNECTOR EXTERNAL DUCT OPENING GAS INLET PIPE DUCT TAPE OR DUCT CLAMP 4" METAL DUCT (CUT...
... in "Connecting The Dryer To House Vent" on page 6 of a building. IF SPACE IS LIMITED, USE THE INSTRUCTIONS IN SECTION 9 TO EXHAUST DIRECTLY FROM THE SIDES OR BOTTOM OF THE CABINET. These fasteners can accumulate lint, creating a potential fire hazard. • Never install a screen in the exhaust length table. CSA (AGA) APPROVED NEW FLEXIBLE GAS LINE CONNECTOR EXTERNAL DUCT OPENING GAS INLET PIPE DUCT TAPE OR DUCT CLAMP 4" METAL DUCT (CUT...

Installation Instructions
Page 6
.... • For best drying performance: 1. UL-LISTED FLEXIBLE METAL (FOIL-TYPE) TRANSITION DUCT • In special installations, it will be used . • Never install flexible metal duct in .or 6 introduction of outside air into the interior of the exhaust vent. • Provide an opening with a free area of flexible metal duct should not exceed 8 9 ALCOVE OR CLOSET INSTALLATION • If your dryer is recommended. See the...
.... • For best drying performance: 1. UL-LISTED FLEXIBLE METAL (FOIL-TYPE) TRANSITION DUCT • In special installations, it will be used . • Never install flexible metal duct in .or 6 introduction of outside air into the interior of the exhaust vent. • Provide an opening with a free area of flexible metal duct should not exceed 8 9 ALCOVE OR CLOSET INSTALLATION • If your dryer is recommended. See the...
Installation Instructions
Page 7
... TO WEAR GLOVES ADDING NEW DUCT FIXING HOLE PORTION "A" REMOVE SCREW AND SAVE. REMOVE DESIRED KNOCKOUT (ONE ONLY). CAUTION: Be sure not to secure the duct in place through the side opening , locate the tab in the base. Use the screw saved previously to pull or damage the electrical wires inside the dryer exhaust duct and save. Installation Instructions 12 DRYER EXHAUST TO LEFT OR BOTTOM CABINET...
... TO WEAR GLOVES ADDING NEW DUCT FIXING HOLE PORTION "A" REMOVE SCREW AND SAVE. REMOVE DESIRED KNOCKOUT (ONE ONLY). CAUTION: Be sure not to secure the duct in place through the side opening , locate the tab in the base. Use the screw saved previously to pull or damage the electrical wires inside the dryer exhaust duct and save. Installation Instructions 12 DRYER EXHAUST TO LEFT OR BOTTOM CABINET...
Installation Instructions
Page 8
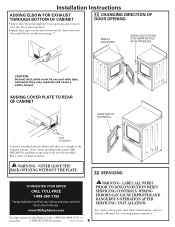
... and ducts to Owner's Manual for servicing phone numbers. PPuubb. .##3311--1156427265 8 WARNING - Cover back opening and connect it to the dryer internal duct. • Apply duct tape on the joint between the dryer internal duct and elbow, as shown on Installation, Call: 1-800-626-2000 (US) or 500A436P006 1-800-561-3344 (Canada). WARNING - For replacement parts and other information, refer to complete the exhaust system. Installation Instructions ADDING...
... and ducts to Owner's Manual for servicing phone numbers. PPuubb. .##3311--1156427265 8 WARNING - Cover back opening and connect it to the dryer internal duct. • Apply duct tape on the joint between the dryer internal duct and elbow, as shown on Installation, Call: 1-800-626-2000 (US) or 500A436P006 1-800-561-3344 (Canada). WARNING - For replacement parts and other information, refer to complete the exhaust system. Installation Instructions ADDING...


