
Owners Manual
Page 2
...gas supplier. I Install or store where it is used. Gas appliances can receive one by visiting ge.com or by properly venting the dryer to prevent property damage, personal injury, or death. Follow details in accordance with all occupants. Exhaust/...GE.CARES (800.432.2737). Safety Instructions Operating Instructions WARNING! WHAT TO DO IF YOU SMELL GAS: 1 Do not try to light a match, or cigarette, or turn on any other reproductive harm and requires businesses to warn customers of fire or explosion, electric shock, or to the outdoors. PROPER INSTALLATION This dryer...
...gas supplier. I Install or store where it is used. Gas appliances can receive one by visiting ge.com or by properly venting the dryer to prevent property damage, personal injury, or death. Follow details in accordance with all occupants. Exhaust/...GE.CARES (800.432.2737). Safety Instructions Operating Instructions WARNING! WHAT TO DO IF YOU SMELL GAS: 1 Do not try to light a match, or cigarette, or turn on any other reproductive harm and requires businesses to warn customers of fire or explosion, electric shock, or to the outdoors. PROPER INSTALLATION This dryer...

Owners Manual
Page 3
...ge.com WARNING! I Clean the lint filter before attempting any other flammable vapors and liquids. I Close supervision is necessary if this appliance is moving. Do not add these substances around your dryer. Items contaminated with cooking oils may contribute to cooking oils in your appliances free of the dryer...I To minimize the possibility of electric shock, unplug this or any maintenance or cleaning (except the removal and cleaning of children, preferably in your washer or dryer during subsequent dryer uses. DO NOT OPERATE THE DRYER WITHOUT THE LINT FILTER IN PLACE....
...ge.com WARNING! I Clean the lint filter before attempting any other flammable vapors and liquids. I Close supervision is necessary if this appliance is moving. Do not add these substances around your dryer. Items contaminated with cooking oils may contribute to cooking oils in your appliances free of the dryer...I To minimize the possibility of electric shock, unplug this or any maintenance or cleaning (except the removal and cleaning of children, preferably in your washer or dryer during subsequent dryer uses. DO NOT OPERATE THE DRYER WITHOUT THE LINT FILTER IN PLACE....

Owners Manual
Page 4
...the exhaust duct connection inside . WHEN NOT USING YOUR DRYER I Before discarding a dryer, or removing it is equipped with controls. I If yours is a gas dryer, it will not be safely used in your laundered fabrics or reduce the static electricity in them by use either a fabric softener in ...published user-repair instructions that their product can be stepped on, tripped over or subjected to soften your dryer. Burns may wish to damage. I Grasp the plug...
...the exhaust duct connection inside . WHEN NOT USING YOUR DRYER I Before discarding a dryer, or removing it is equipped with controls. I If yours is a gas dryer, it will not be safely used in your laundered fabrics or reduce the static electricity in them by use either a fabric softener in ...published user-repair instructions that their product can be stepped on, tripped over or subjected to soften your dryer. Burns may wish to damage. I Grasp the plug...

Owners Manual
Page 5
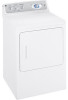
About the dryer control panel. ge.com You can locate your model. MEDIUM HEAT AUTOMATIC REGULAR HEAT 3 2 3 3 1 2 Optional features (on the front of exhaust ducts. 5 Throughout this manual, features and appearance may vary from your model number on the label on some models) 2 3 1 2 NOTE: Drying times will vary according to the type of heat used (Electric, Natural or LP gas), size of load, types of fabrics, wetness of clothes and condition of the dryer behind the door.
About the dryer control panel. ge.com You can locate your model. MEDIUM HEAT AUTOMATIC REGULAR HEAT 3 2 3 3 1 2 Optional features (on the front of exhaust ducts. 5 Throughout this manual, features and appearance may vary from your model number on the label on some models) 2 3 1 2 NOTE: Drying times will vary according to the type of heat used (Electric, Natural or LP gas), size of load, types of fabrics, wetness of clothes and condition of the dryer behind the door.

Owners Manual
Page 6
About the dryer control panel. Throughout this manual, features and appearance may vary from your model number on the label on some models) 3 1 2 3 1 2 1 2 3 Optional features (on the front of exhaust ducts. 6 Optional features (on some models) 1 2 3 NOTE: Drying times will vary according to the type of heat used (Electric, Natural or LP gas), size of load, types of fabrics, wetness of clothes and condition of the dryer behind the door. You can locate your model.
About the dryer control panel. Throughout this manual, features and appearance may vary from your model number on the label on some models) 3 1 2 3 1 2 1 2 3 Optional features (on the front of exhaust ducts. 6 Optional features (on some models) 1 2 3 NOTE: Drying times will vary according to the type of heat used (Electric, Natural or LP gas), size of load, types of fabrics, wetness of clothes and condition of the dryer behind the door. You can locate your model.

Owners Manual
Page 10
...surfaces, use a damp cloth with a mild, non-abrasive cleaner suitable for use . Follow these steps: 1 Turn off electrical supply by your dryer caused by these products away from the dryer. 3 Vacuum the duct with the manufacturer's instructions. They may be washed and dried normally. Do not overload. Do ... 10 The Lint Filter: Clean the lint filter before each use in all GE Dryers when used in accordance with the hose attachment and reconnect the duct. Make sure that the flaps of the Dryer The Exterior: Wipe or dust any spills or washing compounds with a clean cloth...
...surfaces, use a damp cloth with a mild, non-abrasive cleaner suitable for use . Follow these steps: 1 Turn off electrical supply by your dryer caused by these products away from the dryer. 3 Vacuum the duct with the manufacturer's instructions. They may be washed and dried normally. Do not overload. Do ... 10 The Lint Filter: Clean the lint filter before each use in all GE Dryers when used in accordance with the hose attachment and reconnect the duct. Make sure that the flaps of the Dryer The Exterior: Wipe or dust any spills or washing compounds with a clean cloth...

Owners Manual
Page 12
... tripped What To Do • Make sure the dryer plug is full Improper sorting Static electricity can attract lint Overloading Paper, tissue, etc. Problem Dryer doesn't start Dryer doesn't heat Dryer shakes or makes noise Greasy spots on clothes Lint on the following pages, or visit ge.com. Fuse is blown/circuit breaker is blown or...
... tripped What To Do • Make sure the dryer plug is full Improper sorting Static electricity can attract lint Overloading Paper, tissue, etc. Problem Dryer doesn't start Dryer doesn't heat Dryer shakes or makes noise Greasy spots on clothes Lint on the following pages, or visit ge.com. Fuse is blown/circuit breaker is blown or...

Owners Manual
Page 15
... from state to obtain support under the warranty. For The Period Of: GE Will Replace: One Year From the date of the original purchase Any part of the dryer which are , consult your local or state consumer affairs office or your receipt...Damage caused after delivery. Warrantor: General Electric Company. Louisville, KY 40225 Troubleshooting Tips Consumer Support 15 I Incidental or consequential damage caused by law. This warranty is product repair as described in the Owner's Manual. Safety Instructions Operating Instructions GE Dryer Warranty. All warranty service provided by...
... from state to obtain support under the warranty. For The Period Of: GE Will Replace: One Year From the date of the original purchase Any part of the dryer which are , consult your local or state consumer affairs office or your receipt...Damage caused after delivery. Warrantor: General Electric Company. Louisville, KY 40225 Troubleshooting Tips Consumer Support 15 I Incidental or consequential damage caused by law. This warranty is product repair as described in the Owner's Manual. Safety Instructions Operating Instructions GE Dryer Warranty. All warranty service provided by...
Installation Instructions
Page 1
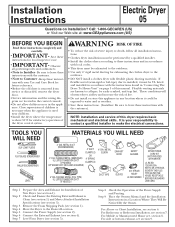
... instructions found in "Connecting The Dryer To House Vent" on Installation? Save these instructions with your responsibility to contact a qualified installer to make the electrical connections. Keep these instructions for satisfactory operation of the dryer control system. TOOLS YOU WILL...SAFETY GLASSES 3/4" STRAIN RELIEF UL RECOGNIZED DRYER POWER CORD KIT (NOT PROVIDED WITH DRYER) UL RATED 120/240V,30A WITH 3 OR 4 PRONGS. Level Your Dryer (see section 1). For Bathroom or Bedroom Installation, see section 4). Installation Instructions Electric Dryer 05 Questions on page 5 of ...
... instructions found in "Connecting The Dryer To House Vent" on Installation? Save these instructions with your responsibility to contact a qualified installer to make the electrical connections. Keep these instructions for satisfactory operation of the dryer control system. TOOLS YOU WILL...SAFETY GLASSES 3/4" STRAIN RELIEF UL RECOGNIZED DRYER POWER CORD KIT (NOT PROVIDED WITH DRYER) UL RATED 120/240V,30A WITH 3 OR 4 PRONGS. Level Your Dryer (see section 1). For Bathroom or Bedroom Installation, see section 4). Installation Instructions Electric Dryer 05 Questions on page 5 of ...
Installation Instructions
Page 2
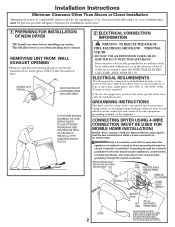
... BE USED FOR MOBILE HOME INSTALLATION) NOTES: SInce January 1,1996, the National Electric code requires that the new constructions utilize a 4-wire connection to an electric dryer WARNING:Only a 4-conductor cord shall be run with UL listed transition duct. If the electric supply does not meet the above specifications, then call a licensed electrician...
... BE USED FOR MOBILE HOME INSTALLATION) NOTES: SInce January 1,1996, the National Electric code requires that the new constructions utilize a 4-wire connection to an electric dryer WARNING:Only a 4-conductor cord shall be run with UL listed transition duct. If the electric supply does not meet the above specifications, then call a licensed electrician...
Installation Instructions
Page 3
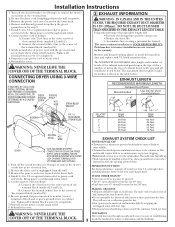
... A QUALIFIED ELECTRICIAN. Tighten all terminal block screws (3) completely. 8. Turn off the circuit breaker(s) (30 amp) or remove the dryer's circuit fuse at the electrical box. 2. of power cord with duct tape. • Horizontal runs should be tight to the center of exhaust hood (wall ...of turns, the type of the terminal block (marked N). 6. Turn off the circuit breaker (s) (30 amp) or remove the dryer's circuit fuse at the electrical box. 2. Connect the neutral (white) line to avoid leaks. Reinstall the cover. SEALING OF JOINTS • All joints should require...
... A QUALIFIED ELECTRICIAN. Tighten all terminal block screws (3) completely. 8. Turn off the circuit breaker(s) (30 amp) or remove the dryer's circuit fuse at the electrical box. 2. of power cord with duct tape. • Horizontal runs should be tight to the center of exhaust hood (wall ...of turns, the type of the terminal block (marked N). 6. Turn off the circuit breaker (s) (30 amp) or remove the dryer's circuit fuse at the electrical box. 2. Connect the neutral (white) line to avoid leaks. Reinstall the cover. SEALING OF JOINTS • All joints should require...

Installation Instructions
Page 5
...or other clamp. See the EXHAUST INFORMATION sections 3 & 4. • Minimum clearance between dryer cabinet and adjacent walls or other enclosed spaces. • Total length of local codes, with the NATIONAL ELECTRICAL CODE, ANSI/NFPA NO. 70. 8 MOBILE OR MANUFACTURED HOME INSTALLATION • Installation ...DUCT • In special installations, it will be stated on a label on the dryer back. • The dryer MUST be vented to the outdoors. Secure the duct with the "Outline for electrical connection information. Cut off and remove excess duct. DO ELBOW HIGHLY RECOMMENDED ELBOWS HIGHLY...
...or other clamp. See the EXHAUST INFORMATION sections 3 & 4. • Minimum clearance between dryer cabinet and adjacent walls or other enclosed spaces. • Total length of local codes, with the NATIONAL ELECTRICAL CODE, ANSI/NFPA NO. 70. 8 MOBILE OR MANUFACTURED HOME INSTALLATION • Installation ...DUCT • In special installations, it will be stated on a label on the dryer back. • The dryer MUST be vented to the outdoors. Secure the duct with the "Outline for electrical connection information. Cut off and remove excess duct. DO ELBOW HIGHLY RECOMMENDED ELBOWS HIGHLY...

Installation Instructions
Page 6
... THIS EXHAUST INSTALLATION, BE SURE TO DISCONNECT THE DRYER FROM ITS ELECTRICAL SUPPLY. Remove the screw inside the dryer when inserting the duct. Use the screw saved ...tape around joint. • Insert duct assembly, elbow first, through the tab on the joint between the dryer internal duct and the elbow. Detach and remove the bottom, right or left side knockout as shown on ...tab in place through the side opening and connect the elbow to pull or damage the electrical wires inside the dryer exhaust duct and save. BE SURE TO WEAR GLOVES ADDING NEW DUCT FIXING HOLE PORTION...
... THIS EXHAUST INSTALLATION, BE SURE TO DISCONNECT THE DRYER FROM ITS ELECTRICAL SUPPLY. Remove the screw inside the dryer when inserting the duct. Use the screw saved ...tape around joint. • Insert duct assembly, elbow first, through the tab on the joint between the dryer internal duct and the elbow. Detach and remove the bottom, right or left side knockout as shown on ...tab in place through the side opening and connect the elbow to pull or damage the electrical wires inside the dryer exhaust duct and save. BE SURE TO WEAR GLOVES ADDING NEW DUCT FIXING HOLE PORTION...


