Owners Manual
Page 4
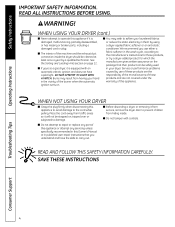
.... Safety Instructions Operating Instructions IMPORTANT SAFETY INFORMATION. READ ALL INSTRUCTIONS BEFORE USING. I Do not attempt to repair or replace any part of this appliance or attempt any servicing unless specifically recommended in this Owner's Manual or in the vicinity of this appliance if ...warranty of the burner when the automatic ignition turns on page 12. I If yours is a gas dryer, it from traffic areas so it is equipped with controls. WHEN USING YOUR DRYER (cont.) I Grasp the plug firmly when disconnecting this appliance to avoid damage to operate this ...
.... Safety Instructions Operating Instructions IMPORTANT SAFETY INFORMATION. READ ALL INSTRUCTIONS BEFORE USING. I Do not attempt to repair or replace any part of this appliance or attempt any servicing unless specifically recommended in this Owner's Manual or in the vicinity of this appliance if ...warranty of the burner when the automatic ignition turns on page 12. I If yours is a gas dryer, it from traffic areas so it is equipped with controls. WHEN USING YOUR DRYER (cont.) I Grasp the plug firmly when disconnecting this appliance to avoid damage to operate this ...

Owners Manual
Page 11
...drying cycle, your finger, pull the hook out of the dryer. 2. All dryer cycles utilize this capability. Using your dryer will be a slight pause and sound change. Press the START/PAUSE button. Typical loads such as part of the dryer is oriented so the hook is selected, in which case the...there will tangle the clothes load less, dry more evenly and improve drying times. GEAppliances.com Reverse Tumble™ All Profile front load matching dryers are equipped with the Reverse Tumble™ feature, as bed and bath mixed loads, where sheets, towels and pillow cases are laundered together...
...drying cycle, your finger, pull the hook out of the dryer. 2. All dryer cycles utilize this capability. Using your dryer will be a slight pause and sound change. Press the START/PAUSE button. Typical loads such as part of the dryer is oriented so the hook is selected, in which case the...there will tangle the clothes load less, dry more evenly and improve drying times. GEAppliances.com Reverse Tumble™ All Profile front load matching dryers are equipped with the Reverse Tumble™ feature, as bed and bath mixed loads, where sheets, towels and pillow cases are laundered together...

Owners Manual
Page 15
... opening with the NATIONAL ELECTRICAL CODE, ANSI/NFPA NO. 70 (for electric dryers) or NATIONAL FUEL GAS CODE, ANSI Z223 (for gas dryers). MOBILE OR MANUFACTURED HOME INSTALLATION • The installation must conform to the MANUFACTURED HOME CONSTRUCTION & SAFETY STANDARD, TITLE 24, PART 32-80 or, when such standard is 52″. • Closet doors...
... opening with the NATIONAL ELECTRICAL CODE, ANSI/NFPA NO. 70 (for electric dryers) or NATIONAL FUEL GAS CODE, ANSI Z223 (for gas dryers). MOBILE OR MANUFACTURED HOME INSTALLATION • The installation must conform to the MANUFACTURED HOME CONSTRUCTION & SAFETY STANDARD, TITLE 24, PART 32-80 or, when such standard is 52″. • Closet doors...

Owners Manual
Page 33
For replacement parts and other information, refer to the back cover for an extended period of time, allow it to warm up before pressing POWER. NOTE: If the dryer has been exposed to disconnection when servicing controls. SERVICING WARNING - The dryer is now ready for use. Label all wires prior to temperatures below freezing for servicing phone numbers. 33 Otherwise, the display will not come on. Wiring errors can cause improper and dangerous operation after servicing/installation. Installation Instructions 4 DRYER STARTUP Press the POWER button.
For replacement parts and other information, refer to the back cover for an extended period of time, allow it to warm up before pressing POWER. NOTE: If the dryer has been exposed to disconnection when servicing controls. SERVICING WARNING - The dryer is now ready for use. Label all wires prior to temperatures below freezing for servicing phone numbers. 33 Otherwise, the display will not come on. Wiring errors can cause improper and dangerous operation after servicing/installation. Installation Instructions 4 DRYER STARTUP Press the POWER button.
Owners Manual
Page 34
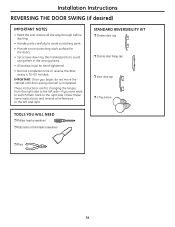
... you ever want to switch them back to the right side, follow these same instructions and reverse all the way through before starting. • Handle parts carefully to avoid scratching paint. • Provide a non-scratching work surface for the doors. • Set screws down by their related...
... you ever want to switch them back to the right side, follow these same instructions and reverse all the way through before starting. • Handle parts carefully to avoid scratching paint. • Provide a non-scratching work surface for the doors. • Set screws down by their related...
Owners Manual
Page 35
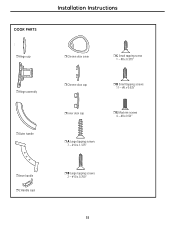
DOOR PARTS Installation Instructions Ì Hinge cap Ì Hinge assembly Ì Outer handle Ì Chrome door cover Ì Chrome door cap Ì Inner door cap Ì C Small tapping screw 1 - #8 x 0.375″ Ì D Small tapping screws 11 - #8 x 0.625″ Ì E Machine screws 4 - #8 x 0.50″ Ì A Large tapping screws 7 - #10 x 1.125″ Ì Inner handle Ì 2 Handle caps Ì B Large tapping screws 2 - #10 x 0.750″ 35
DOOR PARTS Installation Instructions Ì Hinge cap Ì Hinge assembly Ì Outer handle Ì Chrome door cover Ì Chrome door cap Ì Inner door cap Ì C Small tapping screw 1 - #8 x 0.375″ Ì D Small tapping screws 11 - #8 x 0.625″ Ì E Machine screws 4 - #8 x 0.50″ Ì A Large tapping screws 7 - #10 x 1.125″ Ì Inner handle Ì 2 Handle caps Ì B Large tapping screws 2 - #10 x 0.750″ 35
Owners Manual
Page 36
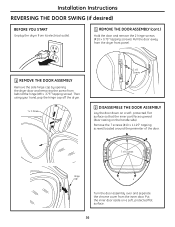
... the inner door. Put the inner door aside on the handle side). Pull the door away from the dryer front panel. 1 REMOVE THE DOOR ASSEMBLY Remove the side hinge cap by opening the dryer door and removing the screw from behind the hinge (#8 x .375″ tapping screw). Then using your ...hand, pop the hinge cap off the dryer. 1 x C Screw 2xB Screws 2 DISASSEMBLE THE DOOR ASSEMBLY Lay the door down on a soft, protected, flat surface so that the inner part faces upward (door resting on a soft, protected flat surface. 36
... the inner door. Put the inner door aside on the handle side). Pull the door away from the dryer front panel. 1 REMOVE THE DOOR ASSEMBLY Remove the side hinge cap by opening the dryer door and removing the screw from behind the hinge (#8 x .375″ tapping screw). Then using your ...hand, pop the hinge cap off the dryer. 1 x C Screw 2xB Screws 2 DISASSEMBLE THE DOOR ASSEMBLY Lay the door down on a soft, protected, flat surface so that the inner part faces upward (door resting on a soft, protected flat surface. 36

Owners Manual
Page 37
... (#8 x 0.625″ tapping screws). Installation Instructions 3 REVERSE DOOR HANDLE AND CAPS A Lay the chrome cover down on a soft, protected, flat surface so that the inner part faces upward (resting on the handle side by removing 4 screws (#8 x 0.625″ tapping screws). 3xD Screws (inner handle) Remove 4 x D screws (outer handle) Outer handle D Assemble...
... (#8 x 0.625″ tapping screws). Installation Instructions 3 REVERSE DOOR HANDLE AND CAPS A Lay the chrome cover down on a soft, protected, flat surface so that the inner part faces upward (resting on the handle side by removing 4 screws (#8 x 0.625″ tapping screws). 3xD Screws (inner handle) Remove 4 x D screws (outer handle) Outer handle D Assemble...

Owners Manual
Page 38
...), using 2 screws (#8 x 0.625″ tapping screws). 4 REVERSE HINGE AND CAPS • Lay the inner door down on a soft, protected flat surface so that the inner part faces up. • Remove the 2 black plug buttons on the opposite side of the hinge, using 2 screws (#8 x 0.75″ tapping screws). • Install the 2 black...
...), using 2 screws (#8 x 0.625″ tapping screws). 4 REVERSE HINGE AND CAPS • Lay the inner door down on a soft, protected flat surface so that the inner part faces up. • Remove the 2 black plug buttons on the opposite side of the hinge, using 2 screws (#8 x 0.75″ tapping screws). • Install the 2 black...
Owners Manual
Page 39
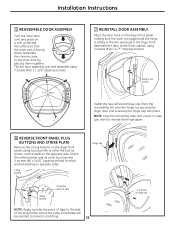
...the hinge again. 6 REVERSE FRONT PANEL PLUG BUTTONS AND STRIKE PLATE Remove the 2 plug buttons on the dryer front panel, using a putty knife or other flat tool as shown, and reinstall on the opposite side. ... x 0.75″ tapping screws). Flip the door assembly over and place on the dryer front panel, making sure the latch is engaged and the hinge is facing down. Assemble the door... to the inner door by opening the dryer door and screwing the hinge cap into place. Assemble the chrome cover to the front cabinet, using 7...
...the hinge again. 6 REVERSE FRONT PANEL PLUG BUTTONS AND STRIKE PLATE Remove the 2 plug buttons on the dryer front panel, using a putty knife or other flat tool as shown, and reinstall on the opposite side. ... x 0.75″ tapping screws). Flip the door assembly over and place on the dryer front panel, making sure the latch is engaged and the hinge is facing down. Assemble the door... to the inner door by opening the dryer door and screwing the hinge cap into place. Assemble the chrome cover to the front cabinet, using 7...

Owners Manual
Page 41
... packaging. Continue using the carton to protect the finished floor in the parts package. B. Installation Instructions KIT CONTENTS Ì Right hand bracket Ì Left hand bracket Ì 4 #12 x 1″ screws Ì 4 #8 x 1/2″ screws INSTALLING THE STACK BRACKET KIT 1 REMOVE THE DRYER LEVELING LEGS A. Use the packing material so you removed the leveling...
... packaging. Continue using the carton to protect the finished floor in the parts package. B. Installation Instructions KIT CONTENTS Ì Right hand bracket Ì Left hand bracket Ì 4 #12 x 1″ screws Ì 4 #8 x 1/2″ screws INSTALLING THE STACK BRACKET KIT 1 REMOVE THE DRYER LEVELING LEGS A. Use the packing material so you removed the leveling...

Owners Manual
Page 44
... 4 bolts through the pedestal and into each set aside. 3 INSTALL THE PEDESTAL TO THE WASHER OR DRYER A Place the pedestal against the bottom of the washer. Slide drawer out of the base and set ...of corner holes on the top of the pedestal as it is at the front of the unit. FOR DRYERS ONLY: C Locate the 4 support pads from drawer slides. Use a 7 mm socket wrench to be installed... the unit. DO NOT INSTALL THESE PADS ON THE WASHER PEDESTAL. 44 B Remove screws from the parts package. Use a Phillips screwdriver to back. Check to securely tighten the bolts. Each pad has 2 protrusions that ...
... 4 bolts through the pedestal and into each set aside. 3 INSTALL THE PEDESTAL TO THE WASHER OR DRYER A Place the pedestal against the bottom of the washer. Slide drawer out of the base and set ...of corner holes on the top of the pedestal as it is at the front of the unit. FOR DRYERS ONLY: C Locate the 4 support pads from drawer slides. Use a 7 mm socket wrench to be installed... the unit. DO NOT INSTALL THESE PADS ON THE WASHER PEDESTAL. 44 B Remove screws from the parts package. Use a Phillips screwdriver to back. Check to securely tighten the bolts. Each pad has 2 protrusions that ...
Owners Manual
Page 49
... to one -year limited warranty, you may be responsible for any of the dryer which fails due to a defect in this additional one year or the shortest period allowed by a GE Authorized Servicer is needed to replace the defective part. I Failure of circuit breakers. What Is Not Covered (in an area where service...
... to one -year limited warranty, you may be responsible for any of the dryer which fails due to a defect in this additional one year or the shortest period allowed by a GE Authorized Servicer is needed to replace the defective part. I Failure of circuit breakers. What Is Not Covered (in an area where service...
Owners Manual
Page 50
.... For service, call 1.800.561.3344. I Incidental or consequential damage caused by accident, fire, floods or acts of these parts should fail due to a defect in materials or workmanship. WARRANTOR IS NOT RESPONSIBLE FOR CONSEQUENTIAL DAMAGES. Please have serial number and ... additional one year or the shortest period allowed by our Factory Service Centres or an authorized technician. Safety Instructions Operating Instructions GE Dryer Warranty. (For customers in Canada) All warranty service provided by law. During this additional three-year limited warranty, you will...
.... For service, call 1.800.561.3344. I Incidental or consequential damage caused by accident, fire, floods or acts of these parts should fail due to a defect in materials or workmanship. WARRANTOR IS NOT RESPONSIBLE FOR CONSEQUENTIAL DAMAGES. Please have serial number and ... additional one year or the shortest period allowed by our Factory Service Centres or an authorized technician. Safety Instructions Operating Instructions GE Dryer Warranty. (For customers in Canada) All warranty service provided by law. During this additional three-year limited warranty, you will...
Owners Manual
Page 152
...-printed registration card included in Mexico E1C 9M3 Extended Warranties In the U.S.: GEAppliances.com Purchase a GE extended warranty and learn about special discounts that can now download Owner's Manuals, order parts or even schedule service on -line today, 24 hours every day or by any day of ...is only one step away from GE, contact us on -line and schedule your service at your warranty is still in this manual cover procedures to design for people with disabilities, check out our Website today. In Canada, call 1.888.261.2133 Parts and Accessories In the U.S.: ...
...-printed registration card included in Mexico E1C 9M3 Extended Warranties In the U.S.: GEAppliances.com Purchase a GE extended warranty and learn about special discounts that can now download Owner's Manuals, order parts or even schedule service on -line today, 24 hours every day or by any day of ...is only one step away from GE, contact us on -line and schedule your service at your warranty is still in this manual cover procedures to design for people with disabilities, check out our Website today. In Canada, call 1.888.261.2133 Parts and Accessories In the U.S.: ...


