
Owners Manual
Page 1
... Operating Instructions Controls 5-8 Cycle Options 9, 10 Dryer Features 10, 11 Quick Start Guide 5 Settings Option 10 Using the Dryer 12 Installation Instructions Before You Begin 13-14 Connecting a Gas Dryer 16-19 Connecting an Electric Dryer 20-22 Exhausting the Dryer 23-31 Final Setup 32, 33 Installing the Pedestal 43-45 Location of your Dryer 14-15 Reversing the Door Swing . . . . . .34-39 Stacking the Washer and Dryer 40-42 Troubleshooting Tips . . . . . .46-48 Consumer Support Consumer Support Back Cover Warranty (Canada 50 Warranty (U.S 49 Owner's Manual & Installation...
... Operating Instructions Controls 5-8 Cycle Options 9, 10 Dryer Features 10, 11 Quick Start Guide 5 Settings Option 10 Using the Dryer 12 Installation Instructions Before You Begin 13-14 Connecting a Gas Dryer 16-19 Connecting an Electric Dryer 20-22 Exhausting the Dryer 23-31 Final Setup 32, 33 Installing the Pedestal 43-45 Location of your Dryer 14-15 Reversing the Door Swing . . . . . .34-39 Stacking the Washer and Dryer 40-42 Troubleshooting Tips . . . . . .46-48 Consumer Support Consumer Support Back Cover Warranty (Canada 50 Warranty (U.S 49 Owner's Manual & Installation...
Owners Manual
Page 2
... inside the dryer cabinet. I Connect to a properly rated, protected and sized power supply circuit to avoid electrical overload. Exhaust/Ducting 1 Dryers MUST be followed to minimize the risk of moisture and lint from a neighbor's phone. For complete details, follow the Installation Instructions. READ ALL INSTRUCTIONS BEFORE USING. Gas appliances can be exposed to temperatures below freezing or exposed to light a match, or cigarette, or turn on any gas or electrical appliance...
... inside the dryer cabinet. I Connect to a properly rated, protected and sized power supply circuit to avoid electrical overload. Exhaust/Ducting 1 Dryers MUST be followed to minimize the risk of moisture and lint from a neighbor's phone. For complete details, follow the Installation Instructions. READ ALL INSTRUCTIONS BEFORE USING. Gas appliances can be exposed to temperatures below freezing or exposed to light a match, or cigarette, or turn on any gas or electrical appliance...

Owners Manual
Page 3
... maintenance or cleaning (except the removal and cleaning of slipping. NOTE: Pressing START/PAUSE or POWER does NOT disconnect the appliance from the power supply or disconnect the dryer at the household distribution panel by or near the dryer until the drum has completely stopped. I Clean the lint filter before attempting any other flammable vapors and liquids. These substances give off the circuit breaker before each load...
... maintenance or cleaning (except the removal and cleaning of slipping. NOTE: Pressing START/PAUSE or POWER does NOT disconnect the appliance from the power supply or disconnect the dryer at the household distribution panel by or near the dryer until the drum has completely stopped. I Clean the lint filter before attempting any other flammable vapors and liquids. These substances give off the circuit breaker before each load...
Owners Manual
Page 4
... attempt to repair or replace any part of this appliance or attempt any servicing unless specifically recommended in this Owner's Manual or in published user-repair instructions that you use of these products are not covered under the warranty of the burner when the automatic ignition turns on. Service or performance problems caused by use either a fabric softener in them by a qualified technician. I Before discarding a dryer, or removing it...
... attempt to repair or replace any part of this appliance or attempt any servicing unless specifically recommended in this Owner's Manual or in published user-repair instructions that you use of these products are not covered under the warranty of the burner when the automatic ignition turns on. Service or performance problems caused by use either a fabric softener in them by a qualified technician. I Before discarding a dryer, or removing it...
Owners Manual
Page 8
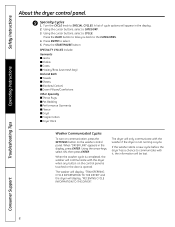
... will display, "RECEIVING CYCLE INFORMATION TO THE DRYER". Troubleshooting Tips Consumer Support 8 Safety Instructions Operating Instructions About the dryer control panel. 9 Specialty Cycles 1. Using the cursor buttons, select a CYCLE. Using the arrow keys, select ON; Using the cursor buttons, select a CATEGORY. 3. If the washer starts a new cycle before the dryer has a chance to SPECIAL CYCLES. then press ENTER. A list of cycle options will only communicate with the washer if the dryer is opened. SPECIALTY CYCLES include: Garments I Jeans...
... will display, "RECEIVING CYCLE INFORMATION TO THE DRYER". Troubleshooting Tips Consumer Support 8 Safety Instructions Operating Instructions About the dryer control panel. 9 Specialty Cycles 1. Using the cursor buttons, select a CYCLE. Using the arrow keys, select ON; Using the cursor buttons, select a CATEGORY. 3. If the washer starts a new cycle before the dryer has a chance to SPECIAL CYCLES. then press ENTER. A list of cycle options will only communicate with the washer if the dryer is opened. SPECIALTY CYCLES include: Garments I Jeans...

Owners Manual
Page 9
... delay time in the dryer. Even though the controls are locked, the POWER button is closed and START/PAUSE button has been pressed again. Hold 3 seconds to start of no-heat tumbling after you have dried to turn off by itself after one minute when the door is opened while the dryer is in DELAY, the countdown time will light up when DELAY START is shut. NOTE: Not all dryer models. Removing clothes...
... delay time in the dryer. Even though the controls are locked, the POWER button is closed and START/PAUSE button has been pressed again. Hold 3 seconds to start of no-heat tumbling after you have dried to turn off by itself after one minute when the door is opened while the dryer is in DELAY, the countdown time will light up when DELAY START is shut. NOTE: Not all dryer models. Removing clothes...
Owners Manual
Page 10
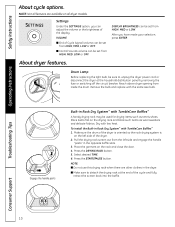
Dry with the same size bulb. Place the garment on the drying rack and block such items as tennis shoes. NOTE: Not all dryer models. Settings Under the SETTINGS option, you have made your selection, press ENTER. About dryer features. Drum Lamp Before replacing the light bulb, be sure to detach the drying rack at the household distribution panel by removing the fuse or switching off the circuit breaker. Engage the handle posts Built...
Dry with the same size bulb. Place the garment on the drying rack and block such items as tennis shoes. NOTE: Not all dryer models. Settings Under the SETTINGS option, you have made your selection, press ENTER. About dryer features. Drum Lamp Before replacing the light bulb, be sure to detach the drying rack at the household distribution panel by removing the fuse or switching off the circuit breaker. Engage the handle posts Built...
Owners Manual
Page 12
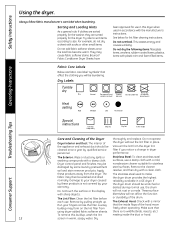
... the clothing you notice a change in dryer performance. Do not operate the dryer without the lint filter in warm, soapy water. Vacuum the lint from the dryer lint filter if you will not rust or corrode. Damage to size. Remove by these products away from using dryer-added fabric softener sheets. The Exhaust Hood: Check with plastic trim and foam-filled items. Fabric Care Labels Below are sorted properly for lint filter cleaning instructions.
... the clothing you notice a change in dryer performance. Do not operate the dryer without the lint filter in warm, soapy water. Vacuum the lint from the dryer lint filter if you will not rust or corrode. Damage to size. Remove by these products away from using dryer-added fabric softener sheets. The Exhaust Hood: Check with plastic trim and foam-filled items. Fabric Care Labels Below are sorted properly for lint filter cleaning instructions.
Owners Manual
Page 13
...-type) duct is installed, it could be exposed to water and/or weather. • The National Fuel Gas Code restricts installations of the dryer control system. • Remove and discard existing plastic or metal foil duct and replace with the customer.) FOR GAS MODELS ONLY: NOTE: Installation and service of this dryer must be UL-listed and installed in accordance with the instructions found in the appliance. They must be exhausted...
...-type) duct is installed, it could be exposed to water and/or weather. • The National Fuel Gas Code restricts installations of the dryer control system. • Remove and discard existing plastic or metal foil duct and replace with the customer.) FOR GAS MODELS ONLY: NOTE: Installation and service of this dryer must be UL-listed and installed in accordance with the instructions found in the appliance. They must be exhausted...

Owners Manual
Page 15
... the exhaust vent. • Provide an opening with the dryer (gas models only). NOTE: WHEN THE EXHAUST DUCT IS LOCATED AT THE REAR OF THE DRYER, MINIMUM CLEARANCE FROM THE WALL IS 5.5 INCHES. in the supply line. • No other refastening devices which extend into the dryer room. 15 See EXHAUSTING THE DRYER. • The installation must be connected to any other duct, vent or chimney. • Do not use sheet...
... the exhaust vent. • Provide an opening with the dryer (gas models only). NOTE: WHEN THE EXHAUST DUCT IS LOCATED AT THE REAR OF THE DRYER, MINIMUM CLEARANCE FROM THE WALL IS 5.5 INCHES. in the supply line. • No other refastening devices which extend into the dryer room. 15 See EXHAUSTING THE DRYER. • The installation must be connected to any other duct, vent or chimney. • Do not use sheet...

Owners Manual
Page 17
... for operation at a test pressure in the same room with natural gas. ADJUSTING FOR ELEVATION • Gas clothes dryers input ratings are based on the installation of the plugged tapping. • Supply line is equipped with a Valve and Burner Assembly for use only with , the dryer. • Use pipe thread compound appropriate for use Teflon® tape. • Connect flexible metal connector to the dryer. Using conversion kit 14-A048, your local gas utility...
... for operation at a test pressure in the same room with natural gas. ADJUSTING FOR ELEVATION • Gas clothes dryers input ratings are based on the installation of the plugged tapping. • Supply line is equipped with a Valve and Burner Assembly for use only with , the dryer. • Use pipe thread compound appropriate for use Teflon® tape. • Connect flexible metal connector to the dryer. Using conversion kit 14-A048, your local gas utility...
Owners Manual
Page 19
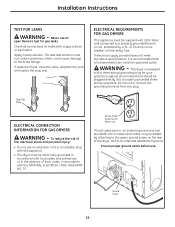
... circuit breaker or time-delay fuse. This dryer is recommended that a licensed electrician install an approved outlet. Ground Screw 19 Installation Instructions TEST FOR LEAKS WARNING - Apply a soap solution. The leak test solution must be supplied with the NATIONAL ELECTRICAL CODE, ANSI/NFPA NO. 70. Open Gas Valve ELECTRICAL CONNECTION INFORMATION FOR GAS DRYERS WARNING - Ensure proper ground exists before use an open flame to the brass fittings. Do not cut or remove...
... circuit breaker or time-delay fuse. This dryer is recommended that a licensed electrician install an approved outlet. Ground Screw 19 Installation Instructions TEST FOR LEAKS WARNING - Apply a soap solution. The leak test solution must be supplied with the NATIONAL ELECTRICAL CODE, ANSI/NFPA NO. 70. Open Gas Valve ELECTRICAL CONNECTION INFORMATION FOR GAS DRYERS WARNING - Ensure proper ground exists before use an open flame to the brass fittings. Do not cut or remove...

Owners Manual
Page 20
... plug type as per the house receptacle before purchasing line cord. Be sure the dryer cord is unplugged from the wall. Installation Instructions CONNECTING AN ELECTRIC DRYER (skip for gas dryers) TOOLS YOU WILL NEED Ì Slip joint pliers Ì Phillips screwdriver Ì Flat-blade screwdriver Ì Level FOR YOUR SAFETY: WARNING Before making the electrical connection, turn off the circuit breaker(s) or remove the dryer's circuit fuse(s) at the electrical box. ELECTRICAL CONNECTION INFORMATION FOR ELECTRIC DRYERS...
... plug type as per the house receptacle before purchasing line cord. Be sure the dryer cord is unplugged from the wall. Installation Instructions CONNECTING AN ELECTRIC DRYER (skip for gas dryers) TOOLS YOU WILL NEED Ì Slip joint pliers Ì Phillips screwdriver Ì Flat-blade screwdriver Ì Level FOR YOUR SAFETY: WARNING Before making the electrical connection, turn off the circuit breaker(s) or remove the dryer's circuit fuse(s) at the electrical box. ELECTRICAL CONNECTION INFORMATION FOR ELECTRIC DRYERS...

Owners Manual
Page 23
... this manual. • Do not terminate exhaust in a chimney, a wall, a ceiling, gas vent, crawl space, attic, under an enclosed floor, or in the exhaust length table. For turns less than specified in any fasteners that runs through an unheated area or is limited, use duct longer than 4 ft. They will cause lint to accumulate, creating a potential fire hazard. • Do not assemble ductwork...
... this manual. • Do not terminate exhaust in a chimney, a wall, a ceiling, gas vent, crawl space, attic, under an enclosed floor, or in the exhaust length table. For turns less than specified in any fasteners that runs through an unheated area or is limited, use duct longer than 4 ft. They will cause lint to accumulate, creating a potential fire hazard. • Do not assemble ductwork...

Owners Manual
Page 27
... using rigid metal exhaust duct. • For straight-line installation, connect the dryer exhaust to the wall, using duct tape. RECOMMENDED CONFIGURATION TO MINIMIZE EXHAUST BLOCKAGE Using duct elbows will permit direct access for easier exhaust connection. This will prevent duct kinking and collapsing. Wall Side Dryer Side 27 Installation Instructions BEFORE YOU BEGIN • Remove and discard existing plastic or metal foil duct and replace with duct tape or a hose clamp. Transition Ducting STANDARD REAR EXHAUST We recommend that exhaust...
... using rigid metal exhaust duct. • For straight-line installation, connect the dryer exhaust to the wall, using duct tape. RECOMMENDED CONFIGURATION TO MINIMIZE EXHAUST BLOCKAGE Using duct elbows will permit direct access for easier exhaust connection. This will prevent duct kinking and collapsing. Wall Side Dryer Side 27 Installation Instructions BEFORE YOU BEGIN • Remove and discard existing plastic or metal foil duct and replace with duct tape or a hose clamp. Transition Ducting STANDARD REAR EXHAUST We recommend that exhaust...

Owners Manual
Page 40
... codes and ordinances. • Note to the outdoors. Save these instructions with the dryer (gas models only). If the closet contains both sides, 1″ front and 3″ rear. Keep these instructions completely and carefully. • IMPORTANT - Stacking of the installer. Disconnect power before installing. DO NOT place the washer on the dryer back. • The dryer MUST be vented to Installer - NOTE: WHEN THE EXHAUST DUCT IS LOCATED AT THE REAR...
... codes and ordinances. • Note to the outdoors. Save these instructions with the dryer (gas models only). If the closet contains both sides, 1″ front and 3″ rear. Keep these instructions completely and carefully. • IMPORTANT - Stacking of the installer. Disconnect power before installing. DO NOT place the washer on the dryer back. • The dryer MUST be vented to Installer - NOTE: WHEN THE EXHAUST DUCT IS LOCATED AT THE REAR...
Owners Manual
Page 46
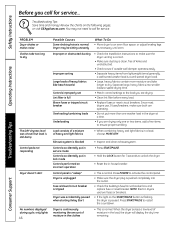
.... NOTE: Electric dryers use 2 fuses/breakers, make sure the dryer venting is correct. • Make sure ducting is clean, free of moisture in a load, choose MORE DRY. You may be sitting unevenly What To Do • Move dryer to call for service. Safety Instructions Before you call for service... Review the charts on the START/PAUSE button is flashing, the dryer is normal. Consumer Support Troubleshooting Tips Save time and money! Exhaust system is blocked Controls accidentally...
.... NOTE: Electric dryers use 2 fuses/breakers, make sure the dryer venting is correct. • Make sure ducting is clean, free of moisture in a load, choose MORE DRY. You may be sitting unevenly What To Do • Move dryer to call for service. Safety Instructions Before you call for service... Review the charts on the START/PAUSE button is flashing, the dryer is normal. Consumer Support Troubleshooting Tips Save time and money! Exhaust system is blocked Controls accidentally...
Owners Manual
Page 47
.... 47 Troubleshooting Tips Consumer Support Dryer doesn't heat Fuse is blown/circuit breaker • Check the building's fuse/circuit breaker box and is blown or one fuse is tripped; Inconsistent drying times Type of heat Type of load and drying conditions • Drying time will vary according to the type of the heaters may tumble if only one breaker tripped. Clothes are fully open. Clothes are trying to select is drying Cannot make a selection and the dryer beeps twice The...
.... 47 Troubleshooting Tips Consumer Support Dryer doesn't heat Fuse is blown/circuit breaker • Check the building's fuse/circuit breaker box and is blown or one fuse is tripped; Inconsistent drying times Type of heat Type of load and drying conditions • Drying time will vary according to the type of the heaters may tumble if only one breaker tripped. Clothes are fully open. Clothes are trying to select is drying Cannot make a selection and the dryer beeps twice The...
Owners Manual
Page 49
... Not Covered (in materials or workmanship. In Alaska, the warranty excludes the cost of the dryer which vary from state to provide required service. Warrantor: General Electric Company. Any part of shipping or service calls to a defect in the United States): I Replacement of house fuses or resetting of the light bulb after delivery. I Damage caused after its expected useful life. I Improper installation, delivery or maintenance. This warranty is...
... Not Covered (in materials or workmanship. In Alaska, the warranty excludes the cost of the dryer which vary from state to provide required service. Warrantor: General Electric Company. Any part of shipping or service calls to a defect in the United States): I Replacement of house fuses or resetting of the light bulb after delivery. I Damage caused after its expected useful life. I Improper installation, delivery or maintenance. This warranty is...
Owners Manual
Page 50
... fails due to replace the defective part. During this additional three-year limited warranty, you will also provide, free of circuit breakers. During this additional one -year warranty, GE will be provided in materials or workmanship. I Improper installation, delivery or maintenance. Safety Instructions Operating Instructions GE Dryer Warranty. (For customers in materials or workmanship. I Replacement of God. This warranty is abused, misused or used for any succeeding owner for products...
... fails due to replace the defective part. During this additional three-year limited warranty, you will also provide, free of circuit breakers. During this additional one -year warranty, GE will be provided in materials or workmanship. I Improper installation, delivery or maintenance. Safety Instructions Operating Instructions GE Dryer Warranty. (For customers in materials or workmanship. I Replacement of God. This warranty is abused, misused or used for any succeeding owner for products...


