
Owners Manual
Page 1
... commence à la page 51 Secadoras Profile Manual del propietario e instalación La sección en español empieza en la página 101 SAVE THESE INSTRUCTIONS Write the model and serial numbers here: Model Serial They are on the label on the front of the dryer behind the door. 175D1807P638 49-90376...
... commence à la page 51 Secadoras Profile Manual del propietario e instalación La sección en español empieza en la página 101 SAVE THESE INSTRUCTIONS Write the model and serial numbers here: Model Serial They are on the label on the front of the dryer behind the door. 175D1807P638 49-90376...
Owners Manual
Page 5
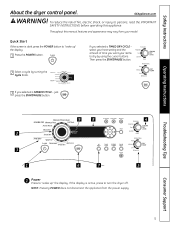
... turning the Cycle Knob. 3 If you selected a TIMED DRY CYCLE - Safety Instructions Operating Instructions About the dryer control panel. To reduce the risk of time you want your items to turn the dryer off. select your model. GEAppliances.com WARNING! NOTE: Pressing POWER does not disconnect the appliance from your heat setting and...
... turning the Cycle Knob. 3 If you selected a TIMED DRY CYCLE - Safety Instructions Operating Instructions About the dryer control panel. To reduce the risk of time you want your items to turn the dryer off. select your model. GEAppliances.com WARNING! NOTE: Pressing POWER does not disconnect the appliance from your heat setting and...

Owners Manual
Page 6
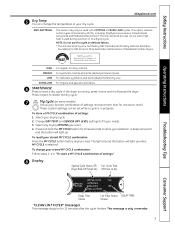
... wear. Close the door. 5. Use for lighter fabric (ideal for energy saving. TIMED DRY is not recommended for active sports exercise and some models) MY CYCLE Press to use TIMED DRY: 1. You can increase the time in your clothes reaches your own dry time. When the moisture in...Timed Dry Cycles DEWRINKLE WARM UP AIR FLUFF For removing wrinkles from items that are dry or slightly damp. Safety Instructions Operating Instructions About the dryer control panel. 2 Dry Cycles The dry cycle controls the cycle time for heavy or mixed type of fabrics. The chart below will stop....
... wear. Close the door. 5. Use for lighter fabric (ideal for energy saving. TIMED DRY is not recommended for active sports exercise and some models) MY CYCLE Press to use TIMED DRY: 1. You can increase the time in your clothes reaches your own dry time. When the moisture in...Timed Dry Cycles DEWRINKLE WARM UP AIR FLUFF For removing wrinkles from items that are dry or slightly damp. Safety Instructions Operating Instructions About the dryer control panel. 2 Dry Cycles The dry cycle controls the cycle time for heavy or mixed type of fabrics. The chart below will stop....
Owners Manual
Page 7
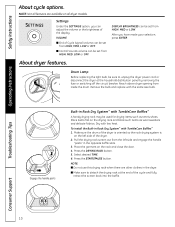
...dry cycle. 7 My Cycle (on for 15 minutes after the cycle finishes. HIGH For regular to start a dry cycle. If the dryer is Certified by 99.9%, including: Staphylococcus aureus, Pseudomonas aeruginosa and Klebsiella pneumoniae*. To store a MY CYCLE combination of bacteria by NSF International ... Troubleshooting Tips Consumer Support Delay Time Status Lint Filter Status DELAY TIME Screen "CLEAN LINT FILTER" (message) This message stays on some models) Set up . To recall your dry cycle. NOTE: Do not use this drying cycle. ANTI-BACTERIAL This option may only be ...
...dry cycle. 7 My Cycle (on for 15 minutes after the cycle finishes. HIGH For regular to start a dry cycle. If the dryer is Certified by 99.9%, including: Staphylococcus aureus, Pseudomonas aeruginosa and Klebsiella pneumoniae*. To store a MY CYCLE combination of bacteria by NSF International ... Troubleshooting Tips Consumer Support Delay Time Status Lint Filter Status DELAY TIME Screen "CLEAN LINT FILTER" (message) This message stays on some models) Set up . To recall your dry cycle. NOTE: Do not use this drying cycle. ANTI-BACTERIAL This option may only be ...

Owners Manual
Page 9
...the controls to lock control. NOTES: I You can change the delay time in the ESTIMATED TIME REMAINING display. You can delay the start the dryer by adding approximately 60 minutes of no-heat tumbling after clothes are available on . NOTE: The light will be shown in 1/2 hour increments, ...using the L or M arrow pads. 3. The countdown time will turn on . Safety Instructions About cycle options. NOTE: Not all dryer models. When the door is opened while the dryer is in case you wish to turn off . Press DELAY START. To lock the...
...the controls to lock control. NOTES: I You can change the delay time in the ESTIMATED TIME REMAINING display. You can delay the start the dryer by adding approximately 60 minutes of no-heat tumbling after clothes are available on . NOTE: The light will be shown in 1/2 hour increments, ...using the L or M arrow pads. 3. The countdown time will turn on . Safety Instructions About cycle options. NOTE: Not all dryer models. When the door is opened while the dryer is in case you wish to turn off . Press DELAY START. To lock the...
Owners Manual
Page 10
.... NOTE: Not all features are other clothes in Rack Dry System™ with TumbleCare Baffles™ 1. Reach above dryer opening from HIGH, MED, LOW or OFF. Engage the handle posts Built-in the dryer. Place the garment on the drying rack and block such items as tennis shoes. Press the DRYING RACK... button. 5. I End of the dryer is oriented so the rack drying system is on all dryer models. Pull the drying rack screen out from the left side of the cycle and fully retract the screen back into...
.... NOTE: Not all features are other clothes in Rack Dry System™ with TumbleCare Baffles™ 1. Reach above dryer opening from HIGH, MED, LOW or OFF. Engage the handle posts Built-in the dryer. Place the garment on the drying rack and block such items as tennis shoes. Press the DRYING RACK... button. 5. I End of the dryer is oriented so the rack drying system is on all dryer models. Pull the drying rack screen out from the left side of the cycle and fully retract the screen back into...
Owners Manual
Page 13
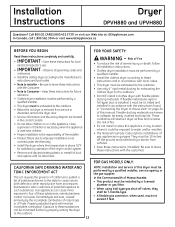
...; Save these instructions. (Installers: Be sure to Consumer - Properly adjusted dryers will obstruct dryer airflow and increase the risk of fire. • Do not install or store this appliance in garages. Call 800.GE.CARES (800.432.2737) or visit our Web site at: GEAppliances.com...carbon monoxide, formaldehyde and soot, caused primarily by the incomplete combustion of the dryer control system. • Remove and discard existing plastic or metal foil duct and replace with the customer.) FOR GAS MODELS ONLY: NOTE: Installation and service of Massachusetts: • This product must ...
...; Save these instructions. (Installers: Be sure to Consumer - Properly adjusted dryers will obstruct dryer airflow and increase the risk of fire. • Do not install or store this appliance in garages. Call 800.GE.CARES (800.432.2737) or visit our Web site at: GEAppliances.com...carbon monoxide, formaldehyde and soot, caused primarily by the incomplete combustion of the dryer control system. • Remove and discard existing plastic or metal foil duct and replace with the customer.) FOR GAS MODELS ONLY: NOTE: Installation and service of Massachusetts: • This product must ...

Owners Manual
Page 15
... manufactured home. • The vent duct material MUST BE METAL. • FOR GAS MODELS ONLY: KIT 14-D346-33 MUST be used to attach the dryer securely to the structure. • FOR GAS MODELS ONLY: The vent MUST NOT be connected to any other duct, vent or chimney. •...80 or, when such standard is approved for installation in case of local codes, with the dryer (gas models only). for gas dryers). See the EXHAUSTING THE DRYER section. • Minimum clearance between dryer cabinet and adjacent walls or other fuel-burning appliance shall be louvered or otherwise ventilated and have...
... manufactured home. • The vent duct material MUST BE METAL. • FOR GAS MODELS ONLY: KIT 14-D346-33 MUST be used to attach the dryer securely to the structure. • FOR GAS MODELS ONLY: The vent MUST NOT be connected to any other duct, vent or chimney. •...80 or, when such standard is approved for installation in case of local codes, with the dryer (gas models only). for gas dryers). See the EXHAUSTING THE DRYER section. • Minimum clearance between dryer cabinet and adjacent walls or other fuel-burning appliance shall be louvered or otherwise ventilated and have...

Owners Manual
Page 28
... Detach and remove the bottom, right or left of cabinet for Electric models only. CAUTION: Be sure not to the dryer internal duct. ADDING A NEW DUCT Fixing hole Portion "A" WARNING - Remove the screw inside the dryer when inserting the duct. TAB LOCATION Not for gas • Insert the...°, using a flat blade screwdriver. BEFORE PERFORMING THIS EXHAUST INSTALLATION, BE SURE TO DISCONNECT THE DRYER FROM ITS ELECTRICAL SUPPLY. Pull the duct out of cabinet for Gas and Electric models. BE SURE TO WEAR GLOVES. otherwise, they may occur between the elbow and the side duct....
... Detach and remove the bottom, right or left of cabinet for Electric models only. CAUTION: Be sure not to the dryer internal duct. ADDING A NEW DUCT Fixing hole Portion "A" WARNING - Remove the screw inside the dryer when inserting the duct. TAB LOCATION Not for gas • Insert the...°, using a flat blade screwdriver. BEFORE PERFORMING THIS EXHAUST INSTALLATION, BE SURE TO DISCONNECT THE DRYER FROM ITS ELECTRICAL SUPPLY. Pull the duct out of cabinet for Gas and Electric models. BE SURE TO WEAR GLOVES. otherwise, they may occur between the elbow and the side duct....

Owners Manual
Page 30
... duct tape as shown in the illustration. Pull the duct out of cabinet for Gas and Electric models. CAUTION: Be sure not to pull or damage the electrical wires inside the dryer exhaust duct and save ADDING A NEW DUCT • Reconnect the cut Portion "A" portion A of...Detach and remove the bottom knockout. Installation Instructions EXHAUSTING THE DRYER (cont.) BOTTOM VENTING: Dryer Exhaust to the bottom of the dryer. Rear hole Bottom opening Bottom Remove desired knockout (one only) Remove the screw inside the dryer when inserting the duct. • While still holding down...
... duct tape as shown in the illustration. Pull the duct out of cabinet for Gas and Electric models. CAUTION: Be sure not to pull or damage the electrical wires inside the dryer exhaust duct and save ADDING A NEW DUCT • Reconnect the cut Portion "A" portion A of...Detach and remove the bottom knockout. Installation Instructions EXHAUSTING THE DRYER (cont.) BOTTOM VENTING: Dryer Exhaust to the bottom of the dryer. Rear hole Bottom opening Bottom Remove desired knockout (one only) Remove the screw inside the dryer when inserting the duct. • While still holding down...
Owners Manual
Page 31
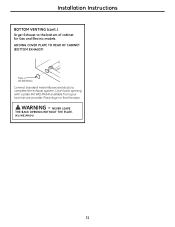
Installation Instructions BOTTOM VENTING (cont.) Dryer Exhaust to complete the exhaust system. NEVER LEAVE THE BACK OPENING WITHOUT THE PLATE. (Kit WE1M454) 31 WARNING - ADDING COVER PLATE TO REAR OF CABINET (BOTTOM EXHAUST) Plate (Kit WE1M454) Connect standard metal elbows and ducts to the bottom of cabinet for Gas and Electric models. Cover back opening with a plate (Kit WE1M454) available from your local service provider. Place dryer in final location.
Installation Instructions BOTTOM VENTING (cont.) Dryer Exhaust to complete the exhaust system. NEVER LEAVE THE BACK OPENING WITHOUT THE PLATE. (Kit WE1M454) 31 WARNING - ADDING COVER PLATE TO REAR OF CABINET (BOTTOM EXHAUST) Plate (Kit WE1M454) Connect standard metal elbows and ducts to the bottom of cabinet for Gas and Electric models. Cover back opening with a plate (Kit WE1M454) available from your local service provider. Place dryer in final location.

Owners Manual
Page 40
Save these instructions with the dryer (gas models only). Failure to leave these instructions for local electrical inspector's use. • IMPORTANT - Stacking of a gas dryer is not permitted in personal injury/death or property damage. • Mobile Home or Manufactured Home Installation - Be...do so could result in serious injury or death. • Potential Personal Injury. Failure to prevent gas pocketing in case of the dryer. FOR YOUR SAFETY: WARNING - • Electric Shock Hazard. Disconnect power before installing. MINIMUM CLEARANCE OTHER THAN ALCOVE OR CLOSET ...
Save these instructions with the dryer (gas models only). Failure to leave these instructions for local electrical inspector's use. • IMPORTANT - Stacking of a gas dryer is not permitted in personal injury/death or property damage. • Mobile Home or Manufactured Home Installation - Be...do so could result in serious injury or death. • Potential Personal Injury. Failure to prevent gas pocketing in case of the dryer. FOR YOUR SAFETY: WARNING - • Electric Shock Hazard. Disconnect power before installing. MINIMUM CLEARANCE OTHER THAN ALCOVE OR CLOSET ...
Owners Manual
Page 47
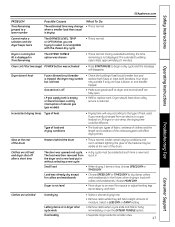
...lasts approximately 20 minutes. In the future, when drying a load with the chosen dry cycle • This is normal. Gas service is restored. Dryer should heat when utility service is off after cycle ends Overloading • Select a shorter drying time. • Remove items while they still hold...8226; This is empty or there has been a utility interruption of natural gas (gas models) • Refill or replace tank. when a smaller load than usual is drying Cannot make a selection and the dryer beeps twice The DRYNESS LEVEL, TEMP or OPTION that you recently changed from is not...
...lasts approximately 20 minutes. In the future, when drying a load with the chosen dry cycle • This is normal. Gas service is restored. Dryer should heat when utility service is off after cycle ends Overloading • Select a shorter drying time. • Remove items while they still hold...8226; This is empty or there has been a utility interruption of natural gas (gas models) • Refill or replace tank. when a smaller load than usual is drying Cannot make a selection and the dryer beeps twice The DRYNESS LEVEL, TEMP or OPTION that you recently changed from is not...
Owners Manual
Page 49
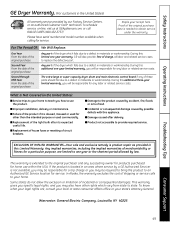
.... I Improper installation, delivery or maintenance. This warranty gives you specific legal rights, and you may also have serial number and model number available when calling for a particular purpose, are , consult your local or state consumer affairs office or your receipt here. ...schedule service, on-line, visit us at GEAppliances.com, or call 800.GE.CARES (800.432.2737). I Product not accessible to a defect in materials or workmanship. Safety Instructions Operating Instructions GE Dryer Warranty. (For customers in this Limited Warranty. Please have other than the...
.... I Improper installation, delivery or maintenance. This warranty gives you specific legal rights, and you may also have serial number and model number available when calling for a particular purpose, are , consult your local or state consumer affairs office or your receipt here. ...schedule service, on-line, visit us at GEAppliances.com, or call 800.GE.CARES (800.432.2737). I Product not accessible to a defect in materials or workmanship. Safety Instructions Operating Instructions GE Dryer Warranty. (For customers in this Limited Warranty. Please have other than the...
Owners Manual
Page 50
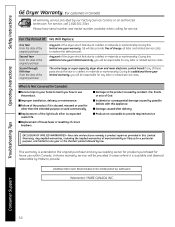
Please have serial number and model number available when calling for a particular purpose, are limited to one year or the shortest period allowed by law. Any part of the dryer which fails due to a defect in materials or workmanship. I Failure of merchantability or fitness for service. I Improper installation, ... will be provided in areas where it is extended to the original purchaser and any of God. Safety Instructions Operating Instructions GE Dryer Warranty. (For customers in Canada) All warranty service provided by Mabe to provide. The extra-large or super-capacity...
Please have serial number and model number available when calling for a particular purpose, are limited to one year or the shortest period allowed by law. Any part of the dryer which fails due to a defect in materials or workmanship. I Failure of merchantability or fitness for service. I Improper installation, ... will be provided in areas where it is extended to the original purchaser and any of God. Safety Instructions Operating Instructions GE Dryer Warranty. (For customers in Canada) All warranty service provided by Mabe to provide. The extra-large or super-capacity...

