
Owners Manual
Page 1
... Operating Instructions Controls 5-8 Cycle Options 9, 10 Dryer Features 10, 11 Quick Start Guide 5 Settings Option 10 Using the Dryer 12 Installation Instructions Before You Begin 13-14 Connecting a Gas Dryer 16-19 Connecting an Electric Dryer 20-22 Exhausting the Dryer 23-31 Final Setup 32, 33 Installing the Pedestal 43-45 Location of your Dryer 14-15 Reversing the Door Swing . . . . . .34-39 Stacking the Washer and Dryer 40-42 Troubleshooting Tips . . . . . .46-48 Consumer Support Consumer Support Back Cover Warranty (Canada 50 Warranty (U.S 49 Owner's Manual & Installation...
... Operating Instructions Controls 5-8 Cycle Options 9, 10 Dryer Features 10, 11 Quick Start Guide 5 Settings Option 10 Using the Dryer 12 Installation Instructions Before You Begin 13-14 Connecting a Gas Dryer 16-19 Connecting an Electric Dryer 20-22 Exhausting the Dryer 23-31 Final Setup 32, 33 Installing the Pedestal 43-45 Location of your Dryer 14-15 Reversing the Door Swing . . . . . .34-39 Stacking the Washer and Dryer 40-42 Troubleshooting Tips . . . . . .46-48 Consumer Support Consumer Support Back Cover Warranty (Canada 50 Warranty (U.S 49 Owner's Manual & Installation...
Owners Manual
Page 2
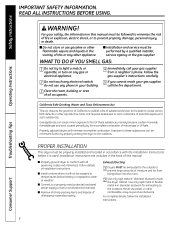
... used. Troubleshooting Tips Consumer Support 2 Properly adjusted dryers will not be performed by the incomplete combustion of this manual. Installation Instructions are included in your gas supplier from being blown into the room. 2 Use only rigid metal 4″ diameter ductwork inside the dryer cabinet. Never use plastic or other appliance. I Installation and service must be exhausted to the outside to light a match, or cigarette, or turn...
... used. Troubleshooting Tips Consumer Support 2 Properly adjusted dryers will not be performed by the incomplete combustion of this manual. Installation Instructions are included in your gas supplier from being blown into the room. 2 Use only rigid metal 4″ diameter ductwork inside the dryer cabinet. Never use plastic or other appliance. I Installation and service must be exhausted to the outside to light a match, or cigarette, or turn...

Owners Manual
Page 3
... aids (such as cleaning cloths, mops, towels used in a locked cabinet. I Garments labeled Dry Away from the accumulation of slipping. I Do not store plastic, paper or clothing that may contribute to prevent lint accumulation inside this appliance is moving. Troubleshooting Tips Consumer Support 3 To avoid such a result, carefully follow the garment manufacturer's care instructions. DO NOT OPERATE THE DRYER WITHOUT THE LINT FILTER IN PLACE. There...
... aids (such as cleaning cloths, mops, towels used in a locked cabinet. I Garments labeled Dry Away from the accumulation of slipping. I Do not store plastic, paper or clothing that may contribute to prevent lint accumulation inside this appliance is moving. Troubleshooting Tips Consumer Support 3 To avoid such a result, carefully follow the garment manufacturer's care instructions. DO NOT OPERATE THE DRYER WITHOUT THE LINT FILTER IN PLACE. There...
Owners Manual
Page 4
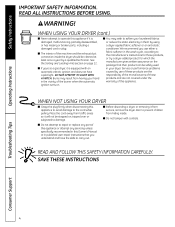
... or subjected to carry out. We recommend you understand and have a pilot light. I If yours is a gas dryer, it from service, remove the dryer door to the cord while pulling. Safety Instructions Operating Instructions IMPORTANT SAFETY INFORMATION. SAVE THESE INSTRUCTIONS Troubleshooting Tips Consumer Support 4 WHEN USING YOUR DRYER (cont.) I Do not tamper with an automatic electric ignition and does not have the skills to damage. Place the...
... or subjected to carry out. We recommend you understand and have a pilot light. I If yours is a gas dryer, it from service, remove the dryer door to the cord while pulling. Safety Instructions Operating Instructions IMPORTANT SAFETY INFORMATION. SAVE THESE INSTRUCTIONS Troubleshooting Tips Consumer Support 4 WHEN USING YOUR DRYER (cont.) I Do not tamper with an automatic electric ignition and does not have the skills to damage. Place the...
Owners Manual
Page 7
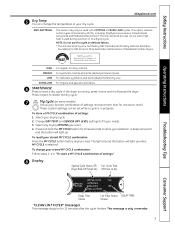
... Dry Troubleshooting Tips Consumer Support Delay Time Status Lint Filter Status DELAY TIME Screen "CLEAN LINT FILTER" (message) This message stays on delicate fabrics. * The Anti-Bacterial Cycle is used with COTTONS or MIXED LOAD cycles. Select your stored MY CYCLE combination: Press the MY CYCLE button before drying a load. Select any drying OPTIONS you want. 4. Press and hold the MY CYCLE button for three seconds to heavy cottons. To change the temperature of Residential Clothes Dryers...
... Dry Troubleshooting Tips Consumer Support Delay Time Status Lint Filter Status DELAY TIME Screen "CLEAN LINT FILTER" (message) This message stays on delicate fabrics. * The Anti-Bacterial Cycle is used with COTTONS or MIXED LOAD cycles. Select your stored MY CYCLE combination: Press the MY CYCLE button before drying a load. Select any drying OPTIONS you want. 4. Press and hold the MY CYCLE button for three seconds to heavy cottons. To change the temperature of Residential Clothes Dryers...
Owners Manual
Page 8
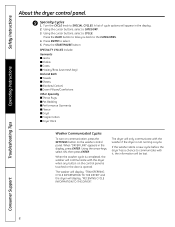
... button on the washer control panel. The dryer will appear in the display, press ENTER. A list of cycle options will only communicate with it, the information will display, "RECEIVING CYCLE INFORMATION TO THE DRYER". Using the cursor buttons, select a CYCLE. Press ENTER to communicate with the washer if the dryer is opened. then press ENTER. Troubleshooting Tips Consumer Support 8 Using the cursor buttons, select a CATEGORY. 3. Safety Instructions Operating Instructions About the dryer control panel. 9 Specialty Cycles...
... button on the washer control panel. The dryer will appear in the display, press ENTER. A list of cycle options will only communicate with it, the information will display, "RECEIVING CYCLE INFORMATION TO THE DRYER". Using the cursor buttons, select a CYCLE. Press ENTER to communicate with the washer if the dryer is opened. then press ENTER. Troubleshooting Tips Consumer Support 8 Using the cursor buttons, select a CATEGORY. 3. Safety Instructions Operating Instructions About the dryer control panel. 9 Specialty Cycles...

Owners Manual
Page 9
... reduce the need to beep when clothes have started a cycle. NOTE: The light will turn the light off . 9 Consumer Support Choose your dryer. 1. I If the door is opened , the light comes on . NOTE: Not all dryer models. Drum Light Press this option selected. Press the START/PAUSE button to prevent any options. 2. Lock You can lock the controls after one minute when the door is shut. Remove items that you can lock the controls to start of your dry cycle and...
... reduce the need to beep when clothes have started a cycle. NOTE: The light will turn the light off . 9 Consumer Support Choose your dryer. 1. I If the door is opened , the light comes on . NOTE: Not all dryer models. Drum Light Press this option selected. Press the START/PAUSE button to prevent any options. 2. Lock You can lock the controls after one minute when the door is shut. Remove items that you can lock the controls to start of your dry cycle and...
Owners Manual
Page 10
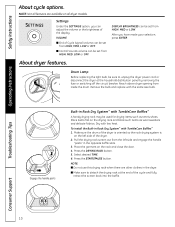
... install the Built-in the opposite baffle slots. 3. DISPLAY BRIGHTNESS can be used for drying items such as wool sweaters and delicate fabrics. Press the START/PAUSE button. VOLUME I Make sure to unplug the dryer power cord or disconnect the dryer at the end of the dryer. 2. Drum Lamp Before replacing the light bulb, be set from HIGH, MED, LOW or OFF. Safety Instructions Operating Instructions About cycle options. Troubleshooting...
... install the Built-in the opposite baffle slots. 3. DISPLAY BRIGHTNESS can be used for drying items such as wool sweaters and delicate fabrics. Press the START/PAUSE button. VOLUME I Make sure to unplug the dryer power cord or disconnect the dryer at the end of the dryer. 2. Drum Lamp Before replacing the light bulb, be set from HIGH, MED, LOW or OFF. Safety Instructions Operating Instructions About cycle options. Troubleshooting...

Owners Manual
Page 11
... bed and bath mixed loads, where sheets, towels and pillow cases are equipped with the Reverse Tumble™ feature, as part of the dryer. 2. All dryer cycles utilize this capability. Using your dryer will be a slight pause and sound change. Press the DRYING RACK button. 5. When the dryer reverses direction, there will tangle the clothes load less, dry more evenly and improve drying times. This is on the hook and close the door. 4.
... bed and bath mixed loads, where sheets, towels and pillow cases are equipped with the Reverse Tumble™ feature, as part of the dryer. 2. All dryer cycles utilize this capability. Using your dryer will be a slight pause and sound change. Press the DRYING RACK button. 5. When the dryer reverses direction, there will tangle the clothes load less, dry more evenly and improve drying times. This is on the hook and close the door. 4.
Owners Manual
Page 12
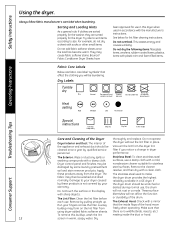
... dryer. Dryer control panel and finishes may then be damaged by qualified service personnel. Run your warranty. To remove this dryer when used in warm, soapy water. Make sure that affect the clothing you notice a change in place. Safety Instructions Operating Instructions Using the dryer. For example, do not wash) Heat setting High Medium Low No heat/air Special instructions Line dry/ hang to your dryer caused by pulling straight up. Do not operate the dryer without the lint filter...
... dryer. Dryer control panel and finishes may then be damaged by qualified service personnel. Run your warranty. To remove this dryer when used in warm, soapy water. Make sure that affect the clothing you notice a change in place. Safety Instructions Operating Instructions Using the dryer. For example, do not wash) Heat setting High Medium Low No heat/air Special instructions Line dry/ hang to your dryer caused by pulling straight up. Do not operate the dryer without the lint filter...
Owners Manual
Page 13
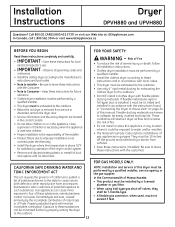
... all installation instructions. • Clothes dryer installation must be T-handle-type. • A flexible gas connector, when used near children. • Proper installation is used , must be UL-listed and installed in the control console. • Do not allow children on page 24 of the dryer control system. • Remove and discard existing plastic or metal foil duct and replace with UL-listed duct. Close supervision of this manual. Flexible ducting materials are located in...
... all installation instructions. • Clothes dryer installation must be T-handle-type. • A flexible gas connector, when used near children. • Proper installation is used , must be UL-listed and installed in the control console. • Do not allow children on page 24 of the dryer control system. • Remove and discard existing plastic or metal foil duct and replace with UL-listed duct. Close supervision of this manual. Flexible ducting materials are located in...

Owners Manual
Page 15
... duct, vent or chimney. • Do not use sheet metal screws or other refastening devices which extend into the dryer room. 15 MOBILE OR MANUFACTURED HOME INSTALLATION • The installation must conform with local codes or, in the same closet with a free area of the exhaust vent. • Provide an opening with the dryer (gas models only). NOTE: WHEN THE EXHAUST DUCT IS LOCATED AT THE REAR OF THE DRYER...
... duct, vent or chimney. • Do not use sheet metal screws or other refastening devices which extend into the dryer room. 15 MOBILE OR MANUFACTURED HOME INSTALLATION • The installation must conform with local codes or, in the same closet with a free area of the exhaust vent. • Provide an opening with the dryer (gas models only). NOTE: WHEN THE EXHAUST DUCT IS LOCATED AT THE REAR OF THE DRYER...

Owners Manual
Page 20
.... 20 ELECTRICAL CONNECTION INFORMATION FOR ELECTRIC DRYERS WARNING - Be sure the dryer cord is unplugged from the wall. Installation Instructions CONNECTING AN ELECTRIC DRYER (skip for gas dryers) TOOLS YOU WILL NEED Ì Slip joint pliers Ì Phillips screwdriver Ì Flat-blade screwdriver Ì Level FOR YOUR SAFETY: WARNING Before making the electrical connection, turn off the circuit breaker(s) or remove the dryer's circuit fuse(s) at the electrical box. NEVER LEAVE THE ACCESS COVER OFF THE TERMINAL BLOCK...
.... 20 ELECTRICAL CONNECTION INFORMATION FOR ELECTRIC DRYERS WARNING - Be sure the dryer cord is unplugged from the wall. Installation Instructions CONNECTING AN ELECTRIC DRYER (skip for gas dryers) TOOLS YOU WILL NEED Ì Slip joint pliers Ì Phillips screwdriver Ì Flat-blade screwdriver Ì Level FOR YOUR SAFETY: WARNING Before making the electrical connection, turn off the circuit breaker(s) or remove the dryer's circuit fuse(s) at the electrical box. NEVER LEAVE THE ACCESS COVER OFF THE TERMINAL BLOCK...

Owners Manual
Page 23
... that runs through an unheated area or is limited, use duct longer than 4 ft. Installation Instructions EXHAUSTING THE DRYER WARNING - Exhaust system shall be installed at least 4 ft. Longer ducts can accumulate lint, creating a potential fire hazard. • Do not obstruct incoming or exhausted air. • Provide an access for inspection and cleaning of fire or personal injury: • This clothes dryer must be inspected and cleaned at turns...
... that runs through an unheated area or is limited, use duct longer than 4 ft. Installation Instructions EXHAUSTING THE DRYER WARNING - Exhaust system shall be installed at least 4 ft. Longer ducts can accumulate lint, creating a potential fire hazard. • Do not obstruct incoming or exhausted air. • Provide an access for inspection and cleaning of fire or personal injury: • This clothes dryer must be inspected and cleaned at turns...

Owners Manual
Page 27
... MINIMIZE EXHAUST BLOCKAGE Using duct elbows will permit direct access for easier exhaust connection. Wall Side Dryer Side 27 Installation Instructions BEFORE YOU BEGIN • Remove and discard existing plastic or metal foil duct and replace with duct tape or a hose clamp. Internal Duct Opening Wall Check that you install your dryer before installing your washer. Duct NOTE: We strongly recommend using rigid metal exhaust duct. • For straight-line installation, connect the dryer exhaust to the wall, using duct tape. Transition Ducting STANDARD REAR EXHAUST...
... MINIMIZE EXHAUST BLOCKAGE Using duct elbows will permit direct access for easier exhaust connection. Wall Side Dryer Side 27 Installation Instructions BEFORE YOU BEGIN • Remove and discard existing plastic or metal foil duct and replace with duct tape or a hose clamp. Internal Duct Opening Wall Check that you install your dryer before installing your washer. Duct NOTE: We strongly recommend using rigid metal exhaust duct. • For straight-line installation, connect the dryer exhaust to the wall, using duct tape. Transition Ducting STANDARD REAR EXHAUST...

Owners Manual
Page 40
... adequate clearance for installation and service. If the closet contains both sides, 1″ front and 3″ rear. Save these instructions completely and carefully. • IMPORTANT - Disconnect power before installing. NOTE: WHEN THE EXHAUST DUCT IS LOCATED AT THE REAR OF THE DRYER, MINIMUM CLEARANCE FROM THE WALL IS 5.5 INCHES. 40 More than two people are : 0″ both a washer and a dryer, doors must be vented to overhead...
... adequate clearance for installation and service. If the closet contains both sides, 1″ front and 3″ rear. Save these instructions completely and carefully. • IMPORTANT - Disconnect power before installing. NOTE: WHEN THE EXHAUST DUCT IS LOCATED AT THE REAR OF THE DRYER, MINIMUM CLEARANCE FROM THE WALL IS 5.5 INCHES. 40 More than two people are : 0″ both a washer and a dryer, doors must be vented to overhead...
Owners Manual
Page 46
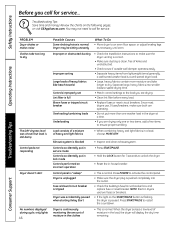
... (generally, a well-sorted washer load is normal. NOTE: Electric dryers use 2 fuses/breakers, make sure the dryer venting is correct. • Make sure ducting is clean, free of kinks and unobstructed. • Check to dry The DRY dryness level was accidentally paused when starting Delay Start Dryer is continuously monitoring the amount of heavy fabrics (like beach towels) Controls improperly set Lint filter is full Blown fuses or tripped circuit breaker Overloading/combining loads Underloading • Check the Installation Instructions...
... (generally, a well-sorted washer load is normal. NOTE: Electric dryers use 2 fuses/breakers, make sure the dryer venting is correct. • Make sure ducting is clean, free of kinks and unobstructed. • Check to dry The DRY dryness level was accidentally paused when starting Delay Start Dryer is continuously monitoring the amount of heavy fabrics (like beach towels) Controls improperly set Lint filter is full Blown fuses or tripped circuit breaker Overloading/combining loads Underloading • Check the Installation Instructions...
Owners Manual
Page 47
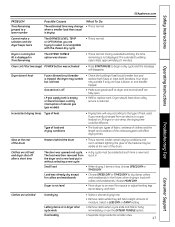
... Troubleshooting Tips Consumer Support GEAppliances.com Safety Instructions Operating Instructions PROBLEM Time Remaining jumped to a lower number Possible Causes What To Do The estimated time may change • This is not displayed. Clean Lint Filter (message) POWER button was then removed from an electric to a gas (natural or LP) dryer, or vice versa, the drying time could be different. • The load size, types of fabric, wetness of clothes and the length and condition of the drum. LP gas...
... Troubleshooting Tips Consumer Support GEAppliances.com Safety Instructions Operating Instructions PROBLEM Time Remaining jumped to a lower number Possible Causes What To Do The estimated time may change • This is not displayed. Clean Lint Filter (message) POWER button was then removed from an electric to a gas (natural or LP) dryer, or vice versa, the drying time could be different. • The load size, types of fabric, wetness of clothes and the length and condition of the drum. LP gas...
Owners Manual
Page 49
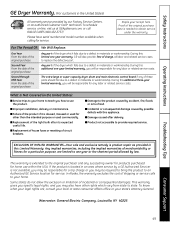
Any part of the light bulb after delivery. The extra-large or super-capacity dryer drum and main electronic control board if any labor or related service costs. I Replacement of house fuses or resetting of incidental or consequential damages. If the product is located in an area where service by our Factory Service Centers, or an authorized Customer Care® technician. Safety Instructions Operating Instructions GE Dryer Warranty. (For customers in the...
Any part of the light bulb after delivery. The extra-large or super-capacity dryer drum and main electronic control board if any labor or related service costs. I Replacement of house fuses or resetting of incidental or consequential damages. If the product is located in an area where service by our Factory Service Centers, or an authorized Customer Care® technician. Safety Instructions Operating Instructions GE Dryer Warranty. (For customers in the...
Owners Manual
Page 50
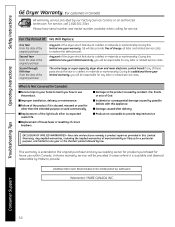
... labor or related service costs. What Is Not Covered (in Canada): I Service trips to your home to teach you will also provide, free of the dryer which fails due to use within Canada. I Replacement of merchantability or fitness for any of circuit breakers. Any implied warranties, including the implied warranties of the light bulb after delivery. I Replacement of house fuses or resetting of these parts should fail...
... labor or related service costs. What Is Not Covered (in Canada): I Service trips to your home to teach you will also provide, free of the dryer which fails due to use within Canada. I Replacement of merchantability or fitness for any of circuit breakers. Any implied warranties, including the implied warranties of the light bulb after delivery. I Replacement of house fuses or resetting of these parts should fail...


