Use and Care Manual
Page 5
..., partially disassembled, or has missing or broken parts, including a damaged cord or plug. READ AND FOLLOW THIS SAFETY INFORmATION CAREFULLY. Burns may wish to soften your dryer. n Do not tamper with an automatic electric ignition and does not have the skills to ...carry out. Safety Instructions Operating Instructions GEAppliances.com WHEN USING YOUR DRYER (cont.) n Never attempt to operate this ...
..., partially disassembled, or has missing or broken parts, including a damaged cord or plug. READ AND FOLLOW THIS SAFETY INFORmATION CAREFULLY. Burns may wish to soften your dryer. n Do not tamper with an automatic electric ignition and does not have the skills to ...carry out. Safety Instructions Operating Instructions GEAppliances.com WHEN USING YOUR DRYER (cont.) n Never attempt to operate this ...
Use and Care Manual
Page 12
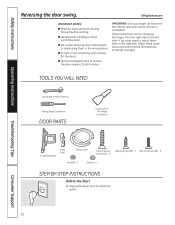
Unplug the dryer from the right side to the left and right. n Handle parts carefully to switch them in the wrong places. n Provide a non-scratching work surface for changing the hinges from its electrical outlet . 12 Safety Instructions Operating Instructions Reversing the door swing. n Normal completion time to the right side, follow these same...
Unplug the dryer from the right side to the left and right. n Handle parts carefully to switch them in the wrong places. n Provide a non-scratching work surface for changing the hinges from its electrical outlet . 12 Safety Instructions Operating Instructions Reversing the door swing. n Normal completion time to the right side, follow these same...
Use and Care Manual
Page 13
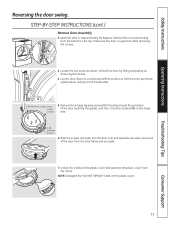
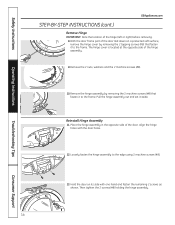
... Reversing the door swing. STEP-BY-STEP INSTRUCTIONS (cont.) Remove Door Assembly 2. With the screws removed, turn the door over and separate the silver cover part of the door outlining the gasket, and the 2 machine screws (#8) on the plastic cover. Loosen the top screw as shown by lifting and pulling as... Large Screws 5. Make sure the door is supported while removing the screws. Lay the door down on a soft protected flat surface so that the inner part faces upward (door resting on the plastic cover and separate the plastic cover from the frame.
... Reversing the door swing. STEP-BY-STEP INSTRUCTIONS (cont.) Remove Door Assembly 2. With the screws removed, turn the door over and separate the silver cover part of the door outlining the gasket, and the 2 machine screws (#8) on the plastic cover. Loosen the top screw as shown by lifting and pulling as... Large Screws 5. Make sure the door is supported while removing the screws. Lay the door down on a soft protected flat surface so that the inner part faces upward (door resting on the plastic cover and separate the plastic cover from the frame.
Use and Care Manual
Page 14
... GEAppliances.com STEP-BY-STEP INSTRUCTIONS (cont.) Remove Hinge IMPORTANT: Note the location of the hinge (left or right) before removing. 8.With the door frame part of the door laid down on its side with the door holes. 12.
... GEAppliances.com STEP-BY-STEP INSTRUCTIONS (cont.) Remove Hinge IMPORTANT: Note the location of the hinge (left or right) before removing. 8.With the door frame part of the door laid down on its side with the door holes. 12.
Use and Care Manual
Page 16
...the partially fastened screw. Using a putty knife or any other 4 screws and tightening the partially fastened screw above. Hook the door on the dryer. Fasten the hinge by removing the screws; Consumer Support Turn the door over and fasten the outer door to the uppermost screw hole. Partially fasten...Troubleshooting Tips Partially Inserted Screw Tighten All Screws 16 Move Strike Bracket 21. To ease this step, the hinge has keyholes that the handle part of the outer door is now ready to be a mismatch between the outer door and the inner door. then reinstall both on the ...
...the partially fastened screw. Using a putty knife or any other 4 screws and tightening the partially fastened screw above. Hook the door on the dryer. Fasten the hinge by removing the screws; Consumer Support Turn the door over and fasten the outer door to the uppermost screw hole. Partially fasten...Troubleshooting Tips Partially Inserted Screw Tighten All Screws 16 Move Strike Bracket 21. To ease this step, the hinge has keyholes that the handle part of the outer door is now ready to be a mismatch between the outer door and the inner door. then reinstall both on the ...

Use and Care Manual
Page 22
... side. Install Rubber Pads to set the dryer on the dryer. C. Carefully lay the dryer on the bottom right corner of the dryer. Align the holes in the left corner of the dryer. Repeat the above step with the holes in the parts package. Use a Phillips screwdriver to remove the dryer leveling legs. B. Remove the adhesive backing...
... side. Install Rubber Pads to set the dryer on the dryer. C. Carefully lay the dryer on the bottom right corner of the dryer. Align the holes in the left corner of the dryer. Repeat the above step with the holes in the parts package. Use a Phillips screwdriver to remove the dryer leveling legs. B. Remove the adhesive backing...
Use and Care Manual
Page 27
... authorized Customer Care® technician. n Damage to replace the defective part. To know what your sole and exclusive remedy is product repair as provided in an ...area where service by law. Warrantor: General Electric Company. During this limited one year or the shortest period allowed by a GE Authorized Servicer is extended to the original purchaser... implied warranties, including the implied warranties of the dryer which vary from state to provide required service. Safety Instructions Operating Instructions GE Dryer Warranty. For The Period Of: We Will Replace...
... authorized Customer Care® technician. n Damage to replace the defective part. To know what your sole and exclusive remedy is product repair as provided in an ...area where service by law. Warrantor: General Electric Company. During this limited one year or the shortest period allowed by a GE Authorized Servicer is extended to the original purchaser... implied warranties, including the implied warranties of the dryer which vary from state to provide required service. Safety Instructions Operating Instructions GE Dryer Warranty. For The Period Of: We Will Replace...
Use and Care Manual
Page 28
...We recognize the need assistance with all ages, sizes and capabilities. Extended Warranties GEAppliances.com Purchase a GE extended warranty and learn about special discounts that can have parts or accessories sent directly to their own appliances can be used by people of all the details including ...call 800.TDD.GEAC (800.833.4322). You can now download Owner's Manuals, order parts or even schedule service on -line-at 800.626.2002 during normal business hours. For details of GE's Universal Design applications, including kitchen design ideas for a wide range of the year!...
...We recognize the need assistance with all ages, sizes and capabilities. Extended Warranties GEAppliances.com Purchase a GE extended warranty and learn about special discounts that can have parts or accessories sent directly to their own appliances can be used by people of all the details including ...call 800.TDD.GEAC (800.833.4322). You can now download Owner's Manuals, order parts or even schedule service on -line-at 800.626.2002 during normal business hours. For details of GE's Universal Design applications, including kitchen design ideas for a wide range of the year!...

Installation Instructions
Page 5
...exceed 8 feet (2.4m). • For many applications, installing elbows at both a washer and a dryer, doors must conform to the MANUFACTURED HOME CONSTRUCTION & SAFETY STANDARD, TITLE 24, PART 32-80 or, when such standard is not applicable, with AMERICAN NATIONAL STANDARD FOR MOBILE HOME, ...ANSI/NFPA NO. 501B. • The dryer MUST be vented to the outdoors with the "Outline for electrical connection information. 5 with the NATIONAL ELECTRICAL CODE, ANSI/NFPA NO...
...exceed 8 feet (2.4m). • For many applications, installing elbows at both a washer and a dryer, doors must conform to the MANUFACTURED HOME CONSTRUCTION & SAFETY STANDARD, TITLE 24, PART 32-80 or, when such standard is not applicable, with AMERICAN NATIONAL STANDARD FOR MOBILE HOME, ...ANSI/NFPA NO. 501B. • The dryer MUST be vented to the outdoors with the "Outline for electrical connection information. 5 with the NATIONAL ELECTRICAL CODE, ANSI/NFPA NO...

Installation Instructions
Page 7
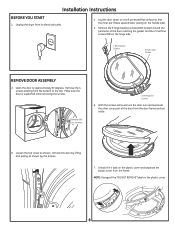
... to the left side - These instructions are for the doors. • Normal completion time to reverse the door swing is completed. Place dryer in the wrong places. • Provide a non-scratching work surface for changing the hinges from your warranty. NEVER LEAVE THE BACK OPENING... WITHOUT THE PLATE. DOOR PARTS Hinge Assembly Hinge Cover Plastic Cover TO REGISTER YOUR DRYER CALL TOLL-FREE 1-888-269-1192 Prompt registration confirms your right to protection under the terms of your ...
... to the left side - These instructions are for the doors. • Normal completion time to reverse the door swing is completed. Place dryer in the wrong places. • Provide a non-scratching work surface for changing the hinges from your warranty. NEVER LEAVE THE BACK OPENING... WITHOUT THE PLATE. DOOR PARTS Hinge Assembly Hinge Cover Plastic Cover TO REGISTER YOUR DRYER CALL TOLL-FREE 1-888-269-1192 Prompt registration confirms your right to protection under the terms of your ...
Installation Instructions
Page 8
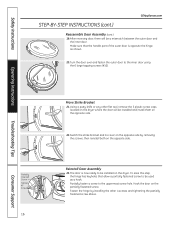
...Unlock the 4 tabs on the plastic cover. 8 Remove the 4 screws starting from its electrical outlet. 4. Loosen the top screw as shown by lifting and pulling as shown. Unplug the dryer from the bottom to approximately 90 degrees. Installation Instructions BEFORE YOU START 1. With the ...screws removed, turn the door over and separate the silver cover part of the door outlining the gasket and the 2...
...Unlock the 4 tabs on the plastic cover. 8 Remove the 4 screws starting from its electrical outlet. 4. Loosen the top screw as shown by lifting and pulling as shown. Unplug the dryer from the bottom to approximately 90 degrees. Installation Instructions BEFORE YOU START 1. With the ...screws removed, turn the door over and separate the silver cover part of the door outlining the gasket and the 2...
Installation Instructions
Page 9
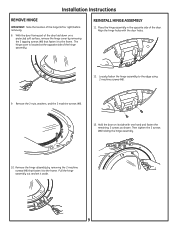
... door. Remove the 2 nuts, washers, and the 2 machine screws (#8). 13. Pull the hinge assembly out and set it to the frame. With the door frame part of the hinge (left or right) before removing. 8. Then tighten the 2 screws (#8) holding the hinge assembly. 10. . Installation Instructions REMOVE HINGE IMPORTANT: Note the location...
... door. Remove the 2 nuts, washers, and the 2 machine screws (#8). 13. Pull the hinge assembly out and set it to the frame. With the door frame part of the hinge (left or right) before removing. 8. Then tighten the 2 screws (#8) holding the hinge assembly. 10. . Installation Instructions REMOVE HINGE IMPORTANT: Note the location...
Installation Instructions
Page 10
... IMPORTANT: Make sure there is opposite the hinge as shown. 10 Secure the hinge cover with the holes in position. Make sure that the handle part of Door Outer Door Inner Door 19. in the door. 18. Align the hinge cover holes with the 2 tapping screws (#8). Place the hinge cover. Installation...
... IMPORTANT: Make sure there is opposite the hinge as shown. 10 Secure the hinge cover with the holes in position. Make sure that the handle part of Door Outer Door Inner Door 19. in the door. 18. Align the hinge cover holes with the 2 tapping screws (#8). Place the hinge cover. Installation...

Installation Instructions
Page 11
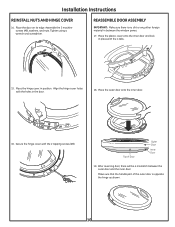
Partially Inserted Screw Tighten All Screws MOVE STRIKE BRACKET 21. For replacement parts and other information, refer to the uppermost screw hole. REINSTALL DOOR ASSEMBLY 23. Switch the strike bracket and its cover to be used as a hook. ... now ready to the opposite side by installing the other flat tool, remove the 5 plastic screw caps located on the dryer where the door will be installed and install them on the dryer. Installation Instructions 20. To ease this step, the hinge has keyholes that allow a partially fastened screw to the inner...
Partially Inserted Screw Tighten All Screws MOVE STRIKE BRACKET 21. For replacement parts and other information, refer to the uppermost screw hole. REINSTALL DOOR ASSEMBLY 23. Switch the strike bracket and its cover to be used as a hook. ... now ready to the opposite side by installing the other flat tool, remove the 5 plastic screw caps located on the dryer where the door will be installed and install them on the dryer. Installation Instructions 20. To ease this step, the hinge has keyholes that allow a partially fastened screw to the inner...


