GE DCVH680EJWW Support Question
GE DCVH680EJWW Support Question
Find answers below for this question about GE DCVH680EJWW - 7.0 cu.ft. Electric Dryer.Need a GE DCVH680EJWW manual? We have 3 online manuals for this item!
Question posted by ricky99053 on January 8th, 2012
Door Not Closing
Hi, It seems as if the clip in the door has been squeezed together , so the door dont stay close and machine cann't work. Where do i find a replacement part. It carries to screws.
Current Answers
Answer #1: Posted by BusterDoogen on January 8th, 2012 2:06 PM
BusterDoogen

Member since:
October 30th, 2011 Points: 28,565,397

Member since:
October 30th, 2011 Points: 28,565,397
If this dryer is still under warranty call
GE Appliance Service 1-800-432-2737 Monday–Friday: 7 a.m.–10 p.m. ET Saturday–Sunday: 8 a.m.–6 p.m. ET Schedule Service Online
If not, call to find the correct Strike Bracket:
Parts & Accessories 1-877-959-8688 Monday–Friday: 8 a.m.–7 p.m. ET Saturday: 8:30 a.m.–5 p.m. ET Sunday: Closed geapplianceparts.com
Related GE DCVH680EJWW Manual Pages
Use and Care Manual - Page 3
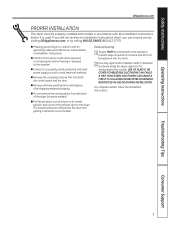
... door. The lowered protector will not be properly installed and located in Installation Instructions. Exhaust/Ducting:
1
Dryers MuST be exhausted to the outside . n Connect to a properly rated, protected and sized power supply circuit to the dryer.
n Pull the protector out and down to its lowest position and connect the exhaust duct to avoid electrical...
Use and Care Manual - Page 4
...of children, preferably in your washer or dryer during operation.
n Close supervision is necessary if this appliance is moving... of electric shock, unplug this or any maintenance or cleaning (except the removal and cleaning of the dryer during ...
Troubleshooting Tips
Consumer Support
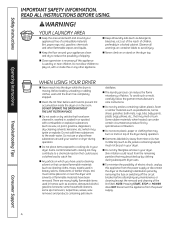
4 YOUR LAUNDRY AREA
n Keep the area underneath and around your dryer. n Do not place items exposed...
Use and Care Manual - Page 5
... electric ignition and does not have the skills to carry out. Safety Instructions
Operating Instructions
GEAppliances.com
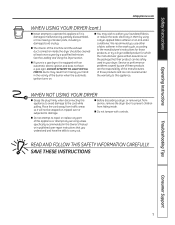
WHEN USING YOUR DRYER (cont.)
n Never attempt to operate this appliance. n The interior of this appliance or attempt any servicing unless specifically recommended in this appliance to avoid damage to repair or replace any part of the machine...
Use and Care Manual - Page 8
...
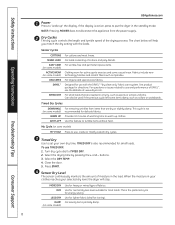
Use this feature to TIMED DRy. 2.
Turn dry cycle dial to tumble items without heat. Close the door. 5.
Use for normal dryness level suitable for energy saving. For wrinkle-free and permanent press ... some casual wear. This cycle is active, press to set your selected dry level, the dryer will help you match the dry setting with the DRYEL™ "dry clean only" fabric ...
Use and Care Manual - Page 10
...the beeper goes off .
NOTES:
n If the door is opened while the dryer is selected. Safety Instructions
Operating Instructions
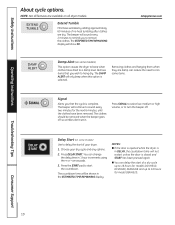
About cycle options.... EXTEND TUMBLE
Extend Tumble
Minimizes wrinkles by adding approximately 60 minutes of your dry cycle and any options.
2. Remove items that the cycle is closed...
Use and Care Manual - Page 12
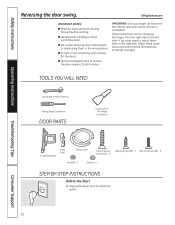
...work surface for changing the hinges from its electrical outlet .
12
n Normal completion time to avoid scratching paint.
TOOLS YOU WILL NEED
Adjustable Crescent Wrench
Phillips Head Screwdriver
DOOR PARTS
Putty Knife or Thin-Blade Screwdriver
Troubleshooting Tips
Consumer Support
Hinge Assembly
Hinge Cover
Plastic Cover
Large Tapping Screw (#10) - 6
Tapping Screw (#8) - 2 Machine...
Use and Care Manual - Page 15
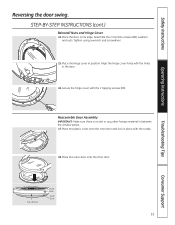
... the 4 tabs.
18. Align the hinge cover holes with the 2 tapping screws (#8). Reassemble Door Assembly
IMPORTANT: Make sure there is no dirt or any other foreign material in the door.
16. Troubleshooting Tips
Consumer Support
Top of Door
Outer Door
Inner Door
15 Assemble the 2 machine screws (#8), washers and nuts. Secure the hinge cover with the holes in...
Use and Care Manual - Page 20
...and Rupture of the dryer. DO NOT place the washer on the dryer back.
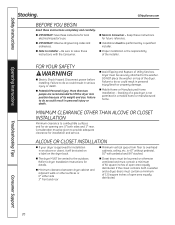
ALCOVE OR CLOSET INSTALLATION
n If your dryer is approved for local electrical inspector's use.
n The dryer MUST be securely ... manufactured home. More than two people are : 0″ both a washer and a dryer, doors must contain a minimum of 120 square inches of the installer. Consideration must be louvered or...
Use and Care Manual - Page 24
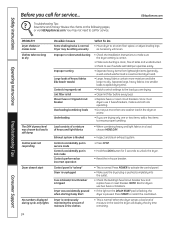
...; This is normal.
Separate large, heavy fabrics into
the outlet. • Check the building's fuse/circuit breaker box and
replace fuse or reset breaker. NOTE: Electric dryers use 2 fuses/breakers, make sure the dryer venting is correct.
• Make sure ducting is clean, free of moisture in the clothes
• Inspect and clean exhaust...
Use and Care Manual - Page 25
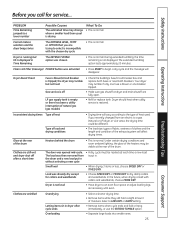
...20 minutes. Clean lint Filter (message) POWER button was then removed from an electric to a gas (natural or LP) dryer, or vice versa, the drying time could be different.
• The load ...)
• Refill or replace tank.
the dryer and a new load put in dryer after a short time
The door was already dry except for service...
Clothes are still wet and dryer shut off
• Make...
Quick Specs - Page 1
... Options: 4-way via rear, right, left and bottom. Circuit Requirements: An individual, properly grounded branch circuit, protected by Underwriters Laboratories
Specification Revised 10/10
360455
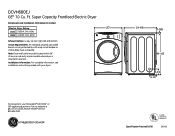
Ft. Super Capacity Frontload Electric Dryer
Dimensions and Installation Information (in position. DCVH680EJ
GE® 7.0 Cu.
Quick Specs - Page 2
... be exhausted to combustible surfaces 0" both a washer and a dryer, doors must conform with the dryer. Minimum Clearance other surfaces are: 0" either side, 3" front and rear
• Minimum vertical space from floor to your dryer is approved for installation in the same closet with the National Electric Code and National Fuel Gas Code, ANSI Z223 for...
Quick Specs - Page 3
...a chimney, under any other obstruction with your dryer.
rigid metal duct
Exhaust hood type
B
Domestic 2-1/2 dryer models
7.0, 6.0 and 5.8 cu.
The maximum length of 4' rigid (aluminum .... Specification Revised 10/10
Listed by Underwriters Laboratories
360455
Ft. Super Capacity Frontload Electric Dryer
Dryer Exhausting Information - Two 45° turns within the duct...
Quick Specs - Page 4
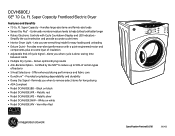
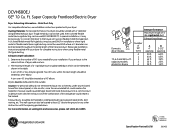
... cycle selection and provide accurate cycle times • Interior Dryer Light - Metallic silver • Model DCVH680EJWW - Vermillion Red
DCVH680J
Specification Revised 10/10
360455 Super ... • ADA Compliant • Model DCVH680EJBB - Ft. Super Capacity Frontload Electric Dryer
Features and Benefits • 7.0 Cu. Ft. Deliver optimal drying results • Anti-Bacteria ...
Installation Instructions - Page 1
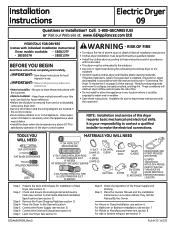
...Save these instructions for future reference. • Before the old dryer is removed from service or discarded, remove the dryer door. • Service information and the wiring diagram are known to...NEED
4" DIA.
For Mobile or Manufactured Home see section 3). Close supervision of this dryer requires basic mechanical and electrical skills. It is installed, it could be easily crushed, and...
Installation Instructions - Page 2
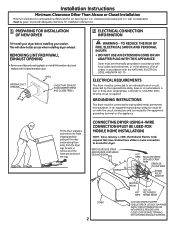
... when installing dryer exhaust
REMOVING LINT FROM WALL EXHAUST OPENING
• Remove and discard existing plastic or metal foil transition duct and replace with UL listed transition duct. INTERNAL DUCT OPENING
WALL
CHECK THAT EXHAUST HOOD DAMPER OPENS AND CLOSES FREELY. REMOVE GROUND STRAP AND DISCARD. TO REDUCE THE RISK OF FIRE, ELECTRICAL SHOCK...
Installation Instructions - Page 3
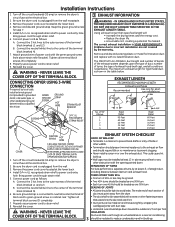
...MARKED FOR USE WITH DRYERS & PROVIDED WITH CLOSED LOOP OR SPADE TERMINALS...screw
for short run installations
4" DIA.
4" DIA.
4" DIA.
SEALING OF JOINTS • All joints should be installed at least 4 ft. The male end of each section of straight duct, including distance between last turn . Turn off the circuit breaker(s) (30 amp) or remove the dryer's
circuit fuse at the electrical...
Installation Instructions - Page 5

...dryer to sit close to the wall without pedestal, 55 in. type) duct. With the dryer in its full length. Allow 2" of 120 sq. DO
DO NOT USE EXCESSIVE EXHAUST LENGTH
DON'T
DO NOT SIT DRYER ON FLEXIBLE EXHAUST. either side 3 in . with the NATIONAL ELECTRICAL...sheet metal screws or ...dryer, doors must conform with local codes or, in the absence of local codes, with pedestal.
• Closet doors...
Installation Instructions - Page 8
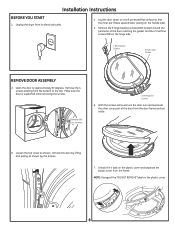
... that the inner part faces upward (door resting on the plastic cover.
8 Make sure the door is supported while removing the screws. Remove the four screws.
2 #8 Machine Screws
6. Installation Instructions
BEFORE YOU START
1. Remove the 6 large tapping screws (#10) located around the perimeter of the door from its electrical outlet.
4.
Loosen the top screw as shown by lifting and...
Installation Instructions - Page 10
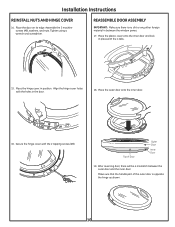
... hinge cover holes with the 2 tapping screws (#8). Place the outer door onto the inner door.
16. Top of the outer door is no dirt or any other foreign material in the door.
18. Installation Instructions
REINSTALL NUTS AND HINGE COVER
14. Assemble the 2 machine screws (#8), washers, and nuts.
Place the door on its edge. Secure the hinge cover...
Similar Questions

Electric Dryer Making A Squeaking Noise
Does Ge Electric Dryer Mod. Dwsr483eb2ww Have Some Type Of Felt Pads Or Plastic For Drum To Spin On ...
Does Ge Electric Dryer Mod. Dwsr483eb2ww Have Some Type Of Felt Pads Or Plastic For Drum To Spin On ...
(Posted by BELINDATIM 9 years ago)

Ge Profile Front Load Electric Dryer...model # Dpvh880ejmg.belt Replacement Help
I need help or web site (video) that can show me how to replace the belt on a GE Profile front load ...
I need help or web site (video) that can show me how to replace the belt on a GE Profile front load ...
(Posted by LDH63 9 years ago)

Drum Won't Turn. Dryer Turns On, Can Set Dying Cycle But Machine Justs 'hums'.
(Posted by scomacdebmac 11 years ago)

Stacking Kit For Ge Wcvhg800jww / Dcvh680ejww
Washer And Dryer
Model number for a stacking kit. Geflstack?
Model number for a stacking kit. Geflstack?
(Posted by Pengler 12 years ago)

Dryer Recalls Any Info Sh 777-378a-ge Model Algeepvxr-363-3bw
(Posted by edkent 13 years ago)