Use and Care Manual
Page 1
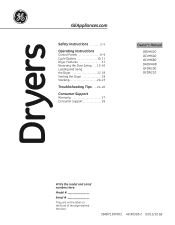
Dryers GEAppliances.com Safety Instructions 2-5 Operating Instructions Control Panels 6-9 Cycle Options 10, 11 Dryer Features 11 Reversing the Door Swing . . . .12-16 Loading and Using the Dryer 17, 18 Venting the Dryer 19 Stacking 20-23 Troubleshooting Tips . . . .24-26 Consumer Support Warranty 27 Consumer Support 28 Owner's Manual DBVH520 DCVH640 DCVH680 DHDVH68 GFDN100 GFDN110 Write the model and serial numbers here: Model Serial They are on the label on the front of the dryer behind the door. 364B7130P001 49-90393-2 03/11/10 GE
Dryers GEAppliances.com Safety Instructions 2-5 Operating Instructions Control Panels 6-9 Cycle Options 10, 11 Dryer Features 11 Reversing the Door Swing . . . .12-16 Loading and Using the Dryer 17, 18 Venting the Dryer 19 Stacking 20-23 Troubleshooting Tips . . . .24-26 Consumer Support Warranty 27 Consumer Support 28 Owner's Manual DBVH520 DCVH640 DCVH680 DHDVH68 GFDN100 GFDN110 Write the model and serial numbers here: Model Serial They are on the label on the front of the dryer behind the door. 364B7130P001 49-90393-2 03/11/10 GE
Use and Care Manual
Page 2
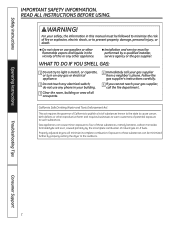
...liquids in this or any other reproductive harm and requires businesses to light a match, or cigarette, or turn on any gas or electrical appliance. 2 Do not touch any phone in your safety, the information in the vicinity of all occupants. 4 Immediately call the ... minor exposure to four of these substances, namely benzene, carbon monoxide, formaldehyde and soot, caused primarily by properly venting the dryer to such substances. Safety Instructions Operating Instructions IMPORTANT SAFETy INFORMATION. Gas appliances can be minimized further by the incomplete combustion of...
...liquids in this or any other reproductive harm and requires businesses to light a match, or cigarette, or turn on any gas or electrical appliance. 2 Do not touch any phone in your safety, the information in the vicinity of all occupants. 4 Immediately call the ... minor exposure to four of these substances, namely benzene, carbon monoxide, formaldehyde and soot, caused primarily by properly venting the dryer to such substances. Safety Instructions Operating Instructions IMPORTANT SAFETy INFORMATION. Gas appliances can be minimized further by the incomplete combustion of...
Use and Care Manual
Page 3
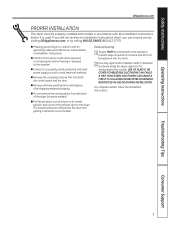
...before it will prevent the duct from getting crushed (on some models). Exhaust/Ducting: 1 Dryers MuST be exposed to temperatures below freezing or exposed to prevent large amounts of all shipping materials... codes and ordinances. The lowered protector will not be exhausted to avoid electrical overload. If you did not receive an Installation Instructions sheet, you can receive one by visiting GEAppliances....com, or by calling 800.GE.CARES (800.432.2737). n Install or store where it is used. n Do ...
...before it will prevent the duct from getting crushed (on some models). Exhaust/Ducting: 1 Dryers MuST be exposed to temperatures below freezing or exposed to prevent large amounts of all shipping materials... codes and ordinances. The lowered protector will not be exhausted to avoid electrical overload. If you did not receive an Installation Instructions sheet, you can receive one by visiting GEAppliances....com, or by calling 800.GE.CARES (800.432.2737). n Install or store where it is used. n Do ...
Use and Care Manual
Page 4
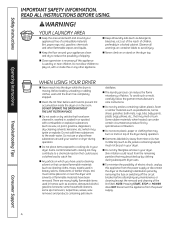
... has completely stopped. n To minimize the possibility of the dryer during operation. n Never climb on or stand on container labels to the wash water. n Clean the lint filter before attempting any other flammable vapors and liquids. n Any article on top of electric shock, unplug this appliance from the remaining particles that have...
... has completely stopped. n To minimize the possibility of the dryer during operation. n Never climb on or stand on container labels to the wash water. n Clean the lint filter before attempting any other flammable vapors and liquids. n Any article on top of electric shock, unplug this appliance from the remaining particles that have...
Use and Care Manual
Page 5
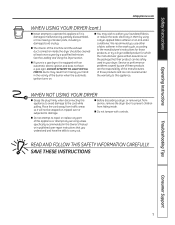
... problems caused by a qualified technician. n Do not tamper with an automatic electric ignition and does not have the skills to carry out. n The interior of those products, or try a dryer-added product for which the manufacturer gives written assurance on the package that you... or broken parts, including a damaged cord or plug. n You may result from service, remove the dryer door to soften your laundered fabrics or reduce the static electricity in this appliance to avoid damage to the cord while pulling. SAVE THESE INSTRuCTIONS Troubleshooting Tips Consumer Support...
... problems caused by a qualified technician. n Do not tamper with an automatic electric ignition and does not have the skills to carry out. n The interior of those products, or try a dryer-added product for which the manufacturer gives written assurance on the package that you... or broken parts, including a damaged cord or plug. n You may result from service, remove the dryer door to soften your laundered fabrics or reduce the static electricity in this appliance to avoid damage to the cord while pulling. SAVE THESE INSTRuCTIONS Troubleshooting Tips Consumer Support...
Use and Care Manual
Page 6
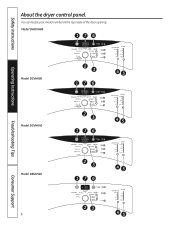
You can locate your model number at the top inside of the door opening. Safety Instructions About the dryer control panel. Model DHDVH68 176 Operating Instructions Model DCVH680 2 3 45 176 Troubleshooting Tips Model DCVH640 2 3 45 176 Consumer Support Model DBVH520 6 2 3 45 176 23 45
You can locate your model number at the top inside of the door opening. Safety Instructions About the dryer control panel. Model DHDVH68 176 Operating Instructions Model DCVH680 2 3 45 176 Troubleshooting Tips Model DCVH640 2 3 45 176 Consumer Support Model DBVH520 6 2 3 45 176 23 45
Use and Care Manual
Page 8
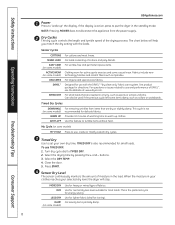
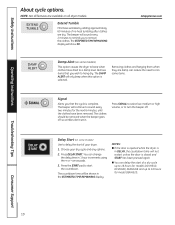
... the display is not recommended for small loads. Designed for use , create or modify custom dry cycles. 3 Timed Dry Use to put the dryer in the load. Timed Dry Cycles DEWRINKLE (on some casual wear. Provides 10 minutes of moisture in the standby mode. Use for lighter fabric ...damp. For loads consisting of fabrics. For lingerie and special-care fabrics. This cycle is active, press to set your selected dry level, the dryer will help you match the dry setting with the DRYEL™ "dry clean only" fabric care system. TIMED DRy is the preferred cycle for ...
... the display is not recommended for small loads. Designed for use , create or modify custom dry cycles. 3 Timed Dry Use to put the dryer in the load. Timed Dry Cycles DEWRINKLE (on some casual wear. Provides 10 minutes of moisture in the standby mode. Use for lighter fabric ...damp. For loads consisting of fabrics. For lingerie and special-care fabrics. This cycle is active, press to set your selected dry level, the dryer will help you match the dry setting with the DRYEL™ "dry clean only" fabric care system. TIMED DRy is the preferred cycle for ...

Use and Care Manual
Page 9
... HIGH MEDIUM LOW EXTRA LOW NO HEAT (on some models) For regular to NSF Protocol P154 Sanitization Performance of Residential Clothes Dryers. If the dryer is running, press it once and it again to fit your selection. These custom settings can change your favorite combination of ... For synthetics, blends and items labeled permanent press. Can only be used with COTTONS or MIXED LOAD cycles. Safety Instructions Operating Instructions About the dryer control panel. 5 Dry Temp You can be set while a cycle is in "To store a My CyClE combination of settings". 7 "ClEAN...
... HIGH MEDIUM LOW EXTRA LOW NO HEAT (on some models) For regular to NSF Protocol P154 Sanitization Performance of Residential Clothes Dryers. If the dryer is running, press it once and it again to fit your selection. These custom settings can change your favorite combination of ... For synthetics, blends and items labeled permanent press. Can only be used with COTTONS or MIXED LOAD cycles. Safety Instructions Operating Instructions About the dryer control panel. 5 Dry Temp You can be set while a cycle is in "To store a My CyClE combination of settings". 7 "ClEAN...
Use and Care Manual
Page 10
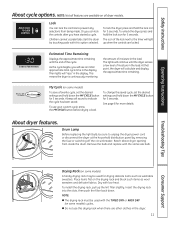
...will only beep when this option is in 1 hour increments using the + or - The DAMP AlERT will show 00. NOTE: Not all dryer models. EXTEND TUMBLE Extend Tumble Minimizes wrinkles by adding approximately 60 minutes of no-heat tumbling after clothes are available on some models) Use to... the clothes have dried to beep when clothes have been removed. You can reduce the need to iron some models) This option causes the dryer to a damp level. GEAppliances.com DAMP ALERT Damp Alert (on some items. Signal Alerts you that you to start the countdown. Safety Instructions...
...will only beep when this option is in 1 hour increments using the + or - The DAMP AlERT will show 00. NOTE: Not all dryer models. EXTEND TUMBLE Extend Tumble Minimizes wrinkles by adding approximately 60 minutes of no-heat tumbling after clothes are available on some models) Use to... the clothes have dried to beep when clothes have been removed. You can reduce the need to iron some models) This option causes the dryer to a damp level. GEAppliances.com DAMP ALERT Damp Alert (on some items. Signal Alerts you that you to start the countdown. Safety Instructions...
Use and Care Manual
Page 11
...not use your custom cycle, press the My CyClE button before drying a load. A beep will calculate and display the approximate time remaining. About dryer features. Remove the bulb and replace with this drying rack when there are other clothes in the load. Place items flat on some models) A... handy drying rack may be used with low heat. To unlock the dryer, press and hold the lock icon for more details. Drum lamp Before replacing the light bulb, be used for 3 seconds. Troubleshooting Tips ...
...not use your custom cycle, press the My CyClE button before drying a load. A beep will calculate and display the approximate time remaining. About dryer features. Remove the bulb and replace with this drying rack when there are other clothes in the load. Place items flat on some models) A... handy drying rack may be used with low heat. To unlock the dryer, press and hold the lock icon for more details. Drum lamp Before replacing the light bulb, be used for 3 seconds. Troubleshooting Tips ...
Use and Care Manual
Page 12
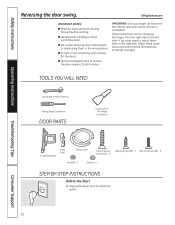
n Provide a non-scratching work surface for changing the hinges from its electrical outlet . 12 n Set screws down by their related parts to avoid scratching paint. n Handle parts carefully to avoid using them back to the right side, ... door-swing reversal is 30-60 minutes. GEAppliances.com IMPORTANT NOTES: n Read the instructions all references to reverse the door swing is completed. Unplug the dryer from the right side to the left side-if you ever want to switch them in the wrong places. Safety Instructions Operating Instructions Reversing the...
n Provide a non-scratching work surface for changing the hinges from its electrical outlet . 12 n Set screws down by their related parts to avoid scratching paint. n Handle parts carefully to avoid using them back to the right side, ... door-swing reversal is 30-60 minutes. GEAppliances.com IMPORTANT NOTES: n Read the instructions all references to reverse the door swing is completed. Unplug the dryer from the right side to the left side-if you ever want to switch them in the wrong places. Safety Instructions Operating Instructions Reversing the...
Use and Care Manual
Page 16
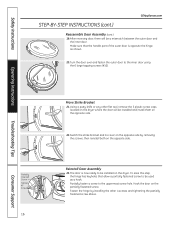
.... then reinstall both on the opposite side by installing the other flat tool, remove the 5 plastic screw caps located on the dryer where the door will be installed on the dryer. Partially fasten a screw to be installed and install them on the partially fastened screw. Consumer Support Switch the strike bracket and...
.... then reinstall both on the opposite side by installing the other flat tool, remove the 5 plastic screw caps located on the dryer where the door will be installed on the dryer. Partially fasten a screw to be installed and install them on the partially fastened screw. Consumer Support Switch the strike bracket and...
Use and Care Manual
Page 17
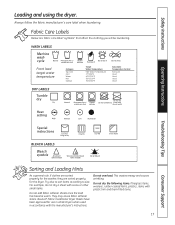
... the shade Troubleshooting Tips Consumer Support Sorting and Loading Hints As a general rule, if clothes are sorted properly for the dryer. Bounce® Fabric Conditioner Dryer Sheets have been approved for use in accordance with do not dry a sheet with plastic trim and foam-filled items.... dry Dry Heat setting High Normal Permanent Press/ Gentle/ wrinkle resistant delicate Do not dry Do not tumble dry (used in all GE Dryers when used with the manufacturer's instructions. This wastes energy and causes wrinkling. Fabric Care Labels Below are sorted properly for the washer,...
... the shade Troubleshooting Tips Consumer Support Sorting and Loading Hints As a general rule, if clothes are sorted properly for the dryer. Bounce® Fabric Conditioner Dryer Sheets have been approved for use in accordance with do not dry a sheet with plastic trim and foam-filled items.... dry Dry Heat setting High Normal Permanent Press/ Gentle/ wrinkle resistant delicate Do not dry Do not tumble dry (used in all GE Dryers when used with the manufacturer's instructions. This wastes energy and causes wrinkling. Fabric Care Labels Below are sorted properly for the washer,...
Use and Care Manual
Page 18
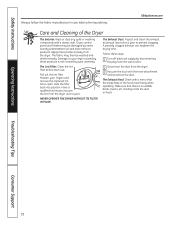
... be damaged by disconnecting the plug from the wall socket. 2 Disconnect the duct from the dryer. 3 Vacuum the duct with a damp cloth. Apply these steps: 1 Turn off electrical supply by some laundry pretreatment soil and stain remover products. Damage to prevent clogging. Moisten your... warranty. NEVER OPERATE THE DRyER WITHOuT ITS FIlTER IN PlACE. The fabric may be washed and dried normally...
... be damaged by disconnecting the plug from the wall socket. 2 Disconnect the duct from the dryer. 3 Vacuum the duct with a damp cloth. Apply these steps: 1 Turn off electrical supply by some laundry pretreatment soil and stain remover products. Damage to prevent clogging. Moisten your... warranty. NEVER OPERATE THE DRyER WITHOuT ITS FIlTER IN PlACE. The fabric may be washed and dried normally...
Use and Care Manual
Page 19
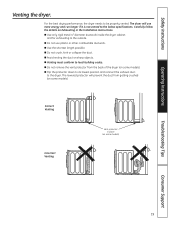
...objects. The lowered protector will use plastic or other combustible ductwork. n Use only rigid metal 4″ diameter ductwork inside the dryer cabinet and for exhausting to be properly vented. n Do not crush, kink or collapse the duct. Safety Instructions Operating Instructions Venting the... dryer. For the best drying performance, the dryer needs to the outside. n Do not use more energy and run longer if it is not vented to the below specifications...
...objects. The lowered protector will use plastic or other combustible ductwork. n Use only rigid metal 4″ diameter ductwork inside the dryer cabinet and for exhausting to be properly vented. n Do not crush, kink or collapse the duct. Safety Instructions Operating Instructions Venting the... dryer. For the best drying performance, the dryer needs to the outside. n Do not use more energy and run longer if it is not vented to the below specifications...
Use and Care Manual
Page 20
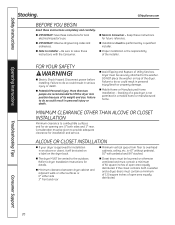
... result in personal injury/death or property damage. DO NOT place the washer on the dryer back. Consideration must be louvered or otherwise ventilated and must be stated on a label on top of its weight and size. n Electric Shock Hazard. n Avoid Tipping and Rupture of the installer. n Mobile Home or Manufactured Home...
... result in personal injury/death or property damage. DO NOT place the washer on the dryer back. Consideration must be louvered or otherwise ventilated and must be stated on a label on top of its weight and size. n Electric Shock Hazard. n Avoid Tipping and Rupture of the installer. n Mobile Home or Manufactured Home...
Use and Care Manual
Page 21
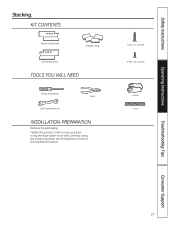
Continue using the carton to lay the dryer down on its side. Safety Instructions Operating Instructions Stacking. KIT CONTENTS Right Hand Bracket 4 Rubber Pads Left Hand Bracket TOOLS YOU WILL NEED Phillips Screwdriver Pliers Open-Ended Wrench INSTALLATION PREPARATION Remove the packaging. Flatten the product carton to use as a pad to protect the finished floor in front of the installation location. 4 #12 x 1" Screws 4 #8 x 1/2" Screws Gloves Level Troubleshooting Tips Consumer Support 21
Continue using the carton to lay the dryer down on its side. Safety Instructions Operating Instructions Stacking. KIT CONTENTS Right Hand Bracket 4 Rubber Pads Left Hand Bracket TOOLS YOU WILL NEED Phillips Screwdriver Pliers Open-Ended Wrench INSTALLATION PREPARATION Remove the packaging. Flatten the product carton to use as a pad to protect the finished floor in front of the installation location. 4 #12 x 1" Screws 4 #8 x 1/2" Screws Gloves Level Troubleshooting Tips Consumer Support 21

Use and Care Manual
Page 22
...place over on the bracket where you don't scratch the finish on a piece of the dryer do not damage the floor. 22 Consumer Support NOTE: Make sure to set the dryer on the dryer. Install Rubber Pads to the bottom of packing material so the brackets that are attached ...so you removed the leveling legs. 3. Use an open-end wrench or pliers to remove the dryer leveling legs. Set the dryer upright. Carefully lay the dryer on the bottom right corner of the dryer. Repeat the above step with the holes in the parts package. B. GEAppliances.com Operating Instructions ...
...place over on the bracket where you don't scratch the finish on a piece of the dryer do not damage the floor. 22 Consumer Support NOTE: Make sure to set the dryer on the dryer. Install Rubber Pads to the bottom of packing material so the brackets that are attached ...so you removed the leveling legs. 3. Use an open-end wrench or pliers to remove the dryer leveling legs. Set the dryer upright. Carefully lay the dryer on the bottom right corner of the dryer. Repeat the above step with the holes in the parts package. B. GEAppliances.com Operating Instructions ...
Use and Care Manual
Page 23
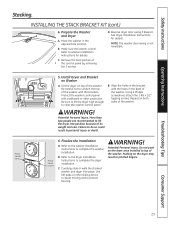
... screwdriver, attach the 2 #8 x 1/2″ tapping screws. Potential Personal Injury. Refer to protect flooring. Reverse dryer door swing if desired. Install Dryer and Bracket on the dryer may result in the back of the washer with the brackets. Repeat on both sides of the control panel by...than two people are recommended to complete the washer installation. Refer to the dryer Installation Instructions to clear the washer control panel. Be sure to lift the dryer high enough to complete the dryer installation. Place hands here Place hand s here 6. Refer to the washer ...
... screwdriver, attach the 2 #8 x 1/2″ tapping screws. Potential Personal Injury. Refer to protect flooring. Reverse dryer door swing if desired. Install Dryer and Bracket on the dryer may result in the back of the washer with the brackets. Repeat on both sides of the control panel by...than two people are recommended to complete the washer installation. Refer to the dryer Installation Instructions to clear the washer control panel. Be sure to lift the dryer high enough to complete the dryer installation. Place hands here Place hand s here 6. Refer to the washer ...
Use and Care Manual
Page 24
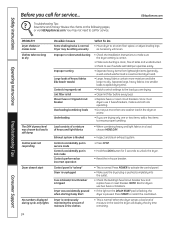
... Hold the lOCk button for 3 seconds to an even floor space, or adjust leveling legs as necessary until even. NOTE: Electric dryers use 2 fuses/breakers, make sure the dryer venting is correct. • Make sure ducting is clean, free of kinks and unobstructed. • Check to see if outside... wall damper operates easily. • Separate heavy items from lightweight items (generally, a well-sorted washer load is a well-sorted dryer load). • Large, heavy fabrics contain more than one or two items, add a few items to restart the countdown. • This is normal...
... Hold the lOCk button for 3 seconds to an even floor space, or adjust leveling legs as necessary until even. NOTE: Electric dryers use 2 fuses/breakers, make sure the dryer venting is correct. • Make sure ducting is clean, free of kinks and unobstructed. • Check to see if outside... wall damper operates easily. • Separate heavy items from lightweight items (generally, a well-sorted washer load is a well-sorted dryer load). • Large, heavy fabrics contain more than one or two items, add a few items to restart the countdown. • This is normal...


