
Owners Manual
Page 1
... Cover Warranty 15 Owner's Manual DBLR333 DBSR463 DBXR463 DHDSR46 DJXR433 DLLSR33 DLSR483 DQSR483 DRSR483 DRSR495 DVLR223 DWSR463 DWSR483 DWXR463 DWXR483 DX2300 DX4500 EED4500 EGD4500 Write the model and serial numbers here: Model Serial You can find them on a label on the front of the dryer behind the door. 175D1807P578 49-90310 10-06 JR Dryers ge.com Safety Instructions 2-4 Operating Instructions Control Panel 5, 6 Control Settings 7 Features 8 Loading and Using the Dryer 10-11 Reversing...
... Cover Warranty 15 Owner's Manual DBLR333 DBSR463 DBXR463 DHDSR46 DJXR433 DLLSR33 DLSR483 DQSR483 DRSR483 DRSR495 DVLR223 DWSR463 DWSR483 DWXR463 DWXR483 DX2300 DX4500 EED4500 EGD4500 Write the model and serial numbers here: Model Serial You can find them on a label on the front of the dryer behind the door. 175D1807P578 49-90310 10-06 JR Dryers ge.com Safety Instructions 2-4 Operating Instructions Control Panel 5, 6 Control Settings 7 Features 8 Loading and Using the Dryer 10-11 Reversing...

Owners Manual
Page 2
... Installation Instructions before it will minimize incomplete combustion. I Connect to a properly rated, protected and sized power supply circuit to the outside . 2 Use only rigid metal 4″ diameter ductwork inside the dryer cabinet. I Properly ground dryer to the outside . Use only rigid metal or flexible metal 4″ diameter ductwork for exhausting to avoid electrical overload. USE OF PLASTIC OR OTHER COMBUSTIBLE DUCTWORK CAN CAUSE A FIRE. Troubleshooting...
... Installation Instructions before it will minimize incomplete combustion. I Connect to a properly rated, protected and sized power supply circuit to the outside . 2 Use only rigid metal 4″ diameter ductwork inside the dryer cabinet. I Properly ground dryer to the outside . Use only rigid metal or flexible metal 4″ diameter ductwork for exhausting to avoid electrical overload. USE OF PLASTIC OR OTHER COMBUSTIBLE DUCTWORK CAN CAUSE A FIRE. Troubleshooting...

Owners Manual
Page 3
... or disconnect the dryer at the household distribution panel by or near the dryer until the drum has completely stopped. I Do not store plastic, paper or clothing that could result from the power supply. I Do not dry articles containing rubber, plastic or similar materials such as cleaning cloths, mops, towels used by removing the fuse or switching off the circuit breaker before each load to catch...
... or disconnect the dryer at the household distribution panel by or near the dryer until the drum has completely stopped. I Do not store plastic, paper or clothing that could result from the power supply. I Do not dry articles containing rubber, plastic or similar materials such as cleaning cloths, mops, towels used by removing the fuse or switching off the circuit breaker before each load to catch...

Owners Manual
Page 4
... attempt any servicing unless specifically recommended in your dryer. See the Loading and Using the Dryer section. I Do not tamper with an automatic electric ignition and does not have the skills to soften your hand in them by a qualified technician. Service or performance problems caused by use either a fabric softener in the wash cycle, according to this Owner's Manual or in published user-repair instructions that...
... attempt any servicing unless specifically recommended in your dryer. See the Loading and Using the Dryer section. I Do not tamper with an automatic electric ignition and does not have the skills to soften your hand in them by a qualified technician. Service or performance problems caused by use either a fabric softener in the wash cycle, according to this Owner's Manual or in published user-repair instructions that...

Owners Manual
Page 5
ge.com You can locate your model. Model DVLR223 3 Model DX2300 AUTOMATIC REGULAR HEAT 2 MEDIUM HEAT 3 2 Models DBSR463, DBXR463, DHDSR46 and DX4500 Optional features (on the front of exhaust ducts. 5 Throughout this manual, features and appearance may vary from your model number on the label on some models) 3 1 2 Model DBLR333 3 1 2 NOTE: Drying times will vary according to the type of heat used (Electric, Natural or LP gas), size of load, types of fabrics, wetness of clothes and condition of the dryer behind the door. About the dryer control panel.
ge.com You can locate your model. Model DVLR223 3 Model DX2300 AUTOMATIC REGULAR HEAT 2 MEDIUM HEAT 3 2 Models DBSR463, DBXR463, DHDSR46 and DX4500 Optional features (on the front of exhaust ducts. 5 Throughout this manual, features and appearance may vary from your model number on the label on some models) 3 1 2 Model DBLR333 3 1 2 NOTE: Drying times will vary according to the type of heat used (Electric, Natural or LP gas), size of load, types of fabrics, wetness of clothes and condition of the dryer behind the door. About the dryer control panel.

Owners Manual
Page 6
... vary according to the type of heat used (Electric, Natural or LP gas), size of load, 6 types of fabrics, wetness of clothes and condition of the dryer behind the door. Throughout this manual, features and appearance may vary from your model number on the label on some models) 3 1 2 Models EED4500 and EGD4500 3 1 2 Model DLLSR33 3 1 2 Model DRSR495 1 2 3 Models DQSR483, DRSR483, DWSR463 and DWXR463 Optional features (on the front of exhaust ducts. About the dryer control panel.
... vary according to the type of heat used (Electric, Natural or LP gas), size of load, 6 types of fabrics, wetness of clothes and condition of the dryer behind the door. Throughout this manual, features and appearance may vary from your model number on the label on some models) 3 1 2 Models EED4500 and EGD4500 3 1 2 Model DLLSR33 3 1 2 Model DRSR495 1 2 3 Models DQSR483, DRSR483, DWSR463 and DWXR463 Optional features (on the front of exhaust ducts. About the dryer control panel.

Owners Manual
Page 7
... knits. DEWRINKLE For removing wrinkles from items that are very lightly damp. Select START. Troubleshooting Tips Consumer Support 7 DAMP DRY For leaving items partially damp. Use with an *. Provides 10 minutes of clothing labeled permanent press. 1 Choose the FABRIC CARE setting-for this load it would be the EASY CARE AUTOMATIC. HEAT DELICATES On some models) Select the correct FABRIC CARE setting. Timed cycles run for a selected time. 2 Drying Cycles COTTONS For cottons...
... knits. DEWRINKLE For removing wrinkles from items that are very lightly damp. Select START. Troubleshooting Tips Consumer Support 7 DAMP DRY For leaving items partially damp. Use with an *. Provides 10 minutes of clothing labeled permanent press. 1 Choose the FABRIC CARE setting-for this load it would be the EASY CARE AUTOMATIC. HEAT DELICATES On some models) Select the correct FABRIC CARE setting. Timed cycles run for a selected time. 2 Drying Cycles COTTONS For cottons...
Owners Manual
Page 8
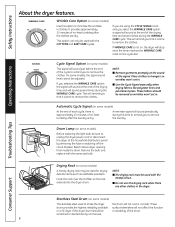
... the dryer drum provides the highest reliability available in a GE dryer. I Use the Cycle Signal especially when drying fabrics like polyester knits and permanent press. Place clothes on , the dryer will sound just before the end of no -heat tumbling after the laundry is time to remove the clothes. Troubleshooting Tips Drying Rack (on some models) Before replacing the light bulb, be removed so wrinkles won 't set in clothes. Consumer Support Stainless Steel Drum (on some models...
... the dryer drum provides the highest reliability available in a GE dryer. I Use the Cycle Signal especially when drying fabrics like polyester knits and permanent press. Place clothes on , the dryer will sound just before the end of no -heat tumbling after the laundry is time to remove the clothes. Troubleshooting Tips Drying Rack (on some models) Before replacing the light bulb, be removed so wrinkles won 't set in clothes. Consumer Support Stainless Steel Drum (on some models...

Owners Manual
Page 9
... the side from which the door was removed. Reinsert the plastic plugs on the dryer face. Tighten the two top screws of the door and the other hand holding the bottom, remove the door from each hinge. Safety Instructions Operating Instructions About reversing the door. ge.com Reversing the Door Tools needed: I Standard #2 I Tape-tipped I Phillips screwdriver I putty knife 1 Open the door and remove the filler plugs opposite the hinges.
... the side from which the door was removed. Reinsert the plastic plugs on the dryer face. Tighten the two top screws of the door and the other hand holding the bottom, remove the door from each hinge. Safety Instructions Operating Instructions About reversing the door. ge.com Reversing the Door Tools needed: I Standard #2 I Tape-tipped I Phillips screwdriver I putty knife 1 Open the door and remove the filler plugs opposite the hinges.

Owners Manual
Page 10
... not covered by disconnecting the plug from the wall socket. 2 Disconnect the duct from the dryer once a year. Dryer control panel and finishes may be washed and dried normally. The fabric may cause fabric softener stains. Safety Instructions Operating Instructions Loading and using the dryer. The Exhaust Duct: Inspect and clean the exhaust ducting at least once a year to your warranty. The Exhaust Hood: Check from the dryer. Always follow the fabric manufacturer's care...
... not covered by disconnecting the plug from the wall socket. 2 Disconnect the duct from the dryer once a year. Dryer control panel and finishes may be washed and dried normally. The fabric may cause fabric softener stains. Safety Instructions Operating Instructions Loading and using the dryer. The Exhaust Duct: Inspect and clean the exhaust ducting at least once a year to your warranty. The Exhaust Hood: Check from the dryer. Always follow the fabric manufacturer's care...

Owners Manual
Page 11
... Venting 11 Troubleshooting Tips Consumer Support I Use the shortest length possible. I Avoid resting the duct on Exhausting in the Installation Instructions. I Do not crush or collapse. The dryer will use plastic or other combustible ductwork. Carefully follow the details on sharp objects. I Do not use more energy and run longer if it is not vented to the outside. Safety Instructions Operating Instructions ge.com Venting the Dryer For the best drying performance, the dryer needs...
... Venting 11 Troubleshooting Tips Consumer Support I Use the shortest length possible. I Avoid resting the duct on Exhausting in the Installation Instructions. I Do not crush or collapse. The dryer will use plastic or other combustible ductwork. Carefully follow the details on sharp objects. I Do not use more energy and run longer if it is not vented to the outside. Safety Instructions Operating Instructions ge.com Venting the Dryer For the best drying performance, the dryer needs...
Owners Manual
Page 12
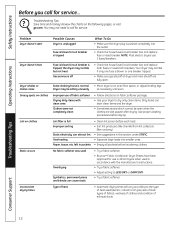
... noise Greasy spots on clothes Lint on the following pages, or visit ge.com. Improper use 2 fuses/breakers. Safety Instructions Operating Instructions Before you call for service... left in pockets • Clean lint screen before each load. • Sort lint producers (like chenille) from lint collectors (like corduroy). • See suggestions in this section under STATIC. • Separate large loads into the outlet. • Check the house fuse/circuit breaker box and replace fuse or reset breaker. Troubleshooting...
... noise Greasy spots on clothes Lint on the following pages, or visit ge.com. Improper use 2 fuses/breakers. Safety Instructions Operating Instructions Before you call for service... left in pockets • Clean lint screen before each load. • Sort lint producers (like chenille) from lint collectors (like corduroy). • See suggestions in this section under STATIC. • Separate large loads into the outlet. • Check the house fuse/circuit breaker box and replace fuse or reset breaker. Troubleshooting...

Owners Manual
Page 13
Select a LESS DRY or DAMP DRY setting. • Remove items when cycle ends and fold or hang immediately. • Separate large loads into smaller loads to speed drying time. • Match control settings to the load you are drying only one washer load in the dryer at a time. • If you are drying. • Clean lint filter before every load. • Check installation instructions for proper ducting/venting. • Make sure ducting is clean, free of kinks and unobstructed. • Check to...
Select a LESS DRY or DAMP DRY setting. • Remove items when cycle ends and fold or hang immediately. • Separate large loads into smaller loads to speed drying time. • Match control settings to the load you are drying only one washer load in the dryer at a time. • If you are drying. • Clean lint filter before every load. • Check installation instructions for proper ducting/venting. • Make sure ducting is clean, free of kinks and unobstructed. • Check to...
Owners Manual
Page 14
Notes. 14 Consumer Support Troubleshooting Tips Operating Instructions Safety Instructions
Notes. 14 Consumer Support Troubleshooting Tips Operating Instructions Safety Instructions

Owners Manual
Page 15
... freezing temperatures. I Replacement of house fuses or resetting of circuit breakers. I Improper installation, delivery or maintenance. I Replacement of God. All warranty service provided by a GE Authorized Servicer is located in an area where service by our Factory Service Centers, or an authorized Customer Care® technician. Staple your state's Attorney General. I Product not accessible to the product caused by accident, fire, floods or acts of the light bulb. I Damage to provide required service...
... freezing temperatures. I Replacement of house fuses or resetting of circuit breakers. I Improper installation, delivery or maintenance. I Replacement of God. All warranty service provided by a GE Authorized Servicer is located in an area where service by our Factory Service Centers, or an authorized Customer Care® technician. Staple your state's Attorney General. I Product not accessible to the product caused by accident, fire, floods or acts of the light bulb. I Damage to provide required service...

Owners Manual
Page 16
... unsafe operation. ge.com Printed in effect. For details of your warranty, should be there after your door. Parts and Accessories ge.com Individuals qualified to their homes (VISA, MasterCard and Discover cards are not satisfied with the service you can have parts or accessories sent directly to service their own appliances can now download Owner's Manuals, order parts or even schedule service on -line today...
... unsafe operation. ge.com Printed in effect. For details of your warranty, should be there after your door. Parts and Accessories ge.com Individuals qualified to their homes (VISA, MasterCard and Discover cards are not satisfied with the service you can have parts or accessories sent directly to service their own appliances can now download Owner's Manuals, order parts or even schedule service on -line today...


