
Installation Instructions
Page 1
...instructions completely and carefully. • IMPORTANT- Gas appliances can be minimized further by a qualified installer. • Install the clothes dryer according to these instructions with National Fuel Gas Code, ANSIZ223.1/NFPA 54 or the Canadian Natural Gas and Propane Installation Code, CSA ... state to cause cancer, birth defects or other reproductive harm and requires businesses to warn customers of the dryer control system. Properly adjusted dryers will obstruct dryer airflow and increase the risk of severe injury or death, follow all governing codes and ordinances. •...
...instructions completely and carefully. • IMPORTANT- Gas appliances can be minimized further by a qualified installer. • Install the clothes dryer according to these instructions with National Fuel Gas Code, ANSIZ223.1/NFPA 54 or the Canadian Natural Gas and Propane Installation Code, CSA ... state to cause cancer, birth defects or other reproductive harm and requires businesses to warn customers of the dryer control system. Properly adjusted dryers will obstruct dryer airflow and increase the risk of severe injury or death, follow all governing codes and ordinances. •...

Installation Instructions
Page 2
...thread plugged tapping, accessible for use with UL listed transition duct. clearance both sides and 1 in . This will allow better access when installing dryer exhaust DISCONNECTING GAS TURN GAS SHUT-OFF VALVE TO THE OFF POSITION. GAS SUPPLY • A 1/8-in . DISCONNECT AND DISCARD OLD FLEXIBLE ...GAS CONNECTOR AND OLD DUCTING MATERIAL. Consideration must be 1/2-in their absence, the NATIONAL FUEL GAS CODE, ANSI Z223. • This gas dryer is to provide adequate clearance for use only with an accessible shut-off within 6 ft . of the plugged tapping. • Supply line...
...thread plugged tapping, accessible for use with UL listed transition duct. clearance both sides and 1 in . This will allow better access when installing dryer exhaust DISCONNECTING GAS TURN GAS SHUT-OFF VALVE TO THE OFF POSITION. GAS SUPPLY • A 1/8-in . DISCONNECT AND DISCARD OLD FLEXIBLE ...GAS CONNECTOR AND OLD DUCTING MATERIAL. Consideration must be 1/2-in their absence, the NATIONAL FUEL GAS CODE, ANSI Z223. • This gas dryer is to provide adequate clearance for use only with an accessible shut-off within 6 ft . of the plugged tapping. • Supply line...

Installation Instructions
Page 3
... TO ALL MALE THREADS. Check all connections using two adjustable wrenches. If leaks are not to pipe threads. APPLY PIPE COMPOUND TO THE ADAPTER AND DRYER GAS INLET.
... TO ALL MALE THREADS. Check all connections using two adjustable wrenches. If leaks are not to pipe threads. APPLY PIPE COMPOUND TO THE ADAPTER AND DRYER GAS INLET.

Installation Instructions
Page 4
...DUCT DIAMETER IS 4 IN (102mm). Using exhaust longer than specified length will: • Increase the drying times and the energy cost. • Reduce the dryer life. • Accumulate lint, creating a potential fire hazard. The maximum exhaust length for short run installations 4" DIA. 4" DIA. 4" DIA. This could...EXTERNAL GROUND WIRE (NOT PROVIDED), WHICH MEETS LOCAL CODES, MAY BE ADDED BY ATTACHING TO THE GREEN GROUND SCREW ON THE REAR OF THE DRYER, AND TO A GROUNDED METAL COLD WATER PIPE OR OTHER ESTABLISHED GROUND. SEALING OF JOINTS • All joints should be insulated to avoid...
...DUCT DIAMETER IS 4 IN (102mm). Using exhaust longer than specified length will: • Increase the drying times and the energy cost. • Reduce the dryer life. • Accumulate lint, creating a potential fire hazard. The maximum exhaust length for short run installations 4" DIA. 4" DIA. 4" DIA. This could...EXTERNAL GROUND WIRE (NOT PROVIDED), WHICH MEETS LOCAL CODES, MAY BE ADDED BY ATTACHING TO THE GREEN GROUND SCREW ON THE REAR OF THE DRYER, AND TO A GROUNDED METAL COLD WATER PIPE OR OTHER ESTABLISHED GROUND. SEALING OF JOINTS • All joints should be insulated to avoid...
Installation Instructions
Page 5
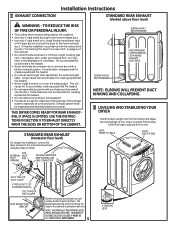
... once a year. These fasteners can accumulate lint, creating a potential fire hazard. • Never install a screen in any fasteners that the dryer is level from moving too close to accumulate, creating a potential fire hazard. • Do not assemble ductwork with a kitchen exhaust system. ELBOW... CONNECTION STANDARD REAR EXHAUST (Vented above floor level) WARNING - TO REDUCE THE RISK OF FIRE OR PERSONAL INJURY: • This clothes dryer must be installed in accordance with the instructions found in the exhaust length table. A combination of a building. This will cause lint to...
... once a year. These fasteners can accumulate lint, creating a potential fire hazard. • Never install a screen in any fasteners that the dryer is level from moving too close to accumulate, creating a potential fire hazard. • Do not assemble ductwork with a kitchen exhaust system. ELBOW... CONNECTION STANDARD REAR EXHAUST (Vented above floor level) WARNING - TO REDUCE THE RISK OF FIRE OR PERSONAL INJURY: • This clothes dryer must be installed in accordance with the instructions found in the exhaust length table. A combination of a building. This will cause lint to...

Installation Instructions
Page 6
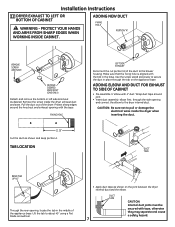
...used AND where a 4" diameter can be vented to the exhaust pipe with AMERICAN NATIONAL STANDARD FOR MOBILE HOME, NO. 501B. • The dryer MUST be used . • Never install flexible metal duct in walls, ceilings, floors or other surfaces is highly recommended (see illustrations below).... of open area equally distributed. • The closet should not exceed 8 feet (2.4m). • Avoid resting the duct on the dryer back. • The dryer MUST be vented to the outdoors. for maximum airflow. 4. Slide one end of open area equally distributed. Cut off and remove excess...
...used AND where a 4" diameter can be vented to the exhaust pipe with AMERICAN NATIONAL STANDARD FOR MOBILE HOME, NO. 501B. • The dryer MUST be used . • Never install flexible metal duct in walls, ceilings, floors or other surfaces is highly recommended (see illustrations below).... of open area equally distributed. • The closet should not exceed 8 feet (2.4m). • Avoid resting the duct on the dryer back. • The dryer MUST be vented to the outdoors. for maximum airflow. 4. Slide one end of open area equally distributed. Cut off and remove excess...
Installation Instructions
Page 7
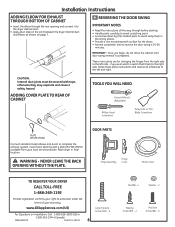
...screwdriver. • Apply duct tape as shown on the appliance base. CAUTION: Be sure not to pull or damage the electrical wires inside the dryer exhaust duct and save. ADDING ELBOW AND DUCT FOR EXHAUST TO SIDE OF CABINET • Pre-assemble 4" elbow with the tab in the ...duct out of the appliance base. Wrap duct tape around the knockout and exhaust opening , locate the tab in the base. Installation Instructions 12 DRYER EXHAUST TO LEFT OR BOTTOM OF CABINET WARNING - PROTECT YOUR HANDS AND ARMS FROM SHARP EDGES WHEN WORKING INSIDE CABINET. ADDING NEW DUCT FIXING...
...screwdriver. • Apply duct tape as shown on the appliance base. CAUTION: Be sure not to pull or damage the electrical wires inside the dryer exhaust duct and save. ADDING ELBOW AND DUCT FOR EXHAUST TO SIDE OF CABINET • Pre-assemble 4" elbow with the tab in the ...duct out of the appliance base. Wrap duct tape around the knockout and exhaust opening , locate the tab in the base. Installation Instructions 12 DRYER EXHAUST TO LEFT OR BOTTOM OF CABINET WARNING - PROTECT YOUR HANDS AND ARMS FROM SHARP EDGES WHEN WORKING INSIDE CABINET. ADDING NEW DUCT FIXING...
Installation Instructions
Page 8
... (#10) ... 6 Nut (#8) - 2 Washer - 2 Tapping Screw (#8) ... 2 Machine Screw (#8) ... 6 DOOR PARTS Hinge Assembly Hinge Cover Plastic Cover TO REGISTER YOUR DRYER CALL TOLL-FREE 1-888-269-1192 Prompt registration confirms your right to protection under the terms of your local service provider. IMPORTANT: Once you ever... want to switch them in final location. WARNING - Place dryer in the wrong places. • Provide a non-scratching work surface for changing the hinges from your warranty. NEVER LEAVE THE...
... (#10) ... 6 Nut (#8) - 2 Washer - 2 Tapping Screw (#8) ... 2 Machine Screw (#8) ... 6 DOOR PARTS Hinge Assembly Hinge Cover Plastic Cover TO REGISTER YOUR DRYER CALL TOLL-FREE 1-888-269-1192 Prompt registration confirms your right to protection under the terms of your local service provider. IMPORTANT: Once you ever... want to switch them in final location. WARNING - Place dryer in the wrong places. • Provide a non-scratching work surface for changing the hinges from your warranty. NEVER LEAVE THE...
Installation Instructions
Page 9
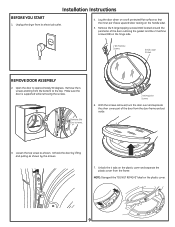
... starting from the door frame and set aside. 3. Unlock the 4 tabs on the hinge side. 2 #8 Machine Screws 6 #10 Large Screws REMOVE DOOR ASSEMBLY 2. Unplug the dryer from the frame. Lay the door down on a soft protected flat surface so that the inner part faces upward (door resting on the plastic cover...
... starting from the door frame and set aside. 3. Unlock the 4 tabs on the hinge side. 2 #8 Machine Screws 6 #10 Large Screws REMOVE DOOR ASSEMBLY 2. Unplug the dryer from the frame. Lay the door down on a soft protected flat surface so that the inner part faces upward (door resting on the plastic cover...

Installation Instructions
Page 12
... or any other information, refer to the uppermost screw hole. For replacement parts and other flat tool, remove the 5 plastic screw caps located on the dryer where the door will be installed on the opposite side. 14 SERVICING WARNING - REINSTALL DOOR ASSEMBLY 23. Turn the door over and fasten the outer... hinge by removing the screws; The door is now ready to the inner door using the 6 large tapping screws (#10). then reinstall both on the dryer. Installation Instructions 20.
... or any other information, refer to the uppermost screw hole. For replacement parts and other flat tool, remove the 5 plastic screw caps located on the dryer where the door will be installed on the opposite side. 14 SERVICING WARNING - REINSTALL DOOR ASSEMBLY 23. Turn the door over and fasten the outer... hinge by removing the screws; The door is now ready to the inner door using the 6 large tapping screws (#10). then reinstall both on the dryer. Installation Instructions 20.


