Use and Care Manual
Page 1
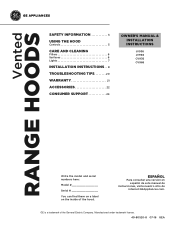
... español de este manual de instrucciones, visite nuestro sitio de internet GEAppliances.com. Vented RANGE HOODS SAFETY INFORMATION 3 USING THE HOOD Controls 5 CARE AND CLEANING Filters 6 Surfaces 6 Lights 7 INSTALLATION INSTRUCTIONS . . 8 TROUBLESHOOTING TIPS 20 WARRANTY 21 ACCESSORIES 22 CONSUMER SUPPORT 24 OWNER'S MANUAL & INSTALLATION INSTRUCTIONS JV936 JV966 CV936 CV966 Write the model and serial numbers here: Model Serial You can find them on a label on the inside of the General Electric Company. Manufactured under trademark license...
... español de este manual de instrucciones, visite nuestro sitio de internet GEAppliances.com. Vented RANGE HOODS SAFETY INFORMATION 3 USING THE HOOD Controls 5 CARE AND CLEANING Filters 6 Surfaces 6 Lights 7 INSTALLATION INSTRUCTIONS . . 8 TROUBLESHOOTING TIPS 20 WARRANTY 21 ACCESSORIES 22 CONSUMER SUPPORT 24 OWNER'S MANUAL & INSTALLATION INSTRUCTIONS JV936 JV966 CV936 CV966 Write the model and serial numbers here: Model Serial You can find them on a label on the inside of the General Electric Company. Manufactured under trademark license...

Use and Care Manual
Page 3
... duct air outside. READ AND SAVE THESE INSTRUCTIONS 49-80520-8 3 Heat oils slowly on high heat or when flambéing food (i.e. Clean ventilating fans frequently. Before servicing or cleaning unit, switch power off the burner. B. Never leave surface units unattended at service panel and lock the service disconnecting means to the service panel. B. C. D. SAFETY INFORMATION IMPORTANT SAFETY INFORMATION READ ALL INSTRUCTIONS BEFORE USING WARNING TO REDUCE THE RISK OF FIRE, ELECTRIC...
... duct air outside. READ AND SAVE THESE INSTRUCTIONS 49-80520-8 3 Heat oils slowly on high heat or when flambéing food (i.e. Clean ventilating fans frequently. Before servicing or cleaning unit, switch power off the burner. B. Never leave surface units unattended at service panel and lock the service disconnecting means to the service panel. B. C. D. SAFETY INFORMATION IMPORTANT SAFETY INFORMATION READ ALL INSTRUCTIONS BEFORE USING WARNING TO REDUCE THE RISK OF FIRE, ELECTRIC...

Use and Care Manual
Page 4
... person(s) in accordance with all parts. When cutting or drilling into wall or ceiling, do not damage electrical wiring and other servicing should be done by the National Fire Protection Association (NFPA), the American Society for available makeup air solutions. D. Ducted fans must be vented to a qualified technician. Turn off breaker to prevent back drafting. How to repair or replace any sharp items to soak...
... person(s) in accordance with all parts. When cutting or drilling into wall or ceiling, do not damage electrical wiring and other servicing should be done by the National Fire Protection Association (NFPA), the American Society for available makeup air solutions. D. Ducted fans must be vented to a qualified technician. Turn off breaker to prevent back drafting. How to repair or replace any sharp items to soak...
Use and Care Manual
Page 6
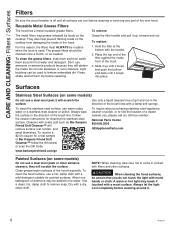
... will darken the metal. CAUTION When cleaning the hood surfaces, be used . CARE AND CLEANING: Filters / Surfaces Filters Be sure the circuit breaker is used to remove soap. Surfaces Stainless Steel Surfaces (on the cooktop. they will scratch the surface. Slide it snaps into place. To clean the grease filters, soak them and then swish them dry before cleaning or servicing any part of the brush lines with the...
... will darken the metal. CAUTION When cleaning the hood surfaces, be used . CARE AND CLEANING: Filters / Surfaces Filters Be sure the circuit breaker is used to remove soap. Surfaces Stainless Steel Surfaces (on the cooktop. they will scratch the surface. Slide it snaps into place. To clean the grease filters, soak them and then swish them dry before cleaning or servicing any part of the brush lines with the...

Use and Care Manual
Page 8
..., USE ONLY METAL DUCT WORK. E. INSTALLATION INSTRUCTIONS Installation Instructions Range Hoods "If you have questions, call GE Appliances at 800.GE.CARES (800.432.2737) or visit our website at the main circuit breaker or fuse box before installing. 8 49-80520-8 Be sure to leave these instructions completely and carefully. • IMPORTANT - WARNING TO REDUCE THE RISK OF FIRE, ELECTRIC SHOCK OR INJURY TO PERSONS, OBSERVE THE FOLLOWING: A. Ducted fans must...
..., USE ONLY METAL DUCT WORK. E. INSTALLATION INSTRUCTIONS Installation Instructions Range Hoods "If you have questions, call GE Appliances at 800.GE.CARES (800.432.2737) or visit our website at the main circuit breaker or fuse box before installing. 8 49-80520-8 Be sure to leave these instructions completely and carefully. • IMPORTANT - WARNING TO REDUCE THE RISK OF FIRE, ELECTRIC SHOCK OR INJURY TO PERSONS, OBSERVE THE FOLLOWING: A. Ducted fans must...

Use and Care Manual
Page 9
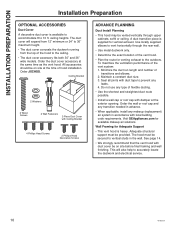
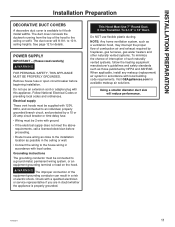
Use of the duct cover requires special consideration to the installation height above the cooking space. See page 12 for details. 49-80520-8 9 INSTALLATION PREPARATION Installation Preparation PRODUCT DIMENSIONS 12" 18" INSTALLATION CLEARANCES These vent hoods are designed to be concealed in the soffit or upper cabinetry. SOFFIT INSTALLATION SOFFIT 21" 30" Models Requires a 30" opening . 35-7/8" 24" Required Minimum and 36" Recommended Maximum For this installation, the ductwork running from...
Use of the duct cover requires special consideration to the installation height above the cooking space. See page 12 for details. 49-80520-8 9 INSTALLATION PREPARATION Installation Preparation PRODUCT DIMENSIONS 12" 18" INSTALLATION CLEARANCES These vent hoods are designed to be concealed in the soffit or upper cabinetry. SOFFIT INSTALLATION SOFFIT 21" 30" Models Requires a 30" opening . 35-7/8" 24" Required Minimum and 36" Recommended Maximum For this installation, the ductwork running from...
Use and Care Manual
Page 10
.... ceiling heights. Ceiling Bracket 2 Washers 2 Wood Screws 2 Wall Fasteners 2-Piece Duct Cover with duct cover be provided. Visit GEAppliances.com for venting exhaust to vertical studs in accordance with duct tape to 10 ft. The duct cover will also help to vent horizontally through upper cabinets, soffit or ceiling. Order JXCHSS. Use locally supplied elbows to accurately locate the ductwork and electrical service. 10 49-80520-8 Order the wall or roof cap and any transition needed in...
.... ceiling heights. Ceiling Bracket 2 Washers 2 Wood Screws 2 Wall Fasteners 2-Piece Duct Cover with duct cover be provided. Visit GEAppliances.com for venting exhaust to vertical studs in accordance with duct tape to 10 ft. The duct cover will also help to vent horizontally through upper cabinets, soffit or ceiling. Order JXCHSS. Use locally supplied elbows to accurately locate the ductwork and electrical service. 10 49-80520-8 Order the wall or roof cap and any transition needed in...
Use and Care Manual
Page 11
... beginning installation. Follow National Electrical Codes or prevailing local codes and ordinances. ceiling heights. Electrical supply These vent hoods must be supplied with a qualified electrician or service representative if you are in accordance with this appliance. Visit GEAppliances.com for details. See page 12 for available makeup air solutions. Do NOT use an extension cord or adapter plug with local building code requirements. Using a smaller diameter duct size will...
... beginning installation. Follow National Electrical Codes or prevailing local codes and ordinances. ceiling heights. Electrical supply These vent hoods must be supplied with a qualified electrician or service representative if you are in accordance with this appliance. Visit GEAppliances.com for details. See page 12 for available makeup air solutions. Do NOT use an extension cord or adapter plug with local building code requirements. Using a smaller diameter duct size will...
Use and Care Manual
Page 12
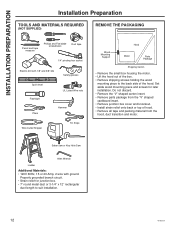
... Spirit level Flashlight Pliers UL Listed Wire nuts Hammer Wire Cutter/Stripper Tin Snips Wood Mounting Support Hood Motor Parts Package Shipping Carton • Remove the small box housing the motor. • Lift the hood out of the box. • Remove shipping screws holding the wood mounting piece to suit installation. 12 49-80520-8 Do not discard. • Remove the "V" shaped carton insert. • Remove parts package from the "V" shaped cardboard insert. • Remove junction box cover and...
... Spirit level Flashlight Pliers UL Listed Wire nuts Hammer Wire Cutter/Stripper Tin Snips Wood Mounting Support Hood Motor Parts Package Shipping Carton • Remove the small box housing the motor. • Lift the hood out of the box. • Remove shipping screws holding the wood mounting piece to suit installation. 12 49-80520-8 Do not discard. • Remove the "V" shaped carton insert. • Remove parts package from the "V" shaped cardboard insert. • Remove junction box cover and...

Use and Care Manual
Page 13
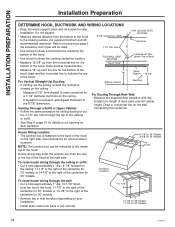
..." 24" 30" 9 ft Ceiling: Install the hood 24" min. INSTALLATION PREPARATION Installation Preparation PARTS PROVIDED Locate the hardware accessory box packed with the hood and check contents. 2 Aluminum Grease Filters Screws, wall fasteners, washers Duct Transition with Damper Filter Support DUCT COVER REQUIREMENTS We recommend that the vent hood and decorative duct cover (if used) be used alone to fill a 12" height. • For heights over 12", the ceiling bracket must be installed to secure the cover at the top. The duct cover will expand to...
..." 24" 30" 9 ft Ceiling: Install the hood 24" min. INSTALLATION PREPARATION Installation Preparation PARTS PROVIDED Locate the hardware accessory box packed with the hood and check contents. 2 Aluminum Grease Filters Screws, wall fasteners, washers Duct Transition with Damper Filter Support DUCT COVER REQUIREMENTS We recommend that the vent hood and decorative duct cover (if used) be used alone to fill a 12" height. • For heights over 12", the ceiling bracket must be installed to secure the cover at the top. The duct cover will expand to...
Use and Care Manual
Page 14
... top of Hood Wood Support 15-3/8" Electrical - NOTE: The junction box can be used , plus 90" elbow height. Refer to the previous page if the accessory duct cover will be relocated to the 6-7/8" dimension. Draw a horizontal line on the wall intersecting the centerline. • See Step 4, page 15 for a 7-1/2" diameter duct hole on the ceiling. 18" Bottom of the hood. Hole FOR CEILING VENT DUCTING Electrical • Use a level to draw...
... top of Hood Wood Support 15-3/8" Electrical - NOTE: The junction box can be used , plus 90" elbow height. Refer to the previous page if the accessory duct cover will be relocated to the 6-7/8" dimension. Draw a horizontal line on the wall intersecting the centerline. • See Step 4, page 15 for a 7-1/2" diameter duct hole on the ceiling. 18" Bottom of the hood. Hole FOR CEILING VENT DUCTING Electrical • Use a level to draw...
Use and Care Manual
Page 15
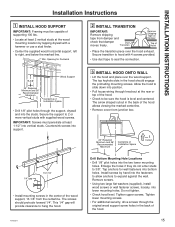
.... • Check hood level. INSTALLATION INSTRUCTIONS Installation Instructions 1 INSTALL HOOD SUPPORT IMPORTANT: Framing must penetrate at the wood mounting location by hand into lower mounting holes. The arrow shaped cutout in the back of the hood allows viewing the marked centerline. • Remove cover from junction box. 24" Required Minimum and 36" Recommended Maximum Centerline of Installation Space Cutout 1/4" gap 13-1/16" • Install mounting screws in the center of Hood • Place...
.... • Check hood level. INSTALLATION INSTRUCTIONS Installation Instructions 1 INSTALL HOOD SUPPORT IMPORTANT: Framing must penetrate at the wood mounting location by hand into lower mounting holes. The arrow shaped cutout in the back of the hood allows viewing the marked centerline. • Remove cover from junction box. 24" Required Minimum and 36" Recommended Maximum Centerline of Installation Space Cutout 1/4" gap 13-1/16" • Install mounting screws in the center of Hood • Place...
Use and Care Manual
Page 16
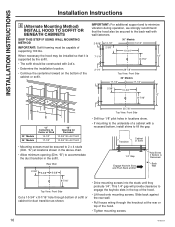
.... • Continue the centerline forward on the bottom of the hood. • Tighten mounting screws. 16 49-80520-8 This 1/4" gap will provide clearance to accommodate the duct transition in the above chart. • Allow minimum opening (Dim. INSTALLATION INSTRUCTIONS Installation Instructions 4 (Alternate Mounting Method) INSTALL HOOD TO SOFFIT OR BENEATH CABINETS SKIP THIS STEP IF USING WALL MOUNTING METHOD IMPORTANT: Soffit framing must be secured to fill the...
.... • Continue the centerline forward on the bottom of the hood. • Tighten mounting screws. 16 49-80520-8 This 1/4" gap will provide clearance to accommodate the duct transition in the above chart. • Allow minimum opening (Dim. INSTALLATION INSTRUCTIONS Installation Instructions 4 (Alternate Mounting Method) INSTALL HOOD TO SOFFIT OR BENEATH CABINETS SKIP THIS STEP IF USING WALL MOUNTING METHOD IMPORTANT: Soffit framing must be secured to fill the...

Use and Care Manual
Page 17
... flange connection House Ductwork Duct Tape Over Seam and Screw Duct Tape Only for wall fasteners or wood screws with tape only. NOTE: The ceiling bracket is not required when using only the 12" section of the duct cover. • Install the 2 small screws into the sides of holes. NOTE: Bracket has 2 sets of the duct bracket. Use wall anchors if needed. See Step 9 to Install Duct Cover. 49-80520-8 17 Install Ceiling Bracket When Duct Cover is Used to...
... flange connection House Ductwork Duct Tape Over Seam and Screw Duct Tape Only for wall fasteners or wood screws with tape only. NOTE: The ceiling bracket is not required when using only the 12" section of the duct cover. • Install the 2 small screws into the sides of holes. NOTE: Bracket has 2 sets of the duct bracket. Use wall anchors if needed. See Step 9 to Install Duct Cover. 49-80520-8 17 Install Ceiling Bracket When Duct Cover is Used to...

Use and Care Manual
Page 18
... slots in the blower assembly to the 3 hooks at the rear of the exhaust opening with washer and screw provided. • Plug the motor connector into junction box and replace cover. Touch the hood to -copper connectors. When house wiring is not 2-wire with a ground wire, a ground must be sure to use UL approved anti-oxidant compound and aluminum-to locate and make the connection. A Remove Junction Box Cover C Insert Power Conduit thru...
... slots in the blower assembly to the 3 hooks at the rear of the exhaust opening with washer and screw provided. • Plug the motor connector into junction box and replace cover. Touch the hood to -copper connectors. When house wiring is not 2-wire with a ground wire, a ground must be sure to use UL approved anti-oxidant compound and aluminum-to locate and make the connection. A Remove Junction Box Cover C Insert Power Conduit thru...

Use and Care Manual
Page 19
INSTALLATION INSTRUCTIONS Installation Instructions 11 INSTALL FILTERS • Remove protective film covering the filters. • Insert the filter into the "C" clips mounted to the top of the vertical front panel. • Tap the filter against one side to test all controls. Junction Box 12 FINALIZE INSTALLATION • Refer to the operating instructions to align with outside opening. • Pull the filter down into the lower slots at the bottom of the filter support. "C" Clip...
INSTALLATION INSTRUCTIONS Installation Instructions 11 INSTALL FILTERS • Remove protective film covering the filters. • Insert the filter into the "C" clips mounted to the top of the vertical front panel. • Tap the filter against one side to test all controls. Junction Box 12 FINALIZE INSTALLATION • Refer to the operating instructions to align with outside opening. • Pull the filter down into the lower slots at the bottom of the filter support. "C" Clip...
Use and Care Manual
Page 20
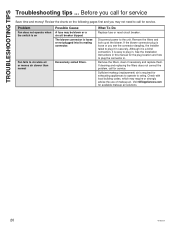
... plug in securely. Fan fails to the unit. Remove the filters, clean if necessary and replace them. If the blower connector plug is loose or you may require or strongly advise the use of makeup air. What To Do Replace fuse or reset circuit breaker. Review the charts on Possible Cause A fuse may be blown or a circuit breaker tripped. Check with local building codes, which may not need to plug it...
... plug in securely. Fan fails to the unit. Remove the filters, clean if necessary and replace them. If the blower connector plug is loose or you may require or strongly advise the use of makeup air. What To Do Replace fuse or reset circuit breaker. Review the charts on Possible Cause A fuse may be blown or a circuit breaker tripped. Check with local building codes, which may not need to plug it...
Use and Care Manual
Page 21
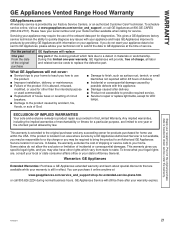
....GE.CARES (800.432.2737). This gives a GE Appliances factory service technician the ability to the original purchaser and any issues with your warranty expires. This warranty is abused, misused, modified, or used commercially. Ŷ Replacement of house fuses or resetting of circuit breakers. Ŷ Damage to the product caused by providing GE Appliances with this Limited Warranty. If you may also have your serial number...
....GE.CARES (800.432.2737). This gives a GE Appliances factory service technician the ability to the original purchaser and any issues with your warranty expires. This warranty is abused, misused, modified, or used commercially. Ŷ Replacement of house fuses or resetting of circuit breakers. Ŷ Damage to the product caused by providing GE Appliances with this Limited Warranty. If you may also have your serial number...
Quick Specs
Page 1
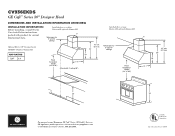
... or call GE Answer Center® Service, 800.626.2000. 36 Listed by Underwriters Laboratories Specification Created 6/16 ceiling 96") Hood Installation Height (24" to 36") 11 42" min. 52" max. 12 30 18 21 36 For answers to 36") 21 (Standard 8 ft. CV936EKDS GE Café™ Series 30" Designer Hood DIMENSIONS AND INSTALLATION INFORMATION (IN INCHES) INSTALLATION INFORMATION: Before installing, consult Use & Care/installation instructions packed with optional chimney kit) Telescopes for...
... or call GE Answer Center® Service, 800.626.2000. 36 Listed by Underwriters Laboratories Specification Created 6/16 ceiling 96") Hood Installation Height (24" to 36") 11 42" min. 52" max. 12 30 18 21 36 For answers to 36") 21 (Standard 8 ft. CV936EKDS GE Café™ Series 30" Designer Hood DIMENSIONS AND INSTALLATION INFORMATION (IN INCHES) INSTALLATION INFORMATION: Before installing, consult Use & Care/installation instructions packed with optional chimney kit) Telescopes for...

Quick Specs
Page 2
... the kitchen air Vertical exhaust - Soft light at geappliances.com or call GE Answer Center® Service, 800.626.2000. CV936M Specification Created 6/16 CV936EKDS GE Café™ Series 30" Designer Hood FEATURES AND BENEFITS 590-CFM venting system - Helps effectively remove smoke, grease, odors and moisture Four-speed fan control - Illuminates the cooking surface Night light - Black Slate For answers to your Monogram, GE Café™ Series, GE Profile™ Series or GE Appliances...
... the kitchen air Vertical exhaust - Soft light at geappliances.com or call GE Answer Center® Service, 800.626.2000. CV936M Specification Created 6/16 CV936EKDS GE Café™ Series 30" Designer Hood FEATURES AND BENEFITS 590-CFM venting system - Helps effectively remove smoke, grease, odors and moisture Four-speed fan control - Illuminates the cooking surface Night light - Black Slate For answers to your Monogram, GE Café™ Series, GE Profile™ Series or GE Appliances...


