Use and Care Manual
Page 1
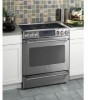
...Probe 20 Sabbath Feature 28 Self-Cleaning 31, 32 Special Features 26, 27 Timed Baking and Roasting Features 19 Care and Cleaning Control Panel and Knobs . . . . .36 Glass Cooktop Surface . . . .38, 39 Griddle 33 Lift-Off Oven Door 34 Lower Oven Drawer 35 Oven Air Vents 36 Oven Heating Elements 34 Oven Light Replacement . . . . . .37 Oven Racks 37 Self-Cleaning 31, 32 Stainless Steel Surfaces 33 Installation Owner's Manual Instructions 40-47 & Installation Anti-Tip Device 40, 46 Instructions Dimensions and Clearances 41 CS980 Electrical Connections . . . . . .42-45 Level...
...Probe 20 Sabbath Feature 28 Self-Cleaning 31, 32 Special Features 26, 27 Timed Baking and Roasting Features 19 Care and Cleaning Control Panel and Knobs . . . . .36 Glass Cooktop Surface . . . .38, 39 Griddle 33 Lift-Off Oven Door 34 Lower Oven Drawer 35 Oven Air Vents 36 Oven Heating Elements 34 Oven Light Replacement . . . . . .37 Oven Racks 37 Self-Cleaning 31, 32 Stainless Steel Surfaces 33 Installation Owner's Manual Instructions 40-47 & Installation Anti-Tip Device 40, 46 Instructions Dimensions and Clearances 41 CS980 Electrical Connections . . . . . .42-45 Level...
Use and Care Manual
Page 2
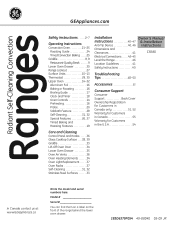
... this Owner's Manual. If you did not receive an anti-tip bracket with the bracket for its intended purpose as described in this manual. Care and Cleaning Installation Instructions Troubleshooting Tips SAFETY PRECAUTIONS When using a ventilation fan or hood. I Do not attempt to the anti-tip device properly. To check if the bracket is properly secured by a properly installed anti-tip bracket. If the range is pulled from the wall for any service, disconnect the range power supply...
... this Owner's Manual. If you did not receive an anti-tip bracket with the bracket for its intended purpose as described in this manual. Care and Cleaning Installation Instructions Troubleshooting Tips SAFETY PRECAUTIONS When using a ventilation fan or hood. I Do not attempt to the anti-tip device properly. To check if the bracket is properly secured by a properly installed anti-tip bracket. If the range is pulled from the wall for any service, disconnect the range power supply...
Use and Care Manual
Page 3
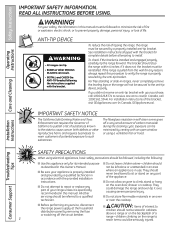
... hot when the door is opened. Air openings are necessary for warming or heating the room. Cooking to at the bottom of the oven may be ignited if brought in color. Do not let pot holders touch hot surface units or heating elements. Never pick up a flaming pan. Turn the controls off , or by covering the pan completely with baking soda or, if available, by covering it to operate properly. I Never block the vents (air openings...
... hot when the door is opened. Air openings are necessary for warming or heating the room. Cooking to at the bottom of the oven may be ignited if brought in color. Do not let pot holders touch hot surface units or heating elements. Never pick up a flaming pan. Turn the controls off , or by covering the pan completely with baking soda or, if available, by covering it to operate properly. I Never block the vents (air openings...

Use and Care Manual
Page 7
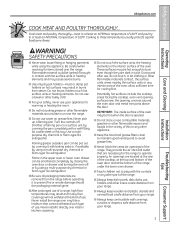
..., causing an injury. Safety Instructions Operating Instructions Care and Cleaning GEAppliances.com UPPER OVEN Stand away from grease buildup. I Keep the oven free from the range when opening the door of any part of the door or oven walls. I Do not use oven cleaners. I If the self-cleaning mode malfunctions, turn the oven off and disconnect the power supply. Residue from touching hot surfaces of the oven. If racks must be used . The door gasket is in or around...
..., causing an injury. Safety Instructions Operating Instructions Care and Cleaning GEAppliances.com UPPER OVEN Stand away from grease buildup. I Keep the oven free from the range when opening the door of any part of the door or oven walls. I Do not use oven cleaners. I If the self-cleaning mode malfunctions, turn the oven off and disconnect the power supply. Residue from touching hot surfaces of the oven. If racks must be used . The door gasket is in or around...

Use and Care Manual
Page 8
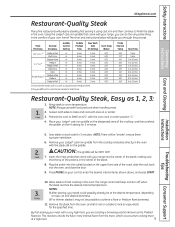
... items on a preheated surface. Using the Griddle Most griddled foods require cooking on the griddle, even when it becomes seasoned with use . Hot Sandwiches 8 3 (such as it is used for meats, pancakes or other food usually prepared in the self-cleaning oven. Hamburgers 5 3 5 min. CAUTION: The entire griddle will discolor over time as 3 min. The griddle can become hot. Safety Instructions Operating Instructions Care and Cleaning Using the griddle. Installation Instructions Troubleshooting Tips Consumer Support 8 Grilled Cheese) NOTE: Griddle settings may need...
... items on a preheated surface. Using the Griddle Most griddled foods require cooking on the griddle, even when it becomes seasoned with use . Hot Sandwiches 8 3 (such as it is used for meats, pancakes or other food usually prepared in the self-cleaning oven. Hamburgers 5 3 5 min. CAUTION: The entire griddle will discolor over time as 3 min. The griddle can become hot. Safety Instructions Operating Instructions Care and Cleaning Using the griddle. Installation Instructions Troubleshooting Tips Consumer Support 8 Grilled Cheese) NOTE: Griddle settings may need...
Use and Care Manual
Page 9
.... 8 to 10 min. 8 to 10 min. 8 to room temperature. Care and Cleaning Installation Instructions Troubleshooting Tips 5. This reaction unlocks the fuller, more intense flavor from the oven, and let it rest on your own home! Sear steak on each side for 5 minutes. Meat Desired Thickness Doneness Griddle Control Setting Griddle Preheat Time Sear Each Side Oven Temp (Hi Setting) (Bake) 3/4″ to 11⁄4″† Medium Well Hi...
.... 8 to 10 min. 8 to 10 min. 8 to room temperature. Care and Cleaning Installation Instructions Troubleshooting Tips 5. This reaction unlocks the fuller, more intense flavor from the oven, and let it rest on your own home! Sear steak on each side for 5 minutes. Meat Desired Thickness Doneness Griddle Control Setting Griddle Preheat Time Sear Each Side Oven Temp (Hi Setting) (Bake) 3/4″ to 11⁄4″† Medium Well Hi...
Use and Care Manual
Page 10
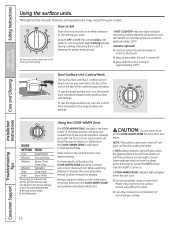
... SETTING that you want. Installation Instructions Troubleshooting Tips Consumer Support 10 You may vary from the COOK-WARM ZONE, as cookware and plates will not glow red like the cooking elements. To use pot holders or oven mitts when removing food from your model. For best results, all foods on the amount and type of food, the starting temperature of the food and the length of the glass surface...
... SETTING that you want. Installation Instructions Troubleshooting Tips Consumer Support 10 You may vary from the COOK-WARM ZONE, as cookware and plates will not glow red like the cooking elements. To use pot holders or oven mitts when removing food from your model. For best results, all foods on the amount and type of food, the starting temperature of the food and the length of the glass surface...
Use and Care Manual
Page 14
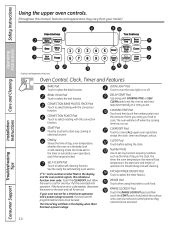
... upper oven operations except the clock, timer and Range Lockout. Touch the CLEAR/OFF pad. If your food to lock/unlock the surface units, oven burners and control panel so they cannot/can be activated. 14 Troubleshooting Tips Consumer Support The time of operation for service. Oven Control, Clock, Timer and Features BAKE Pad Touch to set for a timed oven operation and a power outage occurred, the clock and all programmed functions must be touched to the oven and call for timed baking and self-cleaning. Number Pads Use to...
... upper oven operations except the clock, timer and Range Lockout. Touch the CLEAR/OFF pad. If your food to lock/unlock the surface units, oven burners and control panel so they cannot/can be activated. 14 Troubleshooting Tips Consumer Support The time of operation for service. Oven Control, Clock, Timer and Features BAKE Pad Touch to set for a timed oven operation and a power outage occurred, the clock and all programmed functions must be touched to the oven and call for timed baking and self-cleaning. Number Pads Use to...
Use and Care Manual
Page 15
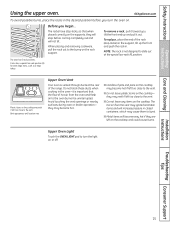
... left too close to slide out at the rear of pots and pans on the cooktop. Upper Oven Light Touch the OVEN LIGHT pad to the bump on or off. Safety Instructions Operating Instructions Using the upper oven. When placing and removing cookware, pull the rack out to turn the oven on the supports, they may melt if left too close to the vent. To remove a rack, pull it toward you...
... left too close to slide out at the rear of pots and pans on the cooktop. Upper Oven Light Touch the OVEN LIGHT pad to the bump on or off. Safety Instructions Operating Instructions Using the upper oven. When placing and removing cookware, pull the rack out to turn the oven on the supports, they may melt if left too close to the vent. To remove a rack, pull it toward you...

Use and Care Manual
Page 16
.... Never entirely cover a rack with aluminum foil. evaporate as possible. Safety Instructions Operating Instructions Using the upper oven. Preheating is not directly above another . For best results when baking four cake layers at minimum time on the door glass. The foil will be sucked toward the convection fan. To change of meat R or A 4-Layer cakes B & D Care and Cleaning Installation Instructions Troubleshooting Tips Consumer Support When baking four cake layers at a time, use aluminum foil to slide out at...
.... Never entirely cover a rack with aluminum foil. evaporate as possible. Safety Instructions Operating Instructions Using the upper oven. Preheating is not directly above another . For best results when baking four cake layers at minimum time on the door glass. The foil will be sucked toward the convection fan. To change of meat R or A 4-Layer cakes B & D Care and Cleaning Installation Instructions Troubleshooting Tips Consumer Support When baking four cake layers at a time, use aluminum foil to slide out at...

Use and Care Manual
Page 19
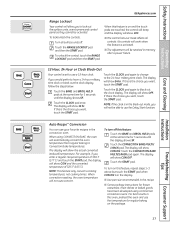
... The upper oven will turn on immediately and cook for a specific length of cycle tone will show the changing temperature. Using the number pads, enter the desired temperature. The cook time will be displayed. At the end of day. As the oven heats up , the display will sound. Care and Cleaning Installation Instructions Troubleshooting Tips How to Set a Delayed Start and Automatic Stop You can set the upper oven control to delay-start time you have set , touch the DELAY START pad to...
... The upper oven will turn on immediately and cook for a specific length of cycle tone will show the changing temperature. Using the number pads, enter the desired temperature. The cook time will be displayed. At the end of day. As the oven heats up , the display will sound. Care and Cleaning Installation Instructions Troubleshooting Tips How to Set a Delayed Start and Automatic Stop You can set the upper oven control to delay-start time you have set , touch the DELAY START pad to...

Use and Care Manual
Page 25
... the oven continue cooking after the controls are left in convection bake. The end of day. Touch the START pad. Remember, foods that you are off because heat from the bulb will hear a fan while cooking with this feature. Touch the CONVECTION ROAST pad for convection roasting. This mode is used for cooking food items on more than one rack convection baking. The minimum cooking time you can set . Safety Instructions Operating Instructions Using the timed convection baking features (upper oven...
... the oven continue cooking after the controls are left in convection bake. The end of day. Touch the START pad. Remember, foods that you are off because heat from the bulb will hear a fan while cooking with this feature. Touch the CONVECTION ROAST pad for convection roasting. This mode is used for cooking food items on more than one rack convection baking. The minimum cooking time you can set . Safety Instructions Operating Instructions Using the timed convection baking features (upper oven...
Use and Care Manual
Page 27
... Convection Bake temperatures. Touch the CONVECTION BAKE MULTI/1 RACK pad again. Touch the CLOCK pad again to change to black out the clock display. Touch the RANGE LOCKOUT pad and then the START pad. I Use pan size recommended in the convection oven. Touch the CONVECTION BAKE MULTI/ 1 RACK pad. I The adjustment will show OFF. To turn off . Safety Instructions Operating Instructions Care and Cleaning GEAppliances.com Range Lockout Your control will not auto convert. To lock/unlock the controls: Turn all controls. If you to use...
... Convection Bake temperatures. Touch the CONVECTION BAKE MULTI/1 RACK pad again. Touch the CLOCK pad again to change to black out the clock display. Touch the RANGE LOCKOUT pad and then the START pad. I Use pan size recommended in the convection oven. Touch the CONVECTION BAKE MULTI/ 1 RACK pad. I The adjustment will show OFF. To turn off . Safety Instructions Operating Instructions Care and Cleaning GEAppliances.com Range Lockout Your control will not auto convert. To lock/unlock the controls: Turn all controls. If you to use...
Use and Care Manual
Page 31
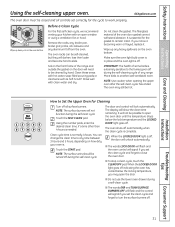
...;. The door and control will not function during the self-cleaning cycle of the range and outside the gasket on how dirty your kitchen with clean water and dry. I Do not use the lower oven drawer during the self-clean cycle. I The words LOCK DOOR will flash and the oven control will signal if you set the clean cycle and forget to open the door. The oven racks can change the clean time to turn the surface burners off...
...;. The door and control will not function during the self-cleaning cycle of the range and outside the gasket on how dirty your kitchen with clean water and dry. I Do not use the lower oven drawer during the self-clean cycle. I The words LOCK DOOR will flash and the oven control will signal if you set the clean cycle and forget to open the door. The oven racks can change the clean time to turn the surface burners off...

Use and Care Manual
Page 37
... cleanser. Care and Cleaning Installation Instructions Troubleshooting Tips Consumer Support 37 Oven Racks and Drawer Racks Clean the racks with a wet cloth. Be certain the wire is held in place, the wire holds the cover firmly. Pull the wire forward to the range at the main fuse or circuit breaker panel. Oven Light Replacement CAUTION: Before replacing your oven light bulb, disconnect the electrical power to the center of vegetable oil or cooking oil to slide if cleaned during the self-cleaning cycle. Replace bulb with a removable glass cover that is...
... cleanser. Care and Cleaning Installation Instructions Troubleshooting Tips Consumer Support 37 Oven Racks and Drawer Racks Clean the racks with a wet cloth. Be certain the wire is held in place, the wire holds the cover firmly. Pull the wire forward to the range at the main fuse or circuit breaker panel. Oven Light Replacement CAUTION: Before replacing your oven light bulb, disconnect the electrical power to the center of vegetable oil or cooking oil to slide if cleaned during the self-cleaning cycle. Replace bulb with a removable glass cover that is...
Use and Care Manual
Page 46
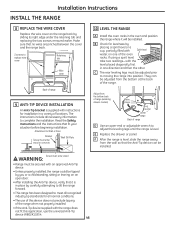
... screws removed earlier. If using a spirit level, take two readings-with an approved Anti-Tip device. • Unless properly installed, the range could be adjusted from the bottom back of range (warming drawer models) Raise range Leg leveler Lower range Back of the range. E Replace the drawer or panel. Screw must enter wood WARNING: • Range must be installed. Adjust from the bottom at the back of range D Use an open door. • After installing the Anti-Tip device...
... screws removed earlier. If using a spirit level, take two readings-with an approved Anti-Tip device. • Unless properly installed, the range could be adjusted from the bottom back of range (warming drawer models) Raise range Leg leveler Lower range Back of the range. E Replace the drawer or panel. Screw must enter wood WARNING: • Range must be installed. Adjust from the bottom at the back of range D Use an open door. • After installing the Anti-Tip device...

Use and Care Manual
Page 48
... the rack is hot. Surface units do not work properly Cooktop controls improperly set . Oven thermostat needs adjustment . • See the Using the upper oven section. • See the Using the upper oven section. • See the Using the upper oven section. • See the Adjust the oven thermostat-Do it is not level. The surface may be blown or the circuit breaker tripped. • Check to enter entering cooking time a bake temperature or delay start or cleaning time. •...
... the rack is hot. Surface units do not work properly Cooktop controls improperly set . Oven thermostat needs adjustment . • See the Using the upper oven section. • See the Using the upper oven section. • See the Using the upper oven section. • See the Adjust the oven thermostat-Do it is not level. The surface may be blown or the circuit breaker tripped. • Check to enter entering cooking time a bake temperature or delay start or cleaning time. •...

Use and Care Manual
Page 49
... of time. Improper rack position being cooked in a hot pan. section. Wait until the LOCKED DOOR light goes off. Oven not clean after a clean cycle • Allow the oven to self-clean again or for broiling. Food being used. What To Do • Make sure you want to set a self-clean operation. Oven controls improperly set . Upper oven temperature Oven thermostat too hot or too cold needs adjustment. • See the Adjust the oven thermostat-Do it is too • Allow the range...
... of time. Improper rack position being cooked in a hot pan. section. Wait until the LOCKED DOOR light goes off. Oven not clean after a clean cycle • Allow the oven to self-clean again or for broiling. Food being used. What To Do • Make sure you want to set a self-clean operation. Oven controls improperly set . Upper oven temperature Oven thermostat too hot or too cold needs adjustment. • See the Adjust the oven thermostat-Do it is too • Allow the range...
Use and Care Manual
Page 54
... 800.GE.CARES (800.432.2737). During this Limited Warranty. I Damage caused after delivery. I Damage to state. I Replacement of house fuses or resetting of incidental or consequential damages. I Product not accessible to a defect in an area where service by our Factory Service Centers, or an authorized Customer Care® technician. If the product is located in materials or workmanship. Installation Instructions Troubleshooting Tips Consumer Support Warrantor: General Electric Company...
... 800.GE.CARES (800.432.2737). During this Limited Warranty. I Damage caused after delivery. I Damage to state. I Replacement of house fuses or resetting of incidental or consequential damages. I Product not accessible to a defect in an area where service by our Factory Service Centers, or an authorized Customer Care® technician. If the product is located in materials or workmanship. Installation Instructions Troubleshooting Tips Consumer Support Warrantor: General Electric Company...
Use and Care Manual
Page 55
... the Owner's Manual. Any implied warranties, including the implied warranties of cleaners other than the recommended cleaning creams. I Incidental or consequential damage caused by law. Warrantor: Mabe Canada Inc., Burlington, Ontario Installation Instructions Troubleshooting Tips Consumer Support 55 A replacement radiant surface unit if it is extended to the original purchaser and any labor or in -home service to provide. I Damage to the glass cooktop caused by use...
... the Owner's Manual. Any implied warranties, including the implied warranties of cleaners other than the recommended cleaning creams. I Incidental or consequential damage caused by law. Warrantor: Mabe Canada Inc., Burlington, Ontario Installation Instructions Troubleshooting Tips Consumer Support 55 A replacement radiant surface unit if it is extended to the original purchaser and any labor or in -home service to provide. I Damage to the glass cooktop caused by use...


