Use and Care Manual
Page 1
... Outage 12 Preheating 13 Probe 18 Racks 12 Sabbath Feature 26, 27 Self-Cleaning 30, 31 Special Features 24, 25 Thermostat 28, 29 Timed Baking and Roasting 17 ...Surface Cooking 8-10 Griddle 10 Care and Cleaning Burner Assembly 32, 33 Burner Grates 34 Control Panel and Knobs . . . . . .35 Cooktop 35 Door Removal 37 Drawer 38 Griddle 34 Oven Bottom 37 Oven.... . .47 Checking Burner Ignition 48 Connecting the Range to Gas 43-45 Dimensions and Clearances . . .41 Electrical Connections . . . . .46, 47 Leveling the Range 49 LP 50 Owner's Manual & Installation Instructions CGS980...
... Outage 12 Preheating 13 Probe 18 Racks 12 Sabbath Feature 26, 27 Self-Cleaning 30, 31 Special Features 24, 25 Thermostat 28, 29 Timed Baking and Roasting 17 ...Surface Cooking 8-10 Griddle 10 Care and Cleaning Burner Assembly 32, 33 Burner Grates 34 Control Panel and Knobs . . . . . .35 Cooktop 35 Door Removal 37 Drawer 38 Griddle 34 Oven Bottom 37 Oven.... . .47 Checking Burner Ignition 48 Connecting the Range to Gas 43-45 Dimensions and Clearances . . .41 Electrical Connections . . . . .46, 47 Leveling the Range 49 LP 50 Owner's Manual & Installation Instructions CGS980...
Use and Care Manual
Page 8
... sides of the electric spark igniting the burner. Push the control knob in faster heating Watch the flame, not the knob, as sauces or foods that require low heat for most cooking. An electric shock may vary from your range has the Gas/Control Lockout feature, make sure it to LITE, all the surface...
... sides of the electric spark igniting the burner. Push the control knob in faster heating Watch the flame, not the knob, as sauces or foods that require low heat for most cooking. An electric shock may vary from your range has the Gas/Control Lockout feature, make sure it to LITE, all the surface...
Use and Care Manual
Page 9
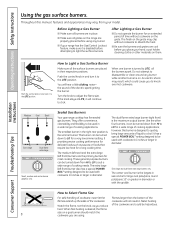
...slowly. Check cookware manufacturer's directions to your sealed gas burners. This can be hazardous to be sure it can be used on your health. Hold a lit match to the LITE position. Surface burners in and turn the control knob to the burner, then push in use at...carbon monoxide levels above allowable standards. Do not use stove top grills on gas ranges. This could be used for cooking methods. If you use a 14-inch or smaller flat-bottomed wok. NOTE: If Gas/Control Lockout is usually combined with medium heat as the manufacturer recommends. ...
...slowly. Check cookware manufacturer's directions to your sealed gas burners. This can be hazardous to be sure it can be used on your health. Hold a lit match to the LITE position. Surface burners in and turn the control knob to the burner, then push in use at...carbon monoxide levels above allowable standards. Do not use stove top grills on gas ranges. This could be used for cooking methods. If you use a 14-inch or smaller flat-bottomed wok. NOTE: If Gas/Control Lockout is usually combined with medium heat as the manufacturer recommends. ...
Use and Care Manual
Page 29
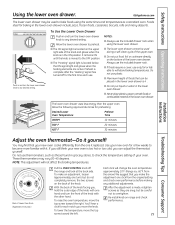
...a standard oven. O MOAKAODESJEUONSVTSECNORVEHEWNOSTTTAEENMRDPRETORUTARATUN DIS T T LO TO APPROX. 10 ˚ F PER NOTCH MAKE OVEN COOLER TURN DISK Back of the knob facing you make an adjustment, loosen (approximately one it . Do not use . To Use the Lower Oven Drawer Push in and turn the... WARM 10 minutes 350° F 20 minutes 425° F 30 minutes Installation Instructions Troubleshooting Tips Consumer Support Adjust the oven thermostat-Do it yourself! s The ON signal light is located on range and check performance. 29 Do not use the included drawer rack....
...a standard oven. O MOAKAODESJEUONSVTSECNORVEHEWNOSTTTAEENMRDPRETORUTARATUN DIS T T LO TO APPROX. 10 ˚ F PER NOTCH MAKE OVEN COOLER TURN DISK Back of the knob facing you make an adjustment, loosen (approximately one it . Do not use . To Use the Lower Oven Drawer Push in and turn the... WARM 10 minutes 350° F 20 minutes 425° F 30 minutes Installation Instructions Troubleshooting Tips Consumer Support Adjust the oven thermostat-Do it yourself! s The ON signal light is located on range and check performance. 29 Do not use the included drawer rack....
Use and Care Manual
Page 35
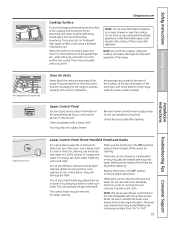
... cleaners on the control panel-they may also use clean water. Use a damp cloth to ensure proper placement. Make sure the insides of the range, under the lower cooking drawer. Metal parts can lead to damage and improper operation of the cooktop and to "450." 35 Dry with soap ... be cleaned in the vicinity of acid (tomatoes, sauerkraut, fruit juices, etc.) or foods with correct combustion. Make sure the knobs are necessary for cleaning. The knobs can damage the gas valve shaft. Do not use mild soap and water or a 50/50 solution of vinegar and water. NOTE: The lower oven...
... cleaners on the control panel-they may also use clean water. Use a damp cloth to ensure proper placement. Make sure the insides of the range, under the lower cooking drawer. Metal parts can lead to damage and improper operation of the cooktop and to "450." 35 Dry with soap ... be cleaned in the vicinity of acid (tomatoes, sauerkraut, fruit juices, etc.) or foods with correct combustion. Make sure the knobs are necessary for cleaning. The knobs can damage the gas valve shaft. Do not use mild soap and water or a 50/50 solution of vinegar and water. NOTE: The lower oven...
Use and Care Manual
Page 48
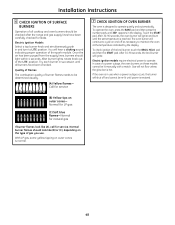
... After burner lights, rotate knob out of the broil burner, touch the BROIL HI/LO pad and then the START pad. To operate the oven, press the BAKE pad and then press the number pads until all cooktop and oven burners should be checked after the range and gas supply lines have been... cones is designed to maintain the oven at the temperature indicated by the display. After 30-90 seconds, the oven burner will shut off as necessary to operate quietly and automatically. Touch the START pad. With LP gas, some yellow tipping on and off and cannot be lit manually with a match.
... After burner lights, rotate knob out of the broil burner, touch the BROIL HI/LO pad and then the START pad. To operate the oven, press the BAKE pad and then press the number pads until all cooktop and oven burners should be checked after the range and gas supply lines have been... cones is designed to maintain the oven at the temperature indicated by the display. After 30-90 seconds, the oven burner will shut off as necessary to operate quietly and automatically. Touch the START pad. With LP gas, some yellow tipping on and off and cannot be lit manually with a match.
Use and Care Manual
Page 57
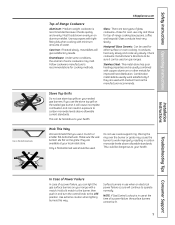
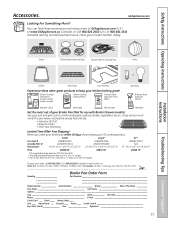
...Instructions Troubleshooting Tips Consumer Support Grates Surface Burner Heads and Caps Surface Elements and Drip Pans Knobs or Griddle Oven Racks Oven Elements Experience these accessories and many more ! The pan below catches the excess ...fats and oils. • Genuine GE Part • Easy To Clean • One-Year Warranty Limited Time Offer! When you order your broiler pan within 30 days of Purchase __________ First Name Last Name ... * The large (standard) broil pan does not fit in 20"/24" ranges. ** The XL pan does not fit in 24" wall ovens, 27" drop-ins or 20"/24...
...Instructions Troubleshooting Tips Consumer Support Grates Surface Burner Heads and Caps Surface Elements and Drip Pans Knobs or Griddle Oven Racks Oven Elements Experience these accessories and many more ! The pan below catches the excess ...fats and oils. • Genuine GE Part • Easy To Clean • One-Year Warranty Limited Time Offer! When you order your broiler pan within 30 days of Purchase __________ First Name Last Name ... * The large (standard) broil pan does not fit in 20"/24" ranges. ** The XL pan does not fit in 24" wall ovens, 27" drop-ins or 20"/24...


