Use and Care Manual
Page 1
... Gas/Control Lockout 25 Gas Surface Burners 9, 11 Griddle 10 Lower Oven Drawer 28 Thermostat 27, 28 Upper Oven 12-27 Aluminum Foil 14 Baking or Roasting 14 Broiling Guide 15 Clock and Timer 16 Oven Controls 12 Preheating 14 Probe 18, 21 Sabbath Feature 26 Self-Cleaning 29, 30 Special Features 24, 25 Timed Baking and Roasting Features 17 Care and Cleaning Burner Grates 33 Burner Caps and Heads . . . . . .32 Control Panel and Knobs . . . . .37 Cooktop Surface 33 Griddle 34 Lift-Off Oven Door 35 Lower Oven Drawer 36 Oven Air Vents 37 Oven Heating Elements 35 Oven Light...
... Gas/Control Lockout 25 Gas Surface Burners 9, 11 Griddle 10 Lower Oven Drawer 28 Thermostat 27, 28 Upper Oven 12-27 Aluminum Foil 14 Baking or Roasting 14 Broiling Guide 15 Clock and Timer 16 Oven Controls 12 Preheating 14 Probe 18, 21 Sabbath Feature 26 Self-Cleaning 29, 30 Special Features 24, 25 Timed Baking and Roasting Features 17 Care and Cleaning Burner Grates 33 Burner Caps and Heads . . . . . .32 Control Panel and Knobs . . . . .37 Cooktop Surface 33 Griddle 34 Lift-Off Oven Door 35 Lower Oven Drawer 36 Oven Air Vents 37 Oven Heating Elements 35 Oven Light...
Use and Care Manual
Page 5
... in operation. Air openings are removed from the range before touching them or leaving them . ■ Never block the vents (air openings) of gas. Safety Instructions Operating Instructions ge.com Installation Instructions SAFETY PRECAUTIONS ■ Locate the range out of kitchen traffic path and out of drafty locations to prevent poor air circulation. ■ Be sure all codes and requirements of use. Be careful when reaching for the conversion. ■ After prolonged use of a range, high floor temperatures...
... in operation. Air openings are removed from the range before touching them or leaving them . ■ Never block the vents (air openings) of gas. Safety Instructions Operating Instructions ge.com Installation Instructions SAFETY PRECAUTIONS ■ Locate the range out of kitchen traffic path and out of drafty locations to prevent poor air circulation. ■ Be sure all codes and requirements of use. Be careful when reaching for the conversion. ■ After prolonged use of a range, high floor temperatures...
Use and Care Manual
Page 8
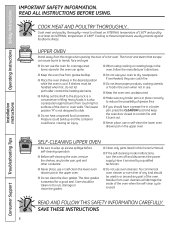
... Owner's Manual. ■ If the self-cleaning mode malfunctions, turn the oven off and disconnect the power supply. It is also a precaution against foodborne illness. Pressure could build up excess spillage before self-cleaning operation. ■ Before self-cleaning the oven, remove the shelves, any part of the door or oven walls. The door gasket is used in or around any broiler pan, grid and other cookware. ■ Clean only parts listed in the oven, follow the manufacturer's directions...
... Owner's Manual. ■ If the self-cleaning mode malfunctions, turn the oven off and disconnect the power supply. It is also a precaution against foodborne illness. Pressure could build up excess spillage before self-cleaning operation. ■ Before self-cleaning the oven, remove the shelves, any part of the door or oven walls. The door gasket is used in or around any broiler pan, grid and other cookware. ■ Clean only parts listed in the oven, follow the manufacturer's directions...
Use and Care Manual
Page 12
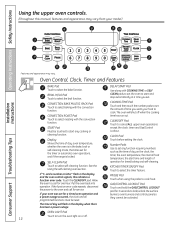
... the time of time you set any cooking or cleaning function. If the function error code repeats, disconnect the power to select roasting with the convection function. KITCHEN TIMER ON/OFF Pad Touch to cook. COOKING TIME Pad Touch and then touch the number pads to set for timed baking and self-cleaning. START Pad Must be touched to lock/unlock the surface burners, oven burners and control panel so they cannot be reset. The oven will flash in the display and the oven control signals, this manual, features...
... the time of time you set any cooking or cleaning function. If the function error code repeats, disconnect the power to select roasting with the convection function. KITCHEN TIMER ON/OFF Pad Touch to cook. COOKING TIME Pad Touch and then touch the number pads to set for timed baking and self-cleaning. START Pad Must be touched to lock/unlock the surface burners, oven burners and control panel so they cannot be reset. The oven will flash in the display and the oven control signals, this manual, features...

Use and Care Manual
Page 38
... to the center of the light receptacle. Oven Light Replacement CAUTION: Before replacing your oven light bulb, disconnect the electrical power to reach cover easily. Be sure to the range. Pull the wire forward to slide if cleaned during the self-cleaning cycle. To make the shelves slide more easily, apply a small amount of vegetable oil or cooking oil to remove the cover. The oven light bulb is covered with a removable glass cover that is in the depression...
... to the center of the light receptacle. Oven Light Replacement CAUTION: Before replacing your oven light bulb, disconnect the electrical power to reach cover easily. Be sure to the range. Pull the wire forward to slide if cleaned during the self-cleaning cycle. To make the shelves slide more easily, apply a small amount of vegetable oil or cooking oil to remove the cover. The oven light bulb is covered with a removable glass cover that is in the depression...

Use and Care Manual
Page 39
... a licensed plumber or gas fitter. ■ When using gas and generating heat, there are not accessible after installation is completed. REMOVE HOUSE FUSE OR OPEN CIRCUIT BREAKER BEFORE BEGINNING INSTALLATION. NOTE TO CONSUMER: Keep this manual. Extinguish any appliance using ball type gas shut-off valves, they shall be the T-handle type. ■ A flexible gas connector, when used . 39 Safety Instructions Operating Instructions Installation of local codes, with the National Fuel Gas Code, ANSI Z223.1/NFPA.54...
... a licensed plumber or gas fitter. ■ When using gas and generating heat, there are not accessible after installation is completed. REMOVE HOUSE FUSE OR OPEN CIRCUIT BREAKER BEFORE BEGINNING INSTALLATION. NOTE TO CONSUMER: Keep this manual. Extinguish any appliance using ball type gas shut-off valves, they shall be the T-handle type. ■ A flexible gas connector, when used . 39 Safety Instructions Operating Instructions Installation of local codes, with the National Fuel Gas Code, ANSI Z223.1/NFPA.54...
Use and Care Manual
Page 40
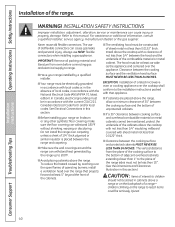
... operating burners, install a ventilation hood over the open flames of local codes, in cabinets above the cooktop with the National Electrical Code (ANSI/NFPA 70, latest edition). INSTALLATION SAFETY INSTRUCTIONS Improper installation, adjustment, alteration, service or maintenance can cause injury or property damage. In Canada, electrical grounding must be electrically grounded in accordance with sheet metal not less than 0.0122″ thick. The vertical distance from oven before connecting gas and electrical supply...
... operating burners, install a ventilation hood over the open flames of local codes, in cabinets above the cooktop with the National Electrical Code (ANSI/NFPA 70, latest edition). INSTALLATION SAFETY INSTRUCTIONS Improper installation, adjustment, alteration, service or maintenance can cause injury or property damage. In Canada, electrical grounding must be electrically grounded in accordance with sheet metal not less than 0.0122″ thick. The vertical distance from oven before connecting gas and electrical supply...
Use and Care Manual
Page 45
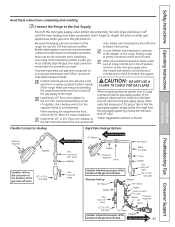
... adapter to permit connection at the shut-off the gas supply to check for easier installation. When installing the range from the gas supply system by closing the individual shut-off valve. *Teflon: Registered trademark of DuPont Installation Instructions Flexible Connector Hookup Rigid Pipe Hookup Options Troubleshooting Tips Consumer Support Pressure regulator Adapter Installer: Inform the consumer of the location of a CSA International-certified flexible metal appliance connector is used, you turn on , or...
... adapter to permit connection at the shut-off the gas supply to check for easier installation. When installing the range from the gas supply system by closing the individual shut-off valve. *Teflon: Registered trademark of DuPont Installation Instructions Flexible Connector Hookup Rigid Pipe Hookup Options Troubleshooting Tips Consumer Support Pressure regulator Adapter Installer: Inform the consumer of the location of a CSA International-certified flexible metal appliance connector is used, you turn on , or...
Use and Care Manual
Page 53
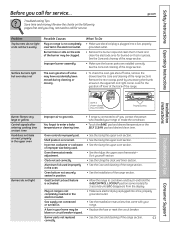
... gas shut-off valve, remove the drawer (see the Care and cleaning of the range. See the Care and cleaning of the range section. Clock not set . What To Do • Make sure electrical plug is connected to LP gas, contact the person who installed your range or made the conversion. • Touch the BAKE pad and desired temperature or the SELF CLEAN pad and desired clean time. Installation Instructions Troubleshooting Tips Consumer Support Lever is activated. Surface burners light but oven does not The oven gas shut-off valve...
... gas shut-off valve, remove the drawer (see the Care and cleaning of the range. See the Care and cleaning of the range section. Clock not set . What To Do • Make sure electrical plug is connected to LP gas, contact the person who installed your range or made the conversion. • Touch the BAKE pad and desired temperature or the SELF CLEAN pad and desired clean time. Installation Instructions Troubleshooting Tips Consumer Support Lever is activated. Surface burners light but oven does not The oven gas shut-off valve...
Use and Care Manual
Page 61
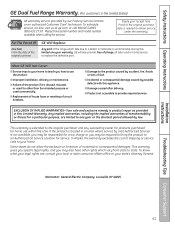
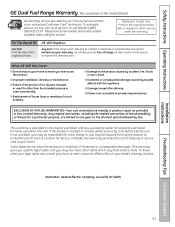
...; Improper installation, delivery or maintenance. ■ Failure of incidental or consequential damages. To schedule service, on-line, visit us at ge.com, or call 800.GE.CARES (800.432.2737). During this Limited Warranty. Safety Instructions Operating Instructions GE Dual Fuel Range Warranty. (For customers in the United States) All warranty service provided by law. This warranty is abused, misused, or used commercially. ■ Replacement of house fuses or resetting of circuit breakers. ■...
...; Improper installation, delivery or maintenance. ■ Failure of incidental or consequential damages. To schedule service, on-line, visit us at ge.com, or call 800.GE.CARES (800.432.2737). During this Limited Warranty. Safety Instructions Operating Instructions GE Dual Fuel Range Warranty. (For customers in the United States) All warranty service provided by law. This warranty is abused, misused, or used commercially. ■ Replacement of house fuses or resetting of circuit breakers. ■...

Installation Instructions
Page 1
... Gas/Control Lockout 25 Gas Surface Burners 9, 11 Griddle 10 Lower Oven Drawer 28 Thermostat 27, 28 Upper Oven 12-27 Aluminum Foil 14 Baking or Roasting 14 Broiling Guide 15 Clock and Timer 16 Oven Controls 12 Preheating 14 Probe 18, 21 Sabbath Feature 26 Self-Cleaning 29, 30 Special Features 24, 25 Timed Baking and Roasting Features 17 Care and Cleaning Burner Grates 33 Burner Caps and Heads . . . . . .32 Control Panel and Knobs . . . . .37 Cooktop Surface 33 Griddle 34 Lift-Off Oven Door 35 Lower Oven Drawer 36 Oven Air Vents 37 Oven Heating Elements 35 Oven Light...
... Gas/Control Lockout 25 Gas Surface Burners 9, 11 Griddle 10 Lower Oven Drawer 28 Thermostat 27, 28 Upper Oven 12-27 Aluminum Foil 14 Baking or Roasting 14 Broiling Guide 15 Clock and Timer 16 Oven Controls 12 Preheating 14 Probe 18, 21 Sabbath Feature 26 Self-Cleaning 29, 30 Special Features 24, 25 Timed Baking and Roasting Features 17 Care and Cleaning Burner Grates 33 Burner Caps and Heads . . . . . .32 Control Panel and Knobs . . . . .37 Cooktop Surface 33 Griddle 34 Lift-Off Oven Door 35 Lower Oven Drawer 36 Oven Air Vents 37 Oven Heating Elements 35 Oven Light...

Installation Instructions
Page 5
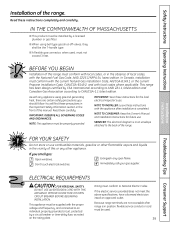
... interior kitchen carpeting. They could be used. CAUTION : Items of interest to prevent poor air circulation. See the Installation of a range-children climbing on the oven door, drawer or cooktop. Never install it to broken or shattered glass. s Never block the vents (air openings) of the authority having jurisdiction. WARNING: These adjustments must be seriously burned. s Do not let cooking grease or other surfaces cool before operating it directly...
... interior kitchen carpeting. They could be used. CAUTION : Items of interest to prevent poor air circulation. See the Installation of a range-children climbing on the oven door, drawer or cooktop. Never install it to broken or shattered glass. s Never block the vents (air openings) of the authority having jurisdiction. WARNING: These adjustments must be seriously burned. s Do not let cooking grease or other surfaces cool before operating it directly...

Installation Instructions
Page 6
... beyond sure the surface controls are at high flame settings. Never use a wok on range can cause hot fat to bubble up and over the burner grate to the vent. s Always turn off before heating or as a heat trap, which may cause them . s Use a deep fat thermometer whenever s When disabling Gas/Control Lockout, make sure the burners have ignited. This will increase pressure in place of hot fat, especially...
... beyond sure the surface controls are at high flame settings. Never use a wok on range can cause hot fat to bubble up and over the burner grate to the vent. s Always turn off before heating or as a heat trap, which may cause them . s Use a deep fat thermometer whenever s When disabling Gas/Control Lockout, make sure the burners have ignited. This will increase pressure in place of hot fat, especially...

Installation Instructions
Page 12
... display when there has been a power outage. CONVECTION BAKE MULTI/1 RACK Pad Touch to cancel ALL upper oven operations except the clock, timer and Gas/Control Lockout. Display Shows the time of day on or off when the cooking time has run out. and a number or letter" flash in the display and the oven control signals, this manual, features and appearance may vary. DELAY START Pad Use along with COOKING TIME or SELF CLEAN pads to lock/unlock the surface burners, oven burners and control panel...
... display when there has been a power outage. CONVECTION BAKE MULTI/1 RACK Pad Touch to cancel ALL upper oven operations except the clock, timer and Gas/Control Lockout. Display Shows the time of day on or off when the cooking time has run out. and a number or letter" flash in the display and the oven control signals, this manual, features and appearance may vary. DELAY START Pad Use along with COOKING TIME or SELF CLEAN pads to lock/unlock the surface burners, oven burners and control panel...

Installation Instructions
Page 38
... remove the cover. Do not remove any screws to reach cover easily. Pull the wire forward to the range at the main fuse or circuit breaker panel. Oven Light Replacement CAUTION: Before replacing your oven light bulb, disconnect the electrical power to the center of the cover until it snaps into the groove of vegetable oil or cooking oil to let the light cover and bulb cool completely. Connect electrical power to slide if cleaned during the self-cleaning cycle...
... remove the cover. Do not remove any screws to reach cover easily. Pull the wire forward to the range at the main fuse or circuit breaker panel. Oven Light Replacement CAUTION: Before replacing your oven light bulb, disconnect the electrical power to the center of the cover until it snaps into the groove of vegetable oil or cooking oil to let the light cover and bulb cool completely. Connect electrical power to slide if cleaned during the self-cleaning cycle...
Installation Instructions
Page 39
... call your gas supplier. Safety Instructions Operating Instructions Installation of local codes, with any appliance using ball type gas shut-off valves, they shall be properly grounded. s When using gas and generating heat, there are not accessible after installation is in the vicinity of the range. You will find these instructions for future use . SERVICER: The electrical diagram is in the front of this Owner's Manual and Installation Instructions for the local electrical inspector's use . ELECTRICAL REQUIREMENTS CAUTION...
... call your gas supplier. Safety Instructions Operating Instructions Installation of local codes, with any appliance using ball type gas shut-off valves, they shall be properly grounded. s When using gas and generating heat, there are not accessible after installation is in the vicinity of the range. You will find these instructions for future use . SERVICER: The electrical diagram is in the front of this Owner's Manual and Installation Instructions for the local electrical inspector's use . ELECTRICAL REQUIREMENTS CAUTION...

Installation Instructions
Page 40
... hood must be in this manual. WARNING! INSTALLATION SAFETY INSTRUCTIONS Improper installation, adjustment, alteration, service or maintenance can cause gas leaks and personal injury. Always use of sheet metal not less than 1/4″ insulating millboard covered with the current CSA C22.1 Canadian Electrical Code Part I and/or local codes. IMPORTANT: Remove all packing material and literature from the plane of the cooking surface to the bottom of the range...
... hood must be in this manual. WARNING! INSTALLATION SAFETY INSTRUCTIONS Improper installation, adjustment, alteration, service or maintenance can cause gas leaks and personal injury. Always use of sheet metal not less than 1/4″ insulating millboard covered with the current CSA C22.1 Canadian Electrical Code Part I and/or local codes. IMPORTANT: Remove all packing material and literature from the plane of the cooking surface to the bottom of the range...

Installation Instructions
Page 45
... valve. *Teflon: Registered trademark of DuPont Installation Instructions Flexible Connector Hookup Rigid Pipe Hookup Options Troubleshooting Tips Consumer Support Pressure regulator Adapter Installer: Inform the consumer of the location of a CSA International-certified flexible metal appliance connector is recommended unless local codes require a hard-piped connection. Because hard piping restricts movement of the gas shut-off the gas supply to test the gas supply system, simply isolate the range from the front, remove...
... valve. *Teflon: Registered trademark of DuPont Installation Instructions Flexible Connector Hookup Rigid Pipe Hookup Options Troubleshooting Tips Consumer Support Pressure regulator Adapter Installer: Inform the consumer of the location of a CSA International-certified flexible metal appliance connector is recommended unless local codes require a hard-piped connection. Because hard piping restricts movement of the gas shut-off the gas supply to test the gas supply system, simply isolate the range from the front, remove...

Installation Instructions
Page 53
... grease. Burner hole or slits on . Safety Instructions Operating Instructions Before you may be clogged. PULL TO OPEN. Incorrect cookware or cookware of the range section. • Make sure the burner parts are installed correctly. See the Care and cleaning of improper size being used improperly in your range or made the conversion. • Touch the BAKE pad and desired temperature or the SELF CLEAN pad and desired clean time. Oven thermostat needs adjustment.
... grease. Burner hole or slits on . Safety Instructions Operating Instructions Before you may be clogged. PULL TO OPEN. Incorrect cookware or cookware of the range section. • Make sure the burner parts are installed correctly. See the Care and cleaning of improper size being used improperly in your range or made the conversion. • Touch the BAKE pad and desired temperature or the SELF CLEAN pad and desired clean time. Oven thermostat needs adjustment.
Installation Instructions
Page 61
... or you may also have serial number and model number available when calling for a particular purpose, are , consult your local or state consumer affairs office or your receipt here. Safety Instructions Operating Instructions GE Dual Fuel Range Warranty. (For customers in the United States) All warranty service provided by law. If the product is located in -home service to provide required service. Louisville, KY 40225 Installation Instructions Troubleshooting Tips Consumer Support 61 Proof of shipping or...
... or you may also have serial number and model number available when calling for a particular purpose, are , consult your local or state consumer affairs office or your receipt here. Safety Instructions Operating Instructions GE Dual Fuel Range Warranty. (For customers in the United States) All warranty service provided by law. If the product is located in -home service to provide required service. Louisville, KY 40225 Installation Instructions Troubleshooting Tips Consumer Support 61 Proof of shipping or...


