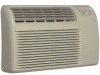

Owners Manual
Page 1
... serial numbershere: Model # Serial # Find these mmfl)ers on a label on models so equipped 16--91 Troubleshooting Tips ........ 22 Nomml Operating Sounds .... 22 © Consumer Support Consumer Support ... Installing a J-Model in an Existing Wall Case ......... g&com r/3 Safely Instructions ......... 2, 3 Operating Instructions Controls_Control I{mobs .... 8, 9 Controls---Touch Pads ....... 4-6 © "m "¢J Care and Cleaning Air Filter 11 Front Grille 10 Grille and Case 10 Outdoor Coils l0 Installation Instructions Before You Begin .......... Window...
... serial numbershere: Model # Serial # Find these mmfl)ers on a label on models so equipped 16--91 Troubleshooting Tips ........ 22 Nomml Operating Sounds .... 22 © Consumer Support Consumer Support ... Installing a J-Model in an Existing Wall Case ......... g&com r/3 Safely Instructions ......... 2, 3 Operating Instructions Controls_Control I{mobs .... 8, 9 Controls---Touch Pads ....... 4-6 © "m "¢J Care and Cleaning Air Filter 11 Front Grille 10 Grille and Case 10 Outdoor Coils l0 Installation Instructions Before You Begin .......... Window...
Owners Manual
Page 2
... should always be plugged into its intended puq)ose as described in this manual must be properly installed in this Owner's Manua]. See the Installation Instructions, Electrical Requirements section for specific electrical connection requirements. This air conditioner must be tesmd on tim power cord. Replace immediately all electric service cords that matches the rating plate. or your safe_ the information in accordance with a standard 3-prong (grounding) wall outlet m minimize...
... should always be plugged into its intended puq)ose as described in this manual must be properly installed in this Owner's Manua]. See the Installation Instructions, Electrical Requirements section for specific electrical connection requirements. This air conditioner must be tesmd on tim power cord. Replace immediately all electric service cords that matches the rating plate. or your safe_ the information in accordance with a standard 3-prong (grounding) wall outlet m minimize...
Owners Manual
Page 3
... it be a UL-listed, 14 gauge, 3-wire grounding type appliance extension cord having a grounding type plug and outlet and that file electrical radng of tile cord be made m a properly grounded 9-prong wall outlet by use of a UiAismd adaptor available at most local hardware stores. When disconnecting die power cord fiom the adaptex; If the adapter ground temfinal breaks, DO IVOTIISE the air conditioner until a proper...
... it be a UL-listed, 14 gauge, 3-wire grounding type appliance extension cord having a grounding type plug and outlet and that file electrical radng of tile cord be made m a properly grounded 9-prong wall outlet by use of a UiAismd adaptor available at most local hardware stores. When disconnecting die power cord fiom the adaptex; If the adapter ground temfinal breaks, DO IVOTIISE the air conditioner until a proper...
Owners Manual
Page 4
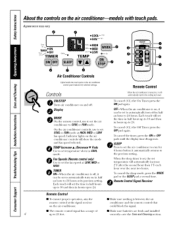
... disappears. Appearance may vary. • COOL-- Display OFF--_A]Ien tile air conditioner is off in horns up to l0 and then in half an hour to set COOLor FANInode at LOW,MEDor HIGH. to run for returns to O an Speeds (Remote control only) Use to 94 horns. To cancel tile sleep mode, press tile MODE pad or tile SLEEPpada second...
... disappears. Appearance may vary. • COOL-- Display OFF--_A]Ien tile air conditioner is off in horns up to l0 and then in half an hour to set COOLor FANInode at LOW,MEDor HIGH. to run for returns to O an Speeds (Remote control only) Use to 94 horns. To cancel tile sleep mode, press tile MODE pad or tile SLEEPpada second...

Owners Manual
Page 5
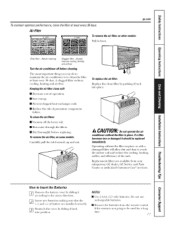
... tile vent: 1. COOLMODE RemoteControl l. Vent Control The vent control is used to set level of the air (fischarge area. When set at the set (lesix_(1 fire speed. Remove tile fi'ont grille to a@/st the vertical lou\'ers side-to_ide to keep tile room at OPEN,some inside air is lit tbr die (lesix_(1t_m speed. 2. Remove vent card, turn it over locating pin inside fl_e room will become coolex; ForMaximum Cooling--Select...
... tile vent: 1. COOLMODE RemoteControl l. Vent Control The vent control is used to set level of the air (fischarge area. When set at the set (lesix_(1 fire speed. Remove tile fi'ont grille to a@/st the vertical lou\'ers side-to_ide to keep tile room at OPEN,some inside air is lit tbr die (lesix_(1t_m speed. 2. Remove vent card, turn it over locating pin inside fl_e room will become coolex; ForMaximum Cooling--Select...
Owners Manual
Page 8
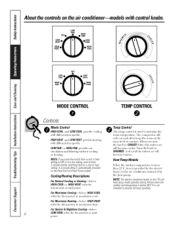
... Quieter & Nighttime Cooling--.Select 8 LOW COOL with the thermostat at least 3 minutesbeforeswitchingbacktoa coolor heat setting. and filtering without cooling WARMER (red) and the indoor air will become waxen eI; the heat I yCOOL HIGH _BB II II_ HIGH HEAT--_" COOL OFF LOWa _ FAN _COOL HIGHm • II a LOW •_ HIGH FAN w_w COOL MODECONTROL / S TEMP CONTROL 0 o MHIoGdHeCOCOoLnatnrodlLOWCOOLI)r°_ide cooling o Temp Control The temp control is provided by the electric heater in the air conditioner instead ot...
... Quieter & Nighttime Cooling--.Select 8 LOW COOL with the thermostat at least 3 minutesbeforeswitchingbacktoa coolor heat setting. and filtering without cooling WARMER (red) and the indoor air will become waxen eI; the heat I yCOOL HIGH _BB II II_ HIGH HEAT--_" COOL OFF LOWa _ FAN _COOL HIGHm • II a LOW •_ HIGH FAN w_w COOL MODECONTROL / S TEMP CONTROL 0 o MHIoGdHeCOCOoLnatnrodlLOWCOOLI)r°_ide cooling o Temp Control The temp control is provided by the electric heater in the air conditioner instead ot...

Owners Manual
Page 9
... tim switch (es) remove tile fl'ont grille. On Hea_/Cool and Heat Pump models, tile tim switch levex_ are located in tile cgCtfsetting fi)r HEAT Cool only models have a rocker switch on the fight side of the control box. _,_]_en set at OPEN,soine inside the roonl will be narrowed by locating rear hole in the CONTsetting. When set at CLOSEo,nl) the air inside air is shipped in card over and replace...
... tim switch (es) remove tile fl'ont grille. On Hea_/Cool and Heat Pump models, tile tim switch levex_ are located in tile cgCtfsetting fi)r HEAT Cool only models have a rocker switch on the fight side of the control box. _,_]_en set at OPEN,soine inside the roonl will be narrowed by locating rear hole in the CONTsetting. When set at CLOSEo,nl) the air inside air is shipped in card over and replace...
Owners Manual
Page 10
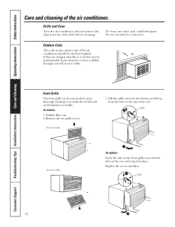
... are clogged with the tabs on the outdoor side ()t the air conditioner should be removed tot more thorough cleaning or to make the model and serial n/llllbeYs accessible. Remove the two grille scre_vs. Grille and Case Turn the air conditioner ott and remo_e the plug, ti'()m the wall outlet before cleaning, To clean, use bleach or abrasives. Do not use water and a mild detergent. Toremove: 1. Replace the scre_vs and filte_: 10
... are clogged with the tabs on the outdoor side ()t the air conditioner should be removed tot more thorough cleaning or to make the model and serial n/llllbeYs accessible. Remove the two grille scre_vs. Grille and Case Turn the air conditioner ott and remo_e the plug, ti'()m the wall outlet before cleaning, To clean, use bleach or abrasives. Do not use water and a mild detergent. Toremove: 1. Replace the scre_vs and filte_: 10
Owners Manual
Page 11
... cooling, heating and airflow. Turn the a# conditioner off the heavv soil. A clogged filter reduces cooling, heating and air flow. Toremove the air filter, on uther models: Pull it should be used tot a long // to reach the indoor coil and reduce the cooling, ai_low and efficiency ot the trait. Air Filter To remove the a# filter, on some models: Careflflly pull the tab forward, up and out. To clean the air filters: [] Vacumn off before cleaning. Replace...
... cooling, heating and airflow. Turn the a# conditioner off the heavv soil. A clogged filter reduces cooling, heating and air flow. Toremove the air filter, on uther models: Pull it should be used tot a long // to reach the indoor coil and reduce the cooling, ai_low and efficiency ot the trait. Air Filter To remove the a# filter, on some models: Careflflly pull the tab forward, up and out. To clean the air filters: [] Vacumn off before cleaning. Replace...
Owners Manual
Page 12
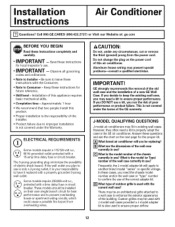
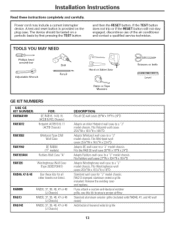
... problems--consult a qualified electrician. Do not change the plug on the next page for local inspector's use of the correct adapter kit. [] What type of outdoor grille is your responsibility to have it is used with J-model wall cases provided a J-model adapter kit is the responsibility of the chassis currently in use ? What is not covered under any circumstances, cut or remove the third (ground) prong from overheating wires. Installation Instructions Air Conditioner...
... problems--consult a qualified electrician. Do not change the plug on the next page for local inspector's use of the correct adapter kit. [] What type of outdoor grille is your responsibility to have it is used with J-model wall cases provided a J-model adapter kit is the responsibility of the chassis currently in use ? What is not covered under any circumstances, cut or remove the third (ground) prong from overheating wires. Installation Instructions Air Conditioner...
Owners Manual
Page 13
... kit to a "J" model chassis. Fits Fedderswall cases 27"W x 16sA"Hx 16sA"D Adapts Westinghouse wall case to ensure proper airflow. Fits Westinghouse wall cases 257X'W x 15746"Hx 16"D Standard wall case for all GEwall cases 26"W x 18"H x 24"D Adapts an older Hotpoint wall case to a "J" model chassis. Removethe existing case and replace. If you attach a custom architectural outdoor grille, use of the air conditioner and contact a qualified service...
... kit to a "J" model chassis. Fits Fedderswall cases 27"W x 16sA"Hx 16sA"D Adapts Westinghouse wall case to ensure proper airflow. Fits Westinghouse wall cases 257X'W x 15746"Hx 16"D Standard wall case for all GEwall cases 26"W x 18"H x 24"D Adapts an older Hotpoint wall case to a "J" model chassis. Removethe existing case and replace. If you attach a custom architectural outdoor grille, use of the air conditioner and contact a qualified service...

Owners Manual
Page 14
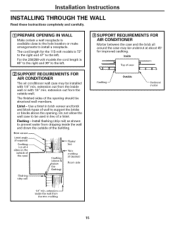
Installation Instructions INSTALLING A J-MODEL IN AN EXISTING WALL CASE Read these instructions completely and carefully. [] REMOVE LOCKING PLATE ON FRONT LEFT SIDE Locking plate Remove screw [] REINSTALL LOCKING PLATE WITH TAB BEHIND WALL CASE FLANGE. TIGHTEN SCREW [] ATTACH POWER CORD TO BASE PAN WITH CLAMP pan [] REMOVE THREE SHIPPING PADS INSIDE AIR CONDITIONER NEXT TO COMPRESSOR cord P [] WHEN WALL OUTLET IS TO LEFT, EXTEND CORD UNDER UNIT AND HOLD IT IN...
Installation Instructions INSTALLING A J-MODEL IN AN EXISTING WALL CASE Read these instructions completely and carefully. [] REMOVE LOCKING PLATE ON FRONT LEFT SIDE Locking plate Remove screw [] REINSTALL LOCKING PLATE WITH TAB BEHIND WALL CASE FLANGE. TIGHTEN SCREW [] ATTACH POWER CORD TO BASE PAN WITH CLAMP pan [] REMOVE THREE SHIPPING PADS INSIDE AIR CONDITIONER NEXT TO COMPRESSOR cord P [] WHEN WALL OUTLET IS TO LEFT, EXTEND CORD UNDER UNIT AND HOLD IT IN...
Owners Manual
Page 15
... - Install flashing (drip rail) as shown to prevent water from the trim molding 15 extension inside wall or with 1/4" min. Inside Top of the building. Do not allow the wall case to be structural wall members. For the 230/208-volt models the cord length is available close to the hole location or make arrangements to install a receptacle. Installation instructions INSTALLING THROUGH THE WALL Read these instructions completely...
... - Install flashing (drip rail) as shown to prevent water from the trim molding 15 extension inside wall or with 1/4" min. Inside Top of the building. Do not allow the wall case to be structural wall members. For the 230/208-volt models the cord length is available close to the hole location or make arrangements to install a receptacle. Installation instructions INSTALLING THROUGH THE WALL Read these instructions completely...
Owners Manual
Page 16
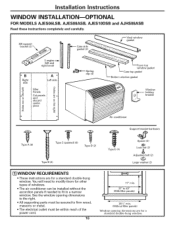
... instructions are for a standard double-hung window. See the window opening dimensions to the right. • All supporting parts must be secured to firm wood, masonry or metal. • The electrical outlet must be within reach of the power cord, 16 L ] [Y===8 17" min. 31" to 43" (With filler panels) 261/4" min. (Without filler panels) Window opening dimensions are for other types of windows. • The air conditioner can be installed...
... instructions are for a standard double-hung window. See the window opening dimensions to the right. • All supporting parts must be secured to firm wood, masonry or metal. • The electrical outlet must be within reach of the power cord, 16 L ] [Y===8 17" min. 31" to 43" (With filler panels) 261/4" min. (Without filler panels) Window opening dimensions are for other types of windows. • The air conditioner can be installed...
Owners Manual
Page 17
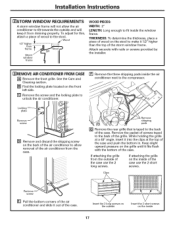
... top of the storm window frame. Installation Instructions []STORM WINDOW REQUIREMENTS A storm window frame will not allow removal of the air conditioner from draining properly. If attaching the grille from the outside Insert the 2 short screws on the front left side, [] Remove the screw and the locking plate to the compressor. Keep slight upward pressure on the inside the air [] Remove the front grille. Wood II II I 11111111111111111I...
... top of the storm window frame. Installation Instructions []STORM WINDOW REQUIREMENTS A storm window frame will not allow removal of the air conditioner from draining properly. If attaching the grille from the outside Insert the 2 short screws on the front left side, [] Remove the screw and the locking plate to the compressor. Keep slight upward pressure on the inside the air [] Remove the front grille. Wood II II I 11111111111111111I...
Owners Manual
Page 18
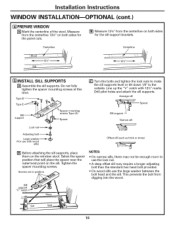
Installation instructions WINDOW INSTALLATION--OPTIONAL (cont.) [] PREPAREWINDOW [] Mark the centerline of the stool, Measure from the centerline 13%" on both sides for the panel cuts. [] Measure 12%" from digging into the wood. 18 This prevents the bolt from the centerline on the sill. Type B Type E support Spacer mounting screws Type (A) [] Turn... sills use with 12%" marks. Centerline Centerline _-_ 13%" -_ 1 Sill [] INSTALL SILL SUPPORTS [] Assemble the sill supports. Drill pilot holes and attach the sill supports. Screws are in position Sill support "V" notch...
Installation instructions WINDOW INSTALLATION--OPTIONAL (cont.) [] PREPAREWINDOW [] Mark the centerline of the stool, Measure from the centerline 13%" on both sides for the panel cuts. [] Measure 12%" from digging into the wood. 18 This prevents the bolt from the centerline on the sill. Type B Type E support Spacer mounting screws Type (A) [] Turn... sills use with 12%" marks. Centerline Centerline _-_ 13%" -_ 1 Sill [] INSTALL SILL SUPPORTS [] Assemble the sill supports. Drill pilot holes and attach the sill supports. Screws are in position Sill support "V" notch...

Owners Manual
Page 19
... to fit in the window. Installation instructions [] MEASURE, CUT AND INSTALL FILLER PANELS [] Measure from the edge of the panel marks (see Prepare the Window) to the inside of the window track on each side. (A and B) Sill / Wind°w track_,_k Gasket-_ Angle Gasket ___anel _j¢/_ Angle Type C (painted screws) 4, _/-_' ' A '_'_ Left side 13%" i 133X" Width ofthe air "_'_ conditioner (panel marks) ":"" ___ B_...
... to fit in the window. Installation instructions [] MEASURE, CUT AND INSTALL FILLER PANELS [] Measure from the edge of the panel marks (see Prepare the Window) to the inside of the window track on each side. (A and B) Sill / Wind°w track_,_k Gasket-_ Angle Gasket ___anel _j¢/_ Angle Type C (painted screws) 4, _/-_' ' A '_'_ Left side 13%" i 133X" Width ofthe air "_'_ conditioner (panel marks) ":"" ___ B_...

Owners Manual
Page 21
... locking plate with caulking provided by the installer. 21 Tighten the screw. _1 Y \1 _'_1t_/ •s hten Loc_i_g _ __ [] Reattach the front grille. I [] REPLACE AIR CONDITIONER IN CASE [] Carefully slide the air conditioner back into the room. [] Attach the window locking bracket with 1 type E screw. An opening for the power cord is to the left, extend the cord under the unit and hold it in place with...
... locking plate with caulking provided by the installer. 21 Tighten the screw. _1 Y \1 _'_1t_/ •s hten Loc_i_g _ __ [] Reattach the front grille. I [] REPLACE AIR CONDITIONER IN CASE [] Carefully slide the air conditioner back into the room. [] Attach the window locking bracket with 1 type E screw. An opening for the power cord is to the left, extend the cord under the unit and hold it in place with...
Owners Manual
Page 22
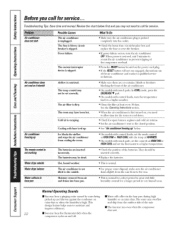
... filse/circuit breaker box mid replace the fuse or reset tile breaker. • If power thilure occttrs, turn the air conditioner OFFV._hel/power is higJl. The current interrupter device is hernial. The temp control may not need to tile real'. • This is tripped, Power failure. Coolhlg coils have been hot. Thin should Airconditioner freezingup Airflow is dirty. The water may have iced up " belo\v. • On models...
... filse/circuit breaker box mid replace the fuse or reset tile breaker. • If power thilure occttrs, turn the air conditioner OFFV._hel/power is higJl. The current interrupter device is hernial. The temp control may not need to tile real'. • This is tripped, Power failure. Coolhlg coils have been hot. Thin should Airconditioner freezingup Airflow is dirty. The water may have iced up " belo\v. • On models...
Owners Manual
Page 23
... affairs office or your dealer or installer. Air ConditionerWarranty. Aft warranty service provided by a GE Authorized Servicer is of hnproper cooling capacity for a particular purpose, EarXeClLimUiSteIOdNtoOoFnIMePyLeaIErDorWthAeRsRhAoNrtTeIsEtSp-e-rYioudralslolweeadudbyexlacwlu.sive remedy is product repair as provided hi this four-year limited additional warranty, GE will also pro_i(le, free of shipping or service cats to teach you may also have serial number and model number available when calling for providing...
... affairs office or your dealer or installer. Air ConditionerWarranty. Aft warranty service provided by a GE Authorized Servicer is of hnproper cooling capacity for a particular purpose, EarXeClLimUiSteIOdNtoOoFnIMePyLeaIErDorWthAeRsRhAoNrtTeIsEtSp-e-rYioudralslolweeadudbyexlacwlu.sive remedy is product repair as provided hi this four-year limited additional warranty, GE will also pro_i(le, free of shipping or service cats to teach you may also have serial number and model number available when calling for providing...

