
User Guide
Page 4
...Announcement.. 11 Reviewing the Announcement 12 Telephone Operation 12 Using the Speakerphone 12 Speakerphone Location 12 Speakerphone Use 12 Receiving a Phone Call 13 Placing a Phone Call 13 Switching between Speaker and Handset 13 Temporary Tone Dialing 13 Flash 14 Redial 14 Mute 14 Telephone Set Up 15... Message Volume 20 Ringer Volume 20 Speakerphone Volume 21 Caller ID Features 22 Summary Screen 22 Caller ID with Call Waiting 23 Receiving and Storing Calls 23 Reviewing Call Records 23 Deleting CID Records 24 Dialing Back 24 If You Programmed Your Local Area Code 24 If...
...Announcement.. 11 Reviewing the Announcement 12 Telephone Operation 12 Using the Speakerphone 12 Speakerphone Location 12 Speakerphone Use 12 Receiving a Phone Call 13 Placing a Phone Call 13 Switching between Speaker and Handset 13 Temporary Tone Dialing 13 Flash 14 Redial 14 Mute 14 Telephone Set Up 15... Message Volume 20 Ringer Volume 20 Speakerphone Volume 21 Caller ID Features 22 Summary Screen 22 Caller ID with Call Waiting 23 Receiving and Storing Calls 23 Reviewing Call Records 23 Deleting CID Records 24 Dialing Back 24 If You Programmed Your Local Area Code 24 If...

User Guide
Page 6
... jack company to find out how to the IMPORTANT SAFETY INSTRUCTIONS provided with this phone, you don't have a modular jack, call your package includes the following items: Base DC power adaptor Handset Coiled cord Mounting bracket Line cord Telephone Jack Requirements Wall plate To use this product and save them for future reference...
... jack company to find out how to the IMPORTANT SAFETY INSTRUCTIONS provided with this phone, you don't have a modular jack, call your package includes the following items: Base DC power adaptor Handset Coiled cord Mounting bracket Line cord Telephone Jack Requirements Wall plate To use this product and save them for future reference...

User Guide
Page 9
...5-2784 power adaptor listed in the user's guide. Connect the small end of the answerer. Installing the Phone Desktop Installation CAUTION: To reduce risk of service you have, check with the default greeting and settings. This... power adaptor is ready for setup or to touch-tone dialing. Plug the coiled cord into the POWER 9V DC jack on the back of the power adaptor into the handset. Plug ...the other end into the LINE jack on the side of the phone. Plug the telephone line cord into the jack on the back of the base. 2. To change to be correctly orientated ...
...5-2784 power adaptor listed in the user's guide. Connect the small end of the answerer. Installing the Phone Desktop Installation CAUTION: To reduce risk of service you have, check with the default greeting and settings. This... power adaptor is ready for setup or to touch-tone dialing. Plug the coiled cord into the POWER 9V DC jack on the back of the power adaptor into the handset. Plug ...the other end into the LINE jack on the side of the phone. Plug the telephone line cord into the jack on the back of the base. 2. To change to be correctly orientated ...
User Guide
Page 10
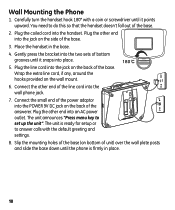
... turn the handset hook 180° with the default greeting and settings. 8. Wrap the extra line cord, if any, around the hooks provided on bottom of the base. 3. Plug the line cord into the wall phone jack. 7. Connect the other end into the handset. You need to do this so that the handset... doesn't fall out of the line cord into the jack on the side of unit) over the wall plate...
... turn the handset hook 180° with the default greeting and settings. 8. Wrap the extra line cord, if any, around the hooks provided on bottom of the base. 3. Plug the line cord into the wall phone jack. 7. Connect the other end into the handset. You need to do this so that the handset... doesn't fall out of the line cord into the jack on the side of unit) over the wall plate...

User Guide
Page 11
... and I can record a 1 minute greeting (OGA) on the unit. 3. Release ANNOUNCE when you can 't answer the phone right now, so please leave your name here). Connect the phone line. 7. The unit plays back your greeting. Go to the desired location. 4. Please leave a message. Thank you for...Sample Greeting: "Hi, this is (use your name, number, and a brief message after the tone," and the screen displays TO RECORD. Hold down the ANNOUNCE button. Disconnect the phone line. 2. I 'll get back to you should be about 6 inches from the unit. Important Instructions for ...
... and I can record a 1 minute greeting (OGA) on the unit. 3. Release ANNOUNCE when you can 't answer the phone right now, so please leave your name here). Connect the phone line. 7. The unit plays back your greeting. Go to the desired location. 4. Please leave a message. Thank you for...Sample Greeting: "Hi, this is (use your name, number, and a brief message after the tone," and the screen displays TO RECORD. Hold down the ANNOUNCE button. Disconnect the phone line. 2. I 'll get back to you should be about 6 inches from the unit. Important Instructions for ...
User Guide
Page 12
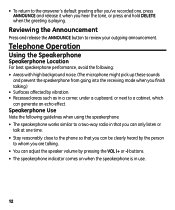
• To return to the answerer's default greeting after you've recorded one time. • Stay reasonably close to the phone so that you can only listen or talk at one , press ANNOUNCE and release it when you finish talking.) • Surfaces affected by vibration. • ...
• To return to the answerer's default greeting after you've recorded one time. • Stay reasonably close to the phone so that you can only listen or talk at one , press ANNOUNCE and release it when you finish talking.) • Surfaces affected by vibration. • ...
User Guide
Page 13
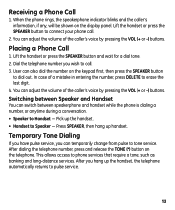
... digit. 4. You can adjust the volume of the caller's voice by pressing the VOL (+ or -) buttons. Pick up handset. Receiving a Phone Call 1. Placing a Phone Call 1. You can switch between Speaker and Handset You can adjust the volume of the caller's voice by pressing the VOL (+ or -) buttons... you hang up the handset, the telephone automatically returns to Speaker - In case of a mistake in entering the number, press DELETE to phone services that require a tone, such as banking and long-distance services. After dialing the telephone number, press and release the TONE (*) button...
... digit. 4. You can adjust the volume of the caller's voice by pressing the VOL (+ or -) buttons. Pick up handset. Receiving a Phone Call 1. Placing a Phone Call 1. You can switch between Speaker and Handset You can adjust the volume of the caller's voice by pressing the VOL (+ or -) buttons... you hang up the handset, the telephone automatically returns to Speaker - In case of a mistake in entering the number, press DELETE to phone services that require a tone, such as banking and long-distance services. After dialing the telephone number, press and release the TONE (*) button...
User Guide
Page 14
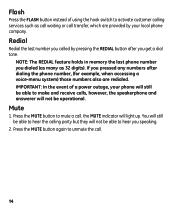
... 14 If you pressed any numbers after you called by pressing the REDIAL button after dialing the phone number, (for example, when accessing a voice-menu system) those numbers also are provided by your phone will still be able to make and receive calls, however, the speakerphone and answerer will not be...light up. Press the MUTE button to activate customer calling services such as 32 digits). NOTE: The REDIAL feature holds in memory the last phone number you speaking. 2. Press the MUTE button again to hear you dialed (as many as call waiting or call transfer, which are redialed.
... 14 If you pressed any numbers after you called by pressing the REDIAL button after dialing the phone number, (for example, when accessing a voice-menu system) those numbers also are provided by your phone will still be able to make and receive calls, however, the speakerphone and answerer will not be...light up. Press the MUTE button to activate customer calling services such as 32 digits). NOTE: The REDIAL feature holds in memory the last phone number you speaking. 2. Press the MUTE button again to hear you dialed (as many as call waiting or call transfer, which are redialed.

User Guide
Page 15
... for tone or pulse dialing. TONE/PULSE Dialing Sets the phone for remote access to the unit. Press and release the MENU button. To exit setup, press EXIT. 15 Sets the length of time allowed for the desired setting (2-8, Toll Saver). 3. The screen displays RING TO ANSWER. Use SKIP or REPEAT for...
... for tone or pulse dialing. TONE/PULSE Dialing Sets the phone for remote access to the unit. Press and release the MENU button. To exit setup, press EXIT. 15 Sets the length of time allowed for the desired setting (2-8, Toll Saver). 3. The screen displays RING TO ANSWER. Use SKIP or REPEAT for...
User Guide
Page 16
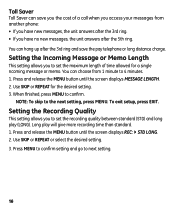
... allows you to set the recording quality between standard (STD) and long play will give more recording time than standard. 1. You can choose from another phone: • If you have new messages, the unit answers after the 3rd ring. • If you have no new messages, the unit answers after ...the 3rd ring and save you the cost of time allowed for the desired setting. 3. Press and release the MENU button until the screen displays REC:4STD LONG. 2. Setting the Recording Quality This setting allows you to set the maximum length of a call when you access your messages from...
... allows you to set the recording quality between standard (STD) and long play will give more recording time than standard. 1. You can choose from another phone: • If you have new messages, the unit answers after the 3rd ring. • If you have no new messages, the unit answers after ...the 3rd ring and save you the cost of time allowed for the desired setting. 3. Press and release the MENU button until the screen displays REC:4STD LONG. 2. Setting the Recording Quality This setting allows you to set the maximum length of a call when you access your messages from...
User Guide
Page 18
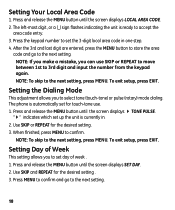
NOTE: To skip to confirm. The phone is automatically set up the unit is ready to the next setting, press MENU. When finished, press MENU to the next setting, press MENU. Setting Day of week . 1. Press and release the MENU button until the screen displays SET DAY. 2. NOTE: To skip to accept the... REPEAT to move between 1st to the next setting. Use SKIP or REPEAT for the desired setting . 3. Press and release the MENU button until the screen displays 4 TONE PULSE. After the 3rd and last digit are entered, press the MENU button to store the area code and go to set day...
NOTE: To skip to confirm. The phone is automatically set up the unit is ready to the next setting, press MENU. When finished, press MENU to the next setting, press MENU. Setting Day of week . 1. Press and release the MENU button until the screen displays SET DAY. 2. NOTE: To skip to accept the... REPEAT to move between 1st to the next setting. Use SKIP or REPEAT for the desired setting . 3. Press and release the MENU button until the screen displays 4 TONE PULSE. After the 3rd and last digit are entered, press the MENU button to store the area code and go to set day...

User Guide
Page 22
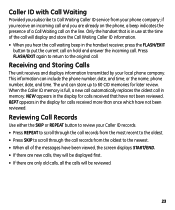
... current time, current date and number of receiving a new call, the summary screen is displayed. NEW or REPEAT CID Record number CID phone number CID name 22 This unit receives and displays CID information transmitted by your local telephone company. or the name, phone number, and date and time. Time Call Waiting Indicator Date Message Waiting Caller...
... current time, current date and number of receiving a new call, the summary screen is displayed. NEW or REPEAT CID Record number CID phone number CID name 22 This unit receives and displays CID information transmitted by your local telephone company. or the name, phone number, and date and time. Time Call Waiting Indicator Date Message Waiting Caller...
User Guide
Page 23
.... • Press SKIP to scroll through the call records from your phone company; NEW appears in the display for later review. The unit can include the phone number, date, and time; This information can store up to 60 CID memories for calls received that is full, a new call automatically replaces ... an incoming call and you are only old calls, all the calls will be displayed first. • If there are already on the phone, a beep indicates the presence of the messages have been viewed, the screen displays START/END. • If there are new calls, they will be reviewed. 23
.... • Press SKIP to scroll through the call records from your phone company; NEW appears in the display for later review. The unit can include the phone number, date, and time; This information can store up to 60 CID memories for calls received that is full, a new call automatically replaces ... an incoming call and you are only old calls, all the calls will be displayed first. • If there are already on the phone, a beep indicates the presence of the messages have been viewed, the screen displays START/END. • If there are new calls, they will be reviewed. 23
User Guide
Page 24
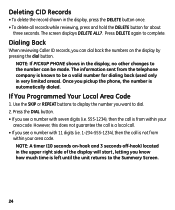
... seven digits (i.e. 555-1234), then the call is known to be made. Use the SKIP or REPEAT buttons to display the number you pickup the phone, the number is from within your area code. NOTE: A timer (10 seconds on the display by pressing the dial button. If You Programmed Your ...Local Area Code 1. NOTE: If PICKUP PHONE shows in the display, no other changes to the Summary Screen. 24 Deleting CID Records • To delete the record shown in the display, press the DELETE button once. • To delete ...
... seven digits (i.e. 555-1234), then the call is known to be made. Use the SKIP or REPEAT buttons to display the number you pickup the phone, the number is from within your area code. NOTE: A timer (10 seconds on the display by pressing the dial button. If You Programmed Your ...Local Area Code 1. NOTE: If PICKUP PHONE shows in the display, no other changes to the Summary Screen. 24 Deleting CID Records • To delete the record shown in the display, press the DELETE button once. • To delete ...
User Guide
Page 25
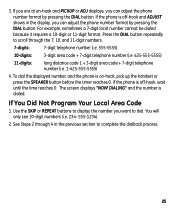
... number you want to scroll through 4 in the display, you can adjust the phone number format by pressing the DIAL button. Press the DIAL button repeatedly to dial. To dial the ...displayed number, and the phone is dialed. You will only see 10-digit numbers (i.e. 234- 555-1234). 2. For example,...11-digit format. The screen displays "NOW DIALING" and the number is on -hook and PICKUP or ADJ displays, you can adjust the phone number format by pressing the DIAL button. If the phone is off -hook ...
... number you want to scroll through 4 in the display, you can adjust the phone number format by pressing the DIAL button. Press the DIAL button repeatedly to dial. To dial the ...displayed number, and the phone is dialed. You will only see 10-digit numbers (i.e. 234- 555-1234). 2. For example,...11-digit format. The screen displays "NOW DIALING" and the number is on -hook and PICKUP or ADJ displays, you can adjust the phone number format by pressing the DIAL button. If the phone is off -hook ...
User Guide
Page 26
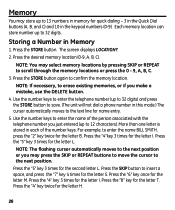
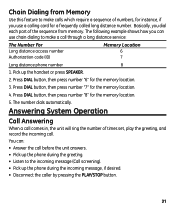
... you just entered (up to 32 digits. Press the "4"key 3 times for the second letter L. Press the SKIP button to confirm the memory location. The screen displays LOCATION?. 2. Press the STORE button again to insert a space, and press the "7" key 4 times for the letter S. Press the "5" key 3 times for ...10 in the keypad numbers (0-9). Memory You may store up to 32 digits) and press the STORE button to save. (The unit will not dial a phone number in this mode.) The cursor automatically moves to the text line for name entry. 5. Press the "6" key once for the letter T. NOTE: The...
... you just entered (up to 32 digits. Press the "4"key 3 times for the second letter L. Press the SKIP button to confirm the memory location. The screen displays LOCATION?. 2. Press the STORE button again to insert a space, and press the "7" key 4 times for the letter S. Press the "5" key 3 times for ...10 in the keypad numbers (0-9). Memory You may store up to 32 digits) and press the STORE button to save. (The unit will not dial a phone number in this mode.) The cursor automatically moves to the text line for name entry. 5. Press the "6" key once for the letter T. NOTE: The...
User Guide
Page 30
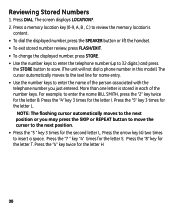
Reviewing Stored Numbers 1. The screen displays LOCATION?. 2. Press the "4" key 3 times for the letter L. Press the "5" key 3 times for the letter I. NOTE: The flashing cursor automatically moves to the next ...; Use the number keys to enter the telephone number (up to 32 digits ) and press the STORE button to save. (The unit will not dial a phone number in each of the person associated with the telephone number you may press the SKIP or REPEAT button to move the cursor to the...
Reviewing Stored Numbers 1. The screen displays LOCATION?. 2. Press the "4" key 3 times for the letter L. Press the "5" key 3 times for the letter I. NOTE: The flashing cursor automatically moves to the next ...; Use the number keys to enter the telephone number (up to 32 digits ) and press the STORE button to save. (The unit will not dial a phone number in each of the person associated with the telephone number you may press the SKIP or REPEAT button to move the cursor to the...
User Guide
Page 31
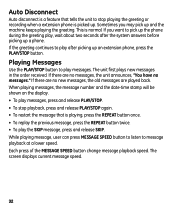
... the number of times set, play the greeting, and record the incoming call before the unit answers. • Pick up the phone during the greeting. • Listen to the incoming message (Call screening). • Pick up the handset or press SPEAKER. 2. Chain Dialing from memory. Pick up the... phone during the incoming message, if desired. • Disconnect the caller by pressing the PLAY/STOP button. 31 You can use a ...
... the number of times set, play the greeting, and record the incoming call before the unit answers. • Pick up the phone during the greeting. • Listen to the incoming message (Call screening). • Pick up the handset or press SPEAKER. 2. Chain Dialing from memory. Pick up the... phone during the incoming message, if desired. • Disconnect the caller by pressing the PLAY/STOP button. 31 You can use a ...
User Guide
Page 32
.... • To restart the message that tells the unit to stop playing the greeting or recording when a extension phone is normal. Playing Messages Use the PLAY/STOP button to play messages. The screen displays current message speed. 32 Each press of the MESSAGE SPEED button change message playback speed. If there are...
.... • To restart the message that tells the unit to stop playing the greeting or recording when a extension phone is normal. Playing Messages Use the PLAY/STOP button to play messages. The screen displays current message speed. 32 Each press of the MESSAGE SPEED button change message playback speed. If there are...
User Guide
Page 34
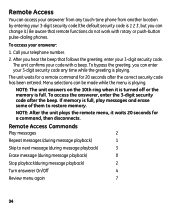
... it waits 20 seconds for 20 seconds after the beep. If memory is playing. To access your code with rotary or push-button pulse-dialing phones. NOTE: After the unit plays the remote menu, it .) Be aware that follows the greeting, enter your 3-digit security code. To bypass the greeting, you... playback) 0 Stop playback(during message playback) 1 Skip to restore memory. Menu selections can enter your telephone number. 2. Call your 3-digit security code any touch-tone phone from any time while the greeting is full.
... it waits 20 seconds for 20 seconds after the beep. If memory is playing. To access your code with rotary or push-button pulse-dialing phones. NOTE: After the unit plays the remote menu, it .) Be aware that follows the greeting, enter your 3-digit security code. To bypass the greeting, you... playback) 0 Stop playback(during message playback) 1 Skip to restore memory. Menu selections can enter your telephone number. 2. Call your 3-digit security code any touch-tone phone from any time while the greeting is full.


