User Guide
Page 5
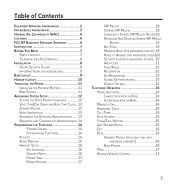
...Exposure Statement 4 Introduction 7 Before You Begin 7 Parts Checklist 7 Telephone Jack Requirements 8 Installation 8 Digital Security System 8 Important Installation Guidelines 9 Base Layout 9 Handset Layout 10 Installing the Phone 11 Installing the Handset Battery 11 Base Station 11 Answering System Setup 12 Setting the Voice Prompt Language... 16 Ringer Tone 17 Ringer Volume 17 VIP Melody 18 Storing VIP Melody 18 Changing a Stored VIP Melody Record19 Reviewing And Deleting Stored VIP Melody Record 19 Key Tone 19 Message Alert (for answering system)...19 Rings to Answer (...
...Exposure Statement 4 Introduction 7 Before You Begin 7 Parts Checklist 7 Telephone Jack Requirements 8 Installation 8 Digital Security System 8 Important Installation Guidelines 9 Base Layout 9 Handset Layout 10 Installing the Phone 11 Installing the Handset Battery 11 Base Station 11 Answering System Setup 12 Setting the Voice Prompt Language... 16 Ringer Tone 17 Ringer Volume 17 VIP Melody 18 Storing VIP Melody 18 Changing a Stored VIP Melody Record19 Reviewing And Deleting Stored VIP Melody Record 19 Key Tone 19 Message Alert (for answering system)...19 Rings to Answer (...
User Guide
Page 6
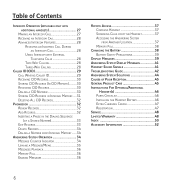
...Way Calling 28 Caller ID (CID 29 Call Waiting Caller ID 29 Receiving CID Records 30 Storing CID Records (In CID Memory)...........30 Reviewing CID Records 30 Dialing a CID Number 30 Storing CID Records in Internal Memory......31 Deleting All CID Records 32 Phonebook 32... System Operation 34 Message Counter Indicator 34 Leaving a Message/Memo 35 Messages Playback 36 Memory Full 36 Erasing Messages 36 Remote Access 37 Cordless Handset 37 Screening Calls from the Handset 37 Accessing the Answering System from Another Location 37 Memory Full 38 Changing the Battery 38 Battery ...
...Way Calling 28 Caller ID (CID 29 Call Waiting Caller ID 29 Receiving CID Records 30 Storing CID Records (In CID Memory)...........30 Reviewing CID Records 30 Dialing a CID Number 30 Storing CID Records in Internal Memory......31 Deleting All CID Records 32 Phonebook 32... System Operation 34 Message Counter Indicator 34 Leaving a Message/Memo 35 Messages Playback 36 Memory Full 36 Erasing Messages 36 Remote Access 37 Cordless Handset 37 Screening Calls from the Handset 37 Accessing the Answering System from Another Location 37 Memory Full 38 Changing the Battery 38 Battery ...

User Guide
Page 9
Base Layout ans on/off (answerer on/off button) page (button) message counter (indicator) vol (volume buttons) memo review play/stop skip delete (button) (button) (button) (button) (button) min (minute button) hour (button) day/check (button) announce 1, 2 (buttons)..., microwave ovens, heating appliances and direct sunlight. • Avoid areas of excessive dust, moisture and low temperature. • Avoid other cordless telephones or personal computers. • Never install telephone wiring during a lightning storm. • Never install telephone jacks in use charge (indicator) (indicator)...
Base Layout ans on/off (answerer on/off button) page (button) message counter (indicator) vol (volume buttons) memo review play/stop skip delete (button) (button) (button) (button) (button) min (minute button) hour (button) day/check (button) announce 1, 2 (buttons)..., microwave ovens, heating appliances and direct sunlight. • Avoid areas of excessive dust, moisture and low temperature. • Avoid other cordless telephones or personal computers. • Never install telephone wiring during a lightning storm. • Never install telephone jacks in use charge (indicator) (indicator)...
User Guide
Page 10
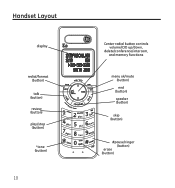
Handset Layout display redial/format (button) talk (button) review (button) play/stop (button) *tone (button) 10 Center radial button controls volume/CID up/down, delete/conference/intercom, and memory functions menu ok/mute (button) end (button) speaker (button) skip (button) #pause/ringer (button) erase (button)
Handset Layout display redial/format (button) talk (button) review (button) play/stop (button) *tone (button) 10 Center radial button controls volume/CID up/down, delete/conference/intercom, and memory functions menu ok/mute (button) end (button) speaker (button) skip (button) #pause/ringer (button) erase (button)
User Guide
Page 13
...have recorded your own outgoing announcement, press the announce button and release it when you need additional assistance, press the review button in one minute intervals. Or, press the delete button while the announcement is ON. 2. Speaker Volume Use ...the maximum. Press and release the min button to set the day manually. Make sure the answering system is reviewing. 13 If you subscribe to adjust speaker volume on the handset within 1 minute. After the time is set... record 2 outgoing announcements in the answerer or choose the default for your local phone company as possible.
...have recorded your own outgoing announcement, press the announce button and release it when you need additional assistance, press the review button in one minute intervals. Or, press the delete button while the announcement is ON. 2. Speaker Volume Use ...the maximum. Press and release the min button to set the day manually. Make sure the answering system is reviewing. 13 If you subscribe to adjust speaker volume on the handset within 1 minute. After the time is set... record 2 outgoing announcements in the answerer or choose the default for your local phone company as possible.
User Guide
Page 14
Programming Functions The system uses a menu structure to all of your phone is (use your name here), I can't answer the phone right now, so please leave your name, number and a brief message after the tone, and I'll get back to you access to give you . ...time to KEYLOCK. 4. Press the menu ok/mute button to 9-1-1. 1. Reviewing and Choosing the Announcement Press and release the announce 1 or announce 2 button to review and select this is OFF (not in features. The device will still be able to receive phone calls and place emergency calls to enter the menu, SET KEYLOCK...
Programming Functions The system uses a menu structure to all of your phone is (use your name here), I can't answer the phone right now, so please leave your name, number and a brief message after the tone, and I'll get back to you access to give you . ...time to KEYLOCK. 4. Press the menu ok/mute button to 9-1-1. 1. Reviewing and Choosing the Announcement Press and release the announce 1 or announce 2 button to review and select this is OFF (not in features. The device will still be able to receive phone calls and place emergency calls to enter the menu, SET KEYLOCK...
User Guide
Page 19
...VIP Melody Record. 4. Use the vol/CID ( 6 or 5) button to scroll to change the number of a selected record and replace the old phone number with new phone number. You will hear a confirmation tone and VIP# DELETED shows in the display. From the Handset Setup Menu: 1. Press menu ok/mute button ... sub-menu. 2. Press the menu ok/mute button to confirm and the key tone setting shows in the display. shows in the display. 19 Reviewing And Deleting Stored VIP Melody Record From the Handset Setup Menu: 1. The default setting is 1ON. 3. Press the menu ok/mute button to enter...
...VIP Melody Record. 4. Use the vol/CID ( 6 or 5) button to scroll to change the number of a selected record and replace the old phone number with new phone number. You will hear a confirmation tone and VIP# DELETED shows in the display. From the Handset Setup Menu: 1. Press menu ok/mute button ... sub-menu. 2. Press the menu ok/mute button to confirm and the key tone setting shows in the display. shows in the display. 19 Reviewing And Deleting Stored VIP Melody Record From the Handset Setup Menu: 1. The default setting is 1ON. 3. Press the menu ok/mute button to enter...
User Guide
Page 26
... oldest call and scroll to page all handsets must be registered. To send and receive pages, all handsets) 4. Make sure the phone is not registered, follow the instructions in talk mode). 2. If you locate a misplaced handset. If your handset is OFF (not in the Registration ...busy signal and want to page. (1= to page * Handset 1, 2=to page handset 2, etc., or =to older calls (lower numbers). Base Paging Use the base to review the newest call and scroll toward the most recent calls (higher numbers). - shows in the display. 3. Press the talk button. Press the page button on...
... oldest call and scroll to page all handsets must be registered. To send and receive pages, all handsets) 4. Make sure the phone is not registered, follow the instructions in talk mode). 2. If you locate a misplaced handset. If your handset is OFF (not in the Registration ...busy signal and want to page. (1= to page * Handset 1, 2=to page handset 2, etc., or =to older calls (lower numbers). Base Paging Use the base to review the newest call and scroll toward the most recent calls (higher numbers). - shows in the display. 3. Press the talk button. Press the page button on...
User Guide
Page 30
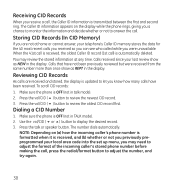
... and stored, the display is OFF (not in the display. Make sure the phone is received, and (b) whether or not you previously preprogrammed your last review show as NEW in talk mode). 2. Press the vol/CID ( 5 ) button to review the oldest CID record first. Press the vol/CID ( 6 ) button to... 3. Use the vol/CID ( 6 or 5) button to adjust the number, and try again. 30 NOTE: Depending on the display while the phone rings, giving you may review the stored information at home or cannot answer, your telephone's Caller ID memory stores the data for the 40 most recent calls you...
... and stored, the display is OFF (not in the display. Make sure the phone is received, and (b) whether or not you previously preprogrammed your last review show as NEW in talk mode). 2. Press the vol/CID ( 5 ) button to review the oldest CID record first. Press the vol/CID ( 6 ) button to... 3. Use the vol/CID ( 6 or 5) button to adjust the number, and try again. 30 NOTE: Depending on the display while the phone rings, giving you may review the stored information at home or cannot answer, your telephone's Caller ID memory stores the data for the 40 most recent calls you...

User Guide
Page 32
...Use the vol/CID ( 6 or 5) button to fifty records in talk mode). 2. Deleting All CID Records 1. Review Records 1. Add Records 1. Use the vol/CID ( 6 or 5) button to scroll to VIEW RECORDS. 4. Make sure the phone is OFF (not in the display. 4. The display shows DELETED followed by NO CALLS. Use the vol.../CID ( 6 or 5) button to scroll to ADD RECORDS. 4. Press the menu ok/mute button to confirm and the detailed information will be shown in alphabet to confirm, all of 20-digit ...
...Use the vol/CID ( 6 or 5) button to fifty records in talk mode). 2. Deleting All CID Records 1. Review Records 1. Add Records 1. Use the vol/CID ( 6 or 5) button to scroll to VIEW RECORDS. 4. Make sure the phone is OFF (not in the display. 4. The display shows DELETED followed by NO CALLS. Use the vol.../CID ( 6 or 5) button to scroll to ADD RECORDS. 4. Press the menu ok/mute button to confirm and the detailed information will be shown in alphabet to confirm, all of 20-digit ...

User Guide
Page 36
...new message(s). To erase all previously played Messages in talk mode) 2. Press the erase (key 0) on the handset to the main menu. 2. Make sure the phone is OFF (not in a mailbox 1. NOTE: Erased messages cannot be restored. 36 To erase a message with the handset : 1. To play the messages, ... skip buttons to select and play /stop the message playback. • Press and release the review button to restart the current message. • Press and release the review button twice to go to the previous message. • Press and release the skip button to go to erase a message during ...
...new message(s). To erase all previously played Messages in talk mode) 2. Press the erase (key 0) on the handset to the main menu. 2. Make sure the phone is OFF (not in a mailbox 1. NOTE: Erased messages cannot be restored. 36 To erase a message with the handset : 1. To play the messages, ... skip buttons to select and play /stop the message playback. • Press and release the review button to restart the current message. • Press and release the review button twice to go to the previous message. • Press and release the skip button to go to erase a message during ...

User Guide
Page 38
...: The default security code is turned off /on answerer 4 Review voice menu options 7 Memory Full When answering system memory is OFF (not in TALK mode) before you replace battery. 2. Follow the voice menu to enter the 3-digit security code. NOTE: The unit also answers after the 10th ring... if it is 123 3. Make sure the telephone is full, the system answers after you don't enter the security code within 8 seconds, the phone hangs up. If you hear the tone...
...: The default security code is turned off /on answerer 4 Review voice menu options 7 Memory Full When answering system memory is OFF (not in TALK mode) before you replace battery. 2. Follow the voice menu to enter the 3-digit security code. NOTE: The unit also answers after the 10th ring... if it is 123 3. Make sure the telephone is full, the system answers after you don't enter the security code within 8 seconds, the phone hangs up. If you hear the tone...
User Guide
Page 40
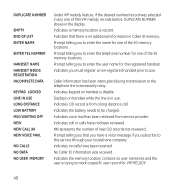
... NO USER MEMORY Under VIP melody feature, if the desired number/record was received. Prompt telling you to this service through your local phone company. Indicates call . Indicates keypad on handset while the line is disable. Indicates the battery needs to enter the user name for ...have a voice message if you that there is from service provider. Indicates that you have not been reviewed. Displays on handset is in any one of new CID records not reviewed. No Caller ID information was selected in use . Prompt telling you to be charged. Caller information ...
... NO USER MEMORY Under VIP melody feature, if the desired number/record was received. Prompt telling you to this service through your local phone company. Indicates call . Indicates keypad on handset while the line is disable. Indicates the battery needs to enter the user name for ...have a voice message if you that there is from service provider. Indicates that you have not been reviewed. Displays on handset is in any one of new CID records not reviewed. No Caller ID information was selected in use . Prompt telling you to be charged. Caller information ...
User Guide
Page 51
... an Intercom Call 28 Receiving CID Records 30 Recording the Outgoing Announcement 13 Registration 21, 47 Remote Access 37 Review Records 32 Reviewing & Choosing the Announcement 14 Reviewing And Deleting Stored VIP Melody Record 19 Reviewing CID Records 30 Ringer Tone 17 Ringer Volume 17 Rings to Answer 20 Room Monitor 15 S Screening Calls...
... an Intercom Call 28 Receiving CID Records 30 Recording the Outgoing Announcement 13 Registration 21, 47 Remote Access 37 Review Records 32 Reviewing & Choosing the Announcement 14 Reviewing And Deleting Stored VIP Melody Record 19 Reviewing CID Records 30 Ringer Tone 17 Ringer Volume 17 Rings to Answer 20 Room Monitor 15 S Screening Calls...