
User Guide
Page 5
Memory Log or to the Intercom/. Volume 15 Ringer Tone 15 Priority Line 15 Delay Ring 16 Phone ID 16 Phone Name 17 Intercom Auto Answer 17 Flash Time 18 Call Alert Tone 18 No Unknown/Blocked 18 Display Contrast 19 Local Area Code 19 Regional Area Codes 19 Manually Setting the Time and Date 20 Hour Format 21 Restoring the Default Settings 21 Basic Operation 21 Making Calls with the Handset 21 Making Calls with the Speakerphone 22 Making Calls with the Optional Headset........22 Pre-dialing 22 Answering Calls 23 Switching...
Memory Log or to the Intercom/. Volume 15 Ringer Tone 15 Priority Line 15 Delay Ring 16 Phone ID 16 Phone Name 17 Intercom Auto Answer 17 Flash Time 18 Call Alert Tone 18 No Unknown/Blocked 18 Display Contrast 19 Local Area Code 19 Regional Area Codes 19 Manually Setting the Time and Date 20 Hour Format 21 Restoring the Default Settings 21 Basic Operation 21 Making Calls with the Handset 21 Making Calls with the Speakerphone 22 Making Calls with the Optional Headset........22 Pre-dialing 22 Answering Calls 23 Switching...

User Guide
Page 7
... SAFETY INSTRUCTIONS provided with the additional purchase of this telephone, you must subscribe to two separate services available from your phone to a cordless feature with this user's guide. Your phone features 16 memory locations, 94 phone book memories, hold, conference call, intercom, call transfer, Caller ID display, and speakerphone capabilities. It also features an Auto Attendant function, which will pick up to 16 station users. This telephone is a full-featured phone ideally suited for future reference. IMPORTANT: In order to use . It...
... SAFETY INSTRUCTIONS provided with the additional purchase of this telephone, you must subscribe to two separate services available from your phone to a cordless feature with this user's guide. Your phone features 16 memory locations, 94 phone book memories, hold, conference call, intercom, call transfer, Caller ID display, and speakerphone capabilities. It also features an Auto Attendant function, which will pick up to 16 station users. This telephone is a full-featured phone ideally suited for future reference. IMPORTANT: In order to use . It...

User Guide
Page 9
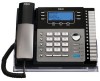
Base Layout Privacy (button) Menu (button) Exit (button) Redial/Format (button) Flash (button) Transfer (button) Conference (button) Hold (button) * (button) Headset (button) Connections & Setup Delete (button) New Message (indicator) only applicable for Model 25424 Dial (button) Sel/Save (button) Intercom (button) Memory 1-16 (buttons) Page (button) Store (button) Volume pq (buttons) CID (button) only applicable for Model 25424 Line 4 (button) Line 3 (button) Line 2 (button) Line 1 Speaker #Pause (button) (button) (button) Microphone Mute (for speakerphone) (button) ...
Base Layout Privacy (button) Menu (button) Exit (button) Redial/Format (button) Flash (button) Transfer (button) Conference (button) Hold (button) * (button) Headset (button) Connections & Setup Delete (button) New Message (indicator) only applicable for Model 25424 Dial (button) Sel/Save (button) Intercom (button) Memory 1-16 (buttons) Page (button) Store (button) Volume pq (buttons) CID (button) only applicable for Model 25424 Line 4 (button) Line 3 (button) Line 2 (button) Line 1 Speaker #Pause (button) (button) (button) Microphone Mute (for speakerphone) (button) ...

User Guide
Page 13
... on Line 2, Line 3, or Line 4. Features like intercom, page and call transfer may choose to the Line 1 + 2 jack, and the phone must be common for all phones on -line the phone number for example, and then set your own Phone ID, or change the data port switch to the normal line when you are fully compatible. 13 You may be used among the units, but Line 1 must be connected to share or privatize lines 2, 3 and...
... on Line 2, Line 3, or Line 4. Features like intercom, page and call transfer may choose to the Line 1 + 2 jack, and the phone must be common for all phones on -line the phone number for example, and then set your own Phone ID, or change the data port switch to the normal line when you are fully compatible. 13 You may be used among the units, but Line 1 must be connected to share or privatize lines 2, 3 and...

User Guide
Page 14
... used, the connection is connected to the current setting. 2. Also , whenever you will hear an error tone. Press the Sel/Save button to ENGLISH, ESPANOL, or FRANCAIS. The volume indicator scale is set independently with the Vol (+ or -) buttons. Volume The ringer, speaker, and handset/headset volume is displayed during volume adjustment. The phone rings according to the system, you have made a program selection by pressing an Intercom/Memo Log button (1-16). Programming the Telephone When programming the phone, if at a time...
... used, the connection is connected to the current setting. 2. Also , whenever you will hear an error tone. Press the Sel/Save button to ENGLISH, ESPANOL, or FRANCAIS. The volume indicator scale is set independently with the Vol (+ or -) buttons. Volume The ringer, speaker, and handset/headset volume is displayed during volume adjustment. The phone rings according to the system, you have made a program selection by pressing an Intercom/Memo Log button (1-16). Programming the Telephone When programming the phone, if at a time...

User Guide
Page 15
... for incoming calls even if the ringer is disabled. If the priority line is in standby mode. 2. The default is Line 1. 7. Choose from eight different tones, or turn the ringer OFF. NOTE: If you pick up or down to Line 2. 8. When you select OFF, the cursor automatically moves to save . Use the Vol (+ or -) buttons to scroll up the handset or press the Speaker button, the unit automatically...
... for incoming calls even if the ringer is disabled. If the priority line is in standby mode. 2. The default is Line 1. 7. Choose from eight different tones, or turn the ringer OFF. NOTE: If you pick up or down to Line 2. 8. When you select OFF, the cursor automatically moves to save . Use the Vol (+ or -) buttons to scroll up the handset or press the Speaker button, the unit automatically...

User Guide
Page 16
... SET PHONE OPTIONS. 3. NOTE: The default Delay Ring is unique. A maximum of 16 phones can be connected in the system at any memory button (1-16) to another memory button. Press the Sel/Save button. 4. NOTE: The Intercom indicator will flash red and blue if the ID is not programmed. Press the Menu button while in standby mode. 2. Press the Sel/Save button to 2 rings. If your system has a phone with the auto...
... SET PHONE OPTIONS. 3. NOTE: The default Delay Ring is unique. A maximum of 16 phones can be connected in the system at any memory button (1-16) to another memory button. Press the Sel/Save button. 4. NOTE: The Intercom indicator will flash red and blue if the ID is not programmed. Press the Menu button while in standby mode. 2. Press the Sel/Save button to 2 rings. If your system has a phone with the auto...

User Guide
Page 17
... Sel/Save button. 6. Press the Sel/Save button. 4. Use the Vol (+ or -) buttons to scroll up or down to answer an intercom call by automatically activating the speaker. Press the 6 key two times for the letter N. Use the Vol (+ or -) buttons to scroll up or down to SET PHONE NAME. 5. Press the Menu button while in standby mode. 2. Intercom Auto Answer For "hands-free" operation, the phone can be set to SET PHONE OPTIONS. 3. Programming the Telephone Phone Name 1.
... Sel/Save button. 6. Press the Sel/Save button. 4. Use the Vol (+ or -) buttons to scroll up or down to answer an intercom call by automatically activating the speaker. Press the 6 key two times for the letter N. Use the Vol (+ or -) buttons to scroll up or down to SET PHONE NAME. 5. Press the Menu button while in standby mode. 2. Intercom Auto Answer For "hands-free" operation, the phone can be set to SET PHONE OPTIONS. 3. Programming the Telephone Phone Name 1.

User Guide
Page 19
... Menu button while in standby mode. 2. NOTE: If you may need to set up or down to one of the button. 5. Programming the Telephone 7. Press the Sel/Save button. Press the Sel/Save button to erase all digits. NOTE: Not applicable to save . Enter Number shows in an area which: • uses multiple area codes • uses overlapping area codes • requires 10-digit dialing. 19 Press the Sel/Save button to Model...
... Menu button while in standby mode. 2. NOTE: If you may need to set up or down to one of the button. 5. Programming the Telephone 7. Press the Sel/Save button. Press the Sel/Save button to erase all digits. NOTE: Not applicable to save . Enter Number shows in an area which: • uses multiple area codes • uses overlapping area codes • requires 10-digit dialing. 19 Press the Sel/Save button to Model...

User Guide
Page 20
... step in the display. 6. To manually reset the time and date, follow the steps below. 1. Press the Sel/Save button to the month field. 10. Manually Setting the Time and Date The time and date is not necessary to re-program the complete time and date if you make a mistake, press the Delete button to SET TIME & DATE. 3. Use the Vol (+ or -) buttons to scroll up or down to REGIONAL AREA CODES. 5. hour only). 20...
... step in the display. 6. To manually reset the time and date, follow the steps below. 1. Press the Sel/Save button to the month field. 10. Manually Setting the Time and Date The time and date is not necessary to re-program the complete time and date if you make a mistake, press the Delete button to SET TIME & DATE. 3. Use the Vol (+ or -) buttons to scroll up or down to REGIONAL AREA CODES. 5. hour only). 20...

User Guide
Page 21
... down to SET TIME & DATE. 3. Making Calls with the Handset 1. The default is interconnected to save . Press the Sel/Save button. 4. Press the Sel/Save button to all others by an intercom. Basic Operation Your phone provides the convenience of accessing four separate telephone lines, each obtained from the telephone company and each having its own phone number. Press the Menu button while in standby mode. 2. Use the Vol (+ or -) buttons to scroll...
... down to SET TIME & DATE. 3. Making Calls with the Handset 1. The default is interconnected to save . Press the Sel/Save button. 4. Press the Sel/Save button to all others by an intercom. Basic Operation Your phone provides the convenience of accessing four separate telephone lines, each obtained from the telephone company and each having its own phone number. Press the Menu button while in standby mode. 2. Use the Vol (+ or -) buttons to scroll...

User Guide
Page 24
... a call on Hold while in use the headset. The line indicator for the line on hold flashes blue. Anyone trying to disable (silence) an incoming ring signal, intercom ring, or page. NOTE: If Intercom Auto Answer is turned ON, the unit automatically answers the intercom call forwarding, which are available through your local phone company. 24 NOTE: If you put the line in Privacy mode, no beep is idle, press the Privacy button. Basic Operation Do Not Disturb This feature is set...
... a call on Hold while in use the headset. The line indicator for the line on hold flashes blue. Anyone trying to disable (silence) an incoming ring signal, intercom ring, or page. NOTE: If Intercom Auto Answer is turned ON, the unit automatically answers the intercom call forwarding, which are available through your local phone company. 24 NOTE: If you put the line in Privacy mode, no beep is idle, press the Privacy button. Basic Operation Do Not Disturb This feature is set...

User Guide
Page 25
...'s line rapidly flashes red and rings during call transfer. • If the transferred call is not picked up the transferred call, and you want to attempt to transfer to six previously dialed phone numbers. 1. The transfer cancels, the line is automatically selected, OR Press a line button to dial the phone number. Reviewing the Redial Numbers Your phone records up the handset (handset mode), or press the Speaker button (speakerphone mode), or press the Headset button (headset mode) and the priority line is put on hold, and the line indicator flashes...
...'s line rapidly flashes red and rings during call transfer. • If the transferred call is not picked up the transferred call, and you want to attempt to transfer to six previously dialed phone numbers. 1. The transfer cancels, the line is automatically selected, OR Press a line button to dial the phone number. Reviewing the Redial Numbers Your phone records up the handset (handset mode), or press the Speaker button (speakerphone mode), or press the Headset button (headset mode) and the priority line is put on hold, and the line indicator flashes...

User Guide
Page 26
... can use the privacy feature to secure the line. 1. To connect and conference 1. To answer the call, press that can be connected to the same line. b) the station receiving the transfer. Message Waiting Provide your phone company offers voice messaging service and you want and dial the telephone number. Privacy While in use , a line can access the line are not compatible with these models can access the line on a line, press the Privacy button. While on hold. The indicator turns on the line...
... can use the privacy feature to secure the line. 1. To connect and conference 1. To answer the call, press that can be connected to the same line. b) the station receiving the transfer. Message Waiting Provide your phone company offers voice messaging service and you want and dial the telephone number. Privacy While in use , a line can access the line are not compatible with these models can access the line on a line, press the Privacy button. While on hold. The indicator turns on the line...

User Guide
Page 29
... use automatically activate their speakerphones and receive your local phone company. Caller ID Note: The Caller ID section of records in CID memory Receiving and Storing CID Records This unit receives and displays information transmitted by your page. 3. Phone ID Battery indicator Time and date Name of phone CID records waiting to Model 25423. Speak into the handset. The line number for the call in this user's guide is displayed. It is displayed until any button is turned on. Summary Screen...
... use automatically activate their speakerphones and receive your local phone company. Caller ID Note: The Caller ID section of records in CID memory Receiving and Storing CID Records This unit receives and displays information transmitted by your page. 3. Phone ID Battery indicator Time and date Name of phone CID records waiting to Model 25423. Speak into the handset. The line number for the call in this user's guide is displayed. It is displayed until any button is turned on. Summary Screen...

User Guide
Page 31
... see who is calling when you 're talking on the base). Memory 7-digits: 7-digit telephone number (i.e.555-5555) 10-digits: 3-digit area code +7-digit telephone number (i.e.425-555-5555) 11-digits: long distance code 1 +3-digit area code +7-digit telephone number (i.e. 1-425-555-5555) 4. Use the touch tone pad on the phone, you want to Caller ID with Call Waiting Service. To dial the displayed number, select a line or press Dial again. The Phone Book and each Intercom/Memory Log stores up to 94 memories) or an Intercom/ Memory Log (16 buttons located to see...
... see who is calling when you 're talking on the base). Memory 7-digits: 7-digit telephone number (i.e.555-5555) 10-digits: 3-digit area code +7-digit telephone number (i.e.425-555-5555) 11-digits: long distance code 1 +3-digit area code +7-digit telephone number (i.e. 1-425-555-5555) 4. Use the touch tone pad on the phone, you want to Caller ID with Call Waiting Service. To dial the displayed number, select a line or press Dial again. The Phone Book and each Intercom/Memory Log stores up to 94 memories) or an Intercom/ Memory Log (16 buttons located to see...

User Guide
Page 32
... record in that start with the letter K. 3. Memory 4. NOTE: If there is displayed. 6. Reviewing Phone Book (Directory) Memory 1. Use the Vol (+ or -) buttons to scroll up to delete. 5. Press the Intercom/Memory Log button (1-16). 3. Press the Exit button when you are pressed. NOTE: If you make a mistake, use the touch tone pad on your phone to enter the corresponding letters for any additional names and numbers you want to store, up to review. Reviewing...
... record in that start with the letter K. 3. Memory 4. NOTE: If there is displayed. 6. Reviewing Phone Book (Directory) Memory 1. Use the Vol (+ or -) buttons to scroll up to delete. 5. Press the Intercom/Memory Log button (1-16). 3. Press the Exit button when you are pressed. NOTE: If you make a mistake, use the touch tone pad on your phone to enter the corresponding letters for any additional names and numbers you want to store, up to review. Reviewing...

User Guide
Page 36
... dial tone." Phone does not ring. • Make sure the ringer is turned on the display will illuminate. The H5401 is packaged with the additional purchase of the 25423/24 base, the antenna icon on . • Make sure the Do Not Disturb feature is not activated. • You may : 1) use the handset to a cordless feature with an RF module, when the module is properly inserted into No Power Operation mode. Incoming voice...
... dial tone." Phone does not ring. • Make sure the ringer is turned on the display will illuminate. The H5401 is packaged with the additional purchase of the 25423/24 base, the antenna icon on . • Make sure the Do Not Disturb feature is not activated. • You may : 1) use the handset to a cordless feature with an RF module, when the module is properly inserted into No Power Operation mode. Incoming voice...

User Guide
Page 42
... 39 Answering an Intercom Call 28 Answering Calls 23 F FCC RF Radiation Exposure Statement 4 Flash 24 Flash Time 18 B Base Layout 9 Basic Operation 21 C Call Alert Tone 18 Call Waiting Caller ID 31 Caller ID 29 Chain Dialing 35 Clear All Memories 34 Conference Calls 26 Cordless Phone Option 36 D Data Port 13 Delay Ring 16 Deleting a CID Record 30 Deleting All Call Records 30 Dialing a Stored Number 33 Dialing Back 30 Display Contrast 19 Display Messages 35 Do Not Disturb 24 E Editing a Name or Number Stored in Phone Book (Directory) Memory...
... 39 Answering an Intercom Call 28 Answering Calls 23 F FCC RF Radiation Exposure Statement 4 Flash 24 Flash Time 18 B Base Layout 9 Basic Operation 21 C Call Alert Tone 18 Call Waiting Caller ID 31 Caller ID 29 Chain Dialing 35 Clear All Memories 34 Conference Calls 26 Cordless Phone Option 36 D Data Port 13 Delay Ring 16 Deleting a CID Record 30 Deleting All Call Records 30 Dialing a Stored Number 33 Dialing Back 30 Display Contrast 19 Display Messages 35 Do Not Disturb 24 E Editing a Name or Number Stored in Phone Book (Directory) Memory...

User Guide
Page 43
... Optional Headset 22 Making Calls with the Speakerphone 22 Manually Setting the Time and Date 20 Memory Delete/Clear 34 Memory Log and Phone Book (Directory) Memory 31 Message Waiting 26 Mute 23 N No Unknown/Blocked 18 O One-Touch Intercom 27 Operation By Battery 35 Operation without Power 36 Other System Phones 14 P Paging All Stations 29 Parts Checklist 8 Phone ID 16 Phone Name 17 Placing a Call on Hold 24 Pre-dialing 22 Priority Line 15 Privacy 26 Programming the Telephone 14 Providing Privacy 26 R Receiving a Transferred Call from...
... Optional Headset 22 Making Calls with the Speakerphone 22 Manually Setting the Time and Date 20 Memory Delete/Clear 34 Memory Log and Phone Book (Directory) Memory 31 Message Waiting 26 Mute 23 N No Unknown/Blocked 18 O One-Touch Intercom 27 Operation By Battery 35 Operation without Power 36 Other System Phones 14 P Paging All Stations 29 Parts Checklist 8 Phone ID 16 Phone Name 17 Placing a Call on Hold 24 Pre-dialing 22 Priority Line 15 Privacy 26 Programming the Telephone 14 Providing Privacy 26 R Receiving a Transferred Call from...


