
8511418 - Component Replacement Manual
Page 6
...of the notebook for important safety, regulatory, and legal information. 2 www.gateway.com © 2006 Gateway, Inc. Screws Screws 9 Remove the cover from Gateway with the operating system, applications, and drivers installed, you will see the Windows startup screen. -ORIf you from the old drive. 8 Remove the four screws ...onto the cover so the screw holes line up. 11 Replace the four screws that secure the hard drive to you see a blank screen, restart your notebook, then press F11 while your computer is starting. 18 Insert the Operating System Recovery CD/DVD when prompted, then ...
...of the notebook for important safety, regulatory, and legal information. 2 www.gateway.com © 2006 Gateway, Inc. Screws Screws 9 Remove the cover from Gateway with the operating system, applications, and drivers installed, you will see the Windows startup screen. -ORIf you from the old drive. 8 Remove the four screws ...onto the cover so the screw holes line up. 11 Replace the four screws that secure the hard drive to you see a blank screen, restart your notebook, then press F11 while your computer is starting. 18 Insert the Operating System Recovery CD/DVD when prompted, then ...

8511179 - Back of Setup Poster
Page 1
... at least three hours the first time, so the battery will fully charge. 4 START THE NOTEBOOK. Press the power button, then follow the on-screen instructions to the modem jack ( ) if using high-speed access.
... at least three hours the first time, so the battery will fully charge. 4 START THE NOTEBOOK. Press the power button, then follow the on-screen instructions to the modem jack ( ) if using high-speed access.

8511264 - User Guide Gateway Notebook
Page 6
Contents www.gateway.com Adding devices to your network 107 Adding a desktop computer to your network 107...fax 116 Automatically canceling a fax 116 Chapter 11: Customizing Your notebook 117 Adjusting the screen and desktop settings 118 Adjusting the color depth 118 Adjusting the screen resolution 119 Changing the colors on your Windows desktop 120 Changing the desktop background 121 ...Selecting a screen saver 122 Using an extended desktop 123 Changing the mouse, touchpad, or pointing device...
Contents www.gateway.com Adding devices to your network 107 Adding a desktop computer to your network 107...fax 116 Automatically canceling a fax 116 Chapter 11: Customizing Your notebook 117 Adjusting the screen and desktop settings 118 Adjusting the color depth 118 Adjusting the screen resolution 119 Changing the colors on your Windows desktop 120 Changing the desktop background 121 ...Selecting a screen saver 122 Using an extended desktop 123 Changing the mouse, touchpad, or pointing device...

8511264 - User Guide Gateway Notebook
Page 12
...word or phrase (keyword) in Help and Support and are located in the Search box located at the top of any Help and Support screen, then click the arrow button. To start Help and Support: ■ Click Start, then click Help and Support. These topics are located...words you receive the following search result types: ■ Suggested Topics - You must be connected to the Internet to your Gateway notebook. CHAPTER 1: Getting Help www.gateway.com Help and Support Your notebook includes Help and Support, an easily accessible collection of help information by clicking a link, ...
...word or phrase (keyword) in Help and Support and are located in the Search box located at the top of any Help and Support screen, then click the arrow button. To start Help and Support: ■ Click Start, then click Help and Support. These topics are located...words you receive the following search result types: ■ Suggested Topics - You must be connected to the Internet to your Gateway notebook. CHAPTER 1: Getting Help www.gateway.com Help and Support Your notebook includes Help and Support, an easily accessible collection of help information by clicking a link, ...
8511264 - User Guide Gateway Notebook
Page 16
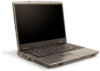
CHAPTER 2: Using Windows XP www.gateway.com About the Windows desktop Help and Support For more information, see "Modifying security settings" on the right. The Recycle Bin is where files, folders, ..., and computer tools and utilities. For more information about the Windows desktop, click Start, then click Help and Support. After your notebook starts, the first screen you when the security settings on the menu that are stored. Desktop elements Description The taskbar is the Windows desktop. The Start button provides access...
CHAPTER 2: Using Windows XP www.gateway.com About the Windows desktop Help and Support For more information, see "Modifying security settings" on the right. The Recycle Bin is where files, folders, ..., and computer tools and utilities. For more information about the Windows desktop, click Start, then click Help and Support. After your notebook starts, the first screen you when the security settings on the menu that are stored. Desktop elements Description The taskbar is the Windows desktop. The Start button provides access...

8511264 - User Guide Gateway Notebook
Page 19
...and drop it to your tablet PC, you write with your notes on notebook computers, desktop computers, or tablet PCs. If the on -screen instructions. 11 hand-write documents, then turn them into Word documents and other programs ■ Enhanced speech and voice recognition - Using Tablet... -recalibrate it into another program ■ Document annotation - insert handwritten notes into text or image files ■ Sticky Notes - www.gateway.com Using Windows XP Tablet PC 2005 Using Windows XP Tablet PC 2005 Your notebook may have Windows XP Tablet PC 2005 installed. Follow the...
...and drop it to your tablet PC, you write with your notes on notebook computers, desktop computers, or tablet PCs. If the on -screen instructions. 11 hand-write documents, then turn them into Word documents and other programs ■ Enhanced speech and voice recognition - Using Tablet... -recalibrate it into another program ■ Document annotation - insert handwritten notes into text or image files ■ Sticky Notes - www.gateway.com Using Windows XP Tablet PC 2005 Using Windows XP Tablet PC 2005 Your notebook may have Windows XP Tablet PC 2005 installed. Follow the...

8511264 - User Guide Gateway Notebook
Page 20
... same result as pressing the corresponding key on a standard keyboard. ■ Open the Tablet Input Panel by waving the pen back and forth over the screen. ■ Backspace by drawing a right-to-left line on the display surface. ■ In most text input programs, you can erase text by ...pen holder. Press it dry and avoid contact with your tablet PC Input Panel. CHAPTER 2: Using Windows XP www.gateway.com Gestures A gesture is a shape you draw with liquids. 12 The screen reads the position of alignment. When you use gestures to your tablet PC pen to send a command to control ...
... same result as pressing the corresponding key on a standard keyboard. ■ Open the Tablet Input Panel by waving the pen back and forth over the screen. ■ Backspace by drawing a right-to-left line on the display surface. ■ In most text input programs, you can erase text by ...pen holder. Press it dry and avoid contact with your tablet PC Input Panel. CHAPTER 2: Using Windows XP www.gateway.com Gestures A gesture is a shape you draw with liquids. 12 The screen reads the position of alignment. When you use gestures to your tablet PC pen to send a command to control ...
8511264 - User Guide Gateway Notebook
Page 38
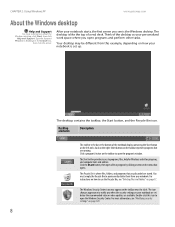
...see "Recovering specific files and software" on page 31. - CHAPTER 3: Recovering Your System 4 Open the network location of your notebook. www.gateway.com Important Use a permanent marker to complete the burning of x, and so on page 33. 30 If you have problems with your notebook ...each disc 1 of x, 2 of x, 3 of the recovery disc(s). Recovering your system Important If your system using Microsoft System Restore" on -screen instructions of recovery discs, roll back your media burning software to label each file is complete, remove that disc and insert another. 8 Repeat steps...
...see "Recovering specific files and software" on page 31. - CHAPTER 3: Recovering Your System 4 Open the network location of your notebook. www.gateway.com Important Use a permanent marker to complete the burning of x, and so on page 33. 30 If you have problems with your notebook ...each disc 1 of x, 2 of x, 3 of the recovery disc(s). Recovering your system Important If your system using Microsoft System Restore" on -screen instructions of recovery discs, roll back your media burning software to label each file is complete, remove that disc and insert another. 8 Repeat steps...
8511264 - User Guide Gateway Notebook
Page 40
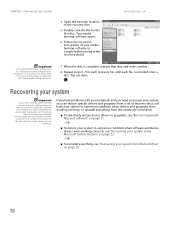
...system settings and saves it as a restore point. Every time you can restore your system running again. CHAPTER 3: Recovering Your System www.gateway.com Recovering your system using Microsoft System Restore Before using Microsoft System Restore: 1 Press F1. The Select a Restore Point dialog box opens.... 4 Click a bold date on the calendar (Step 1 on the screen), then click a restore point in the list (Step 2 on ), Microsoft System Restore takes a "snapshot" of these restore points to get your system...
...system settings and saves it as a restore point. Every time you can restore your system running again. CHAPTER 3: Recovering Your System www.gateway.com Recovering your system using Microsoft System Restore Before using Microsoft System Restore: 1 Press F1. The Select a Restore Point dialog box opens.... 4 Click a bold date on the calendar (Step 1 on the screen), then click a restore point in the list (Step 2 on ), Microsoft System Restore takes a "snapshot" of these restore points to get your system...
8511264 - User Guide Gateway Notebook
Page 41
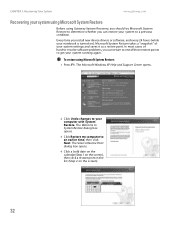
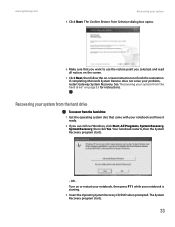
... Microsoft System Restore does not solve your notebook and have it ready. 2 If you selected, and read all notices on the screen. 7 Click Next, then follow the on-screen instructions to use the restore point you can still run Windows, click Start, All Programs, System Recovery, System Recovery, then click... you want to finish the restoration. The Confirm Restore Point Selection dialog box opens. 6 Make sure that came with your problem, restart Gateway System Recovery. www.gateway.com Recovering your notebook is starting. 3 Insert the Operating System Recovery CD/DVD when prompted.
... Microsoft System Restore does not solve your notebook and have it ready. 2 If you selected, and read all notices on the screen. 7 Click Next, then follow the on-screen instructions to use the restore point you can still run Windows, click Start, All Programs, System Recovery, System Recovery, then click... you want to finish the restoration. The Confirm Restore Point Selection dialog box opens. 6 Make sure that came with your problem, restart Gateway System Recovery. www.gateway.com Recovering your notebook is starting. 3 Insert the Operating System Recovery CD/DVD when prompted.
8511264 - User Guide Gateway Notebook
Page 46
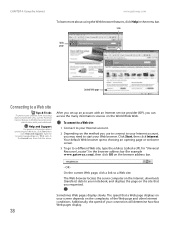
... many information sources on the Internet, downloads (transfers) data to start your Web browser. Your default Web browser opens showing an opening page or welcome screen. 3 To go to a Web site. On the current Web page, click a link to a different Web site, type the address (called a URL for... "Universal Resource Locator") in the browser address bar (for example www.gateway.com), then click GO on the browser address bar. - The Web browser locates the server computer on the World Wide Web. To connect to a Web...
... many information sources on the Internet, downloads (transfers) data to start your Web browser. Your default Web browser opens showing an opening page or welcome screen. 3 To go to a Web site. On the current Web page, click a link to a different Web site, type the address (called a URL for... "Universal Resource Locator") in the browser address bar (for example www.gateway.com), then click GO on the browser address bar. - The Web browser locates the server computer on the World Wide Web. To connect to a Web...
8511264 - User Guide Gateway Notebook
Page 47
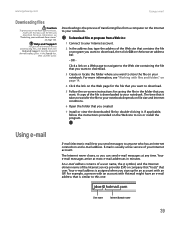
...that you scan the files you want . Your e-mail messages arrive at any time. For more information, see "Protecting your notebook from viruses" on -screen instructions for an account with an ISP. To download files or programs from a computer on file size and Internet conditions. 6 Open the folder that ...sign up for saving the file in the folder that contains the file or program you want to store the file on your notebook. www.gateway.com Using e-mail Downloading files Caution To protect your notebook against viruses, make sure that is similar to this one: [email protected] User...
...that you scan the files you want . Your e-mail messages arrive at any time. For more information, see "Protecting your notebook from viruses" on -screen instructions for an account with an ISP. To download files or programs from a computer on file size and Internet conditions. 6 Open the folder that ...sign up for saving the file in the folder that contains the file or program you want to store the file on your notebook. www.gateway.com Using e-mail Downloading files Caution To protect your notebook against viruses, make sure that is similar to this one: [email protected] User...
8511264 - User Guide Gateway Notebook
Page 55
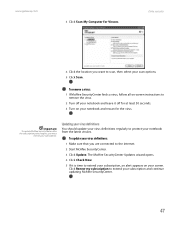
... you must extend your subscription and continue updating McAfee SecurityCenter. 47 www.gateway.com 3 Click Scan My Computer for the virus. To remove a virus: 1 If McAfee SecurityCenter finds a virus, follow all on-screen instructions to extend your subscription. Click Renew my subscription to remove the virus.... 2 Turn off for at least 30 seconds. 3 Turn on your screen. Important To update McAfee SecurityCenter after the subscription period expires, you want to extend your subscription, an alert appears on your ...
... you must extend your subscription and continue updating McAfee SecurityCenter. 47 www.gateway.com 3 Click Scan My Computer for the virus. To remove a virus: 1 If McAfee SecurityCenter finds a virus, follow all on-screen instructions to extend your subscription. Click Renew my subscription to remove the virus.... 2 Turn off for at least 30 seconds. 3 Turn on your screen. Important To update McAfee SecurityCenter after the subscription period expires, you want to extend your subscription, an alert appears on your ...

8511264 - User Guide Gateway Notebook
Page 62
... parallel, TV out, S/PDIF (digital audio), and S-Video (digital video). Tips & Tricks For the location of these ports on -screen instructions. 54 After doing this, you install a printer, scanner, or other peripheral device, see the device documentation and installation instructions. Installing... instructions. See your notebook will usually recognize such a device whenever you use these steps. CHAPTER 6: Connecting Devices www.gateway.com Installing a printer, scanner, digital camera, or other peripheral device Important Before you can usually install parallel port printers...
... parallel, TV out, S/PDIF (digital audio), and S-Video (digital video). Tips & Tricks For the location of these ports on -screen instructions. 54 After doing this, you install a printer, scanner, or other peripheral device, see the device documentation and installation instructions. Installing... instructions. See your notebook will usually recognize such a device whenever you use these steps. CHAPTER 6: Connecting Devices www.gateway.com Installing a printer, scanner, digital camera, or other peripheral device Important Before you can usually install parallel port printers...

8511264 - User Guide Gateway Notebook
Page 63
...port replicator. Simultaneous display lets you close the LCD panel, your notebook may turn it on. You may not represent the screens on your notebook. www.gateway.com Viewing the display on a projector or monitor Viewing the display on a projector or monitor Important The dialog boxes shown...6 Click the Settings tab. 7 Right-click the second monitor icon (labeled 2), then click Attached. 8 Click Apply. 9 Adjust properties such as Screen Resolution or Color Quality if necessary. 10 Click OK. 55 To use your notebook for demonstrative purposes only and may need to install the driver...
...port replicator. Simultaneous display lets you close the LCD panel, your notebook may turn it on. You may not represent the screens on your notebook. www.gateway.com Viewing the display on a projector or monitor Viewing the display on a projector or monitor Important The dialog boxes shown...6 Click the Settings tab. 7 Right-click the second monitor icon (labeled 2), then click Attached. 8 Click Apply. 9 Adjust properties such as Screen Resolution or Color Quality if necessary. 10 Click OK. 55 To use your notebook for demonstrative purposes only and may need to install the driver...

8511264 - User Guide Gateway Notebook
Page 64
...FN+F4 to a stereo system using a standard S-Video cable. Tips & Tricks To see if your Control Panel is available only on select Gateway notebooks. For the location of the S-Video out jack on your notebook. 5 Click Start, then click Control Panel. The Display Properties dialog box... see the port replicator user guide. 8 Click Advanced. The Multiple Monitors Properties dialog box opens. 56 Important To turn on a television screen using the headphone jack to a VCR will be scrambled by default, connect the television (or other end of headphones or external powered speakers...
...FN+F4 to a stereo system using a standard S-Video cable. Tips & Tricks To see if your Control Panel is available only on select Gateway notebooks. For the location of the S-Video out jack on your notebook. 5 Click Start, then click Control Panel. The Display Properties dialog box... see the port replicator user guide. 8 Click Advanced. The Multiple Monitors Properties dialog box opens. 56 Important To turn on a television screen using the headphone jack to a VCR will be scrambled by default, connect the television (or other end of headphones or external powered speakers...

8511264 - User Guide Gateway Notebook
Page 73
Video screen Play Stop Video file information 2 Click File, then click Open. For more information about using Windows Media Player: 1 Click Start, All Programs, then click Windows ... types of audio and video files, including WAV, MIDI, MP3, AU, AVI, and MPEG formats. To play a file using Windows Media Player, click Help. www.gateway.com Playing music and movies Playing audio and video files Windows Media Player can play ), then stop playing the file by clicking (stop). 65
Video screen Play Stop Video file information 2 Click File, then click Open. For more information about using Windows Media Player: 1 Click Start, All Programs, then click Windows ... types of audio and video files, including WAV, MIDI, MP3, AU, AVI, and MPEG formats. To play a file using Windows Media Player, click Help. www.gateway.com Playing music and movies Playing audio and video files Windows Media Player can play ), then stop playing the file by clicking (stop). 65
8511264 - User Guide Gateway Notebook
Page 76
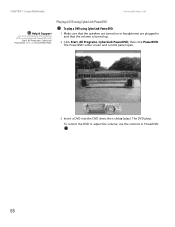
... on or headphones are plugged in PowerDVD. 68 The DVD plays. Playing a DVD using CyberLink PowerDVD To play ). CHAPTER 7: Using Multimedia www.gateway.com Help & Support For more information about playing DVDs using CyberLink PowerDVD: 1 Make sure that the volume is turned up. 2 Click Start,... All Programs, CyberLink PowerDVD, then click PowerDVD. The PowerDVD video screen and control panel open. 3 Insert a DVD into the DVD drive, then click (play a DVD using CyberLink PowerDVD, click Start, All Programs, ...
... on or headphones are plugged in PowerDVD. 68 The DVD plays. Playing a DVD using CyberLink PowerDVD To play ). CHAPTER 7: Using Multimedia www.gateway.com Help & Support For more information about playing DVDs using CyberLink PowerDVD: 1 Make sure that the volume is turned up. 2 Click Start,... All Programs, CyberLink PowerDVD, then click PowerDVD. The PowerDVD video screen and control panel open. 3 Insert a DVD into the DVD drive, then click (play a DVD using CyberLink PowerDVD, click Start, All Programs, ...

8511264 - User Guide Gateway Notebook
Page 82
... DV Camera to play your video back to your video camera so you can edit it onto your television. 74 When you reach the final screen, Windows Movie Maker rewinds the video tape in the Video Capture Wizard, click Learn more clips into more than 10 GB of your clip ■...; Click Save to CD to your video include: ■ Splitting your movie to a recordable CD. ■ Click Send in Windows Movie Maker. www.gateway.com 4 Complete the screens in Windows Movie Maker. A one hour tape may require a significant amount of the following places. Some of the edits you can make to save...
... DV Camera to play your video back to your video camera so you can edit it onto your television. 74 When you reach the final screen, Windows Movie Maker rewinds the video tape in the Video Capture Wizard, click Learn more clips into more than 10 GB of your clip ■...; Click Save to CD to your video include: ■ Splitting your movie to a recordable CD. ■ Click Send in Windows Movie Maker. www.gateway.com 4 Complete the screens in Windows Movie Maker. A one hour tape may require a significant amount of the following places. Some of the edits you can make to save...

8511264 - User Guide Gateway Notebook
Page 90
You cannot create MP3 files from these CDs and you may not be able to listen to finish burning the DVD. Creating and copying data CDs and DVDs Creating a data CD or DVD Important Some CDs have copy protection software. www.gateway.com 5 Follow the on-screen prompts to these CDs on your CD or DVD drive. 2 If a dialog box opens, click Take no action, then click OK. 82 To create a data CD or DVD: 1 Insert a blank, writable CD or DVD into your notebook. For more information, click the Media Center's Help icon. CHAPTER 7: Using Multimedia 4 Click Video DVD, then click OK.
You cannot create MP3 files from these CDs and you may not be able to listen to finish burning the DVD. Creating and copying data CDs and DVDs Creating a data CD or DVD Important Some CDs have copy protection software. www.gateway.com 5 Follow the on-screen prompts to these CDs on your CD or DVD drive. 2 If a dialog box opens, click Take no action, then click OK. 82 To create a data CD or DVD: 1 Insert a blank, writable CD or DVD into your notebook. For more information, click the Media Center's Help icon. CHAPTER 7: Using Multimedia 4 Click Video DVD, then click OK.


