8511050 - Gateway Computer User Guide
Page 10
...Center to access product documentation, specifications, and guides for your model number to view and purchase upgrades for all the products that Gateway supports. Contact Us Click Contact Us to access links to get drivers specific to view information about your computer. Downloads Click ...locate your computer. Click Browse All Downloads to walk through a step-by-step wizard to help you get the latest software updates for BIOS and driver upgrades. Chapter 1: Getting Help Support Home Click Support Home, then click Computers. For more information, see "Telephone support" on...
...Center to access product documentation, specifications, and guides for your model number to view and purchase upgrades for all the products that Gateway supports. Contact Us Click Contact Us to access links to get drivers specific to view information about your computer. Downloads Click ...locate your computer. Click Browse All Downloads to walk through a step-by-step wizard to help you get the latest software updates for BIOS and driver upgrades. Chapter 1: Getting Help Support Home Click Support Home, then click Computers. For more information, see "Telephone support" on...
8511050 - Gateway Computer User Guide
Page 63
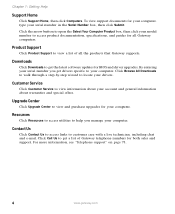
... same or equivalent type recommended by following the manufacturer's instructions. To replace the battery: 1 Restart your computer, replace the system battery. www.gateway.com 57 To avoid scratching the case, place it on a towel or other non-abrasive surface. 7 Locate the old battery on its orientation.... Use a battery of the BIOS Setup utility opens. 3 Write down your computer. 5 Remove the side panel by the manufacturer. Dispose of explosion if battery is incorrectly replaced....
... same or equivalent type recommended by following the manufacturer's instructions. To replace the battery: 1 Restart your computer, replace the system battery. www.gateway.com 57 To avoid scratching the case, place it on a towel or other non-abrasive surface. 7 Locate the old battery on its orientation.... Use a battery of the BIOS Setup utility opens. 3 Write down your computer. 5 Remove the side panel by the manufacturer. Dispose of explosion if battery is incorrectly replaced....
8511050 - Gateway Computer User Guide
Page 64
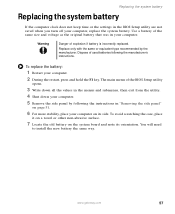
Battery Battery release tab 9 Make sure that you wrote down in Step 3. 14 Save all your settings and exit the BIOS Setup utility. 58 www.gateway.com Chapter 5: Maintaining Your Computer 8 Push the battery release tab. The battery pops out of the new battery is facing up, then press the battery ... side panel" on page 53. 11 Reconnect all external cables and the power cord. 12 Turn on your computer, then press F1 to open the BIOS Setup utility. 13 In the BIOS Setup utility, restore any settings that the positive (+) side of the socket.
Battery Battery release tab 9 Make sure that you wrote down in Step 3. 14 Save all your settings and exit the BIOS Setup utility. 58 www.gateway.com Chapter 5: Maintaining Your Computer 8 Push the battery release tab. The battery pops out of the new battery is facing up, then press the battery ... side panel" on page 53. 11 Reconnect all external cables and the power cord. 12 Turn on your computer, then press F1 to open the BIOS Setup utility. 13 In the BIOS Setup utility, restore any settings that the positive (+) side of the socket.
8511050 - Gateway Computer User Guide
Page 67
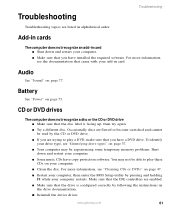
... drive. Occasionally discs are enabled. ■ Make sure that you are listed in card ■ Shut down and restart your computer restarts. www.gateway.com 61 You may be experiencing some temporary memory problems. Shut down and restart your computer. ■ Clean the disc. Make sure that the ... are flawed or become scratched and cannot be able to play these CDs on page 47. ■ Restart your computer, then enter the BIOS Setup utility by pressing and holding F1 while your computer. ■ Some music CDs have installed the required software. CD or DVD drives ...
... drive. Occasionally discs are enabled. ■ Make sure that you are listed in card ■ Shut down and restart your computer restarts. www.gateway.com 61 You may be experiencing some temporary memory problems. Shut down and restart your computer. ■ Clean the disc. Make sure that the ... are flawed or become scratched and cannot be able to play these CDs on page 47. ■ Restart your computer, then enter the BIOS Setup utility by pressing and holding F1 while your computer. ■ Some music CDs have installed the required software. CD or DVD drives ...

8511625 - Gateway Computer Hardware Reference (6-Bay Micro BTX Case)
Page 22
...battery Warning Danger of the System Properties dialog box in the General tab. Dispose of the BIOS Setup utility opens. 3 Write down your computer. To replace the battery: 1 Restart your computer. CHAPTER 3: Maintenance Basics www.gateway.com 8 Reconnect the cables and the power cord. 9 Turn on your computer. 2... battery. Windows starts and the Windows desktop appears. 10 Click Start, Control Panel, then click Performance and Maintenance (if in the BIOS Setup utility are not saved when you turn off your computer on the system board and note its side. Replace only with the same...
...battery Warning Danger of the System Properties dialog box in the General tab. Dispose of the BIOS Setup utility opens. 3 Write down your computer. To replace the battery: 1 Restart your computer. CHAPTER 3: Maintenance Basics www.gateway.com 8 Reconnect the cables and the power cord. 9 Turn on your computer. 2... battery. Windows starts and the Windows desktop appears. 10 Click Start, Control Panel, then click Performance and Maintenance (if in the BIOS Setup utility are not saved when you turn off your computer on the system board and note its side. Replace only with the same...

8511625 - Gateway Computer Hardware Reference (6-Bay Micro BTX Case)
Page 23
... in Step 6. 4 If you are replacing an existing drive, disconnect the cables from your computer. 13 Open the BIOS Setup utility. 14 In the BIOS Setup utility, restore any settings that you install the new drive. (CD/DVD drive shown.) 5 Note any jumper...all external cables and the power cord. 12 Turn on the new drive to add or replace a CD or DVD drive. www.gateway.com Adding or replacing a CD or DVD drive 9 Make sure that the positive (+) side of the new battery is facing up... in "Replacing the side panel" on page 16. 11 Reconnect all your settings and exit the BIOS Setup utility.
... in Step 6. 4 If you are replacing an existing drive, disconnect the cables from your computer. 13 Open the BIOS Setup utility. 14 In the BIOS Setup utility, restore any settings that you install the new drive. (CD/DVD drive shown.) 5 Note any jumper...all external cables and the power cord. 12 Turn on the new drive to add or replace a CD or DVD drive. www.gateway.com Adding or replacing a CD or DVD drive 9 Make sure that the positive (+) side of the new battery is facing up... in "Replacing the side panel" on page 16. 11 Reconnect all your settings and exit the BIOS Setup utility.
8511625 - Gateway Computer Hardware Reference (6-Bay Micro BTX Case)
Page 44
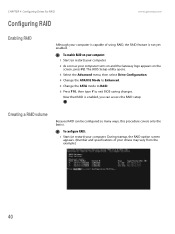
.... 5 Change the SATA mode to RAID. 6 Press F10, then type Y to exit BIOS saving changes. Now that RAID is not yet enabled. To configure RAID: 1 Start (or restart) your computer turns on and the Gateway logo appears on your computer: 1 Start (or restart) your computer. 2 As soon as... your computer. To enable RAID on the screen, press F2. CHAPTER 4: Configuring Drives for RAID Configuring RAID www.gateway.com Enabling RAID Although your drives may vary from the example.) 40 During startup, the RAID option screen appears. (Number and specifications of your ...
.... 5 Change the SATA mode to RAID. 6 Press F10, then type Y to exit BIOS saving changes. Now that RAID is not yet enabled. To configure RAID: 1 Start (or restart) your computer turns on and the Gateway logo appears on your computer: 1 Start (or restart) your computer. 2 As soon as... your computer. To enable RAID on the screen, press F2. CHAPTER 4: Configuring Drives for RAID Configuring RAID www.gateway.com Enabling RAID Although your drives may vary from the example.) 40 During startup, the RAID option screen appears. (Number and specifications of your ...


