Gateway Notebook Component Replacement Manual
Page 3
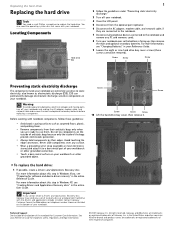
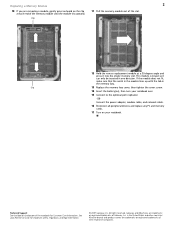
...components by their antistatic bags only when you a set of the notebook for important safety, regulatory, and legal information. © 2007 Gateway, Inc. All other grounded object. Screw Technical Support See the label on the bottom of your notebook. Avoid touching the edge connectors.... See your Reference Guide for Customer Care Information. You also need a small Phillips screwdriver to the notebook and remove any PC and memory cards. 8 Turn your notebook over any surface. • Wear a grounding wrist strap (available at the Web address or telephone ...
...components by their antistatic bags only when you a set of the notebook for important safety, regulatory, and legal information. © 2007 Gateway, Inc. All other grounded object. Screw Technical Support See the label on the bottom of your notebook. Avoid touching the edge connectors.... See your Reference Guide for Customer Care Information. You also need a small Phillips screwdriver to the notebook and remove any PC and memory cards. 8 Turn your notebook over any surface. • Wear a grounding wrist strap (available at the Web address or telephone ...
Gateway Notebook Component Replacement Manual
Page 4
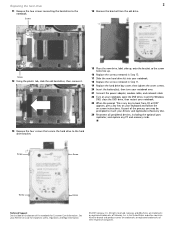
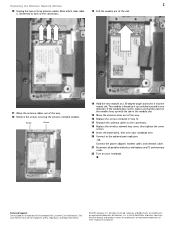
... 11 Remove the two screws connecting the hard drive to the notebook. 14 Remove the bracket from CD or DVD" appears, press any PC and memory cards. 13 Remove the four screws that secure the hard drive to boot from the old drive. See your keyboard and follow the on-screen...over. 21 Connect the power adapter, modem cable, and network cable 22 Turn on your Reference Guide for Customer Care Information. Gateway and eMachines are trademarks or registered trademarks of Gateway, Inc. Screw Screw 12 Using the plastic tab, slide the old hard drive, then remove it. 15 Place the new...
... 11 Remove the two screws connecting the hard drive to the notebook. 14 Remove the bracket from CD or DVD" appears, press any PC and memory cards. 13 Remove the four screws that secure the hard drive to boot from the old drive. See your keyboard and follow the on-screen...over. 21 Connect the power adapter, modem cable, and network cable 22 Turn on your Reference Guide for Customer Care Information. Gateway and eMachines are trademarks or registered trademarks of Gateway, Inc. Screw Screw 12 Using the plastic tab, slide the old hard drive, then remove it. 15 Place the new...

Gateway Notebook Component Replacement Manual
Page 5
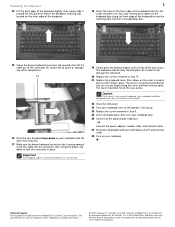
...Turn your Reference Guide. 12 Pull the cover off your Reference Guide for Customer Care Information. Never slide components over any PC and memory cards. 7 Turn your notebook over so the top is marked with notebook components, follow these guidelines: • Avoid static-causing surfaces ...up . 10 Open the LCD panel to a bare metal part of the notebook for important safety, regulatory, and legal information. © 2007 Gateway, Inc. All rights reserved. Replacing the keyboard Replacing the keyboard 1 8 With a small Phillips screwdriver, remove the keyboard screw and put them...
...Turn your Reference Guide. 12 Pull the cover off your Reference Guide for Customer Care Information. Never slide components over any PC and memory cards. 7 Turn your notebook over so the top is marked with notebook components, follow these guidelines: • Avoid static-causing surfaces ...up . 10 Open the LCD panel to a bare metal part of the notebook for important safety, regulatory, and legal information. © 2007 Gateway, Inc. All rights reserved. Replacing the keyboard Replacing the keyboard 1 8 With a small Phillips screwdriver, remove the keyboard screw and put them...
Gateway Notebook Component Replacement Manual
Page 6
... your notebook could be flat all peripheral devices and replace any other brands and product names are trademarks or registered trademarks of Gateway, Inc. Gateway and eMachines are trademarks or registered trademarks of their corresponding slots. 15 Swing the brown keyboard connector clip upward, then lift the...under the palm rest. Be careful not to touch or damage any PC and memory cards. 28 Turn on the bottom of the notebook for important safety, regulatory, and legal information. © 2007 Gateway, Inc. All rights reserved. Replacing the keyboard 14 Lift the back edge of...
... your notebook could be flat all peripheral devices and replace any other brands and product names are trademarks or registered trademarks of Gateway, Inc. Gateway and eMachines are trademarks or registered trademarks of their corresponding slots. 15 Swing the brown keyboard connector clip upward, then lift the...under the palm rest. Be careful not to touch or damage any PC and memory cards. 28 Turn on the bottom of the notebook for important safety, regulatory, and legal information. © 2007 Gateway, Inc. All rights reserved. Replacing the keyboard 14 Lift the back edge of...

Gateway Notebook Component Replacement Manual
Page 7
... other brands and product names are ready to a bare metal part of Gateway, Inc. Before working with notebook components, follow these screws cannot be removed). Screw Screw Screw Screw 9 Lift the memory bay cover, then remove it to use them. All rights reserved. Avoid...only when you are trademarks or registered trademarks of the bags provide electrostatic protection. • Always hold components by their edges. Gateway and eMachines are connected to the notebook. 6 Disconnect all peripheral devices connected to dangerous electrical voltages and moving parts, turn off...
... other brands and product names are ready to a bare metal part of Gateway, Inc. Before working with notebook components, follow these screws cannot be removed). Screw Screw Screw Screw 9 Lift the memory bay cover, then remove it to use them. All rights reserved. Avoid...only when you are trademarks or registered trademarks of the bags provide electrostatic protection. • Always hold components by their edges. Gateway and eMachines are connected to the notebook. 6 Disconnect all peripheral devices connected to dangerous electrical voltages and moving parts, turn off...
Gateway Notebook Component Replacement Manual
Page 8
... bottom of the notebook for important safety, regulatory, and legal information. © 2007 Gateway, Inc. Gateway and eMachines are removing a module, gently press outward on your notebook over. 15 Connect to the optional port replicator. -OR- in the memory bay. Connect the power adapter, modem cable, and network cable. 16 Reconnect all peripheral...
... bottom of the notebook for important safety, regulatory, and legal information. © 2007 Gateway, Inc. Gateway and eMachines are removing a module, gently press outward on your notebook over. 15 Connect to the optional port replicator. -OR- in the memory bay. Connect the power adapter, modem cable, and network cable. 16 Reconnect all peripheral...

Gateway Notebook Component Replacement Manual
Page 9
...Screw Screw Preventing static electricity discharge The components inside of the notebook for important safety, regulatory, and legal information. © 2007 Gateway, Inc. Avoid touching the edge connectors. Never slide components over so the bottom is facing up, then remove the main and...replace the wireless network module: 1 Follow the guidelines under "Preventing static electricity discharge." 2 Turn off your notebook over any PC and memory cards. 7 Turn your notebook and unplug the AC adapter, modem cable, and network cable and remove the main and optional secondary ...
...Screw Screw Preventing static electricity discharge The components inside of the notebook for important safety, regulatory, and legal information. © 2007 Gateway, Inc. Avoid touching the edge connectors. Never slide components over so the bottom is facing up, then remove the main and...replace the wireless network module: 1 Follow the guidelines under "Preventing static electricity discharge." 2 Turn off your notebook over any PC and memory cards. 7 Turn your notebook and unplug the AC adapter, modem cable, and network cable and remove the main and optional secondary ...
Gateway Notebook Component Replacement Manual
Page 10
...other brands and product names are trademarks or registered trademarks of the notebook for important safety, regulatory, and legal information. © 2007 Gateway, Inc. All other countries. Note which color cable is keyed so it into the empty slot. Screw Screw 14 Hold the new module... the power adapter, modem cable, and network cable. 21 Reconnect all peripheral devices and replace any PC and memory cards. 22 Turn on the bottom of Gateway, Inc. Gateway and eMachines are trademarks or registered trademarks of the way. 12 Remove the screws securing the wireless network module...
...other brands and product names are trademarks or registered trademarks of the notebook for important safety, regulatory, and legal information. © 2007 Gateway, Inc. All other countries. Note which color cable is keyed so it into the empty slot. Screw Screw 14 Hold the new module... the power adapter, modem cable, and network cable. 21 Reconnect all peripheral devices and replace any PC and memory cards. 22 Turn on the bottom of Gateway, Inc. Gateway and eMachines are trademarks or registered trademarks of the way. 12 Remove the screws securing the wireless network module...
Gateway Notebook Reference Guide (Windows XP)
Page 4
... 42 Using the CD or DVD drive 45 Identifying drive types 45 Using a CD or DVD 46 Using the memory card reader 47 Memory card types 47 Inserting a memory card 47 Using a memory card 47 Removing a memory card 48 Adding and removing a PC Card 48 Using a port replicator 49 Installing a printer or other peripheral device...
... 42 Using the CD or DVD drive 45 Identifying drive types 45 Using a CD or DVD 46 Using the memory card reader 47 Memory card types 47 Inserting a memory card 47 Using a memory card 47 Removing a memory card 48 Adding and removing a PC Card 48 Using a port replicator 49 Installing a printer or other peripheral device...
Gateway Notebook Reference Guide (Windows XP)
Page 5
www.gateway.com Changing batteries 59 Replacing the main battery 59 Installing a secondary battery 60 Recalibrating the battery(ies 61 Extending battery life 62 Maximizing battery performance ... the battery(ies 80 Storing batteries 81 Cleaning CDs or DVDs 81 Chapter 8: Upgrading Your Notebook 83 Preventing static electricity discharge 84 Adding or replacing memory modules 85 iii
www.gateway.com Changing batteries 59 Replacing the main battery 59 Installing a secondary battery 60 Recalibrating the battery(ies 61 Extending battery life 62 Maximizing battery performance ... the battery(ies 80 Storing batteries 81 Cleaning CDs or DVDs 81 Chapter 8: Upgrading Your Notebook 83 Preventing static electricity discharge 84 Adding or replacing memory modules 85 iii
Gateway Notebook Reference Guide (Windows XP)
Page 6
... external 98 Display 98 DVD drives 99 Ethernet 101 File management 101 Fingerprint reader 102 Hard drive 102 Internet 103 Keyboard 104 Media Center 105 Memory 108 Memory card reader 108 Modem (cable or DSL 109 Modem (dial-up 109 Mouse 112 Networks (wired 113 Networks (wireless 115 Passwords 117 PC Cards...
... external 98 Display 98 DVD drives 99 Ethernet 101 File management 101 Fingerprint reader 102 Hard drive 102 Internet 103 Keyboard 104 Media Center 105 Memory 108 Memory card reader 108 Modem (cable or DSL 109 Modem (dial-up 109 Mouse 112 Networks (wired 113 Networks (wireless 115 Passwords 117 PC Cards...

Gateway Notebook Reference Guide (Windows XP)
Page 15
...rug, or other similar surface. 7 Helps cool internal components. The built-in unexpected shutdown or permanent damage to this slot. www.gateway.com Component Icon Description Headphone jack Plug amplified speakers or headphones into this port. Monitor port USB port Ventilation fan Plug an analog VGA... monitor or projector into this jack. Left Kensington lock slot Ventilation fan USB port Monitor port Memory card PC Card reader IEEE 1394 port slot Component Icon Description Kensington™ lock slot Secure your skin. If the air...
...rug, or other similar surface. 7 Helps cool internal components. The built-in unexpected shutdown or permanent damage to this slot. www.gateway.com Component Icon Description Headphone jack Plug amplified speakers or headphones into this port. Monitor port USB port Ventilation fan Plug an analog VGA... monitor or projector into this jack. Left Kensington lock slot Ventilation fan USB port Monitor port Memory card PC Card reader IEEE 1394 port slot Component Icon Description Kensington™ lock slot Secure your skin. If the air...

Gateway Notebook Reference Guide (Windows XP)
Page 16
... in this slot. For more information, see "Adding and removing a PC Card" on page 48. For more information, see "Using the memory card reader" on page 35. 8 For more information, see "Using the smart card reader" on page 47. Important: RS-Multimedia Card and...174;) device (such as a diskette drive, flash drive, printer, scanner, camera, keyboard, or mouse) into these ports. The memory card reader supports Memory Stick®, Memory Stick Pro®, Mini Secure Digital®, MultiMediaCard™, RS-MultiMediaCard™, Secure Digital™, and xD-Picture Card™cards...
... in this slot. For more information, see "Adding and removing a PC Card" on page 48. For more information, see "Using the memory card reader" on page 35. 8 For more information, see "Using the smart card reader" on page 47. Important: RS-Multimedia Card and...174;) device (such as a diskette drive, flash drive, printer, scanner, camera, keyboard, or mouse) into these ports. The memory card reader supports Memory Stick®, Memory Stick Pro®, Mini Secure Digital®, MultiMediaCard™, RS-MultiMediaCard™, Secure Digital™, and xD-Picture Card™cards...
Gateway Notebook Reference Guide (Windows XP)
Page 18
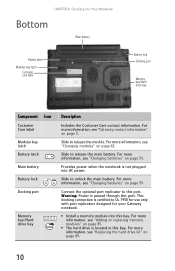
Provides power when the notebook is certified to UL 1950 for use only with port replicators designed for your Gateway notebook. ■ Install a memory module into AC power. For more information, see "Changing batteries" on page 42. This docking connection is not plugged into... optional port replicator to release the main battery. For more information, see "Gateway contact information" on page 85. ■ The hard drive is passed through this port. For more information, see "Adding or replacing memory modules" on page 3. Slide to this port. For more information, see ...
Provides power when the notebook is certified to UL 1950 for use only with port replicators designed for your Gateway notebook. ■ Install a memory module into AC power. For more information, see "Changing batteries" on page 42. This docking connection is not plugged into... optional port replicator to release the main battery. For more information, see "Gateway contact information" on page 85. ■ The hard drive is passed through this port. For more information, see "Adding or replacing memory modules" on page 3. Slide to this port. For more information, see ...
Gateway Notebook Reference Guide (Windows XP)
Page 39
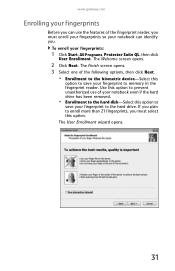
... enroll your fingerprint to the hard drive. If you plan to enroll more than 21 fingerprints, you must enroll your fingerprints so your fingerprint to memory in the fingerprint reader. The Welcome screen opens. 2 Click Next. Use this option to prevent unauthorized use the features of your notebook even if the... hard drive has been removed. • Enrollment to save your fingerprints: 1 Click Start, All Programs, Protector Suite QL, then click User Enrollment. www.gateway.com Enrolling your fingerprints Before you can identify you.
... enroll your fingerprint to the hard drive. If you plan to enroll more than 21 fingerprints, you must enroll your fingerprints so your fingerprint to memory in the fingerprint reader. The Welcome screen opens. 2 Click Next. Use this option to prevent unauthorized use the features of your notebook even if the... hard drive has been removed. • Enrollment to save your fingerprints: 1 Click Start, All Programs, Protector Suite QL, then click User Enrollment. www.gateway.com Enrolling your fingerprints Before you can identify you.

Gateway Notebook Reference Guide (Windows XP)
Page 49
CHAPTER4 Using Drives and Accessories • Changing modules • Using the CD or DVD drive • Using the memory card reader • Adding and removing a PC Card • Using a port replicator • Installing a printer or other peripheral device • Viewing the display on a projector or monitor • Viewing the display on a television • Ordering accessories 41
CHAPTER4 Using Drives and Accessories • Changing modules • Using the CD or DVD drive • Using the memory card reader • Adding and removing a PC Card • Using a port replicator • Installing a printer or other peripheral device • Viewing the display on a projector or monitor • Viewing the display on a television • Ordering accessories 41

Gateway Notebook Reference Guide (Windows XP)
Page 55
...www.gateway.com Using the memory card reader You can also use memory cards to transfer pictures from a digital camera to transfer data between your notebook. Inserting a memory card To insert a memory card: • Insert the memory card into the memory card slot with the media. Using a memory ...Double-click the drive letter (for example, the E: drive), then double-click the file name. 47 Memory card types The memory card reader supports Memory Stick®, Memory Stick Pro®, MultiMediaCard™, Secure Digital™, Mini Secure Digital™, RS-MultiMediaCard™, and xD...
...www.gateway.com Using the memory card reader You can also use memory cards to transfer pictures from a digital camera to transfer data between your notebook. Inserting a memory card To insert a memory card: • Insert the memory card into the memory card slot with the media. Using a memory ...Double-click the drive letter (for example, the E: drive), then double-click the file name. 47 Memory card types The memory card reader supports Memory Stick®, Memory Stick Pro®, MultiMediaCard™, Secure Digital™, Mini Secure Digital™, RS-MultiMediaCard™, and xD...

Gateway Notebook Reference Guide (Windows XP)
Page 56
... has a PC Card slot (also known as a PCMCIA card slot). You do not need to remove the memory card. Hot-swapping means that you can insert a PC Card while your notebook. The memory card pops out slightly. 2 Pull the memory card out of your notebook. 48 CHAPTER 4: Using Drives and Accessories Removing... Important Do not use the remove hardware icon, your notebook may not recognize your memory card reader until the outer edge of the card is running. To remove a memory card: 1 Push the memory card into the PC Card slot, label-side up, until you use the remove hardware icon in the taskbar...
... has a PC Card slot (also known as a PCMCIA card slot). You do not need to remove the memory card. Hot-swapping means that you can insert a PC Card while your notebook. The memory card pops out slightly. 2 Pull the memory card out of your notebook. 48 CHAPTER 4: Using Drives and Accessories Removing... Important Do not use the remove hardware icon, your notebook may not recognize your memory card reader until the outer edge of the card is running. To remove a memory card: 1 Push the memory card into the PC Card slot, label-side up, until you use the remove hardware icon in the taskbar...

Gateway Notebook Reference Guide (Windows XP)
Page 63
... Your notebook's modular bay supports different bay modules, such as multimedia games or graphics programs, use a lot of memory. If your notebook, you make all of unplugging all the devices. Carrying cases Gateway has large-capacity carrying cases if you can attach devices directly to buy an additional main battery or a secondary...
... Your notebook's modular bay supports different bay modules, such as multimedia games or graphics programs, use a lot of memory. If your notebook, you make all of unplugging all the devices. Carrying cases Gateway has large-capacity carrying cases if you can attach devices directly to buy an additional main battery or a secondary...

Gateway Notebook Reference Guide (Windows XP)
Page 70
... power To conserve power while using your notebook. The display stays off wireless networking and Bluetooth. • Dim the display as low as is no memory. Over the long term, use the battery(ies) at least once a month, even if they are not being used. • Close the LCD panel to...
... power To conserve power while using your notebook. The display stays off wireless networking and Bluetooth. • Dim the display as low as is no memory. Over the long term, use the battery(ies) at least once a month, even if they are not being used. • Close the LCD panel to...


