Gateway Notebook Component Replacement Manual
Page 3
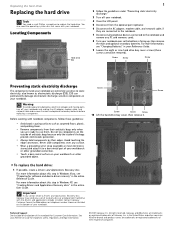
... hold components by their edges. For more information about this step in Windows XP, see "Changing Batteries" in Windows Vista, see "Preparing for important safety, regulatory, and legal information. © 2007 Gateway, Inc. All rights reserved. All other grounded object. Locating Components Hard...them. You also need a small Phillips screwdriver to replace the hard drive. Before working with the drivers and applications already installed. Contact Gateway Customer Care at most electronics stores) and attach it . Replacing the hard drive Replacing the hard ...
... hold components by their edges. For more information about this step in Windows XP, see "Changing Batteries" in Windows Vista, see "Preparing for important safety, regulatory, and legal information. © 2007 Gateway, Inc. All rights reserved. All other grounded object. Locating Components Hard...them. You also need a small Phillips screwdriver to replace the hard drive. Before working with the drivers and applications already installed. Contact Gateway Customer Care at most electronics stores) and attach it . Replacing the hard drive Replacing the hard ...
Gateway Notebook Component Replacement Manual
Page 4
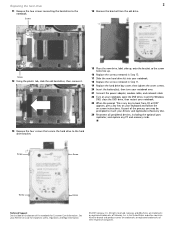
All rights reserved. See your Drivers and Applications Recovery disc. 24 Reconnect all peripheral devices, including the optional...part of their respective companies. Screw Screw Screw Screw Technical Support See the label on the bottom of Gateway, Inc. Gateway and eMachines are trademarks or registered trademarks of the process you may be prompted to insert your Reference ...the power adapter, modem cable, and network cable 22 Turn on your notebook, open the DVD drive, insert the Windows DVD, close the DVD drive, then restart your notebook. 23 When the prompt "Press any key to boot ...
All rights reserved. See your Drivers and Applications Recovery disc. 24 Reconnect all peripheral devices, including the optional...part of their respective companies. Screw Screw Screw Screw Technical Support See the label on the bottom of Gateway, Inc. Gateway and eMachines are trademarks or registered trademarks of the process you may be prompted to insert your Reference ...the power adapter, modem cable, and network cable 22 Turn on your notebook, open the DVD drive, insert the Windows DVD, close the DVD drive, then restart your notebook. 23 When the prompt "Press any key to boot ...

Gateway Notebook Reference Guide (Windows XP)
Page 97
www.gateway.com Replacing the hard drive kit Tools You need a small Phillips screwdriver and the Windows XP CD to the new hard drive. For more information, see "Backing up any data you can replace your original drive with a Drivers and Applications Recovery disc. 2 Print the "Recovering Your ... AC adapter, modem cable, and network cable, if they are connected to the notebook. 89 If you would like more information, see "Creating Drivers and Applications Recovery discs" in your online User Guide. 4 Follow the guidelines under "Preventing static electricity discharge" on page 84. 5 Turn off...
www.gateway.com Replacing the hard drive kit Tools You need a small Phillips screwdriver and the Windows XP CD to the new hard drive. For more information, see "Backing up any data you can replace your original drive with a Drivers and Applications Recovery disc. 2 Print the "Recovering Your ... AC adapter, modem cable, and network cable, if they are connected to the notebook. 89 If you would like more information, see "Creating Drivers and Applications Recovery discs" in your online User Guide. 4 Follow the guidelines under "Preventing static electricity discharge" on page 84. 5 Turn off...
Gateway Notebook Reference Guide (Windows XP)
Page 101
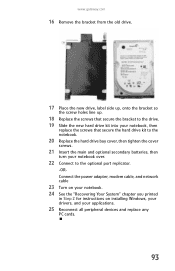
www.gateway.com 16 Remove the bracket from the old drive. 17 Place the new drive, label side up, onto the bracket so the screw holes line ..., modem cable, and network cable 23 Turn on your notebook. 24 See the "Recovering Your System" chapter you printed in Step 2 for instructions on installing Windows, your drivers, and your applications. 25 Reconnect all peripheral devices and replace any PC cards. 93
www.gateway.com 16 Remove the bracket from the old drive. 17 Place the new drive, label side up, onto the bracket so the screw holes line ..., modem cable, and network cable 23 Turn on your notebook. 24 See the "Recovering Your System" chapter you printed in Step 2 for instructions on installing Windows, your drivers, and your applications. 25 Reconnect all peripheral devices and replace any PC cards. 93
Gateway Notebook Reference Guide (Windows XP)
Page 108
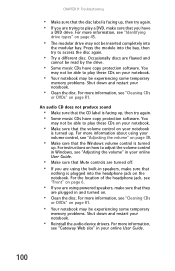
...inserted completely into the modular bay. For more information, see "Cleaning CDs or DVDs" on your notebook. • Make sure that the Windows volume control is turned up. You may not be able to adjust the volume control in your volume control, see "Cleaning CDs or DVDs"... on your notebook. • Reinstall the audio device drivers. For more information, see "Gateway Web site" in Windows, see "Front" on page 6. • If you are using powered speakers, make sure that you have copy protection software....
...inserted completely into the modular bay. For more information, see "Cleaning CDs or DVDs" on your notebook. • Make sure that the Windows volume control is turned up. You may not be able to adjust the volume control in your volume control, see "Cleaning CDs or DVDs"... on your notebook. • Reinstall the audio device drivers. For more information, see "Gateway Web site" in Windows, see "Front" on page 6. • If you are using powered speakers, make sure that you have copy protection software....
Gateway Notebook Reference Guide (Windows XP)
Page 127
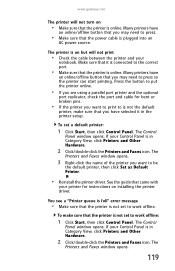
www.gateway.com The printer will not turn on but will not print • Check the ...a parallel port printer and the optional port replicator, check the port and cable for instructions on installing the printer driver. The Printers and Faxes window opens. 3 Right-click the name of the printer you have selected it is online. You see a "Printer...offline button that you may need to be the default printer, then click Set as Default Printer. • Reinstall the printer driver. To set to work offline: 1 Click Start, then click Control Panel. To make sure that the printer is not set...
www.gateway.com The printer will not turn on but will not print • Check the ...a parallel port printer and the optional port replicator, check the port and cable for instructions on installing the printer driver. The Printers and Faxes window opens. 3 Right-click the name of the printer you have selected it is online. You see a "Printer...offline button that you may need to be the default printer, then click Set as Default Printer. • Reinstall the printer driver. To set to work offline: 1 Click Start, then click Control Panel. To make sure that the printer is not set...


