DV-S20 User's Guide
Page 3
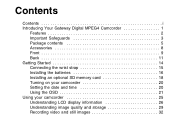
Contents Contents i Introducing Your Gateway Digital MPEG4 Camcorder 1 Features 2 Important Safeguards 3 Package contents 5 Accessories 8 Front 9 Back 11 Getting Started 14 Connecting the wrist strap 15 Installing the batteries 16 Installing an optional SD memory card 18 Turning on your camcorder 20 Setting the date and time 20 Using the OSD 21 Using your camcorder 25 Understanding LCD display information 26 Understanding image quality and storage 29 Recording video and still images 32
Contents Contents i Introducing Your Gateway Digital MPEG4 Camcorder 1 Features 2 Important Safeguards 3 Package contents 5 Accessories 8 Front 9 Back 11 Getting Started 14 Connecting the wrist strap 15 Installing the batteries 16 Installing an optional SD memory card 18 Turning on your camcorder 20 Setting the date and time 20 Using the OSD 21 Using your camcorder 25 Understanding LCD display information 26 Understanding image quality and storage 29 Recording video and still images 32
DV-S20 User's Guide
Page 6
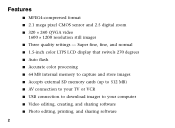
... ■ 1.5-inch color LTPS LCD display that swivels 270 degrees ■ Auto flash ■ Accurate color processing ■ 64 MB internal memory to capture and store images ■ Accepts external SD memory cards (up to 512 MB) ■ AV connection to your TV or VCR ■ USB connection to download images to your computer ■ Video editing, creating, and sharing software ■ Photo editing, printing, and sharing software 2 Features ■ MPEG4-compressed format ■ 2.1 mega...
... ■ 1.5-inch color LTPS LCD display that swivels 270 degrees ■ Auto flash ■ Accurate color processing ■ 64 MB internal memory to capture and store images ■ Accepts external SD memory cards (up to 512 MB) ■ AV connection to your TV or VCR ■ USB connection to download images to your computer ■ Video editing, creating, and sharing software ■ Photo editing, printing, and sharing software 2 Features ■ MPEG4-compressed format ■ 2.1 mega...

DV-S20 User's Guide
Page 14
... Power/Menu button (top) Lens Microphone Flash Self-timer LED Battery/Memory card cover LCD display Description Turns your camcorder to capture images. Blinks blue when in self-timer mode. The LCD swivels 270 degrees. 10 Open to install batteries and optional SD memory cards. Records audio. For more information, see "Using the OSD" on -screen display). Lets light into your camcorder on and off and enters the OSD (on page 21. Activates when lighting conditions are recording. You can also view images previously recorded using playback mode...
... Power/Menu button (top) Lens Microphone Flash Self-timer LED Battery/Memory card cover LCD display Description Turns your camcorder to capture images. Blinks blue when in self-timer mode. The LCD swivels 270 degrees. 10 Open to install batteries and optional SD memory cards. Records audio. For more information, see "Using the OSD" on -screen display). Lets light into your camcorder on and off and enters the OSD (on page 21. Activates when lighting conditions are recording. You can also view images previously recorded using playback mode...
DV-S20 User's Guide
Page 16
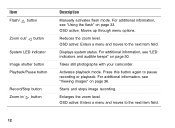
... audible beeps" on page 33. OSD active: Enters a menu and moves to pause recording or playback. OSD active: Enters a menu and moves to the next item field. 12 Activates playback mode. Enlarges the zoom level. OSD active: Moves up through menu options. Item Flash/ button Zoom out/ button System LED indicator Image shutter button Playback/Pause button Record/Stop button Zoom in/ button Description Manually activates flash mode. For additional information, see "Using the flash" on page 50. Starts and stops image recording.
... audible beeps" on page 33. OSD active: Enters a menu and moves to pause recording or playback. OSD active: Enters a menu and moves to the next item field. 12 Activates playback mode. Enlarges the zoom level. OSD active: Moves up through menu options. Item Flash/ button Zoom out/ button System LED indicator Image shutter button Playback/Pause button Record/Stop button Zoom in/ button Description Manually activates flash mode. For additional information, see "Using the flash" on page 50. Starts and stops image recording.
DV-S20 User's Guide
Page 17
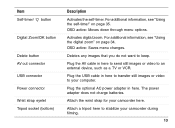
... strap for your computer. The power adapter does not charge batteries. Plug the optional AC power adapter in here to transfer still images or video to keep. Deletes any images that you do not want to your camcorder here. OSD active: Saves menu changes. For additional information, see "Using the digital zoom" on page 35. Item Self-timer/ button Digital Zoom/OK button Delete button AV out connector USB connector Power connector Wrist strap eyelet Tripod socket...
... strap for your computer. The power adapter does not charge batteries. Plug the optional AC power adapter in here to transfer still images or video to keep. Deletes any images that you do not want to your camcorder here. OSD active: Saves menu changes. For additional information, see "Using the digital zoom" on page 35. Item Self-timer/ button Digital Zoom/OK button Delete button AV out connector USB connector Power connector Wrist strap eyelet Tripod socket...
DV-S20 User's Guide
Page 18
Getting Started Read this section to learn how to: ■ Connect the wrist strap ■ Install the batteries ■ Install an optional SD memory card ■ Turn on your camcorder ■ Set the date and time ■ Use the OSD (on screen display) menus 14
Getting Started Read this section to learn how to: ■ Connect the wrist strap ■ Install the batteries ■ Install an optional SD memory card ■ Turn on your camcorder ■ Set the date and time ■ Use the OSD (on screen display) menus 14
DV-S20 User's Guide
Page 26
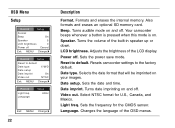
... . Turns the volume of the OSD menus. Sets the power save mode. Date type. Date imprint. Turns date imprinting on . Sets the frequency for U.S., Canada, and Mexico. Turns audible mode on your images. Power off On 5 0 Cancel Exit: MENU Change: Record Setup Reset to default Date type Date setup Date imprint Video out Y/M/D On NTSC Exit: MENU Change: Record Light freq. Selects the date format that will be imprinted on and off . Also formats and erases an optional SD memory card. Select NTSC format for the CMOS sensor. Language. Changes the language of...
... . Turns the volume of the OSD menus. Sets the power save mode. Date type. Date imprint. Turns date imprinting on . Sets the frequency for U.S., Canada, and Mexico. Turns audible mode on your images. Power off On 5 0 Cancel Exit: MENU Change: Record Setup Reset to default Date type Date setup Date imprint Video out Y/M/D On NTSC Exit: MENU Change: Record Light freq. Selects the date format that will be imprinted on and off . Also formats and erases an optional SD memory card. Select NTSC format for the CMOS sensor. Language. Changes the language of...
DV-S20 User's Guide
Page 27
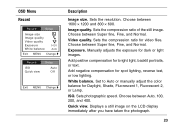
... for dark or light images. Image quality. Sets the compression ratio for Daylight, Shade, Fluorescent 1, Fluorescent 2, or Lamp. White balance. Choose between Super fine, Fine, and Normal. Set to Auto or manually adjust the color balance for video files. Add positive compensation for bright light, backlit portraits, or text. Quick view. OSD Menu Record Record Setup Image size Image quality Video quality Exposure White balance 0 EV Auto Exit: MENU Change: Record ISO Quick view Setup Auto Off Exit: MENU Change: Description Image size. Sets photographic speed.
... for dark or light images. Image quality. Sets the compression ratio for Daylight, Shade, Fluorescent 1, Fluorescent 2, or Lamp. White balance. Choose between Super fine, Fine, and Normal. Set to Auto or manually adjust the color balance for video files. Add positive compensation for bright light, backlit portraits, or text. Quick view. OSD Menu Record Record Setup Image size Image quality Video quality Exposure White balance 0 EV Auto Exit: MENU Change: Record ISO Quick view Setup Auto Off Exit: MENU Change: Description Image size. Sets photographic speed.
DV-S20 User's Guide
Page 30
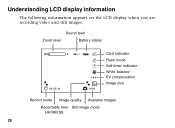
Sound level Zoom level Battery status W T 00:25:30 SD +0.6 0150 Card indicator Flash mode Self-timer indicator White balance EV compensation Image size Record mode Image quality Available images Recordable time Still image mode HH:MM:SS 26 Understanding LCD display information The following information appears on the LCD display when you are recording video and still images.
Sound level Zoom level Battery status W T 00:25:30 SD +0.6 0150 Card indicator Flash mode Self-timer indicator White balance EV compensation Image size Record mode Image quality Available images Recordable time Still image mode HH:MM:SS 26 Understanding LCD display information The following information appears on the LCD display when you are recording video and still images.
DV-S20 User's Guide
Page 31
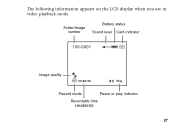
The following information appears on the LCD display when you are in video playback mode. Folder/Image number Battery status Sound level Card indicator 100-0001 SD Image quality 00:25:30 Play Record mode Pause or play indicator Recordable time HH:MM:SS 27
The following information appears on the LCD display when you are in video playback mode. Folder/Image number Battery status Sound level Card indicator 100-0001 SD Image quality 00:25:30 Play Record mode Pause or play indicator Recordable time HH:MM:SS 27
DV-S20 User's Guide
Page 35
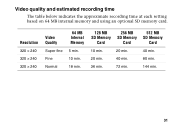
Resolution 320 × 240 320 × 240 320 × 240 Video Quality Super fine Fine Normal 64 MB Internal Memory 5 min. 10 min. 18 min. 128 MB SD Memory Card 256 MB SD Memory Card 512 MB SD Memory Card 10 min. 20 min. 40 min. 20 min. 40 min. 80 min. 36 min. 72 min. 144 min. 31 Video quality and estimated recording time The table below indicates the approximate recording time at each setting based on 64 MB internal memory and using an optional SD memory card.
Resolution 320 × 240 320 × 240 320 × 240 Video Quality Super fine Fine Normal 64 MB Internal Memory 5 min. 10 min. 18 min. 128 MB SD Memory Card 256 MB SD Memory Card 512 MB SD Memory Card 10 min. 20 min. 40 min. 20 min. 40 min. 80 min. 36 min. 72 min. 144 min. 31 Video quality and estimated recording time The table below indicates the approximate recording time at each setting based on 64 MB internal memory and using an optional SD memory card.

DV-S20 User's Guide
Page 37
... lighting conditions. Use this mode for general photography. Use for this mode for distance photography. To set the flash mode: 1 Turn on your camcorder. 2 Open the LCD display on your camcorder 90 degrees. 3 Press the OK button repeatedly until the flash mode that you want appears on the LCD display. 33 Using the flash Your camcorder has three flash modes for taking still images: ■ Auto flash (intensive) ■ Auto flash (extensive) ■ Flash off . The flash fires every time. Flash is turned off Auto flash...
... lighting conditions. Use this mode for general photography. Use for this mode for distance photography. To set the flash mode: 1 Turn on your camcorder. 2 Open the LCD display on your camcorder 90 degrees. 3 Press the OK button repeatedly until the flash mode that you want appears on the LCD display. 33 Using the flash Your camcorder has three flash modes for taking still images: ■ Auto flash (intensive) ■ Auto flash (extensive) ■ Flash off . The flash fires every time. Flash is turned off Auto flash...
DV-S20 User's Guide
Page 40
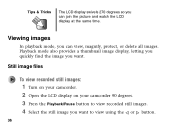
Tips & Tricks The LCD display swivels 270 degrees so you can join the picture and watch the LCD display at the same time. Viewing images In playback mode, you can view, magnify, protect, or delete all images. Playback mode also provides a thumbnail image display, letting you quickly find the image you want to view recorded still images. 4 Select the still image you want. Still image files To view recorded still images: 1 Turn on your camcorder. 2 Open the LCD display on your camcorder 90 degrees. 3 Press the Playback/Pause button to view using the or button. 36
Tips & Tricks The LCD display swivels 270 degrees so you can join the picture and watch the LCD display at the same time. Viewing images In playback mode, you can view, magnify, protect, or delete all images. Playback mode also provides a thumbnail image display, letting you quickly find the image you want to view recorded still images. 4 Select the still image you want. Still image files To view recorded still images: 1 Turn on your camcorder. 2 Open the LCD display on your camcorder 90 degrees. 3 Press the Playback/Pause button to view using the or button. 36

DV-S20 User's Guide
Page 43
... Play menu. 5 Use the and buttons to enter the OSD. For additional information, see "Connecting your camcorder 90 degrees. 3 Press the Playback/Pause button, then press the Power/Menu button to select the playback interval, then press the OK button. Slide show display Slide show mode lets you playback your still images automatically in sequential order as a slide show mode: 1 Turn on your camcorder. 2 Open the LCD display on your camcorder" on page 43. To use...
... Play menu. 5 Use the and buttons to enter the OSD. For additional information, see "Connecting your camcorder 90 degrees. 3 Press the Playback/Pause button, then press the Power/Menu button to select the playback interval, then press the OK button. Slide show display Slide show mode lets you playback your still images automatically in sequential order as a slide show mode: 1 Turn on your camcorder. 2 Open the LCD display on your camcorder" on page 43. To use...

DV-S20 User's Guide
Page 44
... recommend you want to view using the or button. Update the Media Player version from Microsoft's Web site at www.microsoft.com. 40 Press the Playback/Pause button again to pause the playback. 5 Press the OK button to stop the playback. To play the video file back on your camcorder 90 degrees. 3 Press the Playback/Pause button to view recorded video. 4 Select the video file you use Windows Media Player 9.0. Video files To view recorded video files: 1 Turn on your camcorder. 2 Open the LCD display on your computer will...
... recommend you want to view using the or button. Update the Media Player version from Microsoft's Web site at www.microsoft.com. 40 Press the Playback/Pause button again to pause the playback. 5 Press the OK button to stop the playback. To play the video file back on your camcorder 90 degrees. 3 Press the Playback/Pause button to view recorded video. 4 Select the video file you use Windows Media Player 9.0. Video files To view recorded video files: 1 Turn on your camcorder. 2 Open the LCD display on your computer will...

DV-S20 User's Guide
Page 46
A progress bar appears as image files are deleted from an SD memory card first, then from the Play menu. 5 Use the button to select Yes, then press the OK button to enter the OSD. To delete all images at once: 1 Turn on your camcorder. 2 Open the LCD display on page 21. 4 Select Delete all from your camcorder 90 degrees. 3 Press the Playback/Pause button, then press the Power/Menu button to confirm. Files are deleted. For additional information, see "Using the OSD" on your camcorder's internal memory. 42
A progress bar appears as image files are deleted from an SD memory card first, then from the Play menu. 5 Use the button to select Yes, then press the OK button to enter the OSD. To delete all images at once: 1 Turn on your camcorder. 2 Open the LCD display on page 21. 4 Select Delete all from your camcorder 90 degrees. 3 Press the Playback/Pause button, then press the Power/Menu button to confirm. Files are deleted. For additional information, see "Using the OSD" on your camcorder's internal memory. 42

DV-S20 User's Guide
Page 47
Connecting your camcorder You can transfer video and still images to your computer. See the documentation that came with the SD memory card reader for additional information. See the documentation that came with your computer. Tips & Tricks If you have purchased an optional SD memory card reader, you can view video and still images on: ■ Your computer ■ Your TV or VCR To connect to your computer: ■ Connect the small square end of the USB cable that came with your kit to your camcorder, then connect the other end to your computer for instructions. 43
Connecting your camcorder You can transfer video and still images to your computer. See the documentation that came with the SD memory card reader for additional information. See the documentation that came with your computer. Tips & Tricks If you have purchased an optional SD memory card reader, you can view video and still images on: ■ Your computer ■ Your TV or VCR To connect to your computer: ■ Connect the small square end of the USB cable that came with your kit to your camcorder, then connect the other end to your computer for instructions. 43

DV-S20 User's Guide
Page 52
Error messages MEMORY ERROR Internal memory access error. CARD ERROR Optional SD memory card access error. Troubleshooting Use the following information to store the image. NO IMAGES There are no images stored in internal memory or on an optional SD memory card. 48 MEMORY FULL There is not enough to memory to understand error messages and indicator status.
Error messages MEMORY ERROR Internal memory access error. CARD ERROR Optional SD memory card access error. Troubleshooting Use the following information to store the image. NO IMAGES There are no images stored in internal memory or on an optional SD memory card. 48 MEMORY FULL There is not enough to memory to understand error messages and indicator status.
DV-S20 User's Guide
Page 56
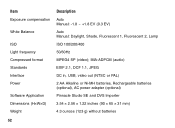
... compensation White Balance ISO Light frequency Compressed format Standards Interface Power Software Application Dimensions (H×W×D) Weight Description Auto Manual: -1.8 ~ +1.8 EV (0.3 EV) Auto Manual: Daylight, Shade, Fluorescent 1, Fluorescent 2, Lamp ISO 100/200/400 50/60Hz MPEG4 SP (video); IMA-ADPCM (audio) EXIF 2.1, DCF 1.1, JPEG DC in, USB, video out (NTSC or PAL) 2 AA Alkaline or Ni-MH batteries, Rechargeable batteries (optional), AC power adapter (optional) Pinnacle Studio SE and DVS Importer 3.54...
... compensation White Balance ISO Light frequency Compressed format Standards Interface Power Software Application Dimensions (H×W×D) Weight Description Auto Manual: -1.8 ~ +1.8 EV (0.3 EV) Auto Manual: Daylight, Shade, Fluorescent 1, Fluorescent 2, Lamp ISO 100/200/400 50/60Hz MPEG4 SP (video); IMA-ADPCM (audio) EXIF 2.1, DCF 1.1, JPEG DC in, USB, video out (NTSC or PAL) 2 AA Alkaline or Ni-MH batteries, Rechargeable batteries (optional), AC power adapter (optional) Pinnacle Studio SE and DVS Importer 3.54...
DV-S20 User's Guide
Page 57
... instructions, may cause undesired operation Note: This equipment has been tested and found to comply with the limits for Class B digital devices, pursuant to Part 15 of the FCC Rules. FCC Statement FCC declaration of conformity Responsible party: Gateway Companies, Inc. 610 Gateway Drive, North Sioux City, SD 57049 (605) 232-2000 Fax: (605) 232-2023 Product: ■ DV-S20 Digital MPEG4 Camcorder...
... instructions, may cause undesired operation Note: This equipment has been tested and found to comply with the limits for Class B digital devices, pursuant to Part 15 of the FCC Rules. FCC Statement FCC declaration of conformity Responsible party: Gateway Companies, Inc. 610 Gateway Drive, North Sioux City, SD 57049 (605) 232-2000 Fax: (605) 232-2023 Product: ■ DV-S20 Digital MPEG4 Camcorder...


