User Guide
Page 8
CONTENTS INTRODUCTION ...12 Overview ...12 Package Contents 13 GETTING TO KNOW YOUR CAMERA 14 Front View ...14 Rear View ...15 Mode Dial ...16 LED Indicators 17 LCD Monitor Information 18 GETTING STARTED 21 Installing the Batteries 21 Using the AC Power Adapter (optional accessory 22 Loading an SD Memory Card (optional accessory 23 Attaching the Camera Strap 24 Attaching the Lens Strap 24 8
CONTENTS INTRODUCTION ...12 Overview ...12 Package Contents 13 GETTING TO KNOW YOUR CAMERA 14 Front View ...14 Rear View ...15 Mode Dial ...16 LED Indicators 17 LCD Monitor Information 18 GETTING STARTED 21 Installing the Batteries 21 Using the AC Power Adapter (optional accessory 22 Loading an SD Memory Card (optional accessory 23 Attaching the Camera Strap 24 Attaching the Lens Strap 24 8
User Guide
Page 10
PLAYBACK MODE 42 Viewing Images 43 Zoom Playback 44 Displaying Thumbnail Images 45 Slide Show Display 46 Setting DPOF 47 Deleting Images/Video Clips 48 To Delete One Image/Video Clip At A Time 48 To Delete All Images/Video Clips At A Time 49 Formatting an SD Card or Internal Memory 50 MOVIE MODE ...51 Recording Video Clips 51 Viewing Video Clips 52 TRANSFERRING RECORDED IMAGES/VIDEO CLIPS TO YOUR COMPUTER ....... 53 Step 1: Connecting the Camera to Your Computer 54 Step 2: Downloading Images/Video Clips 55 For Computers Running Windows 55 10
PLAYBACK MODE 42 Viewing Images 43 Zoom Playback 44 Displaying Thumbnail Images 45 Slide Show Display 46 Setting DPOF 47 Deleting Images/Video Clips 48 To Delete One Image/Video Clip At A Time 48 To Delete All Images/Video Clips At A Time 49 Formatting an SD Card or Internal Memory 50 MOVIE MODE ...51 Recording Video Clips 51 Viewing Video Clips 52 TRANSFERRING RECORDED IMAGES/VIDEO CLIPS TO YOUR COMPUTER ....... 53 Step 1: Connecting the Camera to Your Computer 54 Step 2: Downloading Images/Video Clips 55 For Computers Running Windows 55 10
User Guide
Page 12
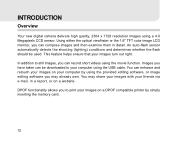
... you to still images, you may share your images with your images on a DPOF compatible printer by using the USB cable. INTRODUCTION Overview Your new digital camera delivers high quality, 2304 x 1728 resolution images using the movie function. This feature helps ensure that your computer using the provided editing software, or image... print your friends via e-mail, in detail. You can compose images and then examine them in a report, or on your computer by simply inserting the memory card. 12
... you to still images, you may share your images with your images on a DPOF compatible printer by using the USB cable. INTRODUCTION Overview Your new digital camera delivers high quality, 2304 x 1728 resolution images using the movie function. This feature helps ensure that your computer using the provided editing software, or image... print your friends via e-mail, in detail. You can compose images and then examine them in a report, or on your computer by simply inserting the memory card. 12
User Guide
Page 17
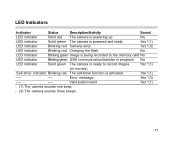
... indicator Blinking red Charging the flash No LED indicator Blinking green Image is being recorded to the memory card No LED indicator Blinking green USB communication/transfer in progress No LED indicator Solid green The camera is ready to record images Yes *(1) (or movies) Self-timer indicator Blinking red The self-timer function...
... indicator Blinking red Charging the flash No LED indicator Blinking green Image is being recorded to the memory card No LED indicator Blinking green USB communication/transfer in progress No LED indicator Solid green The camera is ready to record images Yes *(1) (or movies) Self-timer indicator Blinking red The self-timer function...
User Guide
Page 21
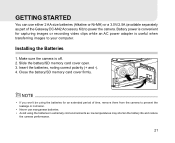
... time, remove them from the camera to power the camera. Installing the Batteries 1. Avoid using the batteries for capturing images or recording video clips while an AC power adapter is off. 2. Close the battery/SD memory card cover firmly. Battery power is convenient for an extended period of the Gateway DC-M42 Accessory Kit) to prevent the...
... time, remove them from the camera to power the camera. Installing the Batteries 1. Avoid using the batteries for capturing images or recording video clips while an AC power adapter is off. 2. Close the battery/SD memory card cover firmly. Battery power is convenient for an extended period of the Gateway DC-M42 Accessory Kit) to prevent the...
User Guide
Page 23
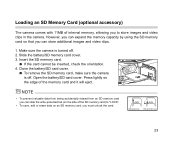
... camera. To remove the SD memory card, make sure the camera is turned off . Open the battery/SD card cover. Close the battery/SD card cover. Loading an SD Memory Card (optional accessory) The camera comes with 11MB of internal memory, allowing you to "LOCK". Slide the battery/SD memory card cover. 3. However, you can expand the memory capacity by using the SD memory card...
... camera. To remove the SD memory card, make sure the camera is turned off . Open the battery/SD card cover. Close the battery/SD card cover. Loading an SD Memory Card (optional accessory) The camera comes with 11MB of internal memory, allowing you to "LOCK". Slide the battery/SD memory card cover. 3. However, you can expand the memory capacity by using the SD memory card...
User Guide
Page 26
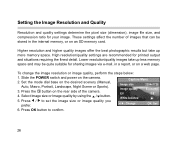
... and may be stored in a report, or on the camera. 2. Set the mode dial base on the rear side of images that can be quite suitable for sharing images via e-mail, in the internal memory, or on an SD memory card. Press the button on the desired scenery (Manual, Auto, Macro, Portrait, ...size or Image quality by using the / button. 5. Slide the POWER switch and power on a web page. These settings affect the number of the camera. 4. Press OK button to set the image size or image quality you prefer. 6. Higher resolution and higher quality images offer the best photographic results ...
... and may be stored in a report, or on the camera. 2. Set the mode dial base on the rear side of images that can be quite suitable for sharing images via e-mail, in the internal memory, or on an SD memory card. Press the button on the desired scenery (Manual, Auto, Macro, Portrait, ...size or Image quality by using the / button. 5. Slide the POWER switch and power on a web page. These settings affect the number of the camera. 4. Press OK button to set the image size or image quality you prefer. 6. Higher resolution and higher quality images offer the best photographic results ...
User Guide
Page 27
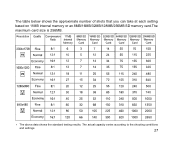
The above data shows the standard testing results. The actual capacity varies according to the shooting conditions and settings. 27 The table below shows the approximate number of shots that you can take at each setting based on 11MB internal memory or an 8MB/16MB/32MB/128MB/256MB SD memory card.The maximum card size is 256MB.
The above data shows the standard testing results. The actual capacity varies according to the shooting conditions and settings. 27 The table below shows the approximate number of shots that you can take at each setting based on 11MB internal memory or an 8MB/16MB/32MB/128MB/256MB SD memory card.The maximum card size is 256MB.
User Guide
Page 43
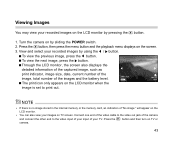
... images and the battery level. The print icon only appears on the LCD monitor when the image is no image stored in the internal memory or the memory card, an indication of "No image " will appear on the LCD monitor by pressing the button. 1. You can also view your images on the screen.... 3. Connect one end of the video cable to the video out jack of the camera and connect the other end to print out. Turn the camera on...
... images and the battery level. The print icon only appears on the LCD monitor when the image is no image stored in the internal memory or the memory card, an indication of "No image " will appear on the LCD monitor by pressing the button. 1. You can also view your images on the screen.... 3. Connect one end of the video cable to the video out jack of the camera and connect the other end to print out. Turn the camera on...
User Guide
Page 47
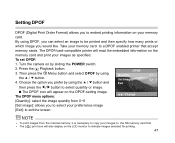
... [ ] print icon will read the embedded information on the DPOF-setting image. Setting DPOF DPOF (Digital Print Order Format) allows you to embed printing information on by sliding the POWER switch. 2. Turn the camera on your memory card. Then press the Menu button and select DPOF by using the / button and then press the...
... [ ] print icon will read the embedded information on the DPOF-setting image. Setting DPOF DPOF (Digital Print Order Format) allows you to embed printing information on by sliding the POWER switch. 2. Turn the camera on your memory card. Then press the Menu button and select DPOF by using the / button and then press the...

User Guide
Page 49
... the rear side of the camera to remove the SD memory card first and the OSD screen will display as "All images on card "or "All images on memory" base on your decision whether to delete information recorded in the card or in the internal memory, the steps are the same as mentioned above... the OK button and then select [All images on memory". The OSD message for deleting all images or video clips will display as "All images on card] by using the / button. 6. Then press the button. 4. Select Delete by using the / button. 5. The camera is ready to confirm. After that, [No image]...
... the rear side of the camera to remove the SD memory card first and the OSD screen will display as "All images on card "or "All images on memory" base on your decision whether to delete information recorded in the card or in the internal memory, the steps are the same as mentioned above... the OK button and then select [All images on memory". The OSD message for deleting all images or video clips will display as "All images on card] by using the / button. 6. Then press the button. 4. Select Delete by using the / button. 5. The camera is ready to confirm. After that, [No image]...
User Guide
Page 50
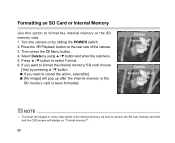
... to format the internal memory or the SD memory card. 1. Press the Playback button on by sliding the POWER switch. 2. Formatting an SD Card or Internal Memory Use this option to select Format. 6. If you want to cancel the action, select [No]. [No image] will display as "Format memory?". 50 Turn the camera on the rear side...
... to format the internal memory or the SD memory card. 1. Press the Playback button on by sliding the POWER switch. 2. Formatting an SD Card or Internal Memory Use this option to select Format. 6. If you want to cancel the action, select [No]. [No image] will display as "Format memory?". 50 Turn the camera on the rear side...
User Guide
Page 55
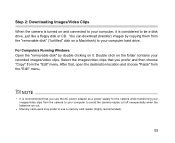
... AC power adapter as a power supply for the camera while transferring your images/video clips from the "Edit" menu. It is recommended that you prefer and then choose "Copy" from the camera to your computer to use a memory card reader (highly recommended). 55 Double click on the ...folder contains your recorded images/video clips. Memory card users may prefer to avoid the camera maybe cut off unexpectedly when the batteries run out. You...
... AC power adapter as a power supply for the camera while transferring your images/video clips from the "Edit" menu. It is recommended that you prefer and then choose "Copy" from the camera to your computer to use a memory card reader (highly recommended). 55 Double click on the ...folder contains your recorded images/video clips. Memory card users may prefer to avoid the camera maybe cut off unexpectedly when the batteries run out. You...
User Guide
Page 65
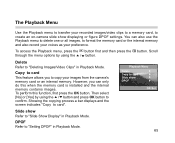
... the Playback menu to delete one or all images, to format the memory card or the internal memory and also record your voices as your images from the camera's memory card or an internal memory. To perform this when the memory card is installed and the internal memory contains images. To access the Playback menu, press the button first and...
... the Playback menu to delete one or all images, to format the memory card or the internal memory and also record your voices as your images from the camera's memory card or an internal memory. To perform this when the memory card is installed and the internal memory contains images. To access the Playback menu, press the button first and...
User Guide
Page 70
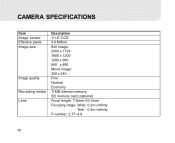
SD memory card (optional) Focal length: 7.8mm~23.4mm Focusing range: Wide: 0.2m~infinity Tele: 0.4m~infinity F-number: 2.77~4.9 70 CAMERA SPECIFICATIONS Item Image sensor Effective pixels Image size Image quality Recording media Lens Description 1/1.8" CCD 4.0 Million Still Image: 2304 x 1728 1600 x 1200 1280 x 960 640 x 480 Movie image: 320 x 240 Fine Normal Economy 11MB internal memory;
SD memory card (optional) Focal length: 7.8mm~23.4mm Focusing range: Wide: 0.2m~infinity Tele: 0.4m~infinity F-number: 2.77~4.9 70 CAMERA SPECIFICATIONS Item Image sensor Effective pixels Image size Image quality Recording media Lens Description 1/1.8" CCD 4.0 Million Still Image: 2304 x 1728 1600 x 1200 1280 x 960 640 x 480 Movie image: 320 x 240 Fine Normal Economy 11MB internal memory;

User Guide
Page 71
... Zoom Optical: 3X Digital: Capture mode: 4X/ Playback mode: 6X Exposure compensation Auto; Manual: Daylight, Cloudy, Sunset, Tungsten, Fluorescent Compressed format JPEG, MPEG 1 Level I for video clip Standards JPEG, EXIF 2.1, DPOF, DCF, MPEG 1 Level I Interface DC IN jack, USB ... Gateway DC-M42 Accessory Kit), AC Power Adapter (3.0V/2.5A) (available separately as part of the Gateway DC-M42 Accessory Kit). Manual: -2.0 ~ +2.0 EV (0.5 EV) White Balance Auto; Tripod socket Dimensions Yes 95mm x 64mm x 36mm (WxHxD) Weight Approx. 180g (without batteries and the SD memory card...
... Zoom Optical: 3X Digital: Capture mode: 4X/ Playback mode: 6X Exposure compensation Auto; Manual: Daylight, Cloudy, Sunset, Tungsten, Fluorescent Compressed format JPEG, MPEG 1 Level I for video clip Standards JPEG, EXIF 2.1, DPOF, DCF, MPEG 1 Level I Interface DC IN jack, USB ... Gateway DC-M42 Accessory Kit), AC Power Adapter (3.0V/2.5A) (available separately as part of the Gateway DC-M42 Accessory Kit). Manual: -2.0 ~ +2.0 EV (0.5 EV) White Balance Auto; Tripod socket Dimensions Yes 95mm x 64mm x 36mm (WxHxD) Weight Approx. 180g (without batteries and the SD memory card...