User Guide
Page 6
...camera and its accessories in a location affected by oil fumes or steam, such as near a cooking stove or humidifier. Handle the camera carefully and do so may cause heat to other devices are disconnected before moving the camera. This may cause a malfunction. Do not place the camera in well-ventilated locations. Handling the camera...the AC power adapter, unplug the adapter from the AC power outlet after you have switched off the camera.) Ensure that any hard object. Do not cover or wrap the camera or the AC power adapter with a cloth or quilt. This may cause a fire or an ...
...camera and its accessories in a location affected by oil fumes or steam, such as near a cooking stove or humidifier. Handle the camera carefully and do so may cause heat to other devices are disconnected before moving the camera. This may cause a malfunction. Do not place the camera in well-ventilated locations. Handling the camera...the AC power adapter, unplug the adapter from the AC power outlet after you have switched off the camera.) Ensure that any hard object. Do not cover or wrap the camera or the AC power adapter with a cloth or quilt. This may cause a fire or an ...
User Guide
Page 8
CONTENTS INTRODUCTION ...12 Overview ...12 Package Contents 13 GETTING TO KNOW YOUR CAMERA 14 Front View ...14 Rear View ...15 Mode Dial ...16 LED Indicators 17 LCD Monitor Information 18 GETTING STARTED 21 Installing the Batteries 21 Using the AC Power Adapter (optional accessory 22 Loading an SD Memory Card (optional accessory 23 Attaching the Camera Strap 24 Attaching the Lens Strap 24 8
CONTENTS INTRODUCTION ...12 Overview ...12 Package Contents 13 GETTING TO KNOW YOUR CAMERA 14 Front View ...14 Rear View ...15 Mode Dial ...16 LED Indicators 17 LCD Monitor Information 18 GETTING STARTED 21 Installing the Batteries 21 Using the AC Power Adapter (optional accessory 22 Loading an SD Memory Card (optional accessory 23 Attaching the Camera Strap 24 Attaching the Lens Strap 24 8
User Guide
Page 21
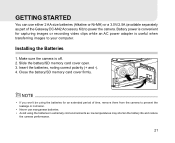
...'t be using the batteries in extremely cold environments as part of time, remove them from the camera to your computer. Make sure the camera is convenient for an extended period of the Gateway DC-M42 Accessory Kit) to power the camera. Never use either 2 AA size batteries (Alkaline or Ni-MH) or a 3.0V/2.5A (available separately as...
...'t be using the batteries in extremely cold environments as part of time, remove them from the camera to your computer. Make sure the camera is convenient for an extended period of the Gateway DC-M42 Accessory Kit) to power the camera. Never use either 2 AA size batteries (Alkaline or Ni-MH) or a 3.0V/2.5A (available separately as...
User Guide
Page 22
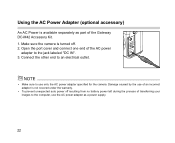
...to use of the AC power adapter to an electrical outlet. To prevent unexpected auto power off . 2. Using the AC Power Adapter (optional accessory) An AC Power is available separately as a power supply. 22 Damage caused by the use only the AC power adapter specified for the... camera. Connect the other end to the jack labeled "DC IN". 3. Open the port cover and connect one end of an incorrect adapter is turned off resulting from no battery power left during the process of the Gateway DC-M42 Accessory Kit. 1. Make sure the camera is not covered under ...
...to use of the AC power adapter to an electrical outlet. To prevent unexpected auto power off . 2. Using the AC Power Adapter (optional accessory) An AC Power is available separately as a power supply. 22 Damage caused by the use only the AC power adapter specified for the... camera. Connect the other end to the jack labeled "DC IN". 3. Open the port cover and connect one end of an incorrect adapter is turned off resulting from no battery power left during the process of the Gateway DC-M42 Accessory Kit. 1. Make sure the camera is not covered under ...
User Guide
Page 23
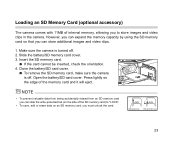
... data on the side of the SD memory card) to store images and video clips in the camera. Slide the battery/SD memory card cover. 3. To remove the SD memory card, make sure the camera is turned off . To prevent valuable data from being accidentally erased from an SD memory card you... can slide the write-protected tab (on an SD memory card, you must unlock the card. 23 Loading an SD Memory Card (optional accessory) The camera comes with 11MB of internal memory, allowing you can store additional images and video clips. 1. Press lightly on the edge of the memory card...
... data on the side of the SD memory card) to store images and video clips in the camera. Slide the battery/SD memory card cover. 3. To remove the SD memory card, make sure the camera is turned off . To prevent valuable data from being accidentally erased from an SD memory card you... can slide the write-protected tab (on an SD memory card, you must unlock the card. 23 Loading an SD Memory Card (optional accessory) The camera comes with 11MB of internal memory, allowing you can store additional images and video clips. 1. Press lightly on the edge of the memory card...

User Guide
Page 71
... memory card) Design and specifications are subject to change without notice. 71 LCD monitor Self-timer 1.6" color TFT LCD 10-second delay Zoom Optical: 3X Digital: Capture mode: 4X/ Playback mode: 6X Exposure compensation Auto; Manual: Daylight, Cloudy, Sunset, Tungsten, Fluorescent Compressed format JPEG, MPEG 1 Level I for video ... Storage: -200C ~600C, 10% ~95% humidity 2 x AA Alkaline batteries (included), 2 x AA Ni-MH batteries (optional), CR-V3 (available separately as part of the Gateway DC-M42 Accessory Kit), AC Power Adapter (3.0V/2.5A) (available separately as part of the...
... memory card) Design and specifications are subject to change without notice. 71 LCD monitor Self-timer 1.6" color TFT LCD 10-second delay Zoom Optical: 3X Digital: Capture mode: 4X/ Playback mode: 6X Exposure compensation Auto; Manual: Daylight, Cloudy, Sunset, Tungsten, Fluorescent Compressed format JPEG, MPEG 1 Level I for video ... Storage: -200C ~600C, 10% ~95% humidity 2 x AA Alkaline batteries (included), 2 x AA Ni-MH batteries (optional), CR-V3 (available separately as part of the Gateway DC-M42 Accessory Kit), AC Power Adapter (3.0V/2.5A) (available separately as part of the...