
User Guide
Page 2
... connected. If such changes or modifications should be made, you could be used. Canada Industry Canada (IC) Unintentional emitter per ICES-003/NMB-003 This digital apparatus does not exceed the Class B limits for help. Reorient or relocate the receiving antenna. Increase the separation between the equipment and receiver. Use cables...
... connected. If such changes or modifications should be made, you could be used. Canada Industry Canada (IC) Unintentional emitter per ICES-003/NMB-003 This digital apparatus does not exceed the Class B limits for help. Reorient or relocate the receiving antenna. Increase the separation between the equipment and receiver. Use cables...
User Guide
Page 3
... not liable whatsoever for online and chat support or call 1-888-737-6949 Monday-Friday 7am to our website or contact Gateway. 3. The bundled driver, software, design, specifications and user's manual that were packaged with the camera are trademarks or registered trademarks of Intel Corporation. For driver updates, refer to 9pm (Central Time...
... not liable whatsoever for online and chat support or call 1-888-737-6949 Monday-Friday 7am to our website or contact Gateway. 3. The bundled driver, software, design, specifications and user's manual that were packaged with the camera are trademarks or registered trademarks of Intel Corporation. For driver updates, refer to 9pm (Central Time...

User Guide
Page 9
Choosing the Language 25 Setting the Date and the Time 25 Setting the Image Resolution and Quality 26 TAKING PHOTOGRAPHS 28 Basic Setting 28 Using the Viewfinder 28 Using the LCD Monitor 29 Using the Zoom Functions 30 Using the Self-Timer 31 Using the Flash 32 Photography in a Variety of Modes 34 Selecting Manual Mode 35 Selecting Auto Mode 36 Selecting Macro Mode 37 Selecting Portrait Mode 38 Selecting Landscape Mode 39 Selecting Night Scene Mode 40 Selecting Sports Mode 41 9
Choosing the Language 25 Setting the Date and the Time 25 Setting the Image Resolution and Quality 26 TAKING PHOTOGRAPHS 28 Basic Setting 28 Using the Viewfinder 28 Using the LCD Monitor 29 Using the Zoom Functions 30 Using the Self-Timer 31 Using the Flash 32 Photography in a Variety of Modes 34 Selecting Manual Mode 35 Selecting Auto Mode 36 Selecting Macro Mode 37 Selecting Portrait Mode 38 Selecting Landscape Mode 39 Selecting Night Scene Mode 40 Selecting Sports Mode 41 9
User Guide
Page 13
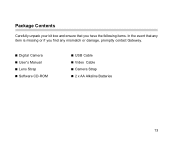
Package Contents Carefully unpack your kit box and ensure that you have the following items. In the event that any item is missing or if you find any mismatch or damage, promptly contact Gateway. Digital Camera User's Manual Lens Strap Software CD-ROM USB Cable Video Cable Camera Strap 2 x AA Alkaline Batteries 13
Package Contents Carefully unpack your kit box and ensure that you have the following items. In the event that any item is missing or if you find any mismatch or damage, promptly contact Gateway. Digital Camera User's Manual Lens Strap Software CD-ROM USB Cable Video Cable Camera Strap 2 x AA Alkaline Batteries 13
User Guide
Page 16
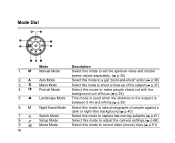
M 2. A 3. 4. 5. 6. 7. 8. 9. 16 Mode Manual Mode Auto Mode Macro Mode Portrait Mode Landscape Mode Night Scene Mode Sports Mode Setup Mode Movie Mode Description Select this mode to set the ... photographs of people against a dark or night-time background.( p.40) Select this mode to capture fast-moving subjects.( p.41) Select this mode to adjust the camera settings.( p.66) Select this mode to record video (movie) clips.( p.51) Mode Dial 1.
M 2. A 3. 4. 5. 6. 7. 8. 9. 16 Mode Manual Mode Auto Mode Macro Mode Portrait Mode Landscape Mode Night Scene Mode Sports Mode Setup Mode Movie Mode Description Select this mode to set the ... photographs of people against a dark or night-time background.( p.40) Select this mode to capture fast-moving subjects.( p.41) Select this mode to adjust the camera settings.( p.66) Select this mode to record video (movie) clips.( p.51) Mode Dial 1.

User Guide
Page 18
LCD Monitor Information These indicators are displayed when recording still images: 1. Image quality [ ] Fine [ ] Normal [ ] Economy 4. Image size [ ] 2304 x 1728 pixels [ ] 1600 x 1200 pixels [ ] 1280 x 960 pixels [ ] 640 x 480 pixels 18 3. Saturation [ ] High [ ] Medium [ ] Low Exposure mode [M] Manual mode [A] Auto mode [ ] Macro mode [ ] Portrait mode [ ] Landscape mode [ ] Night Scene mode [ ] Sports mode 2.
LCD Monitor Information These indicators are displayed when recording still images: 1. Image quality [ ] Fine [ ] Normal [ ] Economy 4. Image size [ ] 2304 x 1728 pixels [ ] 1600 x 1200 pixels [ ] 1280 x 960 pixels [ ] 640 x 480 pixels 18 3. Saturation [ ] High [ ] Medium [ ] Low Exposure mode [M] Manual mode [A] Auto mode [ ] Macro mode [ ] Portrait mode [ ] Landscape mode [ ] Night Scene mode [ ] Sports mode 2.
User Guide
Page 26
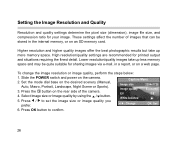
... size or image quality you prefer. 6. Slide the POWER switch and power on the desired scenery (Manual, Auto, Macro, Portrait, Landscape, Night Scene or Sports). 3. Press / to confirm. 26 These settings affect the number of the camera. 4. High resolution/quality settings are recommended for your image. Press the button on the rear... images take up less memory space and may be stored in a report, or on an SD memory card. Set the mode dial base on the camera. 2. Select Image size or Image quality by using the / button. 5.
... size or image quality you prefer. 6. Slide the POWER switch and power on the desired scenery (Manual, Auto, Macro, Portrait, Landscape, Night Scene or Sports). 3. Press / to confirm. 26 These settings affect the number of the camera. 4. High resolution/quality settings are recommended for your image. Press the button on the rear... images take up less memory space and may be stored in a report, or on an SD memory card. Set the mode dial base on the camera. 2. Select Image size or Image quality by using the / button. 5.
User Guide
Page 28
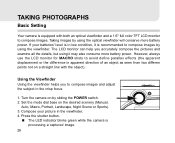
...images by using the viewfinder. Compose your batteries' level is in low condition, it may also consume more battery power. Turn the camera on by using it is recommended to avoid define parallax effects (the apparent displacement or the difference in apparent direction of an object... as seen from two differen points not on the desired scenery (Manual, Auto, Macro, Portrait, Landscape, Night Scene or Sports). 3. Set the mode dial base on a straight line with both an optical viewfinder ...
...images by using the viewfinder. Compose your batteries' level is in low condition, it may also consume more battery power. Turn the camera on by using it is recommended to avoid define parallax effects (the apparent displacement or the difference in apparent direction of an object... as seen from two differen points not on the desired scenery (Manual, Auto, Macro, Portrait, Landscape, Night Scene or Sports). 3. Set the mode dial base on a straight line with both an optical viewfinder ...
User Guide
Page 29
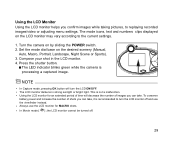
... off . 29 Using the LCD Monitor Using the LCD monitor helps you confirm images while taking pictures, to the current settings. 1. Turn the camera on the desired scenery (Manual, Auto, Macro, Portrait, Landscape, Night Scene or Sports). 3. Using the LCD monitor for MACRO shots. Always use the viewfinder instead. The mode icons... ON/OFF. Set the mode dial base on by sliding the POWER switch. 2. This is processing a captured image. The LED indicator blinks green while the camera is not a malfunction.
... off . 29 Using the LCD Monitor Using the LCD monitor helps you confirm images while taking pictures, to the current settings. 1. Turn the camera on the desired scenery (Manual, Auto, Macro, Portrait, Landscape, Night Scene or Sports). 3. Using the LCD monitor for MACRO shots. Always use the viewfinder instead. The mode icons... ON/OFF. Set the mode dial base on by sliding the POWER switch. 2. This is processing a captured image. The LED indicator blinks green while the camera is not a malfunction.

User Guide
Page 30
... 2. Press T button to capture telephoto and wide-angle shots.By using the digital zoom, images can only set the digital zoom at the resolution of 2304 x 1728 pixels; To capture a digitally zoomed image, perform the following steps: 1. Using the Zoom Functions Zoom photography allows... zoom status. 4. You can appear closer by pressing the (T) telephoto button or farther. Turn the camera on the desired scenery (Manual, Auto, Macro, Portrait, Landscape, Night Scene or Sports). 3. Digital zoom's range is from 1.25x to capture a "zoomed" image. Press the shutter button to 4x...
... 2. Press T button to capture telephoto and wide-angle shots.By using the digital zoom, images can only set the digital zoom at the resolution of 2304 x 1728 pixels; To capture a digitally zoomed image, perform the following steps: 1. Using the Zoom Functions Zoom photography allows... zoom status. 4. You can appear closer by pressing the (T) telephoto button or farther. Turn the camera on the desired scenery (Manual, Auto, Macro, Portrait, Landscape, Night Scene or Sports). 3. Digital zoom's range is from 1.25x to capture a "zoomed" image. Press the shutter button to 4x...
User Guide
Page 31
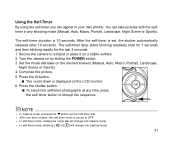
...self-timer you can take pictures with the selftimer in your own photos. The self-timer duration is turned to disrupt the sequence. Turn the camera on the LCD monitor. 6. Compose the picture. 5. In self-timer mode, pressing [ ] or[ ] will change into Capture mode. ...Set the mode dial base on a stable surface. 2. To cancel the self-timer photography at any shooting mode (Manual, Auto, Macro, Portrait, Landscape, Night Scene or Sports). In Capture mode, pressing the button will set , the shutter automatically releases after 10 seconds....
...self-timer you can take pictures with the selftimer in your own photos. The self-timer duration is turned to disrupt the sequence. Turn the camera on the LCD monitor. 6. Compose the picture. 5. In self-timer mode, pressing [ ] or[ ] will change into Capture mode. ...Set the mode dial base on a stable surface. 2. To cancel the self-timer photography at any shooting mode (Manual, Auto, Macro, Portrait, Landscape, Night Scene or Sports). In Capture mode, pressing the button will set , the shutter automatically releases after 10 seconds....

User Guide
Page 32
... off. 1. If you press the button on by sliding the POWER switch. 2. Press the button (located on the rear side of flash. The camera has four flash modes: Automatic Flash (default), Red-Eye Reduction, Fill Flash (on the LCD monitor. 4. Compose the picture and press the shutter ...button. You can take an image using a suitable flash mode to function automatically when lighting conditions warrant the use of the camera) repeatedly until your circumstances. Set the mode dial base on the desired scenery (Manual, Auto, Macro, Portrait, Landscape, Night Scene or Sports). 3.
... off. 1. If you press the button on by sliding the POWER switch. 2. Press the button (located on the rear side of flash. The camera has four flash modes: Automatic Flash (default), Red-Eye Reduction, Fill Flash (on the LCD monitor. 4. Compose the picture and press the shutter ...button. You can take an image using a suitable flash mode to function automatically when lighting conditions warrant the use of the camera) repeatedly until your circumstances. Set the mode dial base on the desired scenery (Manual, Auto, Macro, Portrait, Landscape, Night Scene or Sports). 3.
User Guide
Page 34
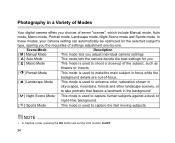
... This mode lets you adjust individual camera settings. [ A ] Auto Mode This mode lets the camera decide the best settings for the selected subject's type, sparing you choices of seven "scenes", which include Manual mode, Auto mode, Macro mode, Portrait mode, Landscape mode, Night Scene mode and Sports...other landscape scenery, or to take portraits that feature a landmark in a Variety of Modes Your digital camera offers you the requisites of settings adjustment one-by-one. In these modes, your camera setting can automatically be optimized for you. [ ] Macro Mode This mode is used to ...
... This mode lets you adjust individual camera settings. [ A ] Auto Mode This mode lets the camera decide the best settings for the selected subject's type, sparing you choices of seven "scenes", which include Manual mode, Auto mode, Macro mode, Portrait mode, Landscape mode, Night Scene mode and Sports...other landscape scenery, or to take portraits that feature a landmark in a Variety of Modes Your digital camera offers you the requisites of settings adjustment one-by-one. In these modes, your camera setting can automatically be optimized for you. [ ] Macro Mode This mode is used to ...

User Guide
Page 35
...Press the Menu button. 4. To set , press the OK button to enter the submenu and choose the setting with your preference. Selecting Manual Mode You can capture images by sliding the POWER switch. 2. Rotate the mode dial to focus the image, then press it fully down... Image quality, EV, White balance, ISO, Color, Saturation and Sharpness you may press / button or press / button to confirm. 5. Turn the camera on by manually adjusting conditions such as image quality, image size, saturation, sharpness, white balance, ISO speed, flash mode and EV compensation. 1. Compose the picture. 6....
...Press the Menu button. 4. To set , press the OK button to enter the submenu and choose the setting with your preference. Selecting Manual Mode You can capture images by sliding the POWER switch. 2. Rotate the mode dial to focus the image, then press it fully down... Image quality, EV, White balance, ISO, Color, Saturation and Sharpness you may press / button or press / button to confirm. 5. Turn the camera on by manually adjusting conditions such as image quality, image size, saturation, sharpness, white balance, ISO speed, flash mode and EV compensation. 1. Compose the picture. 6....

User Guide
Page 36
...focus the image, then press it fully down halfway to enter the submenu and choose the setting with your preference. Turn the camera on by the camera. When the settings are adjusted by sliding the POWER switch. 2. Press the Menu button. 4. Press the shutter button down In... Auto mode [A], Color, Saturation and Sharpness settings cannot be adjusted manually. 36 Compose the picture. 6. Simply point the camera at the subject and then shoot...
...focus the image, then press it fully down halfway to enter the submenu and choose the setting with your preference. Turn the camera on by the camera. When the settings are adjusted by sliding the POWER switch. 2. Press the Menu button. 4. Press the shutter button down In... Auto mode [A], Color, Saturation and Sharpness settings cannot be adjusted manually. 36 Compose the picture. 6. Simply point the camera at the subject and then shoot...

User Guide
Page 58
... enter the submenu and choose the setting. Press the button and then scroll through the options by sliding the POWER switch. 2. Turn the camera on the desired scenery (Manual, Auto, Macro, Portrait, Landscape, Night Scene or Sports). 3. After the settings are set Image size, Image quality, EV, White balance, ISO, Color, Saturation...
... enter the submenu and choose the setting. Press the button and then scroll through the options by sliding the POWER switch. 2. Turn the camera on the desired scenery (Manual, Auto, Macro, Portrait, Landscape, Night Scene or Sports). 3. After the settings are set Image size, Image quality, EV, White balance, ISO, Color, Saturation...

User Guide
Page 71
... and specifications are subject to change without notice. 71 Manual: Daylight, Cloudy, Sunset, Tungsten, Fluorescent Compressed format JPEG, MPEG 1 Level I for video clip Standards JPEG, EXIF 2.1, DPOF, DCF, MPEG 1 Level I Interface DC IN jack, USB connector, VIDEO OUT jack (NTSC ... part of the Gateway DC-M42 Accessory Kit), AC Power Adapter (3.0V/2.5A) (available separately as part of the Gateway DC-M42 Accessory Kit). LCD monitor Self-timer 1.6" color TFT LCD 10-second delay Zoom Optical: 3X Digital: Capture mode: 4X/ Playback mode: 6X Exposure compensation Auto; Manual: -2.0 ~ ...
... and specifications are subject to change without notice. 71 Manual: Daylight, Cloudy, Sunset, Tungsten, Fluorescent Compressed format JPEG, MPEG 1 Level I for video clip Standards JPEG, EXIF 2.1, DPOF, DCF, MPEG 1 Level I Interface DC IN jack, USB connector, VIDEO OUT jack (NTSC ... part of the Gateway DC-M42 Accessory Kit), AC Power Adapter (3.0V/2.5A) (available separately as part of the Gateway DC-M42 Accessory Kit). LCD monitor Self-timer 1.6" color TFT LCD 10-second delay Zoom Optical: 3X Digital: Capture mode: 4X/ Playback mode: 6X Exposure compensation Auto; Manual: -2.0 ~ ...