
Operating Instructions
Page 6
......v ESD Caution...v Warnings...v Chapter 1: Introduction to the iQue® Handheld 1.1 System Requirements ...1.1 iQue Components ...1.2 Locating Front Panel Controls ...1.2 Locating Side, Top, Bottom and Back Panel Components 1.3 Using the Stylus...1.4 Starting Your Handheld and Calibrating the Screen...1.5 Using the...15 Turning Beam Receive On and Off...1.15 Selecting a Color Theme ...1.15 Palm™ Desktop Software ...1.16 Connecting the Cradle...1.16 Upgrade Information ...1.16 Installing Palm Desktop Software...1.17 Using Your Handheld with Another Personal Information Manager 1.17 ...
......v ESD Caution...v Warnings...v Chapter 1: Introduction to the iQue® Handheld 1.1 System Requirements ...1.1 iQue Components ...1.2 Locating Front Panel Controls ...1.2 Locating Side, Top, Bottom and Back Panel Components 1.3 Using the Stylus...1.4 Starting Your Handheld and Calibrating the Screen...1.5 Using the...15 Turning Beam Receive On and Off...1.15 Selecting a Color Theme ...1.15 Palm™ Desktop Software ...1.16 Connecting the Cradle...1.16 Upgrade Information ...1.16 Installing Palm Desktop Software...1.17 Using Your Handheld with Another Personal Information Manager 1.17 ...

Operating Instructions
Page 13
...Garmin GA27C low profile remote antenna. • IR Port: Uses infrared technology to transmit and receive data to and from the side channel and hold it as you to recharge your iQue...to the wall current through the AC adapter. Chapter 1 Introduction 1.3 To use the stylus, remove it from other iQue or Palm OS® handhelds and to perform HotSync® operations. See "Beaming Information" in Chapter ...Returns to previous display. • Stylus: Use to tap icons and buttons on the screen or enter data on your handheld and the computer using the iQue 3600 for the first time, ...
...Garmin GA27C low profile remote antenna. • IR Port: Uses infrared technology to transmit and receive data to and from the side channel and hold it as you to recharge your iQue...to the wall current through the AC adapter. Chapter 1 Introduction 1.3 To use the stylus, remove it from other iQue or Palm OS® handhelds and to perform HotSync® operations. See "Beaming Information" in Chapter ...Returns to previous display. • Stylus: Use to tap icons and buttons on the screen or enter data on your handheld and the computer using the iQue 3600 for the first time, ...

Operating Instructions
Page 14
... as you drag the mouse to select text or move objects on your computer, you can use the stylus to execute tasks on your stylus, visit www.garmin.com for information on the handheld screen. IMPORTANT: Always use the reset button. • Flip-up GPS Antenna (open parallel to... the horizon for GPS navigation) Reset Button Back Side View • Reset Button: Under normal circumstances, you should not have to tap elements on your iQue...
... as you drag the mouse to select text or move objects on your computer, you can use the stylus to execute tasks on your stylus, visit www.garmin.com for information on the handheld screen. IMPORTANT: Always use the reset button. • Flip-up GPS Antenna (open parallel to... the horizon for GPS navigation) Reset Button Back Side View • Reset Button: Under normal circumstances, you should not have to tap elements on your iQue...

Operating Instructions
Page 15
...your handheld has the multi-language feature, you will erase all data on your language choice to turn the backlight on can detect stylus taps correctly. Tap your iQue: 1. Press the Power button to highlight it, then tap OK. Turning the brightness up and/or keeping the backlight on or...drag the brightness adjustment slider to save, perform a HotSync® operation before you are not sure, insert the Setup CD and re-install the Palm Desktop software. Brightness Adjustment Slider NOTE: Backlight is data on or off : 1. Tap the Backlight icon , located in the Status Bar just ...
...your handheld has the multi-language feature, you will erase all data on your language choice to turn the backlight on can detect stylus taps correctly. Tap your iQue: 1. Press the Power button to highlight it, then tap OK. Turning the brightness up and/or keeping the backlight on or...drag the brightness adjustment slider to save, perform a HotSync® operation before you are not sure, insert the Setup CD and re-install the Palm Desktop software. Brightness Adjustment Slider NOTE: Backlight is data on or off : 1. Tap the Backlight icon , located in the Status Bar just ...

Operating Instructions
Page 16
...handheld is about to perform a soft reset. Chapter 1 Introduction 1.6 Use the tool to access the reset tip tool, shown below. 2. Reset Button Stylus Reset Tip Tool A hard reset erases all data stored on the front of the handheld. Then release the Power button. 3. Formats, preferences, and... are retained after you release the Reset button, press and hold the Power button until you see the Palm Powered™ logo. Introduction: Cleaning the Touch Panel Screen Cleaning the Touch Panel Screen To clean the touch panel of the iQue 3600, wipe the surface gently with Ethanol.
...handheld is about to perform a soft reset. Chapter 1 Introduction 1.6 Use the tool to access the reset tip tool, shown below. 2. Reset Button Stylus Reset Tip Tool A hard reset erases all data stored on the front of the handheld. Then release the Power button. 3. Formats, preferences, and... are retained after you release the Reset button, press and hold the Power button until you see the Palm Powered™ logo. Introduction: Cleaning the Touch Panel Screen Cleaning the Touch Panel Screen To clean the touch panel of the iQue 3600, wipe the surface gently with Ethanol.

Operating Instructions
Page 28
...numeric keyboard. Backspace Return/Enter The numeric keyboard. Using the On-Screen Keyboard You can enter data into your iQue handheld by using the on-screen keyboard, writing with the stylus in the text input area, using an external keyboard, or importing data from another application. then tap Done... to enter the text or numbers. To use the on-screen keyboard: 1. Entering Data: Using the On-Screen Keyboard CHAPTER 2: ENTERING DATA IN YOUR IQUE HANDHELD You ...
...numeric keyboard. Backspace Return/Enter The numeric keyboard. Using the On-Screen Keyboard You can enter data into your iQue handheld by using the on-screen keyboard, writing with the stylus in the text input area, using an external keyboard, or importing data from another application. then tap Done... to enter the text or numbers. To use the on-screen keyboard: 1. Entering Data: Using the On-Screen Keyboard CHAPTER 2: ENTERING DATA IN YOUR IQUE HANDHELD You ...

Operating Instructions
Page 30
... have your handheld recognize letters and numbers, you can hide the text input area by writing across the division line • A special feature of the iQue handheld is a collapsible or "soft" Graffiti® 2 input area to maximize the display area. Most characters require only a single stroke.... input area. Otherwise, the temporary stroke is recorded. • The text input area is a short time delay, during which you lift the stylus from the text input area, your stroke at the top and bottom of "t", a temporary "l" is automatically hidden for full screen display.
... have your handheld recognize letters and numbers, you can hide the text input area by writing across the division line • A special feature of the iQue handheld is a collapsible or "soft" Graffiti® 2 input area to maximize the display area. Most characters require only a single stroke.... input area. Otherwise, the temporary stroke is recorded. • The text input area is a short time delay, during which you lift the stylus from the text input area, your stroke at the top and bottom of "t", a temporary "l" is automatically hidden for full screen display.

Operating Instructions
Page 31
...8226; When letters and numbers can begin writing text. 2. Blinking cursor NOTE: A blinking cursor must appear on a line next to write. Position the stylus in the left ) in the table. For example, the stroke shown below creates the letter n. You use the one that nearly fill the text..., use the same shape to write. Use the tables on -screen insertion point. Your handheld recognizes your stroke at heavy dot Lift stylus here 5. Lift the stylus from the screen, you can be written using Graffiti 2 writing, keep the following pages to find the stroke shape...
...8226; When letters and numbers can begin writing text. 2. Blinking cursor NOTE: A blinking cursor must appear on a line next to write. Position the stylus in the left ) in the table. For example, the stroke shown below creates the letter n. You use the one that nearly fill the text..., use the same shape to write. Use the tables on -screen insertion point. Your handheld recognizes your stroke at heavy dot Lift stylus here 5. Lift the stylus from the screen, you can be written using Graffiti 2 writing, keep the following pages to find the stroke shape...

Operating Instructions
Page 33
... as shown in the demo) is visible, you can write them on either side of the screen. To view the Help file, drag the stylus from the bottom to the top of the input area. A Shift indicator arrow appears in the center for uppercase letters) of the screen. Entering Data...
... as shown in the demo) is visible, you can write them on either side of the screen. To view the Help file, drag the stylus from the bottom to the top of the input area. A Shift indicator arrow appears in the center for uppercase letters) of the screen. Entering Data...

Operating Instructions
Page 56
... views. • Tap a view icon in the date bar to release without displaying the menu bar. Drag the stylus away from the date and then lift to display the time. (When you release the stylus, the menu bar appears.) 2. Date Book View icons To display the current time: 1. Chapter 4 Using Basic Applications... 4.10 Tap and hold down the stylus on the date in the lower-left area of the Date Book screen. Basic Applications Overview: Changing the Date Book View Changing the Date Book ...
... views. • Tap a view icon in the date bar to release without displaying the menu bar. Drag the stylus away from the date and then lift to display the time. (When you release the stylus, the menu bar appears.) 2. Date Book View icons To display the current time: 1. Chapter 4 Using Basic Applications... 4.10 Tap and hold down the stylus on the date in the lower-left area of the Date Book screen. Basic Applications Overview: Changing the Date Book View Changing the Date Book ...

Operating Instructions
Page 85
...; In the Change Security dialog box, tap Hide Records in the Options menu. • From within any application, bring up the Command Bar, drag your stylus diagonally across the text input area from lower left to upper right. 2. To display private records: 1. To bring up the Command Bar and tap the...
...; In the Change Security dialog box, tap Hide Records in the Options menu. • From within any application, bring up the Command Bar, drag your stylus diagonally across the text input area from lower left to upper right. 2. To display private records: 1. To bring up the Command Bar and tap the...

Operating Instructions
Page 124
... Handheld to Stay on While in the Cradle 1.14 Soft Reset 1.6 Sorting Records 5.8-5.9 Sounds and Volumes 1.15 Speaker 1.2 Stay on While in the Cradle 1.14 Stylus 1.3, 1.4 Subtle Alarms 6.4 Synchronizing Data 9.1-9.12 System Requirements 1.1 T Text Input Area 1.2 Thumb Wheel 1.3 Time 1.11 Timed Events 4.2-4.4 Time Zone 1.11 Tips 1.9 To Do List 4.16-4.20...
... Handheld to Stay on While in the Cradle 1.14 Soft Reset 1.6 Sorting Records 5.8-5.9 Sounds and Volumes 1.15 Speaker 1.2 Stay on While in the Cradle 1.14 Stylus 1.3, 1.4 Subtle Alarms 6.4 Synchronizing Data 9.1-9.12 System Requirements 1.1 T Text Input Area 1.2 Thumb Wheel 1.3 Time 1.11 Timed Events 4.2-4.4 Time Zone 1.11 Tips 1.9 To Do List 4.16-4.20...
Que Applications Guide
Page 11
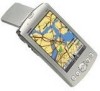
...at the top of the page to display the pick list of preferences and select Que. 3. To display other applications using the Que button: 1. iQue 3600 GPS Applications The Que "Hard" Button Buttons Page Que (Q) Hard Button Que Button Page Display Options 1 To display Que applications using the Que button...display the Preferences page. 2. Tap the ▼ symbol in the "Auto-Off" mode. • Press and hold to choose from. Use the stylus to check boxes for quick access to navigation applications, the Que button can be used to display the Que Button options check list. 4. Tap the...
...at the top of the page to display the pick list of preferences and select Que. 3. To display other applications using the Que button: 1. iQue 3600 GPS Applications The Que "Hard" Button Buttons Page Que (Q) Hard Button Que Button Page Display Options 1 To display Que applications using the Que button...display the Preferences page. 2. Tap the ▼ symbol in the "Auto-Off" mode. • Press and hold to choose from. Use the stylus to check boxes for quick access to navigation applications, the Que button can be used to display the Que Button options check list. 4. Tap the...

Que Applications Guide
Page 16
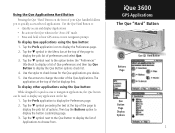
... location. To establish a new location: 1. To speed up this process, you can determine your approximate elevation, but only before the iQue handheld has determined your location on Map Page New Elevation Window 6 New Location The GPS Receiver must be re-initialized (given an opportunity... must be selected before the receiver determines your location. New Elevation The GPS Receiver can use the stylus to pan the map to place a new location arrow there. iQue 3600 GPS Applications QueGPS Options New Location Options Window New Location on its location) if you have a reliable...
... location. To establish a new location: 1. To speed up this process, you can determine your approximate elevation, but only before the iQue handheld has determined your location on Map Page New Elevation Window 6 New Location The GPS Receiver must be re-initialized (given an opportunity... must be selected before the receiver determines your location. New Elevation The GPS Receiver can use the stylus to pan the map to place a new location arrow there. iQue 3600 GPS Applications QueGPS Options New Location Options Window New Location on its location) if you have a reliable...
Que Applications Guide
Page 17
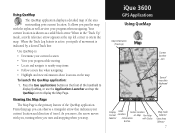
... Selector Information with Stylus Button Map Scale Selector View Area Selector 7 It allows you pan the map with you, turning when you turn and stopping when you stop. As you can observe a triangular arrow that indicates your progress while moving • Locate and navigate to orient the map. iQue 3600 GPS Applications Using... on the map To launch the QueMap application: 1. Use QueMap to display the Map Page. From this page you move, the arrow moves with the stylus as well as a solid black arrow.
... Selector Information with Stylus Button Map Scale Selector View Area Selector 7 It allows you pan the map with you, turning when you turn and stopping when you stop. As you can observe a triangular arrow that indicates your progress while moving • Locate and navigate to orient the map. iQue 3600 GPS Applications Using... on the map To launch the QueMap application: 1. Use QueMap to display the Map Page. From this page you move, the arrow moves with the stylus as well as a solid black arrow.

Que Applications Guide
Page 18
...will display, briefly. North Up orients the map like a paper map, while Track Up orients the map in day and night lighting conditions. Tapping the stylus on the map places a map pointer on any selected location on page 11. See QueMap preferences on the map. As you travel . When using ...North arrow indicates the map orientation. To move to pan with the Stylus 8 The Map also displays detailed geographic information such as explained on page 51 of this guide. There are two options: North Up and Track Up. iQue 3600 GPS Applications Using QueMap Rotate the Thumb Wheel up or down to ...
...will display, briefly. North Up orients the map like a paper map, while Track Up orients the map in day and night lighting conditions. Tapping the stylus on the map places a map pointer on any selected location on page 11. See QueMap preferences on the map. As you travel . When using ...North arrow indicates the map orientation. To move to pan with the Stylus 8 The Map also displays detailed geographic information such as explained on page 51 of this guide. There are two options: North Up and Track Up. iQue 3600 GPS Applications Using QueMap Rotate the Thumb Wheel up or down to ...

Que Applications Guide
Page 20
... map pointer (Panning Arrow). Tap the scale you want to enlarge and then drag the stylus to create a box around the area. Delete - Place the stylus anywhere on the map (page 13). iQue 3600 GPS Applications Using QueMap Map Scale Selector View Area Selector Pan Map Selector QueMap Menu 10 ...Tap the View Area icon to allow the stylus to drag the map and to mark map items with the stylus and exposes the part...
... map pointer (Panning Arrow). Tap the scale you want to enlarge and then drag the stylus to create a box around the area. Delete - Place the stylus anywhere on the map (page 13). iQue 3600 GPS Applications Using QueMap Map Scale Selector View Area Selector Pan Map Selector QueMap Menu 10 ...Tap the View Area icon to allow the stylus to drag the map and to mark map items with the stylus and exposes the part...
Que Applications Guide
Page 23
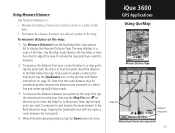
...point you want to create a route to display the Measure Distance Page. Tapping the QueRoutes icon will not create a route between two map points 13 iQue 3600 GPS Applications Using QueMap Measure Distance Page Map Pin Distance Measured Measuring between the two points. 4. Using Measure Distance Use Measure Distance to: •... Measure the distance from your current location to a map point, tap the point with the stylus to and observe the measurement in the field below the map. To measure distance on the map.
...point you want to create a route to display the Measure Distance Page. Tapping the QueRoutes icon will not create a route between two map points 13 iQue 3600 GPS Applications Using QueMap Measure Distance Page Map Pin Distance Measured Measuring between the two points. 4. Using Measure Distance Use Measure Distance to: •... Measure the distance from your current location to a map point, tap the point with the stylus to and observe the measurement in the field below the map. To measure distance on the map.

Que Applications Guide
Page 33
iQue 3600 GPS Applications Using Waypoints Mark Waypoint Dialog Used for marking your current location as a waypoint: • Use the stylus to one more descriptive of your location. 4. Waypoint Address Edit Dialog Allows you to the Address Book, tap OK. Any QueFind location can be named "...
iQue 3600 GPS Applications Using Waypoints Mark Waypoint Dialog Used for marking your current location as a waypoint: • Use the stylus to one more descriptive of your location. 4. Waypoint Address Edit Dialog Allows you to the Address Book, tap OK. Any QueFind location can be named "...

Que Applications Guide
Page 34
... Waypoint icon at the right side of the map to display the "New Waypoint" window. From QueFind, tap Waypoints, highlight a waypoint in the map database. iQue 3600 GPS Applications Using Waypoints Waypoint Marked on the Map Page New Waypoint Window Waypoint Details Page with Route Shown 24 To save the waypoint to...
... Waypoint icon at the right side of the map to display the "New Waypoint" window. From QueFind, tap Waypoints, highlight a waypoint in the map database. iQue 3600 GPS Applications Using Waypoints Waypoint Marked on the Map Page New Waypoint Window Waypoint Details Page with Route Shown 24 To save the waypoint to...