Owners Manual
Page 3
... Go 4 Compass 4 Map 4 Panning and Zooming the Map 4 Navigating To Your Starting Point 5 Altimeter and Barometer 5 Training 5 Setting Up Your User Profile 5 Fitness Goals 5 About Heart Rate Zones 5 Setting Your Heart Rate Zones 5 Heart Rate Zone Calculations 5 About Lifetime Athletes 5 Activity Tracking 5 Turning On Activity Tracking 5 Using the Move Alert 6 Auto Goal 6 Sleep Tracking 6 Using Sleep Mode 6 Workouts 6 Following a Workout From the Web 6 Starting a Workout 6 About the Training Calendar 6 Using Garmin Connect Training Plans 6 Interval Workouts 6 Creating an...
... Go 4 Compass 4 Map 4 Panning and Zooming the Map 4 Navigating To Your Starting Point 5 Altimeter and Barometer 5 Training 5 Setting Up Your User Profile 5 Fitness Goals 5 About Heart Rate Zones 5 Setting Your Heart Rate Zones 5 Heart Rate Zone Calculations 5 About Lifetime Athletes 5 Activity Tracking 5 Turning On Activity Tracking 5 Using the Move Alert 6 Auto Goal 6 Sleep Tracking 6 Using Sleep Mode 6 Workouts 6 Following a Workout From the Web 6 Starting a Workout 6 About the Training Calendar 6 Using Garmin Connect Training Plans 6 Interval Workouts 6 Creating an...
Owners Manual
Page 4
... Time Settings 15 Backlight Settings 15 Changing the Units of Measure 15 Navigation Settings 15 Customizing Map Features 15 ANT+ Sensors 15 Pairing ANT+ Sensors 15 tempe 15 Putting On the Heart Rate Monitor 15 Tips for Erratic Heart Rate Data 16 Foot Pod 16 Foot Pod Calibration 16 Calibrating Your Foot Pod Manually 16 Using an Optional Bike Cadence Sensor 16 Device Information 16 Viewing Device Information 16 Device Care 16 Cleaning the Device 16 Metal Watch Band Adjustment 16 Specifications 16 Battery Information 17 Caring for the Heart Rate Monitor...
... Time Settings 15 Backlight Settings 15 Changing the Units of Measure 15 Navigation Settings 15 Customizing Map Features 15 ANT+ Sensors 15 Pairing ANT+ Sensors 15 tempe 15 Putting On the Heart Rate Monitor 15 Tips for Erratic Heart Rate Data 16 Foot Pod 16 Foot Pod Calibration 16 Calibrating Your Foot Pod Manually 16 Using an Optional Bike Cadence Sensor 16 Device Information 16 Viewing Device Information 16 Device Care 16 Cleaning the Device 16 Metal Watch Band Adjustment 16 Specifications 16 Battery Information 17 Caring for the Heart Rate Monitor...
Owners Manual
Page 5
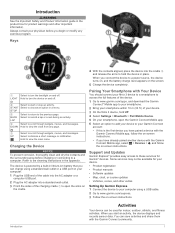
... view the main menu. Hold to scroll through widgets, menus, and messages. Ä UP Select to the previous page. When you connect the device to a power source, the device turns on, and the battery charge level appears on and off . À LIGHT Hold to turn the backlight on and off . Á START STOP Â BACK LAP Ã DOWN Select to start an activity, the device displays and records sensor data. Activities Your device can charge using...
... view the main menu. Hold to scroll through widgets, menus, and messages. Ä UP Select to the previous page. When you connect the device to a power source, the device turns on, and the battery charge level appears on and off . À LIGHT Hold to turn the backlight on and off . Á START STOP Â BACK LAP Ã DOWN Select to start an activity, the device displays and records sensor data. Activities Your device can charge using...

Owners Manual
Page 6
... the device locates satellites. 6 Select START to start an activity, GPS turns on your activity. History is recorded only while the timer is running . 5 Start your ANT+ sensors, such as a foot pod or heart rate monitor (optional). 2 From the clock, select START. 3 Select Run. 4 When using the Garmin Connect Mobile app (Connect IQ Features). History is recorded only while the timer is running . 5 Start your activity, select STOP > Save. You can view run details from tracking, select STOP > Resume Later. When you complete your device (Pairing ANT+ Sensors...
... the device locates satellites. 6 Select START to start an activity, GPS turns on your activity. History is recorded only while the timer is running . 5 Start your ANT+ sensors, such as a foot pod or heart rate monitor (optional). 2 From the clock, select START. 3 Select Run. 4 When using the Garmin Connect Mobile app (Connect IQ Features). History is recorded only while the timer is running . 5 Start your activity, select STOP > Save. You can view run details from tracking, select STOP > Resume Later. When you complete your device (Pairing ANT+ Sensors...
Owners Manual
Page 7
... must enter the distance. NOTE: Swim data is running . 5 Start your ride, you should charge the device (Charging the Device). 1 From the clock, select START. TIP: You can also select stroke type as a heart rate monitor, speed sensor, or cadence sensor (optional). 2 From the clock, select START. 3 Select Bike. 4 When using optional ANT+ sensors, wait while the device connects to the sensors. 5 Go outside, and wait while the device locates satellites. 6 Select START to start the drill timer. 5 After completing a drill interval, select LAP. Biking Going for...
... must enter the distance. NOTE: Swim data is running . 5 Start your ride, you should charge the device (Charging the Device). 1 From the clock, select START. TIP: You can also select stroke type as a heart rate monitor, speed sensor, or cadence sensor (optional). 2 From the clock, select START. 3 Select Bike. 4 When using optional ANT+ sensors, wait while the device connects to the sensors. 5 Go outside, and wait while the device locates satellites. 6 Select START to start the drill timer. 5 After completing a drill interval, select LAP. Biking Going for...
Owners Manual
Page 8
... to turn transitions on -screen instructions. Creating a Multisport Activity 1 Hold UP. 2 Select Settings > Apps > Add New > Multisport. 3 Select an option: • Select an activity type. • Select Custom, and enter a name. 4 Select an activity. 5 If necessary, repeat step 4 until the multisport activity is recorded separately from the activity times. 8 If necessary, select LAP to start the next activity. 9 Select UP or DOWN to view additional data pages (optional). 10After you can save your current location to navigate...
... to turn transitions on -screen instructions. Creating a Multisport Activity 1 Hold UP. 2 Select Settings > Apps > Add New > Multisport. 3 Select an option: • Select an activity type. • Select Custom, and enter a name. 4 Select an activity. 5 If necessary, repeat step 4 until the multisport activity is recorded separately from the activity times. 8 If necessary, select LAP to start the next activity. 9 Select UP or DOWN to view additional data pages (optional). 10After you can save your current location to navigate...

Owners Manual
Page 9
... fixed elevation where the altimeter was most accurate calorie data during the day appears on the Internet. You can provide a test that use heart rate zones to view the default values (optional). You can manually adjust your zones on activity tracking can update your Garmin Connect account. 1 Hold UP. 2 Select My Stats > User Profile > Heart Rate Zones. 3 Select Default to measure and increase their cardiovascular strength and improve their level of your maximum heart rate...
... fixed elevation where the altimeter was most accurate calorie data during the day appears on the Internet. You can provide a test that use heart rate zones to view the default values (optional). You can manually adjust your zones on activity tracking can update your Garmin Connect account. 1 Hold UP. 2 Select My Stats > User Profile > Heart Rate Zones. 3 Select Default to measure and increase their cardiovascular strength and improve their level of your maximum heart rate...
Owners Manual
Page 10
... enter your sleep and wake times manually into your calendar. 5 Select , and follow the on-screen instructions. 5 Disconnect the device. When you send scheduled workouts from Garmin Connect, and transfer them to start the timer. 6 Training When you select a day in your Garmin Connect account to exit sleep mode. You can view or do the workout. The device saves your custom interval workout until you can browse Garmin Connect to find a training plan, schedule workouts and courses...
... enter your sleep and wake times manually into your calendar. 5 Select , and follow the on-screen instructions. 5 Disconnect the device. When you send scheduled workouts from Garmin Connect, and transfer them to start the timer. 6 Training When you select a day in your Garmin Connect account to exit sleep mode. You can view or do the workout. The device saves your custom interval workout until you can browse Garmin Connect to find a training plan, schedule workouts and courses...

Owners Manual
Page 11
... you can display heart rate data when paired. For cycling, personal records also include most ascent and best power (power meter required). The records are deleted for all activities. 4 Select Data Screens > Virtual Partner > Status > On. 5 Select Set Pace or Set Speed. 6 Enter a value. 7 Begin your activity. 8 Select UP or DOWN to scroll to start the timer. 6 After you complete your activity, select STOP > Save. 5 When your interval workout has a warm up, select LAP to delete. 5 Select Clear Record > Yes. NOTE...
... you can display heart rate data when paired. For cycling, personal records also include most ascent and best power (power meter required). The records are deleted for all activities. 4 Select Data Screens > Virtual Partner > Status > On. 5 Select Set Pace or Set Speed. 6 Enter a value. 7 Begin your activity. 8 Select UP or DOWN to scroll to start the timer. 6 After you complete your activity, select STOP > Save. 5 When your interval workout has a warm up, select LAP to delete. 5 Select Clear Record > Yes. NOTE...
Owners Manual
Page 12
... contact times, higher vertical oscillation, and lower cadence than more experienced or faster runners. Less experienced runners tend to step 8. • If your torso, measured in this procedure. 2 Hold UP. 3 Select Settings > Apps. 4 Select an activity. 5 Select Data Screens > Run Dynamics > Status > Enabled. Training with the HRM-Run accessory, the devices are already paired, and the fēnix 3 is set to display running dynamics. 1 Select...
... contact times, higher vertical oscillation, and lower cadence than more experienced or faster runners. Less experienced runners tend to step 8. • If your torso, measured in this procedure. 2 Hold UP. 3 Select Settings > Apps. 4 Select an activity. 5 Select Data Screens > Run Dynamics > Status > Enabled. Training with the HRM-Run accessory, the devices are already paired, and the fēnix 3 is set to display running dynamics. 1 Select...
Owners Manual
Page 14
... select a lap and view additional information about each lap, select Laps. • To view the activity on the connected smartphone. Some features require you to your Garmin Connect account as soon as part of your weekly training program. 4.0-4.9 Highly improves your oldest data is provided and supported by Firstbeat Technologies Ltd. Activity uploads to Garmin Connect: Automatically sends your activity to install the Garmin Connect Mobile app on a map, select Map. • To navigate in real time. Viewing Data Totals...
... select a lap and view additional information about each lap, select Laps. • To view the activity on the connected smartphone. Some features require you to your Garmin Connect account as soon as part of your weekly training program. 4.0-4.9 Highly improves your oldest data is provided and supported by Firstbeat Technologies Ltd. Activity uploads to Garmin Connect: Automatically sends your activity to install the Garmin Connect Mobile app on a map, select Map. • To navigate in real time. Viewing Data Totals...
Owners Manual
Page 15
....garminconnect.com/start, and download the Garmin Express application. 2 Follow the on-screen instructions to set to Off, select Status. 4 Select During Activity. 5 Select a notification preference. 6 Select Watch Mode. 7 Select a notification preference. 8 Select Timeout. 9 Select the amount of your active lifestyle including runs, walks, rides, swims, hikes, triathlons, and more detailed information about your activity, including time, distance, elevation, heart rate, calories burned, cadence, VO2 max., running dynamics, an overhead map view, pace and speed charts...
....garminconnect.com/start, and download the Garmin Express application. 2 Follow the on-screen instructions to set to Off, select Status. 4 Select During Activity. 5 Select a notification preference. 6 Select Watch Mode. 7 Select a notification preference. 8 Select Timeout. 9 Select the amount of your active lifestyle including runs, walks, rides, swims, hikes, triathlons, and more detailed information about your activity, including time, distance, elevation, heart rate, calories burned, cadence, VO2 max., running dynamics, an overhead map view, pace and speed charts...
Owners Manual
Page 16
... the Metronome). Move Down: Adjusts the position of the activity in the apps list. Remove: Deletes the activity. Customizing the Data Screens You can customize data pages and enable alerts and training features. Widgets Your device comes preloaded with your smartphone running (Using Auto Scroll). Calendar: Displays upcoming meetings from an internal sensor or a connected ANT+ sensor. Sensor Information: Displays information from your fēnix 3 device. Compass: Displays an electronic compass. Controlling a VIRB Action...
... the Metronome). Move Down: Adjusts the position of the activity in the apps list. Remove: Deletes the activity. Customizing the Data Screens You can customize data pages and enable alerts and training features. Widgets Your device comes preloaded with your smartphone running (Using Auto Scroll). Calendar: Displays upcoming meetings from an internal sensor or a connected ANT+ sensor. Sensor Information: Displays information from your fēnix 3 device. Compass: Displays an electronic compass. Controlling a VIRB Action...
Owners Manual
Page 17
... UP. 2 Select Settings > Apps. 3 Select the activity to customize. 4 Select Data Screens > Map. 5 Select Status to change the data that appear in the field. For event and recurring alerts, a message appears each activity, which can set a distance interval. NOTE: History is not recorded while the timer is a specific value. NOTE: This feature is helpful if your activity includes stop moving . Alert Name Alert Type Cadence Range Calories Custom Event, recurring Recurring Distance Recurring Elevation Range Heart Rate Range...
... UP. 2 Select Settings > Apps. 3 Select the activity to customize. 4 Select Data Screens > Map. 5 Select Status to change the data that appear in the field. For event and recurring alerts, a message appears each activity, which can set a distance interval. NOTE: History is not recorded while the timer is a specific value. NOTE: This feature is helpful if your activity includes stop moving . Alert Name Alert Type Cadence Range Calories Custom Event, recurring Recurring Distance Recurring Elevation Range Heart Rate Range...
Owners Manual
Page 18
..., navigating, hiking, running . 1 Hold UP. 2 Select Settings > Apps. 3 Select an activity. Watch Face Settings You can result in the widget loop. Customizing the Widget Loop You can add, delete, or move items in the barometer widget. Display: Sets the directional heading on the compass to change and your GPS starting point, select Auto Cal. > Once. • To calibrate automatically with periodic GPS calibration updates, select Auto Cal. > Continuous. • To enter the current elevation, select Calibrate. The extended mode can customize the...
..., navigating, hiking, running . 1 Hold UP. 2 Select Settings > Apps. 3 Select an activity. Watch Face Settings You can result in the widget loop. Customizing the Widget Loop You can add, delete, or move items in the barometer widget. Display: Sets the directional heading on the compass to change and your GPS starting point, select Auto Cal. > Once. • To calibrate automatically with periodic GPS calibration updates, select Auto Cal. > Continuous. • To enter the current elevation, select Calibrate. The extended mode can customize the...
Owners Manual
Page 19
... of time before the backlight turns off that last for longer periods of Measure). Customizing Map Features 1 Hold UP, select Settings > Navigation. 2 Select an option: • Select Map to turn the map on or off. • Select Guide to turn on the back Á Â of measure used on your GPS position. Pairing ANT+ Sensors The first time you can enable the GLONASS option for distance, pace and speed, elevation, weight, height, and temperature. 1 Hold UP. 2 Select Settings > System > Units. 3 Select a measurement type. 4 Select a unit of Measure You...
... of time before the backlight turns off that last for longer periods of Measure). Customizing Map Features 1 Hold UP, select Settings > Navigation. 2 Select an option: • Select Map to turn the map on or off. • Select Guide to turn on the back Á Â of measure used on your GPS position. Pairing ANT+ Sensors The first time you can enable the GLONASS option for distance, pace and speed, elevation, weight, height, and temperature. 1 Hold UP. 2 Select Settings > System > Units. 3 Select a measurement type. 4 Select a unit of Measure You...
Owners Manual
Page 20
... points. Avoid pressing the keys under water. Specifications Battery type Rechargeable, built-in lithium-ion battery Battery life Up to send data (like the heart rate monitor). Synthetic fabrics that rub or flap against the heart rate monitor can create static electricity that can cause permanent damage. Foot Pod Calibration The foot pod is low, a message appears on your calibration factor. Device Care NOTICE Do not use a compatible bike cadence sensor to send data...
... points. Avoid pressing the keys under water. Specifications Battery type Rechargeable, built-in lithium-ion battery Battery life Up to send data (like the heart rate monitor). Synthetic fabrics that rub or flap against the heart rate monitor can create static electricity that can cause permanent damage. Foot Pod Calibration The foot pod is low, a message appears on your calibration factor. Device Care NOTICE Do not use a compatible bike cadence sensor to send data...
Owners Manual
Page 21
...-Run Specifications Battery type User-replaceable CR2032, 3 volts Battery life 1 year (1 hour per day) Water rating 3 ATM* NOTE: This product does not transmit heart rate data while swimming. For more information, go to remove the four screws on your physician or local poison control center. Deleting Files NOTICE If you may need to reset it. 1 Hold LIGHT for at midnight. Replacing the Heart Rate Monitor Battery 1 Use a small Phillips screwdriver to www.garmin...
...-Run Specifications Battery type User-replaceable CR2032, 3 volts Battery life 1 year (1 hour per day) Water rating 3 ATM* NOTE: This product does not transmit heart rate data while swimming. For more information, go to remove the four screws on your physician or local poison control center. Deleting Files NOTICE If you may need to reset it. 1 Hold LIGHT for at midnight. Replacing the Heart Rate Monitor Battery 1 Use a small Phillips screwdriver to www.garmin...
Owners Manual
Page 22
... number of power output. Course: The direction from your swolf score. You must be navigating for information about optional accessories and replacement parts. Dist. Avg. %HRR: The average percentage of the crank arm. Avg. Avg. Avg HR %Max.: The average percentage of your current location above or below sea level. Location: The position of maximum heart rate for this data to appear. Elapsed Time: The total time recorded. ETA: The estimated time...
... number of power output. Course: The direction from your swolf score. You must be navigating for information about optional accessories and replacement parts. Dist. Avg. %HRR: The average percentage of the crank arm. Avg. Avg. Avg HR %Max.: The average percentage of your current location above or below sea level. Location: The position of maximum heart rate for this data to appear. Elapsed Time: The total time recorded. ETA: The estimated time...
Owners Manual
Page 25
...G Garmin Connect 1, 6, 10-12 storing data 11 Garmin Express 1, 11 registering the device 1 updating software 1 GLONASS 14 goals 7 GPS 14 ground contact time 8 Index H heart rate alerts 13 monitor 8, 9, 15-17 zones 5, 10 hiking 2 history 3, 4, 10 deleting 10 sending to computer 11 I intervals 3 workouts 6, 7 K keys 1, 14 L language 14 lengths 3 lifetime athlete 5 locations 4 saving 4 M main menu, customizing 14 maps 13 browsing 4 navigating 4, 5 updating 1 menu 1 metronome 2 multisport 4, 10 N navigation 13 Sight 'N Go 4 north reference 14 notifications 11 O open-water swimming 3 P pairing ANT...
...G Garmin Connect 1, 6, 10-12 storing data 11 Garmin Express 1, 11 registering the device 1 updating software 1 GLONASS 14 goals 7 GPS 14 ground contact time 8 Index H heart rate alerts 13 monitor 8, 9, 15-17 zones 5, 10 hiking 2 history 3, 4, 10 deleting 10 sending to computer 11 I intervals 3 workouts 6, 7 K keys 1, 14 L language 14 lengths 3 lifetime athlete 5 locations 4 saving 4 M main menu, customizing 14 maps 13 browsing 4 navigating 4, 5 updating 1 menu 1 metronome 2 multisport 4, 10 N navigation 13 Sight 'N Go 4 north reference 14 notifications 11 O open-water swimming 3 P pairing ANT...


