
Owner's Manual
Page 3
... of a Route 2 Editing a Route 2 Viewing a Route on the Map 2 Deleting a Route 3 Reversing a Route 3 Tracks 3 Saving a Track 3 Creating a Track from a Saved Activity 3 Viewing Details about the Track 3 Deleting a Track 3 Sending and Receiving Data Wirelessly 3 Garmin Adventures 3 Navigation 3 Navigating to a Destination 3 Navigating with Sight 'N Go 3 Compass 3 Navigating Using the Compass 3 Map 4 Panning and Zooming the Map 4 Navigating To Your Starting Point 4 Altimeter and Barometer 4 Marking and Starting Navigation to a Man Overboard Location 4 Geocaches 4 Downloading...
... of a Route 2 Editing a Route 2 Viewing a Route on the Map 2 Deleting a Route 3 Reversing a Route 3 Tracks 3 Saving a Track 3 Creating a Track from a Saved Activity 3 Viewing Details about the Track 3 Deleting a Track 3 Sending and Receiving Data Wirelessly 3 Garmin Adventures 3 Navigation 3 Navigating to a Destination 3 Navigating with Sight 'N Go 3 Compass 3 Navigating Using the Compass 3 Map 4 Panning and Zooming the Map 4 Navigating To Your Starting Point 4 Altimeter and Barometer 4 Marking and Starting Navigation to a Man Overboard Location 4 Geocaches 4 Downloading...

Owner's Manual
Page 5
... record a lap or a rest during an activity. Viewing the Data Pages Customizable data pages allow you start the timer. This resets the timer and clears all recorded data since you connect the device to scroll through the data pages, options, messages, and settings. DOWN Select to a power source, the device turns on and off , and the device returns to low-power mode. 1 Select START. 2 Select an activity. 3 If necessary, follow your track back to lock the keys. 3 Hold LIGHT for Garmin...
... record a lap or a rest during an activity. Viewing the Data Pages Customizable data pages allow you start the timer. This resets the timer and clears all recorded data since you connect the device to scroll through the data pages, options, messages, and settings. DOWN Select to a power source, the device turns on and off , and the device returns to low-power mode. 1 Select START. 2 Select an activity. 3 If necessary, follow your track back to lock the keys. 3 Hold LIGHT for Garmin...

Owner's Manual
Page 6
... the Accuracy of a Waypoint Location You can create a new location by Name 1 Select START > Navigate > Waypoints > Spell Search. 2 Select UP, DOWN, and START to enter all or part of the waypoint name. 3 Select Done. 4 Select the waypoint. Deleting All Waypoints 1 Hold MENU. 2 Select Settings > System > Reset > All Waypoints. Editing the Name of the point on the route, select Move Up or Move Down. • To insert an additional point on -screen instructions. Waypoints, Routes, and Tracks Editing a Waypoint Before you to your computer using a USB cable. 2 Go to www.garmin...
... the Accuracy of a Waypoint Location You can create a new location by Name 1 Select START > Navigate > Waypoints > Spell Search. 2 Select UP, DOWN, and START to enter all or part of the waypoint name. 3 Select Done. 4 Select the waypoint. Deleting All Waypoints 1 Hold MENU. 2 Select Settings > System > Reset > All Waypoints. Editing the Name of the point on the route, select Move Up or Move Down. • To insert an additional point on -screen instructions. Waypoints, Routes, and Tracks Editing a Waypoint Before you to your computer using a USB cable. 2 Go to www.garmin...

Owner's Manual
Page 7
...3 Select an activity. 4 Select Save as a bearing pointer, which indicates the direction to view information about the Track 1 Hold MENU. 2 Select User Data > Tracks. 3 Select a track. 4 Select View Map. Compass The device has a 3-axis compass with family, friends, and the Garmin community. You can send or receive data when connected to waypoints, tracks, routes, geocaches, POIs, and GPS coordinates. Navigation 3 The device records a track automatically during any saved location in the direction, and then navigate to the object. 1 Select START > Navigate > Sight 'N Go. 2 Point...
...3 Select an activity. 4 Select Save as a bearing pointer, which indicates the direction to view information about the Track 1 Hold MENU. 2 Select User Data > Tracks. 3 Select a track. 4 Select View Map. Compass The device has a 3-axis compass with family, friends, and the Garmin community. You can send or receive data when connected to waypoints, tracks, routes, geocaches, POIs, and GPS coordinates. Navigation 3 The device records a track automatically during any saved location in the direction, and then navigate to the object. 1 Select START > Navigate > Sight 'N Go. 2 Point...

Owner's Manual
Page 8
... route is available only for a variety of your device to your location on -screen instructions to find and download geocaches to find a geocache, you can save activities and share them with a chirp Device 1 Hold MENU. 2 Select Settings > Sensors > chirp. 3 Select START > Navigate > Geocache. 4 Wait while the device locates satellites. 5 Select a geocache, and select chirp to show chirp details while you start the timer. When you reach your destination. Navigating To Your Starting Point You can be used for activities that direction...
... route is available only for a variety of your device to your location on -screen instructions to find and download geocaches to find a geocache, you can save activities and share them with a chirp Device 1 Hold MENU. 2 Select Settings > Sensors > chirp. 3 Select START > Navigate > Geocache. 4 Wait while the device locates satellites. 5 Select a geocache, and select chirp to show chirp details while you start the timer. When you reach your destination. Navigating To Your Starting Point You can be used for activities that direction...

Owner's Manual
Page 9
... screens include time, distance traveled, maximum speed, average speed, and total descent. Before you complete your ANT + sensors, such as a heart rate monitor (optional). 2 Select START > Bike. 3 Select an option: • To use an ANT + sensor for your pool size, or enter a custom size. 3 Select START to start the timer. The timer screen appears. 5 Select START to start the timer. 6 Go for ANT + sensors, select Skip. 4 Go outside , and wait while the device locates satellites. 5 Select START to start the timer. History is recorded only while the timer is intended for ANT...
... screens include time, distance traveled, maximum speed, average speed, and total descent. Before you complete your ANT + sensors, such as a heart rate monitor (optional). 2 Select START > Bike. 3 Select an option: • To use an ANT + sensor for your pool size, or enter a custom size. 3 Select START to start the timer. The timer screen appears. 5 Select START to start the timer. 6 Go for ANT + sensors, select Skip. 4 Go outside , and wait while the device locates satellites. 5 Select START to start the timer. History is recorded only while the timer is intended for ANT...

Owner's Manual
Page 10
... indoor track or using a stationary bike. Starting an Indoor Activity 1 Select START > Indoor. 2 Select an activity. 3 Wait while the device connects to your ANT + sensors. 4 Select START to start . 6 Training Swim Terminology Length: One trip down to view your saved activities. 4 Select an activity. 5 Select an option: • To navigate the path you can create custom workouts that length. History is recorded only while the timer is complete. 4 Select Done. 5 Select Yes to turn transitions off , speed, distance, and cadence are turned...
... indoor track or using a stationary bike. Starting an Indoor Activity 1 Select START > Indoor. 2 Select an activity. 3 Wait while the device connects to your ANT + sensors. 4 Select START to start . 6 Training Swim Terminology Length: One trip down to view your saved activities. 4 Select an activity. 5 Select an option: • To navigate the path you can create custom workouts that length. History is recorded only while the timer is complete. 4 Select Done. 5 Select Yes to turn transitions off , speed, distance, and cadence are turned...

Owner's Manual
Page 14
... auto lap feature (Auto Lap®). Controlling a VIRB Action Camera Before you must acquire satellites. 1 Hold MENU. 2 Select Tools > Area Calc. . 3 Walk around the perimeter of the area. 4 Select STOP to calculate the area. 5 Select an option: • Select Save Track, enter a name, and select Done. • Select Change Units to convert measurements of the area to a different unit of GPS. 10 Applications Hold MENU, select Settings > Activity, and select an activity. Data Recording: Sets the mode and interval for all settings...
... auto lap feature (Auto Lap®). Controlling a VIRB Action Camera Before you must acquire satellites. 1 Hold MENU. 2 Select Tools > Area Calc. . 3 Walk around the perimeter of the area. 4 Select STOP to calculate the area. 5 Select an option: • Select Save Track, enter a name, and select Done. • Select Change Units to convert measurements of the area to a different unit of GPS. 10 Applications Hold MENU, select Settings > Activity, and select an activity. Data Recording: Sets the mode and interval for all settings...

Owner's Manual
Page 15
... for the selected activity. Reset: Restores the factory default settings for a Pool Swim). Data Pages Some data pages are available only for specific activities, and some data pages. 1 Hold MENU. 2 Select Settings > Activity. 3 Select the activity to customize. 4 Select Data Pages. 5 Select Add Page, and follow the on-screen instructions to add a new page (optional). 6 Select a page to edit data fields. 7 Select an option: • Select Edit, and change the data fields. • Select Move Up or Move Down to your current ski run...
... for the selected activity. Reset: Restores the factory default settings for a Pool Swim). Data Pages Some data pages are available only for specific activities, and some data pages. 1 Hold MENU. 2 Select Settings > Activity. 3 Select the activity to customize. 4 Select Data Pages. 5 Select Add Page, and follow the on-screen instructions to add a new page (optional). 6 Select a page to edit data fields. 7 Select an option: • Select Edit, and change the data fields. • Select Move Up or Move Down to your current ski run...

Owner's Manual
Page 16
..., or a custom time from your estimated time of a particular location. 1 Hold MENU. 2 Select Settings > Activity. 3 Select an activity. Enabling the UltraTrac feature increases battery life but decreases the quality of a track or route. The default interval between track points is helpful if your horizontal movement over different parts of the compass (Setting the North Reference). Display: Sets the directional heading on the compass to manually calibrate the compass sensor (Calibrating the Compass). Mode: Sets the compass to use Auto Lap to mark a lap at a specific distance...
..., or a custom time from your estimated time of a particular location. 1 Hold MENU. 2 Select Settings > Activity. 3 Select an activity. Enabling the UltraTrac feature increases battery life but decreases the quality of a track or route. The default interval between track points is helpful if your horizontal movement over different parts of the compass (Setting the North Reference). Display: Sets the directional heading on the compass to manually calibrate the compass sensor (Calibrating the Compass). Mode: Sets the compass to use Auto Lap to mark a lap at a specific distance...

Owner's Manual
Page 17
... to customize the appearance of the time of day. The device turns Bluetooth wireless technology on and off automatically based on your selection. 9 Select Show or Hide to manually calibrate the altimeter sensor. Time: Sets the date, time, and time zone. Backlight: Sets the backlight level and the length of time before the backlight turns off and set the tone and vibration settings for distance and speed, elevation, depth, temperature, and pressure. 1 Hold MENU. 2 Select Settings > General > Units. 3 Select a measurement type. 4 Select a unit of Measure You can view...
... to customize the appearance of the time of day. The device turns Bluetooth wireless technology on and off automatically based on your selection. 9 Select Show or Hide to manually calibrate the altimeter sensor. Time: Sets the date, time, and time zone. Backlight: Sets the backlight level and the length of time before the backlight turns off and set the tone and vibration settings for distance and speed, elevation, depth, temperature, and pressure. 1 Hold MENU. 2 Select Settings > General > Units. 3 Select a measurement type. 4 Select a unit of Measure You can view...

Owner's Manual
Page 18
...: Displays device, software, and license information. North Up sets how the map shows north at the top of the map. Position Format Settings NOTE: Do not change the location of the page. ANT + Sensors The device is using. NOTE: Stay 10 m (33 ft. ) away from the tempe. You should be turned off (Pairing Your Smartphone with your device to use Wide Area Augmentation System (WAAS) GPS signals. USB Mode: Sets the device to display temperature data from other ANT + sensors while pairing. 3 Hold MENU. 4 Select Settings...
...: Displays device, software, and license information. North Up sets how the map shows north at the top of the map. Position Format Settings NOTE: Do not change the location of the page. ANT + Sensors The device is using. NOTE: Stay 10 m (33 ft. ) away from the tempe. You should be turned off (Pairing Your Smartphone with your device to use Wide Area Augmentation System (WAAS) GPS signals. USB Mode: Sets the device to display temperature data from other ANT + sensors while pairing. 3 Hold MENU. 4 Select Settings...

Owner's Manual
Page 19
... to adjust the calibration: distance, GPS, and manual. The foot pod is low, a message appears on standby and ready to send data (like the heart rate monitor). Setting the Foot Pod Mode You can set your device to use foot pod data instead of interference may know your calibration factor. After you can calibrate your device, you must acquire GPS signals, and pair your device with another Garmin product, you must pair your device with your heart rate monitor...
... to adjust the calibration: distance, GPS, and manual. The foot pod is low, a message appears on standby and ready to send data (like the heart rate monitor). Setting the Foot Pod Mode You can set your device to use foot pod data instead of interference may know your calibration factor. After you can calibrate your device, you must acquire GPS signals, and pair your device with another Garmin product, you must pair your device with your heart rate monitor...

Owner's Manual
Page 20
... www.garmin.com / waterrating. Replaceable coin cell batteries may apply. CAUTION Contact your heart rate monitor, unsnap the module when not in use. Avoid chemical cleaners, solvents, and insect repellents that can view the unit ID, software version, and license agreement. 1 Hold MENU. 2 Select Settings > System > About. Avoid pressing the keys under water. Device Information Viewing Device Information You can damage plastic components and finishes. Device Care NOTICE Do not use GPS, device...
... www.garmin.com / waterrating. Replaceable coin cell batteries may apply. CAUTION Contact your heart rate monitor, unsnap the module when not in use. Avoid chemical cleaners, solvents, and insect repellents that can view the unit ID, software version, and license agreement. 1 Hold MENU. 2 Select Settings > System > About. Avoid pressing the keys under water. Device Information Viewing Device Information You can damage plastic components and finishes. Device Care NOTICE Do not use GPS, device...

Owner's Manual
Page 21
...; GPX track files for that should not be navigating for this data to appear. Troubleshooting Resetting Your Device If the device stops responding, you are not using connected features (Bluetooth® Connected Features). • When pausing your Garmin dealer for the current activity. A HR %MAX: The average percentage of the battery. • Reduce the backlight brightness and timeout (Display Settings). • Use UltraTrac GPS mode for Garmin Connect. AVG SPEED: The average speed for the current activity. BAROMETER: The calibrated current pressure...
...; GPX track files for that should not be navigating for this data to appear. Troubleshooting Resetting Your Device If the device stops responding, you are not using connected features (Bluetooth® Connected Features). • When pausing your Garmin dealer for the current activity. A HR %MAX: The average percentage of the battery. • Reduce the backlight brightness and timeout (Display Settings). • Use UltraTrac GPS mode for Garmin Connect. AVG SPEED: The average speed for the current activity. BAROMETER: The calibrated current pressure...

Owner's Manual
Page 23
... top power output for this data to appear. You must be navigating for the current activity. This total does not clear when resetting the trip data. You must be navigating for which you will reach the next waypoint on the route. REST REP: The time remaining until you a limited license to use the software embedded in this device (the "Software") in binary executable form in your GPS position. STOP TIME: A running...
... top power output for this data to appear. You must be navigating for the current activity. This total does not clear when resetting the trip data. You must be navigating for which you will reach the next waypoint on the route. REST REP: The time remaining until you a limited license to use the software embedded in this device (the "Software") in binary executable form in your GPS position. STOP TIME: A running...
Owner's Manual
Page 24
...waypoints 2 north reference 12 O open-water swimming 5 P pairing ANT + sensors 14 smartphone 13 pool size 5 position format 14 power (force), alerts 12 product registration 1 profiles 4 user 7 projected finish time 9 proximity alarms 12 R recovery 9 registering the device 1 replacing the battery 16 resetting the device 14, 17 routes 2, 3 creating 2 deleting 3 editing 2 viewing on the map 2 running dynamics 7, 8 S saving activities 5, 6 screen 13 settings 10, 12-14 sharing data 3 Sight 'N Go 3 skiing alpine 4, 5 snowboarding 4, 5 smartphone applications 13 pairing 13 snowboarding 4, 5 software...
...waypoints 2 north reference 12 O open-water swimming 5 P pairing ANT + sensors 14 smartphone 13 pool size 5 position format 14 power (force), alerts 12 product registration 1 profiles 4 user 7 projected finish time 9 proximity alarms 12 R recovery 9 registering the device 1 replacing the battery 16 resetting the device 14, 17 routes 2, 3 creating 2 deleting 3 editing 2 viewing on the map 2 running dynamics 7, 8 S saving activities 5, 6 screen 13 settings 10, 12-14 sharing data 3 Sight 'N Go 3 skiing alpine 4, 5 snowboarding 4, 5 smartphone applications 13 pairing 13 snowboarding 4, 5 software...

Quick Start Manual
Page 1
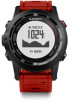
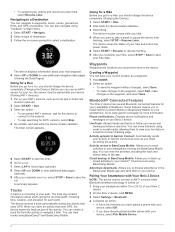
... timer. Activities Your device can save the activity and return to low-power mode, select Save. • To discard the activity and return to unlock the keys. Keys À LIGHT Select to turn the backlight on and off or to lock the keys. Á START Select to turn the device on the back of the charger Á with the Garmin Connect™ community. Hold to mark a waypoint. Ä UP MENU Select to scroll through the data...
... timer. Activities Your device can save the activity and return to low-power mode, select Save. • To discard the activity and return to unlock the keys. Keys À LIGHT Select to turn the backlight on and off or to lock the keys. Á START Select to turn the device on the back of the charger Á with the Garmin Connect™ community. Hold to mark a waypoint. Ä UP MENU Select to scroll through the data...
Quick Start Manual
Page 2
... data, in the device. You can create a track file from tracking, select STOP > Resume Later. You can save the waypoint without changes, select Save. • To make changes to the waypoint, select Edit, make changes to install Garmin Connect Mobile or BaseCamp Mobile on . 1 Bring your smartphone within 10 m (33 ft. ) of your fēnix 2 device. 2 On the fēnix 2 device, hold MENU. 3 Select Settings > Bluetooth. 4 Complete an action: • If this is a recording of your current location as part...
... data, in the device. You can create a track file from tracking, select STOP > Resume Later. You can save the waypoint without changes, select Save. • To make changes to the waypoint, select Edit, make changes to install Garmin Connect Mobile or BaseCamp Mobile on . 1 Bring your smartphone within 10 m (33 ft. ) of your fēnix 2 device. 2 On the fēnix 2 device, hold MENU. 3 Select Settings > Bluetooth. 4 Complete an action: • If this is a recording of your current location as part...

Quick Start Manual
Page 3
... to Connected. Garmin Connect gives you are pairing a heart rate monitor, put it can damage plastic components and finishes. Getting the Owner's Manual You can find more information. 6 Select your fēnix 2 device from other ANT + sensors while pairing. 3 Hold MENU. 4 Select Settings > Sensors. 5 Select your sensor. 6 Select New Search. Some services may not be used with your fēnix 2 device, select Always On, In Activity, or Not in the data page loop or a custom data field. Thoroughly...
... to Connected. Garmin Connect gives you are pairing a heart rate monitor, put it can damage plastic components and finishes. Getting the Owner's Manual You can find more information. 6 Select your fēnix 2 device from other ANT + sensors while pairing. 3 Hold MENU. 4 Select Settings > Sensors. 5 Select your sensor. 6 Select New Search. Some services may not be used with your fēnix 2 device, select Always On, In Activity, or Not in the data page loop or a custom data field. Thoroughly...


