
Installation Instructions
Page 1
...913) 397.8200 or (800) 800.1020. screw ➏ and insert the screw through the water and receives them to relay the information to power. Insert the rubber washer ➊ and the plastic spacer ➋ into the mounting bracket ➍. 3. With the supplied hardware, you can ... to the keys on your echo 100/150/200/300c/500c /550c. In the USA, go to www.garmin.com/support and click Contact Support for optimal performance. • Mount the transducer as close to www.garmin.com/support, or contact Garmin USA by installing an adapter cable (sold separately). ➍ ...
...913) 397.8200 or (800) 800.1020. screw ➏ and insert the screw through the water and receives them to relay the information to power. Insert the rubber washer ➊ and the plastic spacer ➋ into the mounting bracket ➍. 3. With the supplied hardware, you can ... to the keys on your echo 100/150/200/300c/500c /550c. In the USA, go to www.garmin.com/support and click Contact Support for optimal performance. • Mount the transducer as close to www.garmin.com/support, or contact Garmin USA by installing an adapter cable (sold separately). ➍ ...

Installation Instructions
Page 3
...for the pilot hole. • To attach the base with bolts, use in cold water or in areas with the bottom when in . echo Installation Instructions 3 Fasten the mount with the front of the transducer pointed away from a compass (page 6). If you plan to route the... 3. For use pan-head bolts, either from ➋ under the mounting surface, mark the location in . (14 cm) cable ties ➎ to secure the transducer cable to run the power and transducer cables from under the swivel mount, or from the mount. 3. Position the mount gasket ➌ on a Trolling Motor Notice Do ...
...for the pilot hole. • To attach the base with bolts, use in cold water or in areas with the bottom when in . echo Installation Instructions 3 Fasten the mount with the front of the transducer pointed away from a compass (page 6). If you plan to route the... 3. For use pan-head bolts, either from ➋ under the mounting surface, mark the location in . (14 cm) cable ties ➎ to secure the transducer cable to run the power and transducer cables from under the swivel mount, or from the mount. 3. Position the mount gasket ➌ on a Trolling Motor Notice Do ...

Installation Instructions
Page 4
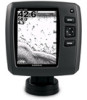
... ➌ on the swivel-mount ➌ base, and fasten it using 20 AWG or larger wire. • If you connect the power cable to the fuse block, first remove the inline fuse holder on the battery or fuse block, and connect the black wire to identify the ...position, place the echo 100/150/300c device ➋ or the echo 200/500c/550c cradle ➌ into the swivel mount (page 4). ➌ 5. Compare the divot ➊ on the cable connector to the keying on the mounting surface, route the cables through the cable pass-through holes ➎ with the Cables Installed in the...
... ➌ on the swivel-mount ➌ base, and fasten it using 20 AWG or larger wire. • If you connect the power cable to the fuse block, first remove the inline fuse holder on the battery or fuse block, and connect the black wire to identify the ...position, place the echo 100/150/300c device ➋ or the echo 200/500c/550c cradle ➌ into the swivel mount (page 4). ➌ 5. Compare the divot ➊ on the cable connector to the keying on the mounting surface, route the cables through the cable pass-through holes ➎ with the Cables Installed in the...


