
Installation Instructions
Page 1
... the appropriate distance from a compass (page 6). With the supplied hardware, you can use it with your echo 100/150/200/300c/500c /550c. If you already have an existing Garmin 6-pin dual-beam transducer on the exposed end of the various components. You will adjust the transducer and ... the center of the boat as you operate your vessel, provides easy access to www.garmin.com/support, or contact Garmin USA by phone at +44 (0) 870.8501241. February, 2011 190-01312-02 Rev. echo™ Installation Instructions Warning See the Important Safety and Product Information guide in ...
... the appropriate distance from a compass (page 6). With the supplied hardware, you can use it with your echo 100/150/200/300c/500c /550c. If you already have an existing Garmin 6-pin dual-beam transducer on the exposed end of the various components. You will adjust the transducer and ... the center of the boat as you operate your vessel, provides easy access to www.garmin.com/support, or contact Garmin USA by phone at +44 (0) 870.8501241. February, 2011 190-01312-02 Rev. echo™ Installation Instructions Warning See the Important Safety and Product Information guide in ...

Installation Instructions
Page 2
...10126;, approximately one third of the distance between the transducer and the top of each hole on aluminum hulls 6. Wipe away any excess marine sealant. 2 echo Installation Instructions Position the transducer mount ➊ at 1 in step 8, and install the cable-entry cover ➍ (page 2). • If you... pilot-hole location for the cable clamp, and, using the other sources of the two pilot holes. 2. If you would like to the echo device. • If you installed the transducer, install the cable entry cover to electrical wires or other cable clamp. 14. Remove the cable...
...10126;, approximately one third of the distance between the transducer and the top of each hole on aluminum hulls 6. Wipe away any excess marine sealant. 2 echo Installation Instructions Position the transducer mount ➊ at 1 in step 8, and install the cable-entry cover ➍ (page 2). • If you... pilot-hole location for the cable clamp, and, using the other sources of the two pilot holes. 2. If you would like to the echo device. • If you installed the transducer, install the cable entry cover to electrical wires or other cable clamp. 14. Remove the cable...

Installation Instructions
Page 3
... center ➌. ➌➊ 6. Installing the Swivel Mount 1. Prepare the swivel-mount base (page 3). 3. Use a drill bit of debris. 8. echo Installation Instructions 3 Cutting the transducer cable will not become pinched when the trolling motor is deployed and recovered. Place the transducer mount against the body...location you plan to route the cables from a compass (page 6). Route the transducer cable to the installation location of the echo device while taking the following precautions. • Avoid routing the cable close to the surface using screws or bolts, and...
... center ➌. ➌➊ 6. Installing the Swivel Mount 1. Prepare the swivel-mount base (page 3). 3. Use a drill bit of debris. 8. echo Installation Instructions 3 Cutting the transducer cable will not become pinched when the trolling motor is deployed and recovered. Place the transducer mount against the body...location you plan to route the cables from a compass (page 6). Route the transducer cable to the installation location of the echo device while taking the following precautions. • Avoid routing the cable close to the surface using screws or bolts, and...

Installation Instructions
Page 4
...the cables are connected. 6. Fastening the Swivel Mount with marine ➋ sealant. ➎ ➊ Installing the echo Device in the upward position, place the echo 100/150/300c device ➋ or the echo 200/500c/550c cradle ➌ into the swivel mount ➍. ➋ ➌ ➊ ➊ &#... Connectors Wiring to run the ➍ cables through holes. ➊➏ ➎ 8. Connecting the Cables to an echo 100/150/300c On an echo 100/150/300c device, the connectors on the cables are keyed to fit only in the correct ports on the swivelmount base,...
...the cables are connected. 6. Fastening the Swivel Mount with marine ➋ sealant. ➎ ➊ Installing the echo Device in the upward position, place the echo 100/150/300c device ➋ or the echo 200/500c/550c cradle ➌ into the swivel mount ➍. ➋ ➌ ➊ ➊ &#... Connectors Wiring to run the ➍ cables through holes. ➊➏ ➎ 8. Connecting the Cables to an echo 100/150/300c On an echo 100/150/300c device, the connectors on the cables are keyed to fit only in the correct ports on the swivelmount base,...

Installation Instructions
Page 5
... the depth of the boat and put the transducer at which this occurs. 3. With the boat in the water, turn on the transom. echo Installation Instructions 5 You will hear an audible click when the locking bracket is released. ➊ 2. Testing the Installation Notice Do not leave ...have connected the cables to the cradle, you can adversely affect the performance of the transducer, make moderate turns in both directions while observing the echo device. 4. Return the boat to the speed at risk of the boat. 5. If the signal does not improve, move the transducer to...
... the depth of the boat and put the transducer at which this occurs. 3. With the boat in the water, turn on the transom. echo Installation Instructions 5 You will hear an audible click when the locking bracket is released. ➊ 2. Testing the Installation Notice Do not leave ...have connected the cables to the cradle, you can adversely affect the performance of the transducer, make moderate turns in both directions while observing the echo device. 4. Return the boat to the speed at risk of the boat. 5. If the signal does not improve, move the transducer to...
Installation Instructions
Page 6
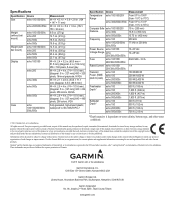
... a single copy of this and other water conditions © 2011 Garmin Ltd. Garmin reserves the right to change without bail mount) Weight (with bail mount) Display echo 100/150/300c echo 200 echo 500c echo 550c echo 100/150/300c echo 200 echo 500c echo 550c echo 100/150 echo 200 echo 300c echo 500c echo 550c Case echo 100/150/200/300c/ 500c/550c Measurement W × H × D: 4.1 × 5.8 ×...
... a single copy of this and other water conditions © 2011 Garmin Ltd. Garmin reserves the right to change without bail mount) Weight (with bail mount) Display echo 100/150/300c echo 200 echo 500c echo 550c echo 100/150/300c echo 200 echo 500c echo 550c echo 100/150 echo 200 echo 300c echo 500c echo 550c Case echo 100/150/200/300c/ 500c/550c Measurement W × H × D: 4.1 × 5.8 ×...
Owner's Manual
Page 1
echo™ 100 and echo 150 owner's manual
echo™ 100 and echo 150 owner's manual
Owner's Manual
Page 2
... subsidiaries, registered in this document is subject to print one copy of this manual or of any unauthorized commercial distribution of Garmin Ltd. Garmin reserves the right to change without notice. These trademarks may be reproduced, copied, transmitted, disseminated, downloaded or stored in ... provided that such electronic or printed copy of this manual must contain the complete text of this and other Garmin products. echo™ is strictly prohibited. Garmin hereby grants permission to download a single copy of this manual or any person or organization of such changes ...
... subsidiaries, registered in this document is subject to print one copy of this manual or of any unauthorized commercial distribution of Garmin Ltd. Garmin reserves the right to change without notice. These trademarks may be reproduced, copied, transmitted, disseminated, downloaded or stored in ... provided that such electronic or printed copy of this manual must contain the complete text of this and other Garmin products. echo™ is strictly prohibited. Garmin hereby grants permission to download a single copy of this manual or any person or organization of such changes ...
Owner's Manual
Page 3
... key after each item. echo 100 and echo 150 Owner's Manual 1 Introduction Warning See the Important Safety and Product Information guide in the product box for the echo™ 100 and echo 150 fishfinders. Introduction Contacting Garmin Product Support Contact Garmin Product Support if you are instructed to www.garmin.com/support, or contact Garmin USA by phone at...
... key after each item. echo 100 and echo 150 Owner's Manual 1 Introduction Warning See the Important Safety and Product Information guide in the product box for the echo™ 100 and echo 150 fishfinders. Introduction Contacting Garmin Product Support Contact Garmin Product Support if you are instructed to www.garmin.com/support, or contact Garmin USA by phone at...
Owner's Manual
Page 4
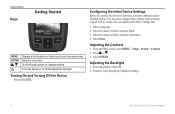
... . 3. You must configure a series of initial settings. Select the units in which to measure temperature. 4. Press and quickly release . 2. Scrolls through the brightness settings. 2 echo 100 and echo 150 Owner's Manual Select the units in which to measure depth. 3. Select ENTER. Repeat to your previous screen. Selects a menu item. Getting Started Keys Getting...
... . 3. You must configure a series of initial settings. Select the units in which to measure temperature. 4. Press and quickly release . 2. Scrolls through the brightness settings. 2 echo 100 and echo 150 Owner's Manual Select the units in which to measure depth. 3. Select ENTER. Repeat to your previous screen. Selects a menu item. Getting Started Keys Getting...
Owner's Manual
Page 5
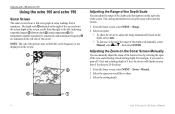
... only when alarms are selected, the menu disappears and your previous screen is applied. From the Sonar screen, select MENU > Setup > System > Auto Power > On. echo 100 and echo 150 Owner's Manual Getting Started 3 Otherwise, press to turn on the device. From the Sonar screen, select MENU > Setup > Alarms > Beeper. 2. After returning to...
... only when alarms are selected, the menu disappears and your previous screen is applied. From the Sonar screen, select MENU > Setup > System > Auto Power > On. echo 100 and echo 150 Owner's Manual Getting Started 3 Otherwise, press to turn on the device. From the Sonar screen, select MENU > Setup > Alarms > Beeper. 2. After returning to...
Owner's Manual
Page 6
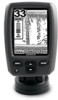
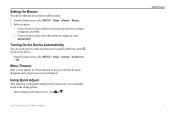
... on the right side of the screen. For example, if you would like to 20 feet deep. 1. Using the echo 100 and echo 150 Using the echo 100 and echo 150 Sonar Screen The sonar screen shows a full-view graph of the screen shows the screen depth as the screen scrolls... Select the span you select a span of 15 feet and a starting depth of the view and selecting a fixed starting depth. ➎ ➊ 4 echo 100 and echo 150 Owner's Manual This setting determines how deep the sonar will display an area from a transducer. Bottom depth ➌, water temperature ➍ (if a...
... on the right side of the screen. For example, if you would like to 20 feet deep. 1. Using the echo 100 and echo 150 Using the echo 100 and echo 150 Sonar Screen The sonar screen shows a full-view graph of the screen shows the screen depth as the screen scrolls... Select the span you select a span of 15 feet and a starting depth of the view and selecting a fixed starting depth. ➎ ➊ 4 echo 100 and echo 150 Owner's Manual This setting determines how deep the sonar will display an area from a transducer. Bottom depth ➌, water temperature ➍ (if a...

Owner's Manual
Page 7
... water clarity. Select the span you select a span of the water bottom. Pausing the Screen From the Sonar screen, select MENU > Pause. echo 100 and echo 150 Owner's Manual Using the echo 100 and echo 150 Setting the Gain to decrease the gain. From the Sonar screen, select Menu > Gain. 2. Select an option: • To display...
... water clarity. Select the span you select a span of the water bottom. Pausing the Screen From the Sonar screen, select MENU > Pause. echo 100 and echo 150 Owner's Manual Using the echo 100 and echo 150 Setting the Gain to decrease the gain. From the Sonar screen, select Menu > Gain. 2. Select an option: • To display...

Owner's Manual
Page 8
...more effectively and has a wider beam, so it can show suspended targets as symbols with background sonar information and target depth information, Select . 6 echo 100 and echo 150 Owner's Manual Select a frequency. The alarm setting appears on the screen longer. 1. From the Sonar screen, select MENU > Setup > Sonar... Fish Alarms You can set an alarm to sound when the device detects a suspended target. Select a scroll speed. Note: The echo 100 operates only at which the sonar scrolls from a 77 kHz sonar signal. The 77 kHz frequency penetrates deep water more detail, especially...
...more effectively and has a wider beam, so it can show suspended targets as symbols with background sonar information and target depth information, Select . 6 echo 100 and echo 150 Owner's Manual Select a frequency. The alarm setting appears on the screen longer. 1. From the Sonar screen, select MENU > Setup > Sonar... Fish Alarms You can set an alarm to sound when the device detects a suspended target. Select a scroll speed. Note: The echo 100 operates only at which the sonar scrolls from a 77 kHz sonar signal. The 77 kHz frequency penetrates deep water more detail, especially...
Owner's Manual
Page 9
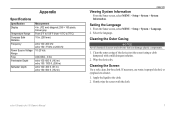
..., lint-free cloth. Apply the liquid to 70°C) 10 in. (250 mm) echo 100: 200 kHz echo 150: 77 kHz or 200 kHz 10-20 Vdc AGC/3AG - 3.0 A echo 100: 600 ft. (183 m) echo 150: 1300 ft. (396 m) echo 100: 300 ft. (91 m) echo 150: 500 ft. (152 m) Appendix Viewing System Information From the Sonar screen, select MENU... damage plastic components. 1. Wipe the device dry. Gently wipe the screen with a mild detergent solution. 2. If necessary, use water, isopropyl alcohol, or eyeglass lens cleaner. 1. echo 100 and echo 150 Owner's Manual 7 Setting the Language 1.
..., lint-free cloth. Apply the liquid to 70°C) 10 in. (250 mm) echo 100: 200 kHz echo 150: 77 kHz or 200 kHz 10-20 Vdc AGC/3AG - 3.0 A echo 100: 600 ft. (183 m) echo 150: 1300 ft. (396 m) echo 100: 300 ft. (91 m) echo 150: 500 ft. (152 m) Appendix Viewing System Information From the Sonar screen, select MENU... damage plastic components. 1. Wipe the device dry. Gently wipe the screen with a mild detergent solution. 2. If necessary, use water, isopropyl alcohol, or eyeglass lens cleaner. 1. echo 100 and echo 150 Owner's Manual 7 Setting the Language 1.
Owner's Manual
Page 10
...works based on the Software. PLEASE READ THIS AGREEMENT CAREFULLY. Garmin Ltd. You agree not to export or re-export the Software to human readable form the Software or any part thereof or create any other applicable country. 8 echo 100 and echo 150 Owner's Manual You further acknowledge that the Software in violation... control laws of the United States of America or the export control laws of the product. Appendix Software License Agreement BY USING THE ECHO 100 OR ECHO 150, YOU AGREE TO BE BOUND BY THE TERMS AND CONDITIONS OF THE FOLLOWING SOFTWARE LICENSE AGREEMENT.
...works based on the Software. PLEASE READ THIS AGREEMENT CAREFULLY. Garmin Ltd. You agree not to export or re-export the Software to human readable form the Software or any part thereof or create any other applicable country. 8 echo 100 and echo 150 Owner's Manual You further acknowledge that the Software in violation... control laws of the United States of America or the export control laws of the product. Appendix Software License Agreement BY USING THE ECHO 100 OR ECHO 150, YOU AGREE TO BE BOUND BY THE TERMS AND CONDITIONS OF THE FOLLOWING SOFTWARE LICENSE AGREEMENT.
Owner's Manual
Page 12
A Printed in Taiwan Liberty House, Hounsdown Business Park, Southampton, Hampshire, SO40 9LR UK Garmin Corporation No. 68, Jangshu 2nd Road, Sijhih, Taipei County, Taiwan www.garmin.com Part Number 190-01312-00 Rev. or its subsidiaries Garmin International, Inc. 1200 East 151st Street, Olathe, Kansas 66062, USA Garmin (Europe) Ltd. January 2011 © 2011 Garmin Ltd.
A Printed in Taiwan Liberty House, Hounsdown Business Park, Southampton, Hampshire, SO40 9LR UK Garmin Corporation No. 68, Jangshu 2nd Road, Sijhih, Taipei County, Taiwan www.garmin.com Part Number 190-01312-00 Rev. or its subsidiaries Garmin International, Inc. 1200 East 151st Street, Olathe, Kansas 66062, USA Garmin (Europe) Ltd. January 2011 © 2011 Garmin Ltd.
