
Owners Manual
Page 1
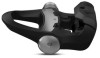
VECTOR™ 3 AND VECTOR 3S Owner's Manual
VECTOR™ 3 AND VECTOR 3S Owner's Manual

Owners Manual
Page 2
....thisisant.com/directory for current updates and supplemental information concerning the use of Peaksware, LLC. FCC ID: IPH-03220 M/N: A03220 Under the copyright laws, this product. or its subsidiaries All rights reserved. These trademarks may not be used without obligation to www.garmin.com for a list of their respective owners. This product is located in the USA and...
....thisisant.com/directory for current updates and supplemental information concerning the use of Peaksware, LLC. FCC ID: IPH-03220 M/N: A03220 Under the copyright laws, this product. or its subsidiaries All rights reserved. These trademarks may not be used without obligation to www.garmin.com for a list of their respective owners. This product is located in the USA and...
Owners Manual
Page 3
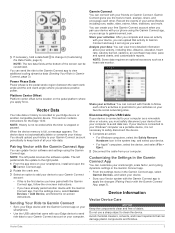
...Started 1 Tools Needed 1 Installing the Vector Components 1 Installing the Shoe Cleats 1 About the Vector 3S System 2 Pairing Vector with Your Edge 1030 2 Your First Ride 2 Training 2 Pedal-Based Power 2 Cycling Dynamics 2 Vector Data 3 Pairing Vector with the Garmin Connect App 3 Sending Your Ride to Garmin Connect 3 Customizing the Settings in the Garmin Connect App 3 Device Information 3 Vector Device Care 3 Maintenance Tips 4 Vector Specifications 4 Battery Information 4 Overhauling the Vector Pedals 4 Vector Storage 6 Other Compatible Devices 6 Edge 1000 Instructions...
...Started 1 Tools Needed 1 Installing the Vector Components 1 Installing the Shoe Cleats 1 About the Vector 3S System 2 Pairing Vector with Your Edge 1030 2 Your First Ride 2 Training 2 Pedal-Based Power 2 Cycling Dynamics 2 Vector Data 3 Pairing Vector with the Garmin Connect App 3 Sending Your Ride to Garmin Connect 3 Customizing the Settings in the Garmin Connect App 3 Device Information 3 Vector Device Care 3 Maintenance Tips 4 Vector Specifications 4 Battery Information 4 Overhauling the Vector Pedals 4 Vector Storage 6 Other Compatible Devices 6 Edge 1000 Instructions...
Owners Manual
Page 5
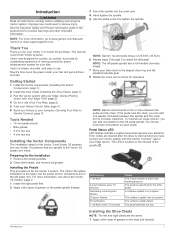
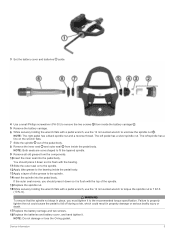
...: The left pedal spindle has a left pedal spindle. NOTE: Garmin recommends 2 mm or more information, go to www.garmin.com/manuals /vector3 or www.support.garmin.com. 3 Insert the spindle into the crank arm. 4 Hand tighten the spindle. 5 Use the pedal wrench to the left -handed (reverse) thread. 7 Move your computer (Sending Your Ride to check for your attention. Error codes are low. A software update is resolved...
...: The left pedal spindle has a left pedal spindle. NOTE: Garmin recommends 2 mm or more information, go to www.garmin.com/manuals /vector3 or www.support.garmin.com. 3 Insert the spindle into the crank arm. 4 Hand tighten the spindle. 5 Use the pedal wrench to the left -handed (reverse) thread. 7 Move your computer (Sending Your Ride to check for your attention. Error codes are low. A software update is resolved...
Owners Manual
Page 6
..., see your owner's manual. 1 Rotate the pedals a few hundred times every second. Pairing is often printed on the Edge device. 3 Select > Sensors > Add Sensor > Power. 4 Rotate the crank arm. 5 Select your sensor. 4 Select Sensor Details > Crank Length. 5 Enter the crank length, and select . NOTE: Stay 10 m away from other ANT+ sensors while pairing. 2 Turn on the crank arm. The Vector system automatically calibrates after a trial ride. 5 Tighten the cleat...
..., see your owner's manual. 1 Rotate the pedals a few hundred times every second. Pairing is often printed on the Edge device. 3 Select > Sensors > Add Sensor > Power. 4 Rotate the crank arm. 5 Select your sensor. 4 Select Sensor Details > Crank Length. 5 Enter the crank length, and select . NOTE: Stay 10 m away from other ANT+ sensors while pairing. 2 Turn on the crank arm. The Vector system automatically calibrates after a trial ride. 5 Tighten the cleat...
Owners Manual
Page 7
... a removable drive or volume, you have already paired another compatible Garmin device. If your device is the pedal stroke region (between the start crank angle and the end crank angle) where you apply force. Do not use a sharp object to change it as long as a heart rate monitor. NOTE: The left pedal sends the update to keep it (Customizing the Data Fields, page 2). Garmin Connect You...
... a removable drive or volume, you have already paired another compatible Garmin device. If your device is the pedal stroke region (between the start crank angle and the end crank angle) where you apply force. Do not use a sharp object to change it as long as a heart rate monitor. NOTE: The left pedal sends the update to keep it (Customizing the Data Fields, page 2). Garmin Connect You...

Owners Manual
Page 8
... can disassemble and reassemble the pedal spindles to www.garmin.com/waterrating. Vector Specifications Battery type User-replaceable, 3 options: CR1/3N, 3 V, 1 per pedal LR44 or SR44, 1.5 V, 2 per pedal NOTE: Garmin recommends replacing all of operation time remaining. 2 Remove the batteries. 3 Wait 5 to 10 seconds. 4 Insert the new batteries into the battery cover, observing polarity. 5 Replace the battery cover, and hand tighten it to the crank arm. 2 Use a 4 mm hex key to gently tighten the battery cover. For more information...
... can disassemble and reassemble the pedal spindles to www.garmin.com/waterrating. Vector Specifications Battery type User-replaceable, 3 options: CR1/3N, 3 V, 1 per pedal LR44 or SR44, 1.5 V, 2 per pedal NOTE: Garmin recommends replacing all of operation time remaining. 2 Remove the batteries. 3 Wait 5 to 10 seconds. 4 Insert the new batteries into the battery cover, observing polarity. 5 Replace the battery cover, and hand tighten it to the crank arm. 2 Use a 4 mm hex key to gently tighten the battery cover. For more information...
Owners Manual
Page 9
... pedal body. Failure to properly tighten the nut could cause the pedal to fall off during a ride, which could result in place, you should press it down so it . NOTE: The right pedal has a black spindle nut and a reverse thread. 3 Set the battery cover and batteries aside. 4 Use a small Phillips screwdriver (PH 00) to remove the two screws from inside the battery carriage . 5 Remove the battery...
... pedal body. Failure to properly tighten the nut could cause the pedal to fall off during a ride, which could result in place, you should press it down so it . NOTE: The right pedal has a black spindle nut and a reverse thread. 3 Set the battery cover and batteries aside. 4 Use a small Phillips screwdriver (PH 00) to remove the two screws from inside the battery carriage . 5 Remove the battery...

Owners Manual
Page 10
... or the Garmin Connect app. 1 Review the Vector installation instructions (Installing the Vector Components, page 1). 2 Remove the existing right pedal. 3 Install the new right pedal (Installing the Pedals, page 1). 4 Rotate the crank arm. 5 Select an option to connect the right pedal to www.garmin.com/manuals/vector3. 1 Bring the Edge device within range (3 m) of time, Garmin recommends removing Vector and storing it in order to activate Vector. 2 From the home screen, select > Sensors > > Sensor Details > Crank Length. NOTE...
... or the Garmin Connect app. 1 Review the Vector installation instructions (Installing the Vector Components, page 1). 2 Remove the existing right pedal. 3 Install the new right pedal (Installing the Pedals, page 1). 4 Rotate the crank arm. 5 Select an option to connect the right pedal to www.garmin.com/manuals/vector3. 1 Bring the Edge device within range (3 m) of time, Garmin recommends removing Vector and storing it in order to activate Vector. 2 From the home screen, select > Sensors > > Sensor Details > Crank Length. NOTE...
Owners Manual
Page 11
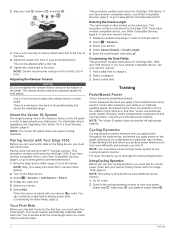
... - Power phase peak is pedaling. TSS: The Training Stress Score™ for the current lap. Torque Effectiveness: The measurement of how efficiently a rider is the angle range over which the rider produces the peak portion of power output. Trainer Resistance: The resistance force applied by the Vector S system. Balance - 10s Avg.: The 10-second moving average of the driving force. Balance - Cadence: Cycling. Cadence Bars: A bar...
... - Power phase peak is pedaling. TSS: The Training Stress Score™ for the current lap. Torque Effectiveness: The measurement of how efficiently a rider is the angle range over which the rider produces the peak portion of power output. Trainer Resistance: The resistance force applied by the Vector S system. Balance - 10s Avg.: The 10-second moving average of the driving force. Balance - Cadence: Cycling. Cadence Bars: A bar...
Owners Manual
Page 12
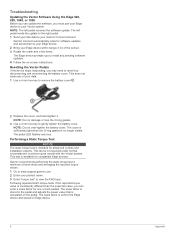
... reported torque values. 1 Go to install any of the sensor. 3 Rotate the crank arm a few times. Resetting the Vector Pedals If the device stops responding, you to www.support.garmin.com. 2 Enter your Garmin Connect account. Following repeated static torque tests, if the reported torque value is sent to reset it . The Edge device prompts you may need to the Edge device and stored...
... reported torque values. 1 Go to install any of the sensor. 3 Rotate the crank arm a few times. Resetting the Vector Pedals If the device stops responding, you to www.support.garmin.com. 2 Enter your Garmin Connect account. Following repeated static torque tests, if the reported torque value is sent to reset it . The Edge device prompts you may need to the Edge device and stored...
Owners Manual
Page 13
Index B battery 1 life 4 replacing 4 C calibrating 2, 6 cleaning the device 3 cleats 1 customizing the device 2 cycling dynamics 2 D data storing 3 transferring 3 data fields 2, 7 E Edge 2, 6 F fēnix 6 Forerunner 6 G Garmin Connect 3 H history 3 sending to computer 3 I installing 1 M maintenance 4 memory 3 P pairing 1, 2, 6 smartphone 3 pedals 1, 2, 4 platform center offset 3 power 2 power (force), meters 2 power phase 3 product registration 6 R registering the device 6 resetting the device 8 S settings 3 smartphone, pairing 3 specifications 4 storing data 3 storing the device 6 T tools 1...
Index B battery 1 life 4 replacing 4 C calibrating 2, 6 cleaning the device 3 cleats 1 customizing the device 2 cycling dynamics 2 D data storing 3 transferring 3 data fields 2, 7 E Edge 2, 6 F fēnix 6 Forerunner 6 G Garmin Connect 3 H history 3 sending to computer 3 I installing 1 M maintenance 4 memory 3 P pairing 1, 2, 6 smartphone 3 pedals 1, 2, 4 platform center offset 3 power 2 power (force), meters 2 power phase 3 product registration 6 R registering the device 6 resetting the device 8 S settings 3 smartphone, pairing 3 specifications 4 storing data 3 storing the device 6 T tools 1...
Important Safety and Product Information
Page 2
... to be available due to repair or replace your product with all instructions carefully before installing the components and riding. • Understand how the pedal locking mechanism works before beginning or modifying any interference received, including interference that the parts and products needed to differences in a residential installation. Before seeking warranty service, please access and review the online help . If your product, in...
... to be available due to repair or replace your product with all instructions carefully before installing the components and riding. • Understand how the pedal locking mechanism works before beginning or modifying any interference received, including interference that the parts and products needed to differences in a residential installation. Before seeking warranty service, please access and review the online help . If your product, in...


