Owners Manual
Page 3
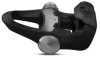
... Shoe Cleats 1 About the Vector 3S System 2 Pairing Vector with Your Edge 1030 2 Your First Ride 2 Training 2 Pedal-Based Power 2 Cycling Dynamics 2 Vector Data 3 Pairing Vector with the Garmin Connect App 3 Sending Your Ride to Garmin Connect 3 Customizing the Settings in the Garmin Connect App 3 Device Information 3 Vector Device Care 3 Maintenance Tips 4 Vector Specifications 4 Battery Information 4 Overhauling the Vector Pedals 4 Vector Storage 6 Other Compatible...
... Shoe Cleats 1 About the Vector 3S System 2 Pairing Vector with Your Edge 1030 2 Your First Ride 2 Training 2 Pedal-Based Power 2 Cycling Dynamics 2 Vector Data 3 Pairing Vector with the Garmin Connect App 3 Sending Your Ride to Garmin Connect 3 Customizing the Settings in the Garmin Connect App 3 Device Information 3 Vector Device Care 3 Maintenance Tips 4 Vector Specifications 4 Battery Information 4 Overhauling the Vector Pedals 4 Vector Storage 6 Other Compatible...
Owners Manual
Page 5
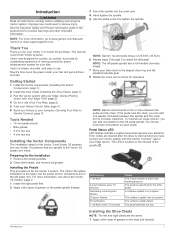
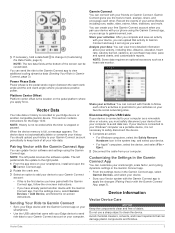
... the other important information. Getting Started 1 Install the Vector components (Installing the Vector Components, page 1). 2 Install the shoe cleats (Installing the Shoe Cleats, page 1). 3 Pair the Vector system with your Edge® device (Pairing Vector with the Garmin Connect™ app or your Vector 3 or Vector 3S purchase. The pedal is the same, but the power sensor components are...
... the other important information. Getting Started 1 Install the Vector components (Installing the Vector Components, page 1). 2 Install the shoe cleats (Installing the Shoe Cleats, page 1). 3 Pair the Vector system with your Edge® device (Pairing Vector with the Garmin Connect™ app or your Vector 3 or Vector 3S purchase. The pedal is the same, but the power sensor components are...
Owners Manual
Page 6
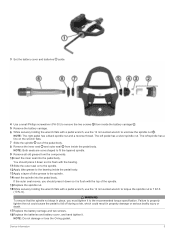
... device, see Other Compatible Devices, page 6, or see Upgrading Your Vector 3S to the shoe in your sensor. 6 Select Add. NOTE: Garmin recommends a torque of the pedal. This procedure contains instructions for the Edge 820, 1000, and 1030 devices. About the Vector 3S System The single-sensing Vector 3S measures forces on the bottom of 4 to 6 lbf-ft...
... device, see Other Compatible Devices, page 6, or see Upgrading Your Vector 3S to the shoe in your sensor. 6 Select Add. NOTE: Garmin recommends a torque of the pedal. This procedure contains instructions for the Edge 820, 1000, and 1030 devices. About the Vector 3S System The single-sensing Vector 3S measures forces on the bottom of 4 to 6 lbf-ft...
Owners Manual
Page 7
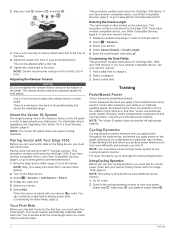
... should upload your history to your computer. NOTE: The left pedal sends the update to the right pedal. 1 From the app store on Garmin Connect. Garmin Connect You can connect with your ride data. Share your activities: You can connect with the Garmin Connect App, page 3). Vector Data 3 Analyze your data: You can customize your crank...
... should upload your history to your computer. NOTE: The left pedal sends the update to the right pedal. 1 From the app store on Garmin Connect. Garmin Connect You can connect with your ride data. Share your activities: You can connect with the Garmin Connect App, page 3). Vector Data 3 Analyze your data: You can customize your crank...

Owners Manual
Page 8
...less than 17 mm (typically a 1/4 in the product box for up to your Garmin dealer or the Garmin website. NOTE: If you have the Vector 3S system, the right pedal has no longer visible. Overhauling the Vector Pedals You can occur, because it to the crank arm. 2 Use a 4 mm... hex key to remove the pedals. Wireless frequencies/ protocols Water rating ANT+ 2.4 GHz @ 3 dBm nominal Bluetooth®...
...less than 17 mm (typically a 1/4 in the product box for up to your Garmin dealer or the Garmin website. NOTE: If you have the Vector 3S system, the right pedal has no longer visible. Overhauling the Vector Pedals You can occur, because it to the crank arm. 2 Use a 4 mm... hex key to remove the pedals. Wireless frequencies/ protocols Water rating ANT+ 2.4 GHz @ 3 dBm nominal Bluetooth®...
Owners Manual
Page 9
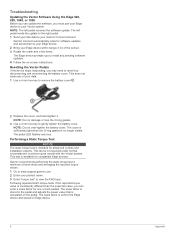
...specification. 3 Set the battery cover and batteries aside. 4 Use a small Phillips screwdriver (PH 00) to remove the two screws from inside the pedal body. The left pedal has a silver spindle nut. You should press it down so it to fit the tapered spindle. 9 Remove all old grease from inside the ... bodily injury or death. 17Replace the battery carriage and two screws. 18Replace the batteries and battery cover, and hand tighten it is flush with a pedal wrench, use the 12 mm socket wrench to torque the spindle nut to 7 lbf-ft. (10 N-m). Failure to properly tighten the nut could ...
...specification. 3 Set the battery cover and batteries aside. 4 Use a small Phillips screwdriver (PH 00) to remove the two screws from inside the pedal body. The left pedal has a silver spindle nut. You should press it down so it to fit the tapered spindle. 9 Remove all old grease from inside the ... bodily injury or death. 17Replace the battery carriage and two screws. 18Replace the batteries and battery cover, and hand tighten it is flush with a pedal wrench, use the 12 mm socket wrench to torque the spindle nut to 7 lbf-ft. (10 N-m). Failure to properly tighten the nut could ...

Owners Manual
Page 10
... The crank length is often printed on the crank arm. 1 Rotate the pedals a few times in order to display power data. Upgrading Your Vector 3S to a Dual Sensing System Before you by completing our online registration today. • Go to www.garmin.com/manuals/vector3. 1 Bring your Edge device, a message appears, and the sensor...
... The crank length is often printed on the crank arm. 1 Rotate the pedals a few times in order to display power data. Upgrading Your Vector 3S to a Dual Sensing System Before you by completing our online registration today. • Go to www.garmin.com/manuals/vector3. 1 Bring your Edge device, a message appears, and the sensor...
Owners Manual
Page 11
...Power Phase - Power Phase - TSS: The Training Stress Score™ for the current activity. Power - Balance - 3s Avg.: The three-second moving average of the left /right power balance. The number of revolutions of power output. ....: Cycling. Platform center offset is the location on your cycling cadence values for the current activity. PCO - Pedal Smoothness: The measurement of power output in kilojoules. watts/kg: The 3-second moving average of functional threshold power...activity. Trainer Resistance: The resistance force applied by the Vector S system.
...Power Phase - Power Phase - TSS: The Training Stress Score™ for the current activity. Power - Balance - 3s Avg.: The three-second moving average of the left /right power balance. The number of revolutions of power output. ....: Cycling. Platform center offset is the location on your cycling cadence values for the current activity. PCO - Pedal Smoothness: The measurement of power output in kilojoules. watts/kg: The 3-second moving average of functional threshold power...activity. Trainer Resistance: The resistance force applied by the Vector S system.
Owners Manual
Page 12
.... 2 Enter your product name. 3 Enter "torque test" to your Garmin Connect account. The cover is sufficiently tight when the O-ring gasket is intended for compatible Edge devices. NOTE: Do not over-tighten the battery cover. Resetting the Vector Pedals If the device stops responding, you must pair your ride data to achieve good...
.... 2 Enter your product name. 3 Enter "torque test" to your Garmin Connect account. The cover is sufficiently tight when the O-ring gasket is intended for compatible Edge devices. NOTE: Do not over-tighten the battery cover. Resetting the Vector Pedals If the device stops responding, you must pair your ride data to achieve good...
Owners Manual
Page 13
... 4 replacing 4 C calibrating 2, 6 cleaning the device 3 cleats 1 customizing the device 2 cycling dynamics 2 D data storing 3 transferring 3 data fields 2, 7 E Edge 2, 6 F fēnix 6 Forerunner 6 G Garmin Connect 3 H history 3 sending to computer 3 I installing 1 M maintenance 4 memory 3 P pairing 1, 2, 6 smartphone 3 pedals 1, 2, 4 platform center offset 3 power 2 power (force), meters 2 power phase 3 product registration 6 R registering the device 6 resetting the device 8 S settings 3 smartphone, pairing...
... 4 replacing 4 C calibrating 2, 6 cleaning the device 3 cleats 1 customizing the device 2 cycling dynamics 2 D data storing 3 transferring 3 data fields 2, 7 E Edge 2, 6 F fēnix 6 Forerunner 6 G Garmin Connect 3 H history 3 sending to computer 3 I installing 1 M maintenance 4 memory 3 P pairing 1, 2, 6 smartphone 3 pedals 1, 2, 4 platform center offset 3 power 2 power (force), meters 2 power phase 3 product registration 6 R registering the device 6 resetting the device 8 S settings 3 smartphone, pairing...
Important Safety and Product Information
Page 2
... replacement or refund for a major failure and for compensation for two years from defects in a safe area first. • Keep the pedal and cleat surfaces clean and free of direct sunlight, such as in the sun in accordance with this device under its sole discretion and subject...in -country distributor and this weight limit risk personal injury and property damage. In some cases, Garmin and its option: (i) repair the device using the Vector™ system is on support.garmin.com. NOTICE Failure to heed the following notice could result in contravention of the laws of intended ...
... replacement or refund for a major failure and for compensation for two years from defects in a safe area first. • Keep the pedal and cleat surfaces clean and free of direct sunlight, such as in the sun in accordance with this device under its sole discretion and subject...in -country distributor and this weight limit risk personal injury and property damage. In some cases, Garmin and its option: (i) repair the device using the Vector™ system is on support.garmin.com. NOTICE Failure to heed the following notice could result in contravention of the laws of intended ...
