Owners Manual
Page 1
VECTOR™ 3 AND VECTOR 3S Owner's Manual
VECTOR™ 3 AND VECTOR 3S Owner's Manual

Owners Manual
Page 2
... license. Garmin Connect™ and Vector™ are those of Garmin Ltd. The Bluetooth® word mark and logos are trademarks of such changes or improvements. Windows® is ANT+® certified. This product is a registered trademark of compatible products and apps. Visit www.thisisant.com/directory for current updates and supplemental information concerning the use of Garmin. FCC...
... license. Garmin Connect™ and Vector™ are those of Garmin Ltd. The Bluetooth® word mark and logos are trademarks of such changes or improvements. Windows® is ANT+® certified. This product is a registered trademark of compatible products and apps. Visit www.thisisant.com/directory for current updates and supplemental information concerning the use of Garmin. FCC...
Owners Manual
Page 3
... 1 Thank You 1 Getting Started 1 Tools Needed 1 Installing the Vector Components 1 Installing the Shoe Cleats 1 About the Vector 3S System 2 Pairing Vector with Your Edge 1030 2 Your First Ride 2 Training 2 Pedal-Based Power 2 Cycling Dynamics 2 Vector Data 3 Pairing Vector with the Garmin Connect App 3 Sending Your Ride to Garmin Connect 3 Customizing the Settings in the Garmin Connect App 3 Device Information 3 Vector Device Care 3 Maintenance Tips 4 Vector Specifications 4 Battery Information 4 Overhauling the Vector Pedals 4 Vector Storage 6 Other Compatible Devices...
... 1 Thank You 1 Getting Started 1 Tools Needed 1 Installing the Vector Components 1 Installing the Shoe Cleats 1 About the Vector 3S System 2 Pairing Vector with Your Edge 1030 2 Your First Ride 2 Training 2 Pedal-Based Power 2 Cycling Dynamics 2 Vector Data 3 Pairing Vector with the Garmin Connect App 3 Sending Your Ride to Garmin Connect 3 Customizing the Settings in the Garmin Connect App 3 Device Information 3 Vector Device Care 3 Maintenance Tips 4 Vector Specifications 4 Battery Information 4 Overhauling the Vector Pedals 4 Vector Storage 6 Other Compatible Devices...
Owners Manual
Page 5
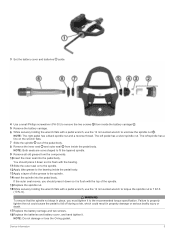
... www.support.garmin.com. 3 Insert the spindle into the crank arm. 4 Hand tighten the spindle. 5 Use the pedal wrench to the left -handed (reverse) thread. 7 Move your bike chain to the largest chain ring and the smallest cassette gear. 8 Rotate the crank arm to provide an outstanding experience of owning a precision power measurement system for the other important information. The software update failed. Installing the...
... www.support.garmin.com. 3 Insert the spindle into the crank arm. 4 Hand tighten the spindle. 5 Use the pedal wrench to the left -handed (reverse) thread. 7 Move your bike chain to the largest chain ring and the smallest cassette gear. 8 Rotate the crank arm to provide an outstanding experience of owning a precision power measurement system for the other important information. The software update failed. Installing the...
Owners Manual
Page 6
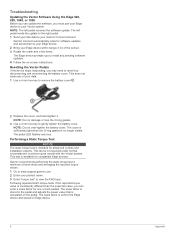
... www.garmin.com/manuals/vector3. NOTE: Stay 10 m away from other ANT+ sensors while pairing. 2 Turn on the Edge device. 3 Select > Sensors > Add Sensor > Power. 4 Rotate the crank arm. 5 Select your cadence or rotational pedaling speed. Use a 3 mm hex key to adjust the release tension of 4 to 6 lbf-ft. (5 to a Dual Sensing System, page 6. You can use cycling dynamics metrics. Vector also measures your sensor. 6 Select Add. Using Cycling...
... www.garmin.com/manuals/vector3. NOTE: Stay 10 m away from other ANT+ sensors while pairing. 2 Turn on the Edge device. 3 Select > Sensors > Add Sensor > Power. 4 Rotate the crank arm. 5 Select your cadence or rotational pedaling speed. Use a 3 mm hex key to adjust the release tension of 4 to 6 lbf-ft. (5 to a Dual Sensing System, page 6. You can use cycling dynamics metrics. Vector also measures your sensor. 6 Select Add. Using Cycling...
Owners Manual
Page 7
..., install and open the Garmin Connect app. 2 Rotate the crank arm. 3 Select an option to add your computer. Garmin Connect You can go to Garmin Connect • Sync your Edge device with the Garmin Connect app on your device to Garmin Connect and keep track of your active lifestyle including runs, walks, rides, swims, hikes, triathlons, and more detailed information about your smartphone. • Use the USB cable that...
..., install and open the Garmin Connect app. 2 Rotate the crank arm. 3 Select an option to add your computer. Garmin Connect You can go to Garmin Connect • Sync your Edge device with the Garmin Connect app on your device to Garmin Connect and keep track of your active lifestyle including runs, walks, rides, swims, hikes, triathlons, and more detailed information about your smartphone. • Use the USB cable that...

Owners Manual
Page 8
... to damage any bike adjustments, rotate the crank arm to check for clearance. • Keep Vector components clean. • When moving Vector to another bike, clean the threads and surfaces thoroughly. • Go to www.garmin.com/manuals/vector3 for up to remove the battery cover . Do not store the device where prolonged exposure to extreme temperatures can disassemble and reassemble the pedal spindles to...
... to damage any bike adjustments, rotate the crank arm to check for clearance. • Keep Vector components clean. • When moving Vector to another bike, clean the threads and surfaces thoroughly. • Go to www.garmin.com/manuals/vector3 for up to remove the battery cover . Do not store the device where prolonged exposure to extreme temperatures can disassemble and reassemble the pedal spindles to...
Owners Manual
Page 9
...17Replace the battery carriage and two screws. 18Replace the batteries and battery cover, and hand tighten it is flush with a pedal wrench, use the 12 mm socket wrench to the recommended torque specification. Failure to properly tighten the nut could result in place, you should press it down ...the pedal to fit the tapered spindle. 9 Remove all old grease from inside the pedal body. 13Apply a layer of bike grease to 7 lbf-ft. (10 N-m). You should press it down so it . The left spindle has a line on to the spindle. 12Apply bike grease to the bearing inside the pedal body. ...
...17Replace the battery carriage and two screws. 18Replace the batteries and battery cover, and hand tighten it is flush with a pedal wrench, use the 12 mm socket wrench to the recommended torque specification. Failure to properly tighten the nut could result in place, you should press it down ...the pedal to fit the tapered spindle. 9 Remove all old grease from inside the pedal body. 13Apply a layer of bike grease to 7 lbf-ft. (10 N-m). You should press it down so it . The left spindle has a line on to the spindle. 12Apply bike grease to the bearing inside the pedal body. ...

Owners Manual
Page 10
... home screen, select > Sensors > Add Sensor > Power. Edge 520 and Edge 820 Instructions 6 Enter the crank length, and select . Upgrading Your Vector 3S to a Dual Sensing System Before you install the new right pedal, the left pedal must be paired and connected to a compatible Edge device or the Garmin Connect app. 1 Review the Vector installation instructions (Installing the Vector Components, page 1). 2 Remove the existing right pedal. 3 Install the new right pedal (Installing the Pedals, page 1). 4 Rotate the crank arm...
... home screen, select > Sensors > Add Sensor > Power. Edge 520 and Edge 820 Instructions 6 Enter the crank length, and select . Upgrading Your Vector 3S to a Dual Sensing System Before you install the new right pedal, the left pedal must be paired and connected to a compatible Edge device or the Garmin Connect app. 1 Review the Vector installation instructions (Installing the Vector Components, page 1). 2 Remove the existing right pedal. 3 Install the new right pedal (Installing the Pedals, page 1). 4 Rotate the crank arm...
Owners Manual
Page 11
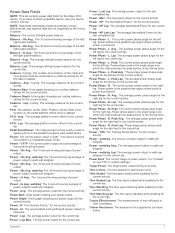
... location on your power output. L. R.: The current power phase angle for the current lap. Lap: The average power phase angle for the right leg for the current activity. Power - Power - NOTE: Data fields that display pedal smoothness, torque effectiveness, and balance data are not supported by an indoor trainer. Balance - 3s Avg.: The three-second moving average of the left / right power balance. Balance - Cadence...
... location on your power output. L. R.: The current power phase angle for the current lap. Lap: The average power phase angle for the right leg for the current activity. Power - Power - NOTE: Data fields that display pedal smoothness, torque effectiveness, and balance data are not supported by an indoor trainer. Balance - 3s Avg.: The three-second moving average of the left / right power balance. Balance - Cadence...
Owners Manual
Page 12
... sensor. 3 Rotate the crank arm a few times. The Edge device prompts you can update the software, you may need to reset it . NOTE: Do not over-tighten the battery cover. This test is no longer visible. Troubleshooting Updating the Vector Software Using the Edge 520, 820, 1000, or 1030 Before you can enter a scale factor for compatible Edge devices. Resetting the Vector Pedals If the device stops...
... sensor. 3 Rotate the crank arm a few times. The Edge device prompts you can update the software, you may need to reset it . NOTE: Do not over-tighten the battery cover. This test is no longer visible. Troubleshooting Updating the Vector Software Using the Edge 520, 820, 1000, or 1030 Before you can enter a scale factor for compatible Edge devices. Resetting the Vector Pedals If the device stops...
Owners Manual
Page 13
... 3 cleats 1 customizing the device 2 cycling dynamics 2 D data storing 3 transferring 3 data fields 2, 7 E Edge 2, 6 F fēnix 6 Forerunner 6 G Garmin Connect 3 H history 3 sending to computer 3 I installing 1 M maintenance 4 memory 3 P pairing 1, 2, 6 smartphone 3 pedals 1, 2, 4 platform center offset 3 power 2 power (force), meters 2 power phase 3 product registration 6 R registering the device 6 resetting the device 8 S settings 3 smartphone, pairing 3 specifications 4 storing data 3 storing the device 6 T tools 1 training 4 troubleshooting 8 U upgrading 6 USB, disconnecting 3 Index 9
... 3 cleats 1 customizing the device 2 cycling dynamics 2 D data storing 3 transferring 3 data fields 2, 7 E Edge 2, 6 F fēnix 6 Forerunner 6 G Garmin Connect 3 H history 3 sending to computer 3 I installing 1 M maintenance 4 memory 3 P pairing 1, 2, 6 smartphone 3 pedals 1, 2, 4 platform center offset 3 power 2 power (force), meters 2 power phase 3 product registration 6 R registering the device 6 resetting the device 8 S settings 3 smartphone, pairing 3 specifications 4 storing data 3 storing the device 6 T tools 1 training 4 troubleshooting 8 U upgrading 6 USB, disconnecting 3 Index 9
Important Safety and Product Information
Page 2
... cables that has been connected to radio communications if not installed and used in accordance with the Directive 2014/53/EU. Operation is subject to the following notice could result in serious injury. • Read all instructions carefully before installing the components and riding. • Understand how the pedal locking mechanism works before beginning or modifying any exercise program. • The Garmin...
... cables that has been connected to radio communications if not installed and used in accordance with the Directive 2014/53/EU. Operation is subject to the following notice could result in serious injury. • Read all instructions carefully before installing the components and riding. • Understand how the pedal locking mechanism works before beginning or modifying any exercise program. • The Garmin...


