
Owners Manual
Page 3
... Shoe Cleats 1 About the Vector 3S System 2 Pairing Vector with Your Edge 1030 2 Your First Ride 2 Training 2 Pedal-Based Power 2 Cycling Dynamics 2 Vector Data 3 Pairing Vector with the Garmin Connect App 3 Sending Your Ride to Garmin Connect 3 Customizing the Settings in the Garmin Connect App 3 Device Information 3 Vector Device Care 3 Maintenance Tips 4 Vector Specifications 4 Battery Information 4 Overhauling the Vector Pedals 4 Vector Storage 6 Other Compatible Devices...
... Shoe Cleats 1 About the Vector 3S System 2 Pairing Vector with Your Edge 1030 2 Your First Ride 2 Training 2 Pedal-Based Power 2 Cycling Dynamics 2 Vector Data 3 Pairing Vector with the Garmin Connect App 3 Sending Your Ride to Garmin Connect 3 Customizing the Settings in the Garmin Connect App 3 Device Information 3 Vector Device Care 3 Maintenance Tips 4 Vector Specifications 4 Battery Information 4 Overhauling the Vector Pedals 4 Vector Storage 6 Other Compatible Devices...
Owners Manual
Page 7
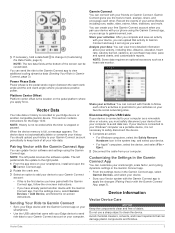
.... Customizing the Settings in the system tray, and select your device, you can send the ride to the Garmin Connect app to view additional cycling dynamics data (Sending Your Ride to Garmin Connect, page 3). 3 If necessary, hold a data field to change it as long as a heart rate monitor. Vector Data 3 The left pedal receives the...
.... Customizing the Settings in the system tray, and select your device, you can send the ride to the Garmin Connect app to view additional cycling dynamics data (Sending Your Ride to Garmin Connect, page 3). 3 If necessary, hold a data field to change it as long as a heart rate monitor. Vector Data 3 The left pedal receives the...
Owners Manual
Page 9
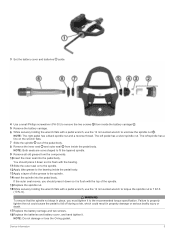
... socket wrench to torque the spindle nut to 7 lbf-ft. (10 N-m). NOTE: Do not damage or lose the O-ring gasket. The left pedal has a silver spindle nut. You should press it down so it to the recommended torque specification. WARNING To ensure that the spindle nut stays in... which could result in place, you should press it down so it . Device Information 5 3 Set the battery cover and batteries aside. 4 Use a small Phillips screwdriver (PH 00) to remove the two screws from inside the pedal body. The left spindle has a line on to the spindle. 12Apply bike grease to the...
... socket wrench to torque the spindle nut to 7 lbf-ft. (10 N-m). NOTE: Do not damage or lose the O-ring gasket. The left pedal has a silver spindle nut. You should press it down so it to the recommended torque specification. WARNING To ensure that the spindle nut stays in... which could result in place, you should press it down so it . Device Information 5 3 Set the battery cover and batteries aside. 4 Use a small Phillips screwdriver (PH 00) to remove the two screws from inside the pedal body. The left spindle has a line on to the spindle. 12Apply bike grease to the...

Owners Manual
Page 10
...Vector with your sensor. Upgrading Your Vector 3S to a Dual Sensing System Before you install the new right pedal, the left pedal must be paired and connected to a compatible Edge device or the Garmin Connect app. 1 Review the Vector installation instructions (Installing the Vector Components, page 1). 2 Remove the existing right pedal. 3 Install the new right pedal (Installing the Pedals... the sensor ID found on the pedal. • From the Garmin Connect app device settings, enable the Right Pedal, and enter the sensor ID found on the crank arm. 1 Rotate the pedals a few times in order to...
...Vector with your sensor. Upgrading Your Vector 3S to a Dual Sensing System Before you install the new right pedal, the left pedal must be paired and connected to a compatible Edge device or the Garmin Connect app. 1 Review the Vector installation instructions (Installing the Vector Components, page 1). 2 Remove the existing right pedal. 3 Install the new right pedal (Installing the Pedals... the sensor ID found on the pedal. • From the Garmin Connect app device settings, enable the Right Pedal, and enter the sensor ID found on the crank arm. 1 Rotate the pedals a few times in order to...
Owners Manual
Page 11
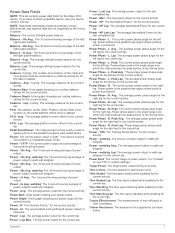
... measurement of power output in each pedal stroke. Balance - Balance - Cadence Graph: A line graph showing your FTP or custom settings. Your device must be connected to 7) based on the pedal platform where force is pedaling. Power - 10s Avg. Power ... last completed lap. Time Standing Lap: The time spent standing while pedaling for the current lap. Power Phase - Power Phase - Power Phase - Power - 3s Avg. If you have another compatible device, see your power output.... Phase - Trainer Resistance: The resistance force applied by the Vector S system.
... measurement of power output in each pedal stroke. Balance - Balance - Cadence Graph: A line graph showing your FTP or custom settings. Your device must be connected to 7) based on the pedal platform where force is pedaling. Power - 10s Avg. Power ... last completed lap. Time Standing Lap: The time spent standing while pedaling for the current lap. Power Phase - Power Phase - Power Phase - Power - 3s Avg. If you have another compatible device, see your power output.... Phase - Trainer Resistance: The resistance force applied by the Vector S system.
Owners Manual
Page 13
... 2 cycling dynamics 2 D data storing 3 transferring 3 data fields 2, 7 E Edge 2, 6 F fēnix 6 Forerunner 6 G Garmin Connect 3 H history 3 sending to computer 3 I installing 1 M maintenance 4 memory 3 P pairing 1, 2, 6 smartphone 3 pedals 1, 2, 4 platform center offset 3 power 2 power (force), meters 2 power phase 3 product registration 6 R registering the device 6 resetting the device 8 S settings 3 smartphone, pairing 3 specifications 4 storing data 3 storing the device 6 T tools 1 training 4 troubleshooting 8 U upgrading...
... 2 cycling dynamics 2 D data storing 3 transferring 3 data fields 2, 7 E Edge 2, 6 F fēnix 6 Forerunner 6 G Garmin Connect 3 H history 3 sending to computer 3 I installing 1 M maintenance 4 memory 3 P pairing 1, 2, 6 smartphone 3 pedals 1, 2, 4 platform center offset 3 power 2 power (force), meters 2 power phase 3 product registration 6 R registering the device 6 resetting the device 8 S settings 3 smartphone, pairing 3 specifications 4 storing data 3 storing the device 6 T tools 1 training 4 troubleshooting 8 U upgrading...
