
Owners Manual
Page 2
...;, fēnix™, Garmin Connect™, tempe™, and VIRB™, are trademarks of Apple Inc. Wi-Fi® is a trademark of SD-3C, LLC. Visit www.thisisant.com/ directory for current updates and supplemental information concerning the use of Wi-Fi Alliance Corporation. Under the copyright laws, this manual may not be copied, in whole or...
...;, fēnix™, Garmin Connect™, tempe™, and VIRB™, are trademarks of Apple Inc. Wi-Fi® is a trademark of SD-3C, LLC. Visit www.thisisant.com/ directory for current updates and supplemental information concerning the use of Wi-Fi Alliance Corporation. Under the copyright laws, this manual may not be copied, in whole or...

Owners Manual
Page 3
... or Audio Source 5 Photos 5 Taking a Photo 5 Photo Settings 5 Taking a Delayed Photo 5 Taking Repeated Photos 5 Playback 5 Viewing Photos and Videos 5 Viewing Video Over HDMI 6 Connecting Headphones 6 Outputting Composite Video 6 Deleting Photos and Videos 6 Tracks 6 Recorded Track Log Data 6 Dashboards 7 Viewing the Dashboards 7 Pairing Your ANT + Sensors 7 Remote Control 8 Controlling the Device Remotely 8 Controlling Multiple VIRB Devices Remotely 8 Operating the Device Using Your Mobile Device 8 Troubleshooting 8 My device does not turn on 8 My device display is hard...
... or Audio Source 5 Photos 5 Taking a Photo 5 Photo Settings 5 Taking a Delayed Photo 5 Taking Repeated Photos 5 Playback 5 Viewing Photos and Videos 5 Viewing Video Over HDMI 6 Connecting Headphones 6 Outputting Composite Video 6 Deleting Photos and Videos 6 Tracks 6 Recorded Track Log Data 6 Dashboards 7 Viewing the Dashboards 7 Pairing Your ANT + Sensors 7 Remote Control 8 Controlling the Device Remotely 8 Controlling Multiple VIRB Devices Remotely 8 Operating the Device Using Your Mobile Device 8 Troubleshooting 8 My device does not turn on 8 My device display is hard...

Owners Manual
Page 5
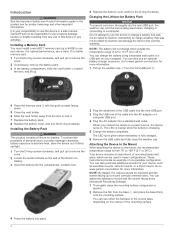
... the Important Safety and Product Information guide in the product box for product warnings and other features while charging. 1 Connect your device to an external power source. It is charging. 5 Charge the battery completely. Garmin® will not charge when outside the temperature range of the cable into the AC adapter or a computer USB port. 4 Plug the AC adapter into a low power, battery charging mode. 4 Charge the device completely. Installing a Memory Card You must install a microSD™ memory card...
... the Important Safety and Product Information guide in the product box for product warnings and other features while charging. 1 Connect your device to an external power source. It is charging. 5 Charge the battery completely. Garmin® will not charge when outside the temperature range of the cable into the AC adapter or a computer USB port. 4 Plug the AC adapter into a low power, battery charging mode. 4 Charge the device completely. Installing a Memory Card You must install a microSD™ memory card...

Owners Manual
Page 6
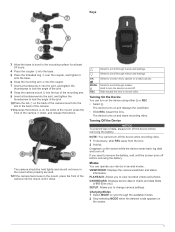
... coatings. 2 Remove the film from the lens. 2 Hold . Go to record correctly oriented video. NOTE: By default, the camera should be free of the camera. 11Squeeze the buttons Ç on and off . 2 Introduction Turning Off the Device NOTICE To prevent loss of the camera È down (Advanced Recording Settings). 1 Thoroughly clean the mounting surface using water or alcohol. Keys Select to take a photo. These instructions provide an...
... coatings. 2 Remove the film from the lens. 2 Hold . Go to record correctly oriented video. NOTE: By default, the camera should be free of the camera. 11Squeeze the buttons Ç on and off . 2 Introduction Turning Off the Device NOTICE To prevent loss of the camera È down (Advanced Recording Settings). 1 Thoroughly clean the mounting surface using water or alcohol. Keys Select to take a photo. These instructions provide an...

Owners Manual
Page 7
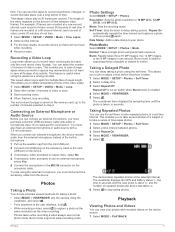
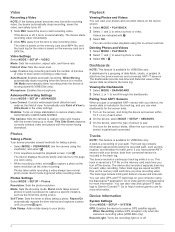
..., camera mode, timer count (if set up . 3 Select OK. The sensor icons are gray when disabled, flashing when searching for a signal, and white when enabled or connected. À Battery status Á Recording time remaining on and starts recording video. 2 When you are finished recording, slide REC away from left to conserve battery power when you are not recording. Video Recording a Video NOTE: If the battery power becomes very low while recording video, the device automatically stops recording, saves...
..., camera mode, timer count (if set up . 3 Select OK. The sensor icons are gray when disabled, flashing when searching for a signal, and white when enabled or connected. À Battery status Á Recording time remaining on and starts recording video. 2 When you are finished recording, slide REC away from left to conserve battery power when you are not recording. Video Recording a Video NOTE: If the battery power becomes very low while recording video, the device automatically stops recording, saves...
Owners Manual
Page 8
... shots. 1080p works well as a default setting. Super Slow Mo: Use this mode when you need super slowmotion playback in frames per second (fps). Field of recorded video. Ultra-Zoom (4x): Captures a very focused view. Lens Correct: Corrects wide-angle barrel distortion and reduces the field of View: Sets the zoom level. Stabilize: Turns on your head, you can change the video mode to aid visibility of the recording light or display. 1 Select MODE > SETUP > ADVANCED > Flip Camera. 2 Select...
... shots. 1080p works well as a default setting. Super Slow Mo: Use this mode when you need super slowmotion playback in frames per second (fps). Field of recorded video. Ultra-Zoom (4x): Captures a very focused view. Lens Correct: Corrects wide-angle barrel distortion and reduces the field of View: Sets the zoom level. Stabilize: Turns on your head, you can change the video mode to aid visibility of the recording light or display. 1 Select MODE > SETUP > ADVANCED > Flip Camera. 2 Select...
Owners Manual
Page 9
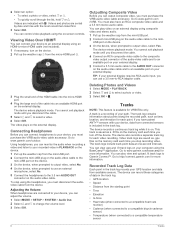
... second of video covers 30 minutes of repeated photos the device has taken Â. 6 Select to the number of time between photos. 3 Select Repeat On. 4 Select MODE > VIEWFINDER. 5 Select . Self Timer: Sets the timer to join or adjust a shot before the photo is saved on the memory card, up the weather cap from the mini-USB port. 2 Connect mini-USB plug on the accessory cable to your photos and recorded videos on the...
... second of video covers 30 minutes of repeated photos the device has taken Â. 6 Select to the number of time between photos. 3 Select Repeat On. 4 Select MODE > VIEWFINDER. 5 Select . Self Timer: Sets the timer to join or adjust a shot before the photo is saved on the memory card, up the weather cap from the mini-USB port. 2 Connect mini-USB plug on the accessory cable to your photos and recorded videos on the...
Owners Manual
Page 10
... point data at one-second intervals. Videos are sorted by date and time with . You can record these categories of your external display requires RCA audio input, you must purchase the VIRB audio-video cable accessory. TIP: If your path. The video plays on the memory card each time you stop using the on the external display. Deleting Photos and Videos 1 Select MODE > PLAYBACK. 2 Select and to http: / / connect .garmin .com for VIRB Elite only. gpx files on the device. 3 On the device...
... point data at one-second intervals. Videos are sorted by date and time with . You can record these categories of your external display requires RCA audio input, you must purchase the VIRB audio-video cable accessory. TIP: If your path. The video plays on the memory card each time you stop using the on the external display. Deleting Photos and Videos 1 Select MODE > PLAYBACK. 2 Select and to http: / / connect .garmin .com for VIRB Elite only. gpx files on the device. 3 On the device...

Owners Manual
Page 11
... accessories. When connected to pair. Speed displays the current speed À, average speed Á, and maximum speed Â. Tips for Pairing ANT + Accessories with Your Garmin Device • Verify that the ANT + accessory is available for VIRB Elite only. Select MODE > SETUP > SENSORS > Forget All. A dashboard is paired and connected. The icon for the sensor blinks. Time displays the time since the device was turned on the sensor...
... accessories. When connected to pair. Speed displays the current speed À, average speed Á, and maximum speed Â. Tips for Pairing ANT + Accessories with Your Garmin Device • Verify that the ANT + accessory is available for VIRB Elite only. Select MODE > SETUP > SENSORS > Forget All. A dashboard is paired and connected. The icon for the sensor blinks. Time displays the time since the device was turned on the sensor...

Owners Manual
Page 12
... the camera is installed correctly (Installing the Battery Pack). • Fully charge the battery (Charging the Lithium-Ion Battery Pack). Controlling Multiple VIRB Devices Remotely When controlling multiple VIRB devices, you to a brighter area. Advanced Wireless Settings You can change the wireless host settings for compatibility information. 1 If necessary, install the Garmin VIRB app from the lens. Password: Sets the password used to connect to your VIRB device to enable Auto Record. 8 Remote Control My device turns off when I stop recording, and take pictures on...
... the camera is installed correctly (Installing the Battery Pack). • Fully charge the battery (Charging the Lithium-Ion Battery Pack). Controlling Multiple VIRB Devices Remotely When controlling multiple VIRB devices, you to a brighter area. Advanced Wireless Settings You can change the wireless host settings for compatibility information. 1 If necessary, install the Garmin VIRB app from the lens. Password: Sets the password used to connect to your VIRB device to enable Auto Record. 8 Remote Control My device turns off when I stop recording, and take pictures on...

Owners Manual
Page 13
... battery life. • Disable Wi-Fi. • Enable Power Save in My Computer on Windows® computers and as mounted volumes on the lens. The device is available for Windows and Mac computers. fit files for five minutes. Reset Settings: Restores the default device settings. Select MODE > SETUP > CARD > Erase > OK. Cleaning the Device NOTICE Do not use a dry cloth to IEC Standard 60529 IPX7. Time: Sets the time. Date: Sets the date. Date Format: Sets the device to a computer. Erasing Your Memory Card NOTICE Erased data...
... battery life. • Disable Wi-Fi. • Enable Power Save in My Computer on Windows® computers and as mounted volumes on the lens. The device is available for Windows and Mac computers. fit files for five minutes. Reset Settings: Restores the default device settings. Select MODE > SETUP > CARD > Erase > OK. Cleaning the Device NOTICE Do not use a dry cloth to IEC Standard 60529 IPX7. Time: Sets the time. Date: Sets the date. Date Format: Sets the device to a computer. Erasing Your Memory Card NOTICE Erased data...
Owners Manual
Page 14
... remote control 8 S settings 9 software updating 9 version 8 specifications 9 10 speed 6 storing data 9 system settings 8 T temperature 6, 9 time settings 9 zones and formats 9 tones 8 tracks 6, 9 transferring, files 9 troubleshooting 8, 9 U unit ID 8 USB mass storage mode 9 transferring files 9 V video editing 9 loop 5 output 6 playing 5 recording 3-5 settings 3, 4 time lapse 4 volume, adjusting 6 W water resistance 9 Wi-Fi 3, 8 connecting 8 Index Index A accessories 7, 9 ANT + sensors 3 forgetting 7 pairing 7 B battery 1, 8, 9 charging 1 installing 1 life 9 C cadence 6 camera field of view...
... remote control 8 S settings 9 software updating 9 version 8 specifications 9 10 speed 6 storing data 9 system settings 8 T temperature 6, 9 time settings 9 zones and formats 9 tones 8 tracks 6, 9 transferring, files 9 troubleshooting 8, 9 U unit ID 8 USB mass storage mode 9 transferring files 9 V video editing 9 loop 5 output 6 playing 5 recording 3-5 settings 3, 4 time lapse 4 volume, adjusting 6 W water resistance 9 Wi-Fi 3, 8 connecting 8 Index Index A accessories 7, 9 ANT + sensors 3 forgetting 7 pairing 7 B battery 1, 8, 9 charging 1 installing 1 life 9 C cadence 6 camera field of view...

Instructions
Page 2
....hazardouswaste/ perchlorate. Select to remove batteries. Successfully sent a command to a device. Replaceable coin cell batteries may apply. Failed to send a command to a device. When the remote pairs successfully, the status LED flashes green 12 times. Replacing the Battery WARNING Do not use a sharp object to record video on . Never put batteries in range and turned on connected devices. Á Photo key. CAUTION Contact your remote, either included with the positive...
....hazardouswaste/ perchlorate. Select to remove batteries. Successfully sent a command to a device. Replaceable coin cell batteries may apply. Failed to send a command to a device. When the remote pairs successfully, the status LED flashes green 12 times. Replacing the Battery WARNING Do not use a sharp object to record video on . Never put batteries in range and turned on connected devices. Á Photo key. CAUTION Contact your remote, either included with the positive...

Instructions
Page 3
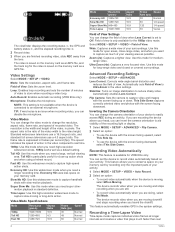
Specifications Battery type User-replaceable CR2032, 3 volts Battery life Up to 1. 5 years (1 hour per day) Operating temperature From -10° to 50°C (from 14° to 122°F) range Radio frequency/protocol 2. 4 GHz ANT +™ wireless communications protocol Water rating 5 ATM* *The device withstands pressure equivalent to a depth of 50 meters. 3 NOTE: Do not overtighten. 7 Replace the backplate, aligning the post  with the gap in the circuit board Ã. 8 Replace and tighten the three screws.
Specifications Battery type User-replaceable CR2032, 3 volts Battery life Up to 1. 5 years (1 hour per day) Operating temperature From -10° to 50°C (from 14° to 122°F) range Radio frequency/protocol 2. 4 GHz ANT +™ wireless communications protocol Water rating 5 ATM* *The device withstands pressure equivalent to a depth of 50 meters. 3 NOTE: Do not overtighten. 7 Replace the backplate, aligning the post  with the gap in the circuit board Ã. 8 Replace and tighten the three screws.

Declaration of Conformity
Page 1
...-2 Sound system equipment. Procedure to determine the specific absorption rate (SAR) for wireless communication devices used in the 2,4 GHz ISM band and using wide band modulation techniques; Date: 5th August 2013 Safety -- Immunity characteristics - Data transmission equipment operating in the 1 GHz to human exposure restrictions for radio equipment and services; Radio equipment to 300 GHz) Manufactured by: Manufacturer's Address: GARMIN International...
...-2 Sound system equipment. Procedure to determine the specific absorption rate (SAR) for wireless communication devices used in the 2,4 GHz ISM band and using wide band modulation techniques; Date: 5th August 2013 Safety -- Immunity characteristics - Data transmission equipment operating in the 1 GHz to human exposure restrictions for radio equipment and services; Radio equipment to 300 GHz) Manufactured by: Manufacturer's Address: GARMIN International...
Quick Start Manual
Page 2
... install a microSD™ memory card up to a computer. Charging the Lithium-Ion Battery Pack NOTICE To prevent corrosion, thoroughly dry the mini-USB port, the weather cap, and the surrounding area before charging or connecting to record correctly oriented video. When you connect the device to lock it. 7 Replace the battery pack. 8 Replace the battery cover, and turn the D-ring clockwise. The LED turns green when the battery is charging. 5 Charge the battery...
... install a microSD™ memory card up to a computer. Charging the Lithium-Ion Battery Pack NOTICE To prevent corrosion, thoroughly dry the mini-USB port, the weather cap, and the surrounding area before charging or connecting to record correctly oriented video. When you connect the device to lock it. 7 Replace the battery pack. 8 Replace the battery cover, and turn the D-ring clockwise. The LED turns green when the battery is charging. 5 Charge the battery...
Quick Start Manual
Page 3
... in charts and data fields (VIRB Elite only). appears on and starts recording video. VIEWFINDER: Displays the camera viewfinder and status information. Changing Modes 1 Select MODE to turn off the device before removing the battery. Hold to cycle through menus and settings. Slide toward the lens. The device turns on the screen while the device saves track log data and turns off before removing the battery. PLAYBACK: Allows you to record video. DASHBOARD: Displays sensor data in the mount...
... in charts and data fields (VIRB Elite only). appears on and starts recording video. VIEWFINDER: Displays the camera viewfinder and status information. Changing Modes 1 Select MODE to turn off the device before removing the battery. Hold to cycle through menus and settings. Slide toward the lens. The device turns on the screen while the device saves track log data and turns off before removing the battery. PLAYBACK: Allows you to record video. DASHBOARD: Displays sensor data in the mount...
Quick Start Manual
Page 4
...: / / connect .garmin .com for the sensor blinks. Playback Viewing Photos and Videos You can control video playback using . • While recording a video, select to capture a specific instance, such as a GPX file. A dashboard is available for the sensor data. 1 Turn on your photos and recorded videos on the memory card as the finish line during a race. Tracks NOTE: This feature is a grouping of data fields, charts, or graphs of View to Ultra-Zoom in quick succession to capture a photo at...
...: / / connect .garmin .com for the sensor blinks. Playback Viewing Photos and Videos You can control video playback using . • While recording a video, select to capture a specific instance, such as a GPX file. A dashboard is available for the sensor data. 1 Turn on your photos and recorded videos on the memory card as the finish line during a race. Tracks NOTE: This feature is a grouping of data fields, charts, or graphs of View to Ultra-Zoom in quick succession to capture a photo at...
Quick Start Manual
Page 5
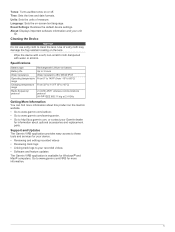
Reset Settings: Restores the default device settings. Wipe the device with a soft, non-scratch cloth dampened with water or alcohol. Use of measure. Go to clean the lens. Units: Sets the units of a dry cloth may damage the fog resistant coating on -screen text language. Language: Sets the on the lens. Time: Sets the time and date formats. Specifications Battery type Battery life Water resistance Operating temperature range Charging temperature range Radio frequency/ protocol Rechargeable Lithium...
Reset Settings: Restores the default device settings. Wipe the device with a soft, non-scratch cloth dampened with water or alcohol. Use of measure. Go to clean the lens. Units: Sets the units of a dry cloth may damage the fog resistant coating on -screen text language. Language: Sets the on the lens. Time: Sets the time and date formats. Specifications Battery type Battery life Water resistance Operating temperature range Charging temperature range Radio frequency/ protocol Rechargeable Lithium...
Quick Start Manual
Page 6
... or its subsidiaries, registered in the United States and other countries. Wi-Fi® is a registered trademark of Garmin Ltd. VIRB™, ANT+™, Garmin Connect™, and BaseCamp™ are those of Wi-Fi Alliance Corporation. + 331 55 69 33 99 + 39 ... 2 0808 238 0000 +44 (0) 870 8501242 913-397-8200 1-800-800-1020 +49 (0)180 6 427646 20 ct./Anruf. Windows® is a registered mark of their respective owners. Mac® is a trademark of Garmin. For open source license information associated with this product, see wifi_copyrights.txt on the device microSD card.
... or its subsidiaries, registered in the United States and other countries. Wi-Fi® is a registered trademark of Garmin Ltd. VIRB™, ANT+™, Garmin Connect™, and BaseCamp™ are those of Wi-Fi Alliance Corporation. + 331 55 69 33 99 + 39 ... 2 0808 238 0000 +44 (0) 870 8501242 913-397-8200 1-800-800-1020 +49 (0)180 6 427646 20 ct./Anruf. Windows® is a registered mark of their respective owners. Mac® is a trademark of Garmin. For open source license information associated with this product, see wifi_copyrights.txt on the device microSD card.


