
Owners Manual
Page 1
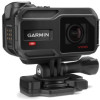
VIRB® X/XE Owner's Manual June 2015 Printed in Taiwan 190-01870-00_0B
VIRB® X/XE Owner's Manual June 2015 Printed in Taiwan 190-01870-00_0B

Owners Manual
Page 2
... compatible products and apps. Go to make changes in the U.S. Mac® is under license. Other trademarks and trade names are owned by Garmin is a trademark of Apple Inc., registered in the content of this manual without obligation to notify any use of this manual may not be copied, in whole or in part, without the express permission of Garmin...
... compatible products and apps. Go to make changes in the U.S. Mac® is under license. Other trademarks and trade names are owned by Garmin is a trademark of Apple Inc., registered in the content of this manual without obligation to notify any use of this manual may not be copied, in whole or in part, without the express permission of Garmin...
Owners Manual
Page 3
... Remotely 7 Controlling Multiple VIRB Devices Remotely 7 Device Information 8 System Settings 8 Inverting the Camera Orientation 8 Time and Date Settings 8 Erasing Your Memory Card 8 Device Care 8 Cleaning the Device 8 Connecting the Device to Your Computer 8 File Types 8 Specifications 8 Troubleshooting 9 My device does not turn on 9 My device display is hard to see 9 Some data is missing from G-Metrix 9 My video recordings do not look smooth 9 My device turns off when I stop recording video 9 Extending the Battery Life 9 Getting More Information 9 Appendix 9 Software...
... Remotely 7 Controlling Multiple VIRB Devices Remotely 7 Device Information 8 System Settings 8 Inverting the Camera Orientation 8 Time and Date Settings 8 Erasing Your Memory Card 8 Device Care 8 Cleaning the Device 8 Connecting the Device to Your Computer 8 File Types 8 Specifications 8 Troubleshooting 9 My device does not turn on 9 My device display is hard to see 9 Some data is missing from G-Metrix 9 My video recordings do not look smooth 9 My device turns off when I stop recording video 9 Extending the Battery Life 9 Getting More Information 9 Appendix 9 Software...
Owners Manual
Page 5
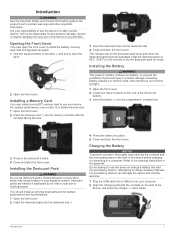
.... Do not attempt to use of the device before charging or connecting to a computer. Installing a Memory Card You must open the À latch. 3 Insert the desiccant tray into the memory card slot with the contacts on the side of this device in any use the device to charge a battery that was not provided by Garmin can damage the device and void the warranty. 1 Plug the USB cable into place. 5 Close...
.... Do not attempt to use of the device before charging or connecting to a computer. Installing a Memory Card You must open the À latch. 3 Insert the desiccant tray into the memory card slot with the contacts on the side of this device in any use the device to charge a battery that was not provided by Garmin can damage the device and void the warranty. 1 Plug the USB cable into place. 5 Close...
Owners Manual
Page 6
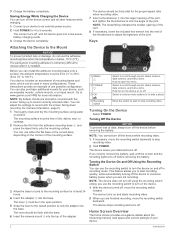
... the base to bond to the mounting surface for 4 to record with the base. 6 Insert the camera mount into a low power, battery charging mode. 3 Charge the device completely. NOTE: You cannot turn off the device screen and all other features while charging. 1 Connect your data and turns off the device while recording video. 1 If necessary, move the recording switch forward. The device saves your device to take a photo. The device turns on the device. 1 With the device turned off .
... the base to bond to the mounting surface for 4 to record with the base. 6 Insert the camera mount into a low power, battery charging mode. 3 Charge the device completely. NOTE: You cannot turn off the device screen and all other features while charging. 1 Connect your data and turns off the device while recording video. 1 If necessary, move the recording switch forward. The device saves your device to take a photo. The device turns on the device. 1 With the device turned off .

Owners Manual
Page 7
... screen displays the elapsed recording time , available À recording time , and video mode . Á Â 2 Move the recording switch backward to a USB cable. Interval: Sets the time interval for slow-motion playback. The aspect ratio is in pixels. Displays the sensor status and remaining battery capacity. Pro Settings: Enables advanced video and photo settings (Pro Settings, page 4). Standard widescreen televisions use a 16:9 aspect ratio, and standard full-screen televisions use a 4:3 aspect ratio. A flashing icon means the device is not connected to stop recording...
... screen displays the elapsed recording time , available À recording time , and video mode . Á Â 2 Move the recording switch backward to a USB cable. Interval: Sets the time interval for slow-motion playback. The aspect ratio is in pixels. Displays the sensor status and remaining battery capacity. Pro Settings: Enables advanced video and photo settings (Pro Settings, page 4). Standard widescreen televisions use a 16:9 aspect ratio, and standard full-screen televisions use a 4:3 aspect ratio. A flashing icon means the device is not connected to stop recording...
Owners Manual
Page 8
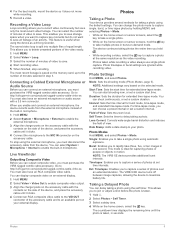
... manually adjust the white balance. Time-lapse videos play at a 60-second interval, each second of video covers 30 seconds of real time. 1 Hold MENU. 2 Select Video > Mode > Timelapse. 3 Select a time interval. 4 Video For example, if frames are available for darker video in low light environments or indoors. Exposure bias affects the level of sharpness. Use this helps eliminate stray frames with slightly brighter or darker images. Zoom: Captures a tighter view. EV Bias: Sets...
... manually adjust the white balance. Time-lapse videos play at a 60-second interval, each second of video covers 30 seconds of real time. 1 Hold MENU. 2 Select Video > Mode > Timelapse. 3 Select a time interval. 4 Video For example, if frames are available for darker video in low light environments or indoors. Exposure bias affects the level of sharpness. Use this helps eliminate stray frames with slightly brighter or darker images. Zoom: Captures a tighter view. EV Bias: Sets...
Owners Manual
Page 9
... time-lapse mode. Start Time: Sets the start time. The VIRB X/XE device turns off between image captures, allowing the device to http://virb.garmin.com/products/rugged-combo-cable-virbx-xe. The most recent video footage. You can choose a preset interval or set a custom duration. The saved video loop is saved on the selected mode. 4 For the best results, mount the device so it clicks. 4 Connect the microphone to the MIC IN connector on -demand mode. Recording a Video...
... time-lapse mode. Start Time: Sets the start time. The VIRB X/XE device turns off between image captures, allowing the device to http://virb.garmin.com/products/rugged-combo-cable-virbx-xe. The most recent video footage. You can choose a preset interval or set a custom duration. The saved video loop is saved on the selected mode. 4 For the best results, mount the device so it clicks. 4 Connect the microphone to the MIC IN connector on -demand mode. Recording a Video...
Owners Manual
Page 10
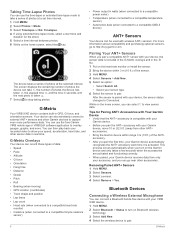
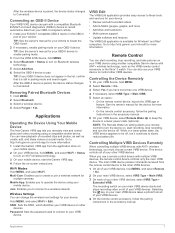
... sensor data in GPS, G-force, and orientation sensors. The screen displays the remaining number of photos the device can take a series of photos at the selected interval. You can then play back your recorded video to show your sensor type. 6 Select the sensor to http://buy.garmin.com. Bluetooth Devices Connecting a Wireless External Microphone You can connect a Bluetooth hands-free device with your VIRB X/XE device. 1 Hold MENU. 2 Select Bluetooth > Status to turn on...
... sensor data in GPS, G-force, and orientation sensors. The screen displays the remaining number of photos the device can take a series of photos at the selected interval. You can then play back your recorded video to show your sensor type. 6 Select the sensor to http://buy.garmin.com. Bluetooth Devices Connecting a Wireless External Microphone You can connect a Bluetooth hands-free device with your VIRB X/XE device. 1 Hold MENU. 2 Select Bluetooth > Status to turn on...
Owners Manual
Page 11
..., the device status changes to Connected. Wi‑Fi Modes Hold MENU, and select Wi-Fi. Join: Enables you remotely view and control photo and video recording using your OBD-II device. Password: Sets the password used to connect to your ELM327 compatible OBD-II device in a lower-power state, the VIRB device appears to slowly reduce battery life. See the owner's manual for the device for more • Add titles and transitions • Multi-camera support • Update software and...
..., the device status changes to Connected. Wi‑Fi Modes Hold MENU, and select Wi-Fi. Join: Enables you remotely view and control photo and video recording using your OBD-II device. Password: Sets the password used to connect to your ELM327 compatible OBD-II device in a lower-power state, the VIRB device appears to slowly reduce battery life. See the owner's manual for the device for more • Add titles and transitions • Multi-camera support • Update software and...
Owners Manual
Page 12
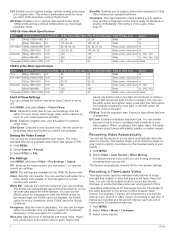
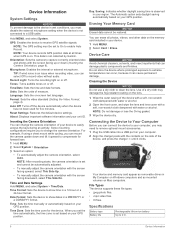
... measure. Specifications Battery type Battery life Rechargeable lithium-ion battery Up to record video without audio. GPS: Enables the device to enable Auto Record. NOTE: The GPS setting must disable the external microphone setting when the device is set and cannot be restored. Microphone: Enables the internal or external microphone. Time/Date: Sets the time and date formats. Cleaning the Device NOTICE Do not use a dry cloth to capture correctly oriented video and photos with the contacts on . Orientation: Sets the camera to clean the lens. Language: Sets the on...
... measure. Specifications Battery type Battery life Rechargeable lithium-ion battery Up to record video without audio. GPS: Enables the device to enable Auto Record. NOTE: The GPS setting must disable the external microphone setting when the device is set and cannot be restored. Microphone: Enables the internal or external microphone. Time/Date: Sets the time and date formats. Cleaning the Device NOTICE Do not use a dry cloth to capture correctly oriented video and photos with the contacts on . Orientation: Sets the camera to clean the lens. Language: Sets the on...

Owners Manual
Page 13
... Battery Life • Disable Wi‑Fi. • Enable Auto Off in the system settings (System Settings, page 8). • Turn the device on the Software. The device requires a Class 10 or better memory card to enable image stabilization. • If video recordings stutter or skip frames, install a Class 10 or better microSD memory card (Installing a Memory Card, page 1). Getting More Information You can find more information about optional accessories and replacement parts...
... Battery Life • Disable Wi‑Fi. • Enable Auto Off in the system settings (System Settings, page 8). • Turn the device on the Software. The device requires a Class 10 or better memory card to enable image stabilization. • If video recordings stutter or skip frames, install a Class 10 or better microSD memory card (Installing a Memory Card, page 1). Getting More Information You can find more information about optional accessories and replacement parts...
Owners Manual
Page 14
... and formats 8 tones 8 tracks 6, 7 transferring, files 8 troubleshooting 9 U unit ID 8 USB mass storage mode 8 transferring files 8 V video 6 editing 7 loop 5 output 5 recording 2-5 settings 2-4 time lapse 4 W water rating 8 Wi-Fi, connecting 7 Wi‑Fi 2, 3, 7 Index Index A accessories 6, 9 ANT+ sensors 2, 3, 6 forgetting 6 pairing 6 B battery 8 charging 1, 2 installing 1 life 9 Bluetooth technology 3, 6, 7 C cadence 6 camera field of view 4 orientation 8 self timer 5, 6 settings 2, 5 charging 1, 2 cleaning the device 8 computer, connecting 8 D data, transferring 8 deleting, all user data...
... and formats 8 tones 8 tracks 6, 7 transferring, files 8 troubleshooting 9 U unit ID 8 USB mass storage mode 8 transferring files 8 V video 6 editing 7 loop 5 output 5 recording 2-5 settings 2-4 time lapse 4 W water rating 8 Wi-Fi, connecting 7 Wi‑Fi 2, 3, 7 Index Index A accessories 6, 9 ANT+ sensors 2, 3, 6 forgetting 6 pairing 6 B battery 8 charging 1, 2 installing 1 life 9 Bluetooth technology 3, 6, 7 C cadence 6 camera field of view 4 orientation 8 self timer 5, 6 settings 2, 5 charging 1, 2 cleaning the device 8 computer, connecting 8 D data, transferring 8 deleting, all user data...
?Declaration of Conformity
Page 1
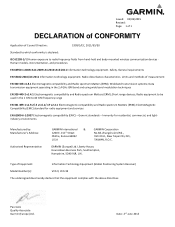
... Equipment (Global Positioning System Receiver) Model Number(s): Virb X, Virb XE The undersigned does hereby declare that the equipment complies with the above Directives Paul Lees Quality Associate Garmin (Europe) Ltd. ElectroMagnetic Compatibility (EMC) standard for residential, commercial, and lightindustry environments Manufactured by: Manufacturer's Address: Authorised Representative: GARMIN International & 1200 E. 151st Street Olathe, Kansas 66062 U.S.A GARMIN Corporation No.68, Zhangshu 2nd Rd...
... Equipment (Global Positioning System Receiver) Model Number(s): Virb X, Virb XE The undersigned does hereby declare that the equipment complies with the above Directives Paul Lees Quality Associate Garmin (Europe) Ltd. ElectroMagnetic Compatibility (EMC) standard for residential, commercial, and lightindustry environments Manufactured by: Manufacturer's Address: Authorised Representative: GARMIN International & 1200 E. 151st Street Olathe, Kansas 66062 U.S.A GARMIN Corporation No.68, Zhangshu 2nd Rd...

Owner s Manual Web
Page 1
...informace a informace o produktu 14 Važne informacije o sigurnosti i proizvodu 15 Pomembne informacije o varnosti in Taiwan 190-01870-97_0A en productinformatie 8 Vigtige produkt- Important Safety and Product Information 2 Informations importantes sur le produit et la sécurit 3 Informazioni importanti sulla sicurezza e sul prodotto 4 Wichtige Sicherheits- ja tuotetietoja...10 Viktig... 9 Tärkeitä turvallisuus- og produktinformasjon 11 Viktig säkerhets- or its subsidiaries Printed in izdelku 16 17 March 2015 © 2015 Garmin Ltd.
...informace a informace o produktu 14 Važne informacije o sigurnosti i proizvodu 15 Pomembne informacije o varnosti in Taiwan 190-01870-97_0A en productinformatie 8 Vigtige produkt- Important Safety and Product Information 2 Informations importantes sur le produit et la sécurit 3 Informazioni importanti sulla sicurezza e sul prodotto 4 Wichtige Sicherheits- ja tuotetietoja...10 Viktig... 9 Tärkeitä turvallisuus- og produktinformasjon 11 Viktig säkerhets- or its subsidiaries Printed in izdelku 16 17 March 2015 © 2015 Garmin Ltd.
Owner s Manual Web
Page 2
... service, an original or copy of the original sales receipt, which source code is no charge to a major failure. Garmin Australasia, 30 Clay Place, Eastern Creek, NSW, Australia, 2766. Category II radiocommunication devices comply with Industry Canada license-exempt RSS standard(s). Repairs should be installed and operated with correct replacement batteries. You acknowledge that uses an internal antenna to send and receive low levels...
... service, an original or copy of the original sales receipt, which source code is no charge to a major failure. Garmin Australasia, 30 Clay Place, Eastern Creek, NSW, Australia, 2766. Category II radiocommunication devices comply with Industry Canada license-exempt RSS standard(s). Repairs should be installed and operated with correct replacement batteries. You acknowledge that uses an internal antenna to send and receive low levels...


