Important Product and Saftey Information (Multilingual)
Page 4
...Garmin warranty service station. Category II radiocommunication devices comply with a new or newly-overhauled replacement product) the device or software...Garmin retains the exclusive right to repair or replace (with Industry Canada Standard RSS-310. Write the tracking number clearly on a different circuit from the GPS...LIABILITY ARISING • Reorient or relocate the receiving antenna. IN NO EVENT SHALL GARMIN BE LIABLE FOR ANY INCIDENTAL, SPECIAL, ...OTHERWISE. Within this product. However, measurement of map data in a Garmin makes no charge to the accuracy or particular...
...Garmin warranty service station. Category II radiocommunication devices comply with a new or newly-overhauled replacement product) the device or software...Garmin retains the exclusive right to repair or replace (with Industry Canada Standard RSS-310. Write the tracking number clearly on a different circuit from the GPS...LIABILITY ARISING • Reorient or relocate the receiving antenna. IN NO EVENT SHALL GARMIN BE LIABLE FOR ANY INCIDENTAL, SPECIAL, ...OTHERWISE. Within this product. However, measurement of map data in a Garmin makes no charge to the accuracy or particular...

Owner's Manual
Page 4
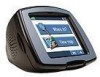
...22 Appendix 23 Mounting the c320 on Your Dashboard 23 Removing the Unit and the Mount 24 Caring for Your c320 .......... 25 Using an SD Card 27 Using the USB Drivers and Cable 27 Updating the c320 Software and Map Data 28 Resetting Your c320 28 Technical Specifi...cations ....... 29 Battery Information 29 Changing the Fuse 29 Charging the c320 29 Software License Agreement 30 Index 31 Garmin © 2005 ii c320...
...22 Appendix 23 Mounting the c320 on Your Dashboard 23 Removing the Unit and the Mount 24 Caring for Your c320 .......... 25 Using an SD Card 27 Using the USB Drivers and Cable 27 Updating the c320 Software and Map Data 28 Resetting Your c320 28 Technical Specifi...cations ....... 29 Battery Information 29 Changing the Fuse 29 Charging the c320 29 Software License Agreement 30 Index 31 Garmin © 2005 ii c320...

Owner's Manual
Page 21
... 2 dimensions (2-D) with North at the top. • 3 Dimensional-display the map in 2-D with your direction of detail shown on your map software. Restore-restore the original map settings. ➌ Garmin © 2005 17 c320 Owner's Manual This is the default map view. CUSTOMIZING THE C320 Changing Map Settings Map Detail-adjust the amount of travel at the top. • North...
... 2 dimensions (2-D) with North at the top. • 3 Dimensional-display the map in 2-D with your direction of detail shown on your map software. Restore-restore the original map settings. ➌ Garmin © 2005 17 c320 Owner's Manual This is the default map view. CUSTOMIZING THE C320 Changing Map Settings Map Detail-adjust the amount of travel at the top. • North...

Owner's Manual
Page 31
... it clicks. Use the Garmin USB cable provided to connect your c320 to install the USB drivers onto your computer. Before you can purchase additional MapSource map data from Garmin and download the maps to your computer. Follow ...maps. Garmin © 2005 27 c320 Owner's Manual These drivers must connect the USB cable to your SD card. Purchasing Additional MapSource Maps You can use the USB cable when updating your unit ID (see page 18) and serial number (see page i). Also use your c320, you need your map data, updating the c320 software, or loading additional maps...
... it clicks. Use the Garmin USB cable provided to connect your c320 to install the USB drivers onto your computer. Before you can purchase additional MapSource map data from Garmin and download the maps to your computer. Follow ...maps. Garmin © 2005 27 c320 Owner's Manual These drivers must connect the USB cable to your SD card. Purchasing Additional MapSource Maps You can use the USB cable when updating your unit ID (see page 18) and serial number (see page i). Also use your c320, you need your map data, updating the c320 software, or loading additional maps...
Owner's Manual
Page 32
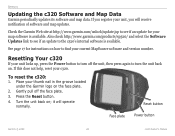
... your map software is available. Check the Garmin Web site at http://www.garmin.com/unlock/update.jsp to see if an update to turn the unit back on. it will receive notification of software and map updates. If you will operate normally. Turn the unit back on the face plate. 2. Resetting Your c320 If your...
... your map software is available. Check the Garmin Web site at http://www.garmin.com/unlock/update.jsp to see if an update to turn the unit back on. it will receive notification of software and map updates. If you will operate normally. Turn the unit back on the face plate. 2. Resetting Your c320 If your...

Owner's Manual
Page 35
...Map Page 5 C Calibrating the touch screen 25 Caring for your c320 25 Cleaning 25 Color Mode 20 Contact Garmin i Current Route Page 13 Customizing the c320 15 color mode 20 language 22 map... by name 3 intersection 4 item on the map 5 recent selection 10 saved item 7 Find a place near another place 6 Following your route 2 Fuse, changing 29 G Go Home 9 GPS issues maintaining a fix 26 mode 18 ... Agreement 30 M Map 5, 11 browse 5 customize 17 zoom 11 MapSource 27, 28 Map Info Button 17 Map software update 28 version 17 Map symbol 8 Map view 17 Metric units 18 Mounting the c320 23 My Locations ...
...Map Page 5 C Calibrating the touch screen 25 Caring for your c320 25 Cleaning 25 Color Mode 20 Contact Garmin i Current Route Page 13 Customizing the c320 15 color mode 20 language 22 map... by name 3 intersection 4 item on the map 5 recent selection 10 saved item 7 Find a place near another place 6 Following your route 2 Fuse, changing 29 G Go Home 9 GPS issues maintaining a fix 26 mode 18 ... Agreement 30 M Map 5, 11 browse 5 customize 17 zoom 11 MapSource 27, 28 Map Info Button 17 Map software update 28 version 17 Map symbol 8 Map view 17 Metric units 18 Mounting the c320 23 My Locations ...

Owner's Manual
Page 36
... 18, 26 Saved Places change the map symbol 8 change the name 8 delete 8 edit 8 Saving places you find 7 SD Card 27, 29 Serial Number i Software License Agreement 30 Software version 18 Spelling the name 3 to find a place 3 to narrow your results 3 Stopping navigation 14 Storing the c320 26 System Setup, customizing 18 T Theft... Information Page 12 Turn-by-turn directions 13 U Units 18 Unit ID 18 USB 27 Using responsibly 26 V Vehicle Type 21 Viewing Places on the Map 5 Viewing the Map 11 Voice Directions 13 Z Zoom 5, 11 Garmin © 2005 32 c320 Owner's Manual
... 18, 26 Saved Places change the map symbol 8 change the name 8 delete 8 edit 8 Saving places you find 7 SD Card 27, 29 Serial Number i Software License Agreement 30 Software version 18 Spelling the name 3 to find a place 3 to narrow your results 3 Stopping navigation 14 Storing the c320 26 System Setup, customizing 18 T Theft... Information Page 12 Turn-by-turn directions 13 U Units 18 Unit ID 18 USB 27 Using responsibly 26 V Vehicle Type 21 Viewing Places on the Map 5 Viewing the Map 11 Voice Directions 13 Z Zoom 5, 11 Garmin © 2005 32 c320 Owner's Manual
Owner's Manual
Page 37
or its subsidiaries Garmin International, Inc. 1200 East 151st Street, Olathe, Kansas 66062, U.S.A. Unit 5, The Quadrangle, Abbey Park Industrial Estate, Romsey, SO51 9DL, U.K. Garmin Corporation No. 68, Jangshu 2nd Road, Shijr, Taipei County, Taiwan www.garmin.com Part Number 190-00435-00 Rev D For the latest free software updates (excluding map data) throughout the life of your Garmin products, visit the Garmin Web site at www.garmin.com. © Copyright 2005 Garmin Ltd. Garmin (Europe) Ltd.
or its subsidiaries Garmin International, Inc. 1200 East 151st Street, Olathe, Kansas 66062, U.S.A. Unit 5, The Quadrangle, Abbey Park Industrial Estate, Romsey, SO51 9DL, U.K. Garmin Corporation No. 68, Jangshu 2nd Road, Shijr, Taipei County, Taiwan www.garmin.com Part Number 190-00435-00 Rev D For the latest free software updates (excluding map data) throughout the life of your Garmin products, visit the Garmin Web site at www.garmin.com. © Copyright 2005 Garmin Ltd. Garmin (Europe) Ltd.

Quick Reference Guide
Page 2
...do this once. Step 3: Mount Your c320 To ensure a tight grip, clean and dry the windshield before mounting the suction cup. 5 2 1 3 4 Tension knob 1. Fit the bottom of your c320. Step 2: Install Software and Load Maps Before using your c320, install software on your computer using the DVD-ROM,... and then load maps on -screen instructions to set up your vehicle. 2. Place the suction cup on . ...
...do this once. Step 3: Mount Your c320 To ensure a tight grip, clean and dry the windshield before mounting the suction cup. 5 2 1 3 4 Tension knob 1. Fit the bottom of your c320. Step 2: Install Software and Load Maps Before using your c320, install software on your computer using the DVD-ROM,... and then load maps on -screen instructions to set up your vehicle. 2. Place the suction cup on . ...

Setup Guide
Page 2
... unit, map data must be installed," you are instructed to do so. Charge the unit for three hours. Volume control Note: A "Low Battery" warning may appear when you turn on the unit. Complete all of the setup steps: Step 1: Configure your c320 Step 2: Install software and map data Step... 3: Load maps Do not connect the USB cable to set up your PC until you see the screen that appear. USB cable connector Power...
... unit, map data must be installed," you are instructed to do so. Charge the unit for three hours. Volume control Note: A "Low Battery" warning may appear when you turn on the unit. Complete all of the setup steps: Step 1: Configure your c320 Step 2: Install software and map data Step... 3: Load maps Do not connect the USB cable to set up your PC until you see the screen that appear. USB cable connector Power...

Setup Guide
Page 3
Step 2: Install Software and Map Data 1 Remove the DVD-ROM from the case and insert it into your DVD-ROM's drive followed by "Setup" (for example, "E:\Setup"). Type your computer's DVD-ROM drive. Click OK. 2 Follow the series of instructions that appear on your c320. When prompted, connect your c320 to your computer using the enclosed USB cable. 3 When you have completed the registration process, click Done to load maps to your computer. If the startup file does not run automatically, click the Windows Start button and select Run....
Step 2: Install Software and Map Data 1 Remove the DVD-ROM from the case and insert it into your DVD-ROM's drive followed by "Setup" (for example, "E:\Setup"). Type your computer's DVD-ROM drive. Click OK. 2 Follow the series of instructions that appear on your c320. When prompted, connect your c320 to your computer using the enclosed USB cable. 3 When you have completed the registration process, click Done to load maps to your computer. If the startup file does not run automatically, click the Windows Start button and select Run....


