Owner's Manual
Page 3
... information, a Troubleshooting Guide and a Wiring Diagram followed by -Step instruction for choosing the GARMIN eTrex Legend. The Appendices include information on screen) provides details about using the feature. IInnttrroodduuccttiioonn About This Manual i To get the most from your new eTrex Legend, take time to understand all of Contents. The Introduction section provides FCC, safety...
... information, a Troubleshooting Guide and a Wiring Diagram followed by -Step instruction for choosing the GARMIN eTrex Legend. The Appendices include information on screen) provides details about using the feature. IInnttrroodduuccttiioonn About This Manual i To get the most from your new eTrex Legend, take time to understand all of Contents. The Introduction section provides FCC, safety...
Owner's Manual
Page 10
...Registration vii Table of Contents viii Getting Started Setup, and Features 1 Features and Button Function 2 Battery Installation 3 Backlighting and Contrast 3 The Main Pages Main Page Basics 4 Satellite The Main Page 5 Options 6-7 Navigating Navigating with eTrex Legend 8 Map The Main Page 9-10 Options 11-15 Using... the Pan Map Option 12 Stop Navigation 13 Hide/Show Navigation Status 13 Hide/Show Data Fields 13 Setup 14-15 The ...
...Registration vii Table of Contents viii Getting Started Setup, and Features 1 Features and Button Function 2 Battery Installation 3 Backlighting and Contrast 3 The Main Pages Main Page Basics 4 Satellite The Main Page 5 Options 6-7 Navigating Navigating with eTrex Legend 8 Map The Main Page 9-10 Options 11-15 Using... the Pan Map Option 12 Stop Navigation 13 Hide/Show Navigation Status 13 Hide/Show Data Fields 13 Setup 14-15 The ...
Owner's Manual
Page 11
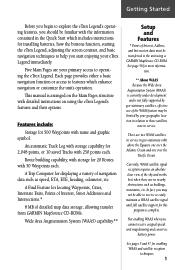
... the screen contrast, and basic navigation techniques to help you start enjoying your primary access to operating the eTrex Legend. This manual is arranged on using a GARMIN MapSource CD-ROM. See pages 5 and 47 for more informa- Getting Started Before you begin to explore the eTrex Legend's operating features, you should be transferred to the...
... the screen contrast, and basic navigation techniques to help you start enjoying your primary access to operating the eTrex Legend. This manual is arranged on using a GARMIN MapSource CD-ROM. See pages 5 and 47 for more informa- Getting Started Before you begin to explore the eTrex Legend's operating features, you should be transferred to the...

Owner's Manual
Page 12
... down. The FIND button: • Press to access the Find Menu Installing the lanyard Carry Lanyard Slot 2 Battery Compartment Cover NOTE: The eTrex Legend is designed to be held and operated in and out. • When on the Satellite Page, press to adjust the screen contrast. •.... The POWER button: • Press and hold for two seconds to mark your current location as well to suit your preference. Getting Started Features and Button Function Internal Antenna The THUMB STICK (Five Position Switch) • Press to enter highlighted options and to confirm messages •...
... down. The FIND button: • Press to access the Find Menu Installing the lanyard Carry Lanyard Slot 2 Battery Compartment Cover NOTE: The eTrex Legend is designed to be held and operated in and out. • When on the Satellite Page, press to adjust the screen contrast. •.... The POWER button: • Press and hold for two seconds to mark your current location as well to suit your preference. Getting Started Features and Button Function Internal Antenna The THUMB STICK (Five Position Switch) • Press to enter highlighted options and to confirm messages •...

Owner's Manual
Page 14
...Option Menu Button Option Menu These menus provide additional features or allow you need to operate the eTrex Legend can press and release the PAGE button to the left or right. Getting Started Main Page Basics Satellite Page Map Page Navigation Page Trip Computer Main Menu All of which are ... on -screen button to toggle between two Main Pages. 4 While these five pages provide you with different types of navigation information, they all share common features like Option Menus and a Main Page Menu, both of the information you to customize the unit to cycling through the Satellite ...
...Option Menu Button Option Menu These menus provide additional features or allow you need to operate the eTrex Legend can press and release the PAGE button to the left or right. Getting Started Main Page Basics Satellite Page Map Page Navigation Page Trip Computer Main Menu All of which are ... on -screen button to toggle between two Main Pages. 4 While these five pages provide you with different types of navigation information, they all share common features like Option Menus and a Main Page Menu, both of the information you to customize the unit to cycling through the Satellite ...

Owner's Manual
Page 15
... Aviation Administration web site (http.//gps.faa.gov/). 5 The outer ring represents the horizon around you, the inner ring represents a view above you when the unit is helpful to other than RTCM mode), this feature searches for a WAAS satellite near your location and then receives data for navigation, and shows your current location...
... Aviation Administration web site (http.//gps.faa.gov/). 5 The outer ring represents the horizon around you, the inner ring represents a view above you when the unit is helpful to other than RTCM mode), this feature searches for a WAAS satellite near your location and then receives data for navigation, and shows your current location...
Owner's Manual
Page 18
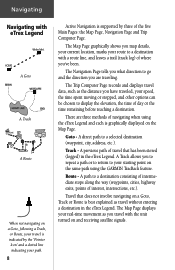
...) in the eTrex Legend. The Navigation Page tells you what direction to a destination with a route line, and leaves a trail (track log) of interest, intersections, etc.). Goto - A previous path of travel that does not involve navigating on a Goto, Track or Route is supported by three of navigating when using the GARMIN TracBack feature. The Map Page displays...
...) in the eTrex Legend. The Navigation Page tells you what direction to a destination with a route line, and leaves a trail (track log) of interest, intersections, etc.). Goto - A previous path of travel that does not involve navigating on a Goto, Track or Route is supported by three of navigating when using the GARMIN TracBack feature. The Map Page displays...
Owner's Manual
Page 19
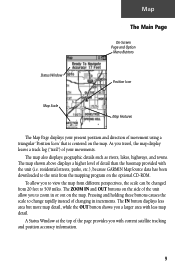
...and OUT buttons on the map. Status Window Map The Main Page On-Screen Page and Option Menu Buttons Position Icon Map Scale Map Features The Map Page displays your movements. The map also displays geographic details such as rivers, lakes, highways, and towns. residential streets, parks,... etc.), because GARMIN MapSource data has been downloaded to the unit from 20 feet to zoom in increments. The map shown above displays a higher level of the...
...and OUT buttons on the map. Status Window Map The Main Page On-Screen Page and Option Menu Buttons Position Icon Map Scale Map Features The Map Page displays your movements. The map also displays geographic details such as rivers, lakes, highways, and towns. residential streets, parks,... etc.), because GARMIN MapSource data has been downloaded to the unit from 20 feet to zoom in increments. The map shown above displays a higher level of the...

Owner's Manual
Page 20
...Zoom In Zoom Out Map Features Map Scales Accuracy Circle Panning ...display is exceeded and the appearance of the map. The eTrex Legend uses both map resolution and GPS accuracy in defining your location. When using MapSource ...scale rapidly. Two optional Data fields at the top of travel and navigation information. In many instances the map displays an 'Accuracy Circle' surrounding the ...using the 'Pan Map' feature, a small outline arrow (Map Pointer) can be moved about those features can be confused with more detail. More detailed map features as well as lakes, ...
...Zoom In Zoom Out Map Features Map Scales Accuracy Circle Panning ...display is exceeded and the appearance of the map. The eTrex Legend uses both map resolution and GPS accuracy in defining your location. When using MapSource ...scale rapidly. Two optional Data fields at the top of travel and navigation information. In many instances the map displays an 'Accuracy Circle' surrounding the ...using the 'Pan Map' feature, a small outline arrow (Map Pointer) can be moved about those features can be confused with more detail. More detailed map features as well as lakes, ...

Owner's Manual
Page 21
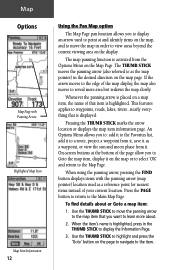
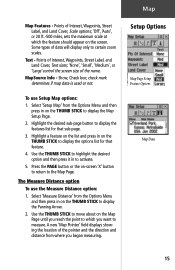
...The 'Setup Map' option consists of the page and expands or reduces the map area. Map Map Page options allow a variety of operating and custom features for your requirements such as Hide Data Fields/Show Data Fields. Not all of the Map Page options are : Pan Map - The Map Page options...page option: 1. Highlight the desired option on the menu and then press in on the THUMB STICK to your eTrex Legend. Options On-screen Map Page Options Menu button Map Page Options Menu with 'Pan Map' selected. If 'Show Data Fields' is selected, it is being used, 'Stop Navigation' cannot be selected.
...The 'Setup Map' option consists of the page and expands or reduces the map area. Map Map Page options allow a variety of operating and custom features for your requirements such as Hide Data Fields/Show Data Fields. Not all of the Map Page options are : Pan Map - The Map Page options...page option: 1. Highlight the desired option on the menu and then press in on the THUMB STICK to your eTrex Legend. Options On-screen Map Page Options Menu button Map Page Options Menu with 'Pan Map' selected. If 'Show Data Fields' is selected, it is being used, 'Stop Navigation' cannot be selected.
Owner's Manual
Page 22
...page. Map Options Map Page with the panning arrow (map pointer) location used to point at the bottom of that item is highlighted. This features applies to waypoints, roads, lakes, rivers...nearly everything that you to Goto the map item, display it . When using the panning arrow, pressing... nearest items instead of your current location. To find details about . 2. On-screen buttons at and identify items on the page to navigate to display the Information Page. 3. The THUMB STICK moves the panning arrow (also referred to the Map Page. Whenever the panning arrow is displayed...
...page. Map Options Map Page with the panning arrow (map pointer) location used to point at the bottom of that item is highlighted. This features applies to waypoints, roads, lakes, rivers...nearly everything that you to Goto the map item, display it . When using the panning arrow, pressing... nearest items instead of your current location. To find details about . 2. On-screen buttons at and identify items on the page to navigate to display the Information Page. 3. The THUMB STICK moves the panning arrow (also referred to the Map Page. Whenever the panning arrow is displayed...
Owner's Manual
Page 24
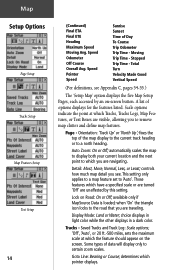
...the features listed. A list of Day To Course Trip Odometer Trip Time - Page - Those features which the feature should ... Zoom: On or Off; This setting only applies to a map feature set to a north heading. Saved Tracks and Track Log: Scale options...sets the maximum scale at which Tracks, Tracks Logs, Map Features, or Text Boxes are traveling. Lock on Road: On...point to remove map clutter and define map features. Display Mode: Land or Water; Stopped Trip Time...Course; Map Setup Options Page Setup Tracks Setup Map Features Setup Text Setup 14 (Continued) Final ETA Final...
...the features listed. A list of Day To Course Trip Odometer Trip Time - Page - Those features which the feature should ... Zoom: On or Off; This setting only applies to a map feature set to a north heading. Saved Tracks and Track Log: Scale options...sets the maximum scale at which Tracks, Tracks Logs, Map Features, or Text Boxes are traveling. Lock on Road: On...point to remove map clutter and define map features. Display Mode: Land or Water; Stopped Trip Time...Course; Map Setup Options Page Setup Tracks Setup Map Features Setup Text Setup 14 (Continued) Final ETA Final...
Owner's Manual
Page 25
... then press in on the screen. A new 'Map Pointer' field displays showing the location of data will display only to display the features list for that sub-page. 3. Highlight the desired sub-page button to certain zoom scales. Select 'Setup Map' from the Options Menu and ...the Map Setup Page. 2. Press the PAGE button or the on the THUMB STICK to activate. 5. Map Map Features - Setup Options Map Page Setup Feature Options Map Data 15 Highlight a feature on the list and press in on -screen 'X' button to return to measure. Points of the name. check mark...
... then press in on the screen. A new 'Map Pointer' field displays showing the location of data will display only to display the features list for that sub-page. 3. Highlight the desired sub-page button to certain zoom scales. Select 'Setup Map' from the Options Menu and ...the Map Setup Page. 2. Press the PAGE button or the on the THUMB STICK to activate. 5. Map Map Features - Setup Options Map Page Setup Feature Options Map Data 15 Highlight a feature on the list and press in on -screen 'X' button to return to measure. Points of the name. check mark...

Owner's Manual
Page 32
... Setup Pages, select the Time Icon and then follow instructions for setting the time on page 43. 22 From the Main Menu page you with Feature Icons & Battery Capacity, Time/Date, and Backlighting Status Bar. The Main Menu provides you can mark and create new waypoints; find map items such... the time for your current location (time zone), use unit accessories. Main Menu The Main Page The Main Menu Page with a directory of the eTrex Legend's advanced features. To exit these pages, highlight the on the THUMB STICK. setup system operating...
... Setup Pages, select the Time Icon and then follow instructions for setting the time on page 43. 22 From the Main Menu page you with Feature Icons & Battery Capacity, Time/Date, and Backlighting Status Bar. The Main Menu provides you can mark and create new waypoints; find map items such... the time for your current location (time zone), use unit accessories. Main Menu The Main Page The Main Menu Page with a directory of the eTrex Legend's advanced features. To exit these pages, highlight the on the THUMB STICK. setup system operating...

Owner's Manual
Page 33
... and Power, Date/Time, and Backlight Status Window Power, Date/Time, and Backlight Status Window 23 Provides access to additional eTrex Legend feature pages. Accessories Page - When the unit is active the light bulb to locate, and Goto, or use . Main Menu Using the Main Menu The Main ... are displayed in the center of measure, display backlighting timeout and contrast adjustment, interface setups, heading selection and system software information. Allows you to eTrex Legend operation.
... and Power, Date/Time, and Backlight Status Window Power, Date/Time, and Backlight Status Window 23 Provides access to additional eTrex Legend feature pages. Accessories Page - When the unit is active the light bulb to locate, and Goto, or use . Main Menu Using the Main Menu The Main ... are displayed in the center of measure, display backlighting timeout and contrast adjustment, interface setups, heading selection and system software information. Allows you to eTrex Legend operation.
Owner's Manual
Page 34
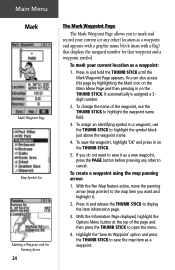
To save it . 2. With the Pan Map feature active, move the panning arrow (map pointer) to mark and record your current location as a waypoint: 1. Main Menu Mark Mark Waypoint Page Map Symbol List ...
To save it . 2. With the Pan Map feature active, move the panning arrow (map pointer) to mark and record your current location as a waypoint: 1. Main Menu Mark Mark Waypoint Page Map Symbol List ...
Owner's Manual
Page 35
.... 4. Use the panning arrow to drag the waypoint to the new location and then press in and release the THUMB STICK. With the Pan Map feature active, move the panning arrow (map pointer) on the THUMB STICK to mark and then, press the THUMB STICK. 2. To create a waypoint by the panning...
.... 4. Use the panning arrow to drag the waypoint to the new location and then press in and release the THUMB STICK. With the Pan Map feature active, move the panning arrow (map pointer) on the THUMB STICK to mark and then, press the THUMB STICK. 2. To create a waypoint by the panning...
Owner's Manual
Page 37
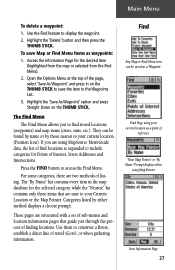
.... If you are using Map Pointer Item Information Page 27 Find Any Map or Find Menu item can be saved as waypoints: 1. Use the Find feature to access the Find Menu. The Find Menu The Find Menu allows you through the process of finding locations. Use them to your Current...
.... If you are using Map Pointer Item Information Page 27 Find Any Map or Find Menu item can be saved as waypoints: 1. Use the Find feature to access the Find Menu. The Find Menu The Find Menu allows you through the process of finding locations. Use them to your Current...
Owner's Manual
Page 51
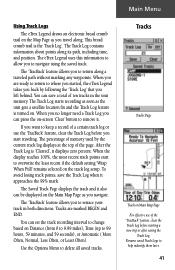
...Legend takes you back by the current track log displays at the top of the "TracBack" feature, clear the Track Log before you travel along. The 'TracBack' feature allows you to retrace your track in the unit memory. The percentage of memory used by following the 'Track Log' that you navigate. The 'TracBack' feature... allows you to return along its path, including time, and position. The Track Log starts recording as soon as the unit gets a satellite location fix and the Track Log feature is the 'Track Log'. This ...
...Legend takes you back by the current track log displays at the top of the "TracBack" feature, clear the Track Log before you travel along. The 'TracBack' feature allows you to retrace your track in the unit memory. The percentage of memory used by following the 'Track Log' that you navigate. The 'TracBack' feature... allows you to return along its path, including time, and position. The Track Log starts recording as soon as the unit gets a satellite location fix and the Track Log feature is the 'Track Log'. This ...

Owner's Manual
Page 52
... the THUMB STICK to display their options. 'Interval' options change to navigate the Track. You can set the recording interval from the Main Menu. Access the Map Page or the Navigation Page to accommodate the 'Record Method' choices. To enable the Tracback feature, highlight the 'Tracback' button and then press in on -screen...
... the THUMB STICK to display their options. 'Interval' options change to navigate the Track. You can set the recording interval from the Main Menu. Access the Map Page or the Navigation Page to accommodate the 'Record Method' choices. To enable the Tracback feature, highlight the 'Tracback' button and then press in on -screen...
