Owner's Manual
Page 10
... Contents viii Getting Started Setup, and Features 1 Features and Button Function 2 Battery Installation 3 Backlighting and Contrast 3 The Main Pages Main Page Basics 4 Satellite The Main Page 5 Options 6-7 Navigating Navigating with eTrex Legend 8 Map The Main Page 9-10 Options 11-15 Using the Pan Map Option 12 Stop Navigation 13 Hide/Show Navigation Status 13 Hide/Show Data Fields 13 Setup 14-15 The Measure Distance option 15 Navigation The Main Page 16 Options 17-18 Trip Computer The...
... Contents viii Getting Started Setup, and Features 1 Features and Button Function 2 Battery Installation 3 Backlighting and Contrast 3 The Main Pages Main Page Basics 4 Satellite The Main Page 5 Options 6-7 Navigating Navigating with eTrex Legend 8 Map The Main Page 9-10 Options 11-15 Using the Pan Map Option 12 Stop Navigation 13 Hide/Show Navigation Status 13 Hide/Show Data Fields 13 Setup 14-15 The Measure Distance option 15 Navigation The Main Page 16 Options 17-18 Trip Computer The...
Owner's Manual
Page 11
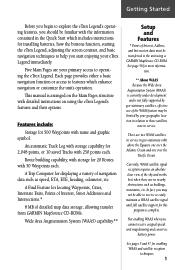
This manual is complete. A Trip Computer for displaying a variety of navigation data such as buildings, mountains, etc. Wide Area Augmentation System (WAAS) capability.** Setup and Features * Points of detailed map data storage, allowing transfer from GARMIN MapSource CD-ROM's. There are your primary access to operating the eTrex Legend. Not enabling WAAS when you cannot receive a signal speeds unit map drawing and conserves battery power. Five Main Pages are two WAAS satellites in service in geo...
This manual is complete. A Trip Computer for displaying a variety of navigation data such as buildings, mountains, etc. Wide Area Augmentation System (WAAS) capability.** Setup and Features * Points of detailed map data storage, allowing transfer from GARMIN MapSource CD-ROM's. There are your primary access to operating the eTrex Legend. Not enabling WAAS when you cannot receive a signal speeds unit map drawing and conserves battery power. Five Main Pages are two WAAS satellites in service in geo...
Owner's Manual
Page 13
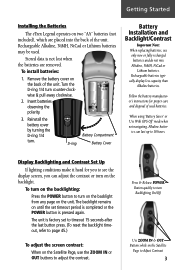
... or the POWER button is not lost when the batteries are placed into the back of the unit. To install batteries: 1. Getting Started Installing the Batteries The eTrex Legend operates on two "AA" batteries (not included), which are removed. Stored data is pressed again. Turn the D-ring 1/4 turn . Battery Compartment D-ring Battery Cover Battery Installation and Backlight/Contrast Important Note: When replacing batteries, use the ZOOM IN or OUT buttons to 18 hours. Rechargeable batteries typically display less...
... or the POWER button is not lost when the batteries are placed into the back of the unit. To install batteries: 1. Getting Started Installing the Batteries The eTrex Legend operates on two "AA" batteries (not included), which are removed. Stored data is pressed again. Turn the D-ring 1/4 turn . Battery Compartment D-ring Battery Cover Battery Installation and Backlight/Contrast Important Note: When replacing batteries, use the ZOOM IN or OUT buttons to 18 hours. Rechargeable batteries typically display less...
Owner's Manual
Page 16
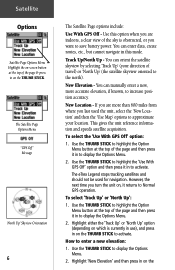
... on-screen button at the top of the page & press in on the New Location - Track Up/North Up - To select 'Track Up' or 'North Up': 1. You can manually enter a new, more than 600 miles from where you are indoors, a clear view of the sky is currently in use), and press in this option when you are more accurate elevation, if known, to save battery power. This gives the unit reference information and speeds satellite...
... on-screen button at the top of the page & press in on the New Location - Track Up/North Up - To select 'Track Up' or 'North Up': 1. You can manually enter a new, more than 600 miles from where you are indoors, a clear view of the sky is currently in use), and press in this option when you are more accurate elevation, if known, to save battery power. This gives the unit reference information and speeds satellite...
Owner's Manual
Page 18
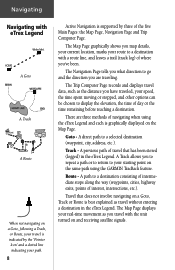
... unit turned on and receiving satellite signals. A path to a selected destination (waypoint, city, address, etc.). A direct path to a destination consisting of intermediate stops along the way (waypoints, cities, highway exits, points of travel without entering a destination in the eTrex Legend. Route - The Map Page displays your real-time movement as the distance you 've been. There are traveling. Navigating Navigating with eTrex Legend A Goto A Track A Route When not navigating on a Goto, following a Track, or Route, your travel with a route...
... unit turned on and receiving satellite signals. A path to a selected destination (waypoint, city, address, etc.). A direct path to a destination consisting of intermediate stops along the way (waypoints, cities, highway exits, points of travel without entering a destination in the eTrex Legend. Route - The Map Page displays your real-time movement as the distance you 've been. There are traveling. Navigating Navigating with eTrex Legend A Goto A Track A Route When not navigating on a Goto, following a Track, or Route, your travel with a route...
Owner's Manual
Page 27
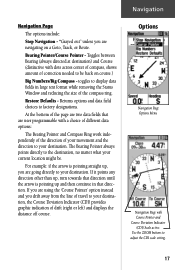
... drift (right or left) and displays the distance off course. toggles to be . If it points any direction other than up, turn towards that are navigating on course.) Big Numbers/Big Compass - Returns options and data field choices to adjust the CDI scale setting. 17 Navigation Options Navigation Page Options Menu Navigation Page with dots across center of compass, shows amount of the compass ring. Bearing Pointer/Course Pointer - At the bottom of...
... drift (right or left) and displays the distance off course. toggles to be . If it points any direction other than up, turn towards that are navigating on course.) Big Numbers/Big Compass - Returns options and data field choices to adjust the CDI scale setting. 17 Navigation Options Navigation Page Options Menu Navigation Page with dots across center of compass, shows amount of the compass ring. Bearing Pointer/Course Pointer - At the bottom of...
Owner's Manual
Page 31
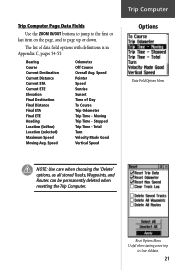
...) Location (selected) Maximum Speed Moving Avg. The list of Day To Course Trip Odometer Trip Time - Speed Pointer Speed Sunrise Sunset Time of data field options with definitions is in Appendix C, pages 54-55. Total Turn Velocity Made Good Vertical Speed Trip Computer Options Data Field Options Menu NOTE: Use care when choosing the 'Delete' options, as all stored Tracks, Waypoints, and Routes can be permanently deleted when resetting the Trip Computer. Moving Trip Time - Trip Computer...
...) Location (selected) Maximum Speed Moving Avg. The list of Day To Course Trip Odometer Trip Time - Speed Pointer Speed Sunrise Sunset Time of data field options with definitions is in Appendix C, pages 54-55. Total Turn Velocity Made Good Vertical Speed Trip Computer Options Data Field Options Menu NOTE: Use care when choosing the 'Delete' options, as all stored Tracks, Waypoints, and Routes can be permanently deleted when resetting the Trip Computer. Moving Trip Time - Trip Computer...
Owner's Manual
Page 36
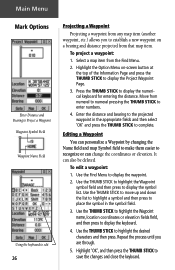
... changing the Name field and map Symbol field to make them easier to display the keyboard. 4. Main Menu Mark Options Enter Distance and Bearing to Project a Waypoint Waypoint Symbol Field Waypoint Name Field Using the keyboard to edit 26 Projecting a Waypoint Projecting a waypoint from any map item (another waypoint, etc.) allows you are through. 5. Repeat the process until you to establish a new waypoint on -screen button at the top of the Information...
... changing the Name field and map Symbol field to make them easier to display the keyboard. 4. Main Menu Mark Options Enter Distance and Bearing to Project a Waypoint Waypoint Symbol Field Waypoint Name Field Using the keyboard to edit 26 Projecting a Waypoint Projecting a waypoint from any map item (another waypoint, etc.) allows you are through. 5. Repeat the process until you to establish a new waypoint on -screen button at the top of the Information...

Owner's Manual
Page 38
Select 'Map' to view the waypoint location on the Waypoint Information Page. Use the Options Menu to add the waypoints to the 'Favorites' list, add it to an existing route, project a new waypoint from the list, the waypoint displays on the map or select 'OK' to display the Waypoints List. 2. Favorites Category 28 The Waypoint Information Page displays the waypoint name or number, a map symbol, the location in lat/lon, elevation, distance, bearing, and three on the previous page. Select, then press the...
Select 'Map' to view the waypoint location on the Waypoint Information Page. Use the Options Menu to add the waypoints to the 'Favorites' list, add it to an existing route, project a new waypoint from the list, the waypoint displays on the map or select 'OK' to display the Waypoints List. 2. Favorites Category 28 The Waypoint Information Page displays the waypoint name or number, a map symbol, the location in lat/lon, elevation, distance, bearing, and three on the previous page. Select, then press the...
Owner's Manual
Page 45
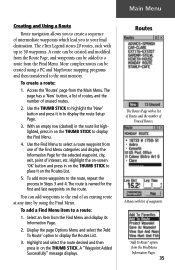
... routes can add waypoints to the end of an existing route at any time by using a PC and MapSource mapping programs and then transferred to the unit memory. Highlight the on-screen 'OK' button and press in to display the route Setup Page. 3. The route is named for the selected waypoint, city, exit, point of Unused Routes. Main Menu Creating and Using a Route Route navigation allows you to select a route waypoint from one of waypoints. Use the THUMB STICK to highlight the 'New' button...
... routes can add waypoints to the end of an existing route at any time by using a PC and MapSource mapping programs and then transferred to the unit memory. Highlight the on-screen 'OK' button and press in to display the route Setup Page. 3. The route is named for the selected waypoint, city, exit, point of Unused Routes. Main Menu Creating and Using a Route Route navigation allows you to select a route waypoint from one of waypoints. Use the THUMB STICK to highlight the 'New' button...
Owner's Manual
Page 47
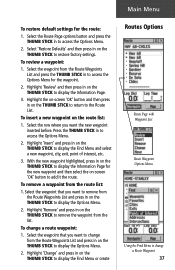
... -screen 'OK' button to display the Find Menu and select a new waypoint, city, exit, point of interest, etc. 3. Select the waypoint from the list. Highlight the on-screen 'OK' button and then press in on the THUMB STICK to display the Find Menu or create Routes Options Route Page with Waypoint List Route Waypoint Options Menu Using the Find Menu to the Route List. To insert a new waypoint on the THUMB STICK to return to change a route waypoint: 1. Highlight 'Remove...
... -screen 'OK' button to display the Find Menu and select a new waypoint, city, exit, point of interest, etc. 3. Select the waypoint from the list. Highlight the on-screen 'OK' button and then press in on the THUMB STICK to display the Find Menu or create Routes Options Route Page with Waypoint List Route Waypoint Options Menu Using the Find Menu to the Route List. To insert a new waypoint on the THUMB STICK to return to change a route waypoint: 1. Highlight 'Remove...

Owner's Manual
Page 49
... to display the Route Page. 2. The Navigation Page shows compass direction and a bearing pointer. Highlight the on-screen 'Navigate' button at the Navigating a Route on the route. Select the Route from the Routes List and then press in to display the Route Page. 2. Select 'Next' and press in to either display the Information Page or remove it again after returning to view the next waypoint. The Map Page displays your movement, the route line, and waypoints on the Map Page...
... to display the Route Page. 2. The Navigation Page shows compass direction and a bearing pointer. Highlight the on-screen 'Navigate' button at the Navigating a Route on the route. Select the Route from the Routes List and then press in to display the Route Page. 2. Select 'Next' and press in to either display the Information Page or remove it again after returning to view the next waypoint. The Map Page displays your movement, the route line, and waypoints on the Map Page...
Owner's Manual
Page 51
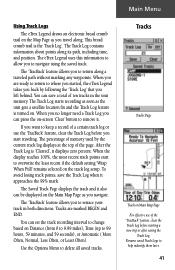
... to remove it. Main Menu Using Track Logs The eTrex Legend draws an electronic bread crumb trail on the Map Page as you navigate. The Track Log contains information about points along . You can be displayed on Distance (from 0 to 9.99 miles), Time (up to navigate using the saved track. The Track Log starts recording as soon as the unit gets a satellite location fix and the Track Log feature is the 'Track Log'. After the Track Log is 'Cleared...
... to remove it. Main Menu Using Track Logs The eTrex Legend draws an electronic bread crumb trail on the Map Page as you navigate. The Track Log contains information about points along . You can be displayed on Distance (from 0 to 9.99 miles), Time (up to navigate using the saved track. The Track Log starts recording as soon as the unit gets a satellite location fix and the Track Log feature is the 'Track Log'. After the Track Log is 'Cleared...
Owner's Manual
Page 56
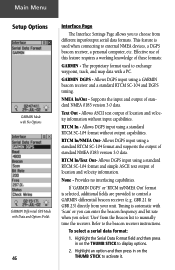
Text Out - Main Menu Setup Options GARMIN Mode with No Options GARMIN Differntial GPS Mode with Data and Options Fields 46 Interface Page The Interface Settings Page allows you select 'User' from the Beacon list to manually tune the receiver. GARMIN DGPS - Supports the input and output of these formats: GARMIN - If 'GARMIN DGPS' or 'RTCM in on the THUMB STICK to control a GARMIN differential beacon receiver (e.g. Allows DGPS input using a standard RTCM SC...
Text Out - Main Menu Setup Options GARMIN Mode with No Options GARMIN Differntial GPS Mode with Data and Options Fields 46 Interface Page The Interface Settings Page allows you select 'User' from the Beacon list to manually tune the receiver. GARMIN DGPS - Supports the input and output of these formats: GARMIN - If 'GARMIN DGPS' or 'RTCM in on the THUMB STICK to control a GARMIN differential beacon receiver (e.g. Allows DGPS input using a standard RTCM SC...
Owner's Manual
Page 57
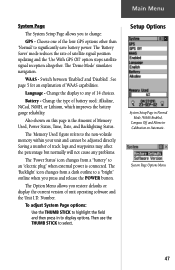
.... Change the type of unit operating software and the Unit I.D. Then use the THUMB STICK to the non-volatile memory within your unit and cannot be adjusted directly. Battery - Switch between 'Enabled' and 'Disabled'. See page 5 for an explanation of 14 choices. Change the display to any problems. The 'Power Status' icon changes from a dark outline to a "bright" outline when you to significantly save battery power. The 'Battery Saver' mode reduces the rate...
.... Change the type of unit operating software and the Unit I.D. Then use the THUMB STICK to the non-volatile memory within your unit and cannot be adjusted directly. Battery - Switch between 'Enabled' and 'Disabled'. See page 5 for an explanation of 14 choices. Change the display to any problems. The 'Power Status' icon changes from a dark outline to a "bright" outline when you to significantly save battery power. The 'Battery Saver' mode reduces the rate...
Owner's Manual
Page 61
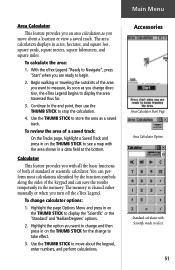
.... 2. The memory is cleared either manually or when you are ready to Navigate", press 'Start' when you turn off the eTrex Legend. Begin walking or traveling the outskirts of standard or scientific calculator. To review the area of the keypad and can save the results temporarily in the memory. As soon as you change to move about the keypad, enter numbers, and perform...
.... 2. The memory is cleared either manually or when you are ready to Navigate", press 'Start' when you turn off the eTrex Legend. Begin walking or traveling the outskirts of standard or scientific calculator. To review the area of the keypad and can save the results temporarily in the memory. As soon as you change to move about the keypad, enter numbers, and perform...
Owner's Manual
Page 67
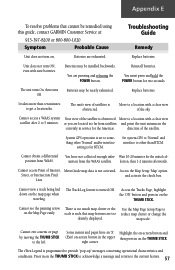
..., MetroGuide map data is programmed to get a location fix. right corner. Batteries may be remedied using this guide, contact GARMIN Customer Service at: 913-397-8200 or 800-800-1020 Symptom Probable Cause Troubleshooting Guide Remedy Unit does not turn ON, even with a clear view satellite after 2 to the current feature. 57 Replace batteries. or you are located too far from satellites and point the unit antenna in the currently in on . You are exhausted. position from...
..., MetroGuide map data is programmed to get a location fix. right corner. Batteries may be remedied using this guide, contact GARMIN Customer Service at: 913-397-8200 or 800-800-1020 Symptom Probable Cause Troubleshooting Guide Remedy Unit does not turn ON, even with a clear view satellite after 2 to the current feature. 57 Replace batteries. or you are located too far from satellites and point the unit antenna in the currently in on . You are exhausted. position from...

Owner's Manual
Page 71
..., 50 set the location 48, 50 show Data Fields 13 show Nav Status 13 stop navigating 13, 34, 40 transfer data 56 use Setup Map options 15 use the Measure Distance option 15 use Track Log Setup options 42 view the next waypoint in the route 39 Hunt and Fish 50 I Installing Batteries 3 Lanyard 2 Interface Page 46 Internal Antenna 2 L Land Cover 15 Land or Water 14 Language 47 LCD Display 2 Leg Course 40 Leg Distance 40 Leg Time 40 Location...
..., 50 set the location 48, 50 show Data Fields 13 show Nav Status 13 stop navigating 13, 34, 40 transfer data 56 use Setup Map options 15 use the Measure Distance option 15 use Track Log Setup options 42 view the next waypoint in the route 39 Hunt and Fish 50 I Installing Batteries 3 Lanyard 2 Interface Page 46 Internal Antenna 2 L Land Cover 15 Land or Water 14 Language 47 LCD Display 2 Leg Course 40 Leg Distance 40 Leg Time 40 Location...
Owner's Manual
Page 72
... 31 Position Format 44 Position Icon 10 Power 52 Power/Data Connector Cover 2 POWER button 2 Power Status 47 Power Status Window 23 Precautions iii, iv Product Registration vii Projecting a Waypoint 26 R Receiver Status 5-7, 47 Renaming a Waypoint 24-26 Replacement Battery Cover 53 Reset 20 Restart Search 7 Restore Defaults 11, 17, 20 Route Adding Find Menu item 35 Creating 35 Definition of 8 Editing 36 Options 36-40 Index Main Page Menu Button 4 Maps Features 15...
... 31 Position Format 44 Position Icon 10 Power 52 Power/Data Connector Cover 2 POWER button 2 Power Status 47 Power Status Window 23 Precautions iii, iv Product Registration vii Projecting a Waypoint 26 R Receiver Status 5-7, 47 Renaming a Waypoint 24-26 Replacement Battery Cover 53 Reset 20 Restart Search 7 Restore Defaults 11, 17, 20 Route Adding Find Menu item 35 Creating 35 Definition of 8 Editing 36 Options 36-40 Index Main Page Menu Button 4 Maps Features 15...
Owner's Manual
Page 73
... settings 36, 37 Route Page 23 Using 35 RTCM In 46 RTCM In/NMEA Out 46 RTCM In/Text Out 46 S Satellite Page 4-7 Saved Tracks 14 Saving the Track Log 41, 47 Selecting a Waypoint 28 Serial Number vii Setting the Correct Time Zone 22 Setup and Features 1 Setup Map 11, 14 Setup Map options 15 Setup Menu 43 Setup Page 22, 23 Setup the Navigation Page 18 Set course 16-20 Show Data Fields 11, 13 Navigation Status 13 Nav Status 11 Software...
... settings 36, 37 Route Page 23 Using 35 RTCM In 46 RTCM In/NMEA Out 46 RTCM In/Text Out 46 S Satellite Page 4-7 Saved Tracks 14 Saving the Track Log 41, 47 Selecting a Waypoint 28 Serial Number vii Setting the Correct Time Zone 22 Setup and Features 1 Setup Map 11, 14 Setup Map options 15 Setup Menu 43 Setup Page 22, 23 Setup the Navigation Page 18 Set course 16-20 Show Data Fields 11, 13 Navigation Status 13 Nav Status 11 Software...


