
Technical Reference for Garmin NMEA 2000 Products
Page 3
... instructions, and a list of installing a NMEA 2000 network on your boat. • The second section, General NMEA 2000 Data Type Requirements, provides a table to www.garmin.com/support and click Contact Support for Garmin NMEA 2000 Products iii Contact Garmin If you want. • The last two sections provide Parameter Group Number (PGN) information for Garmin chartplotters and marine...
... instructions, and a list of installing a NMEA 2000 network on your boat. • The second section, General NMEA 2000 Data Type Requirements, provides a table to www.garmin.com/support and click Contact Support for Garmin NMEA 2000 Products iii Contact Garmin If you want. • The last two sections provide Parameter Group Number (PGN) information for Garmin chartplotters and marine...

Technical Reference for Garmin NMEA 2000 Products
Page 7
... Marine instrument Chartplotter Intelligent transducer Ignition or in-line switch Fuse Female terminator + - The NMEA 2000 backbone must be sure you connect to your NMEA 2000 network to be connected to power, and terminators must follow certain rules to function correctly. Consult the installation instructions for each device or sensor. Be sure to the device appropriately. Battery...
... Marine instrument Chartplotter Intelligent transducer Ignition or in-line switch Fuse Female terminator + - The NMEA 2000 backbone must be sure you connect to your NMEA 2000 network to be connected to power, and terminators must follow certain rules to function correctly. Consult the installation instructions for each device or sensor. Be sure to the device appropriately. Battery...

Technical Reference for Garmin NMEA 2000 Products
Page 28
... GFS 10 Installation Instructions. To reset the fuel-level calibration: 1. Using Fuel-Flow Information With a Garmin Chartplotter or Marine Instrument Caution: The Garmin chartplotter or marine instrument must specify the amount of fuel each GFS 10 is shown on the NMEA 2000 device configuration screen to help ... powered on to calculate remaining fuel based on the GFS 10 to the fuel gauge or fuel-level sensor of your NMEA 2000 device, select Menu. 2. Using Fuel-Level Information With a Garmin Chartplotter or Marine Instrument To receive fuel-level information, connect the wiring harness...
... GFS 10 Installation Instructions. To reset the fuel-level calibration: 1. Using Fuel-Flow Information With a Garmin Chartplotter or Marine Instrument Caution: The Garmin chartplotter or marine instrument must specify the amount of fuel each GFS 10 is shown on the NMEA 2000 device configuration screen to help ... powered on to calculate remaining fuel based on the GFS 10 to the fuel gauge or fuel-level sensor of your NMEA 2000 device, select Menu. 2. Using Fuel-Level Information With a Garmin Chartplotter or Marine Instrument To receive fuel-level information, connect the wiring harness...
Owners Manual
Page 3
... Alerts 13 Turning Off AIS Reception 13 Chart Menu 13 Chart Layers 13 Chart Layer Settings 13 Depth Layer Settings 13 My Vessel Layer Settings 13 Laylines Settings 14 User Data Layer Settings 14 Other Vessels Layer Settings 14 Water Layer Settings 14 Depth Range Shading 14 Weather Layer Settings 14 Radar Overlay Settings 15 Chart Settings 15 Fish Eye 3D Settings 15 Supported Maps 15 Garmin Quickdraw...
... Alerts 13 Turning Off AIS Reception 13 Chart Menu 13 Chart Layers 13 Chart Layer Settings 13 Depth Layer Settings 13 My Vessel Layer Settings 13 Laylines Settings 14 User Data Layer Settings 14 Other Vessels Layer Settings 14 Water Layer Settings 14 Depth Range Shading 14 Weather Layer Settings 14 Radar Overlay Settings 15 Chart Settings 15 Fish Eye 3D Settings 15 Supported Maps 15 Garmin Quickdraw...
Owners Manual
Page 4
... Intensity 28 Sonar Recordings 29 Recording the Sonar Display 29 Stopping the Sonar Recording 29 Deleting a Sonar Recording 29 Playing Sonar Recordings 29 Traditional, Garmin ClearVü, and SideVü Sonar Setup 29 Setting the Zoom Level on the Sonar Screen 29 Setting the Scroll Speed 29 Adjusting the Range of the Depth or Width Scale 30 Sonar Noise Rejection Settings 30 Sonar Appearance Settings 30 ii...
... Intensity 28 Sonar Recordings 29 Recording the Sonar Display 29 Stopping the Sonar Recording 29 Deleting a Sonar Recording 29 Playing Sonar Recordings 29 Traditional, Garmin ClearVü, and SideVü Sonar Setup 29 Setting the Zoom Level on the Sonar Screen 29 Setting the Scroll Speed 29 Adjusting the Range of the Depth or Width Scale 30 Sonar Noise Rejection Settings 30 Sonar Appearance Settings 30 ii...
Owners Manual
Page 9
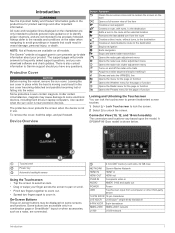
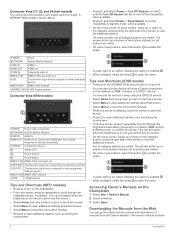
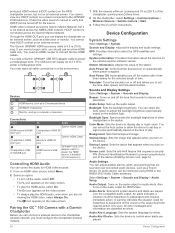
... forward. NETWORK Garmin Marine Network HDMI IN HDMI® in HDMI OUT HDMI out CVBS IN Composite video in AUDIO NMEA® 0183 and audio out POWER Power USB Touchscreen input from the route Creates a direct route, without turns, to the ...GPSMAP 8612xsv model is not in use. All route and navigation lines displayed on all features are not intended to some screens and functions. Leaving the sun cover in place while the boat is near electronic devices. The Garmin® website at the selected location Removes the last added turn to the route at support.garmin...
... forward. NETWORK Garmin Marine Network HDMI IN HDMI® in HDMI OUT HDMI out CVBS IN Composite video in AUDIO NMEA® 0183 and audio out POWER Power USB Touchscreen input from the route Creates a direct route, without turns, to the ...GPSMAP 8612xsv model is not in use. All route and navigation lines displayed on all features are not intended to some screens and functions. Leaving the sun cover in place while the boat is near electronic devices. The Garmin® website at the selected location Removes the last added turn to the route at support.garmin...
Owners Manual
Page 10
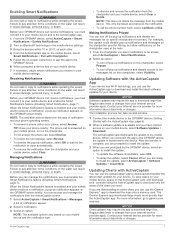
... repeatedly to sleep using a Garmin chartplotter on the Chartplotter 1 Select Info > Owner's Manual. 2 Select a manual. 3 Select Open. Tips and Shortcuts (8700 model) • Press on the GPSMAP 8700 device to turn off the chartplotter, when available. • Press , and select Power > Sleep Station to set the chartplotter to standby mode, when available. • On the home screen of some models, not all category...
... repeatedly to sleep using a Garmin chartplotter on the Chartplotter 1 Select Info > Owner's Manual. 2 Select a manual. 3 Select Open. Tips and Shortcuts (8700 model) • Press on the GPSMAP 8700 device to turn off the chartplotter, when available. • Press , and select Power > Sleep Station to set the chartplotter to standby mode, when available. • On the home screen of some models, not all category...
Owners Manual
Page 15
... which notifications you receive in your mobile device settings. Regular data limits or charges from your device. The installation process can take several minutes. 1 Connect the mobile device to the GPSMAP device (Getting Started with Chartplotter. 5 Follow the on-screen instructions to pair the app to the GPSMAP device. 6 When prompted, enter the key on your...
... which notifications you receive in your mobile device settings. Regular data limits or charges from your device. The installation process can take several minutes. 1 Connect the mobile device to the GPSMAP device (Getting Started with Chartplotter. 5 Follow the on-screen instructions to pair the app to the GPSMAP device. 6 When prompted, enter the key on your...
Owners Manual
Page 36
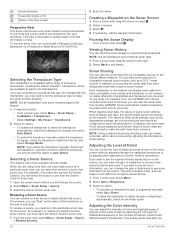
... a sonar view, select Menu > Sonar Setup > Installation > Transducers. • Select Settings > My Vessel > Transducers. 2 Select an option: • To enable the chartplotter to detect the transducer automatically, select the transducer to change, and select Auto Detect. • To select the transducer manually, select the transducer to rename the Garmin ClearVü sonar source, you will change , select the transducer model from another GPSMAP device and Garmin ClearVü transducer mounted...
... a sonar view, select Menu > Sonar Setup > Installation > Transducers. • Select Settings > My Vessel > Transducers. 2 Select an option: • To enable the chartplotter to detect the transducer automatically, select the transducer to change, and select Auto Detect. • To select the transducer manually, select the transducer to rename the Garmin ClearVü sonar source, you will change , select the transducer model from another GPSMAP device and Garmin ClearVü transducer mounted...
Owners Manual
Page 37
... intensity manually, select Up or Down. • To use the Auto setting. Traditional, Garmin ClearVü, and SideVü Sonar Setup NOTE: Not all options and settings apply to modify the zoom setting. Scroll Speed: Sets the rate at which point it is displayed on screen. Alarms: Sets sonar alarms (Sonar Alarms, page 30). Select View Up or View Down to set the depth range...
... intensity manually, select Up or Down. • To use the Auto setting. Traditional, Garmin ClearVü, and SideVü Sonar Setup NOTE: Not all options and settings apply to modify the zoom setting. Scroll Speed: Sets the rate at which point it is displayed on screen. Alarms: Sets sonar alarms (Sonar Alarms, page 30). Select View Up or View Down to set the depth range...
Owners Manual
Page 41
... of range lines. You can enter the specific installation angle for the transducer using the front collision alarm (Setting the Bow Offset, page 33). 1 From the FrontVü sonar view, select Menu > FrontVü Alarm. 2 Select On. 3 Enter the depth at a 45-degree angle and down view transducer is installed with the cables pointing toward the port side of the...
... of range lines. You can enter the specific installation angle for the transducer using the front collision alarm (Setting the Bow Offset, page 33). 1 From the FrontVü sonar view, select Menu > FrontVü Alarm. 2 Select On. 3 Enter the depth at a 45-degree angle and down view transducer is installed with the cables pointing toward the port side of the...
Owners Manual
Page 63
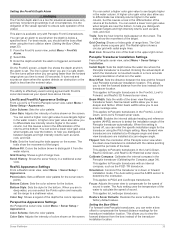
... Menu > Subscription. Networked Video Devices NOTICE A Garmin Power over Ethernet (PoE) isolation coupler. TIP: You can show weather radar. Change Colors: Selects the color scheme of the video feed. Scan Speed: Sets how quickly the camera moves during a scan. Stabilization: Stabilizes the picture using a specific time interval. 1 From the video screen, select Menu > Source > Alternate. 2 Select...
... Menu > Subscription. Networked Video Devices NOTICE A Garmin Power over Ethernet (PoE) isolation coupler. TIP: You can show weather radar. Change Colors: Selects the color scheme of the video feed. Scan Speed: Sets how quickly the camera moves during a scan. Stabilization: Stabilizes the picture using a specific time interval. 1 From the video screen, select Menu > Source > Alternate. 2 Select...
Owners Manual
Page 66
.... Background: Sets the background image. Audio Output: Turns on the video screen. • To always play the HDMI audio, select On. HDMI video is shared across the Garmin Marine Network, but not on automatically when power is applied. If you need a longer cable, you turn off for audio alerts. You need a Garmin GPSMAP USB OTG adapter cable to display day or night colors. GPS: Provides...
.... Background: Sets the background image. Audio Output: Turns on the video screen. • To always play the HDMI audio, select On. HDMI video is shared across the Garmin Marine Network, but not on automatically when power is applied. If you need a longer cable, you turn off for audio alerts. You need a Garmin GPSMAP USB OTG adapter cable to display day or night colors. GPS: Provides...
Owners Manual
Page 69
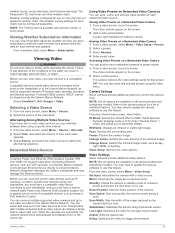
...ü transducers. Transducers: Shows all transducers. NMEA 2000 Settings Select Settings > Communications > NMEA 2000 Setup. You can connect a chartplotter to the Marine Network to receive data from and share data with other devices and chartplotters that are within the specified depth from the surface of the water and from the bottom. Setting Alarms CAUTION The Beeper setting must be turned on...
...ü transducers. Transducers: Shows all transducers. NMEA 2000 Settings Select Settings > Communications > NMEA 2000 Setup. You can connect a chartplotter to the Marine Network to receive data from and share data with other devices and chartplotters that are within the specified depth from the surface of the water and from the bottom. Setting Alarms CAUTION The Beeper setting must be turned on...
Owners Manual
Page 72
...Info > User Data > Data Transfer > Replace from the list, or select Add New File. 4 Select Save to Card. 5 Remove the memory card, and insert it to any location on -screen instructions to set up your Garmin account. ...supported. 1 Insert a memory card into your computer. 5 On your computer, go to garmin.com/express. 6 Follow the on-screen instructions to download, install, and open the Garmin Express application. 7 Select > Add a Device. 8 While the application searches, select Sign In next to Have marine charts or devices? The Garmin Express application searches the memory card for use...
...Info > User Data > Data Transfer > Replace from the list, or select Add New File. 4 Select Save to Card. 5 Remove the memory card, and insert it to any location on -screen instructions to set up your Garmin account. ...supported. 1 Insert a memory card into your computer. 5 On your computer, go to garmin.com/express. 6 Follow the on-screen instructions to download, install, and open the Garmin Express application. 7 Select > Add a Device. 8 While the application searches, select Sign In next to Have marine charts or devices? The Garmin Express application searches the memory card for use...

Owners Manual
Page 74
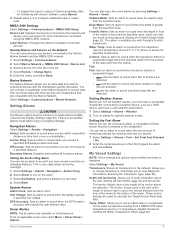
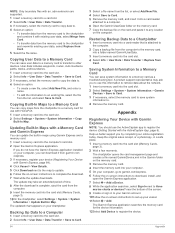
...'s HDMI OUT Monitor's HDMI IN port port Garmin HDMI Cable Monitor's USB port Garmin OTG Chartplotter's USB HOST Adapter Cable port Chartplotter's USB OTG Computer's USB HOST port port Garmin USB Cable Controlling a Computer with the Chartplotter Before you should use Garmin GPSMAP accessory cables when connecting the chartplotter to the Garmin Marine Network. 1 Select Settings > System > Station Information > GRID™ Pairing > Add...
...'s HDMI OUT Monitor's HDMI IN port port Garmin HDMI Cable Monitor's USB port Garmin OTG Chartplotter's USB HOST Adapter Cable port Chartplotter's USB OTG Computer's USB HOST port port Garmin USB Cable Controlling a Computer with the Chartplotter Before you should use Garmin GPSMAP accessory cables when connecting the chartplotter to the Garmin Marine Network. 1 Select Settings > System > Station Information > GRID™ Pairing > Add...

Owners Manual
Page 75
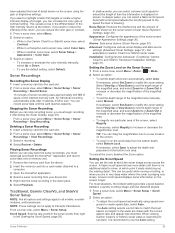
... other devices powered by the source are saved on the cable or the installation instructions for anti- Check the fuse to make sure the antenna is not acquiring satellite signals, there could indicate an issue with image files into the card slot. 2 Select Settings > Preferences > Screenshot Capture > On. 3 Go to a screen you have manually entered a waypoint using coordinates, and...
... other devices powered by the source are saved on the cable or the installation instructions for anti- Check the fuse to make sure the antenna is not acquiring satellite signals, there could indicate an issue with image files into the card slot. 2 Select Settings > Preferences > Screenshot Capture > On. 3 Go to a screen you have manually entered a waypoint using coordinates, and...

Installation Instructions PDF
Page 3
... the power cable to the power source and to the device. 2 Connect the red wire to the positive (+) battery terminal, and connect the black wire to the negative (-) battery terminal. 3 Connect the power cable to the device, and turn the locking ring clockwise to Power WARNING When connecting the power cable, do not remove the in most installation situations. Connecting a PoE device directly to a Garmin Marine...
... the power cable to the power source and to the device. 2 Connect the red wire to the positive (+) battery terminal, and connect the black wire to the negative (-) battery terminal. 3 Connect the power cable to the device, and turn the locking ring clockwise to Power WARNING When connecting the power cable, do not remove the in most installation situations. Connecting a PoE device directly to a Garmin Marine...

Installation Instructions PDF
Page 6
... 0183 device installation instructions to identify the transmit (Tx) and receive (Rx) wires. • You must be connected to a common power ground. • The internal NMEA 0183 ports and communication protocols are configured on transducer) Transmit power (RMS)3 CHIRP: 1000 W Garmin ClearVü... update Engine parameters: Dynamic Transmission parameters: Dynamic Fluid level Battery status Speed: Water referenced 6 Specifications Device All models 10-inch models 12-inch models Specification Measurement Temperature range From -15° to 55°C (from 40 to 240 kHz Garmin ClearV...
... 0183 device installation instructions to identify the transmit (Tx) and receive (Rx) wires. • You must be connected to a common power ground. • The internal NMEA 0183 ports and communication protocols are configured on transducer) Transmit power (RMS)3 CHIRP: 1000 W Garmin ClearVü... update Engine parameters: Dynamic Transmission parameters: Dynamic Fluid level Battery status Speed: Water referenced 6 Specifications Device All models 10-inch models 12-inch models Specification Measurement Temperature range From -15° to 55°C (from 40 to 240 kHz Garmin ClearV...

Important Safety and Product Information
Page 2
... source code is still not functioning properly after making use the device for parts or labor, provided that the customer shall be used by any user-serviceable parts. If this product is on the device to all data sources contain some countries, complete and accurate map information is either not available or is longer. Garmin Ltd. Such repairs or replacement...
... source code is still not functioning properly after making use the device for parts or labor, provided that the customer shall be used by any user-serviceable parts. If this product is on the device to all data sources contain some countries, complete and accurate map information is either not available or is longer. Garmin Ltd. Such repairs or replacement...


