Owners Manual
Page 1
GPSMAP® 64 SERIES / GPSMAP 64X SERIES Owner's Manual
GPSMAP® 64 SERIES / GPSMAP 64X SERIES Owner's Manual

Owners Manual
Page 2
...;, Garmin Connect™, Garmin Express™, HomePort™, and tempe™ are trademarks of Garmin Ltd. These trademarks may not be used without the written consent of Microsoft Corporation in the U.S. Mac® is a registered trademark of Garmin. and other countries. Go to www.thisisant.com/directory for current updates and supplemental information concerning the use of Garmin Ltd. Garmin®, the Garmin logo, ANT...
...;, Garmin Connect™, Garmin Express™, HomePort™, and tempe™ are trademarks of Garmin Ltd. These trademarks may not be used without the written consent of Microsoft Corporation in the U.S. Mac® is a registered trademark of Garmin. and other countries. Go to www.thisisant.com/directory for current updates and supplemental information concerning the use of Garmin Ltd. Garmin®, the Garmin logo, ANT...
Owners Manual
Page 3
... Device 8 Customizing the Data Fields 8 Data Fields 8 System Settings 9 GPS and Other Satellite Systems 9 Serial Interface Settings 9 Display Settings 9 Adjusting the Backlight Brightness 10 Setting the Device Tones 10 Camera Settings 10 Marine Settings 10 Setting Up Marine Alarms 10 Resetting Data 10 Changing the Page Sequence 10 Adding a Page 10 Removing a Page 10 Customizing the Main Menu 10 Changing the Units of Measure 10 Time Settings 10 Position Format Settings 10 Altimeter Settings 11 Routing Settings 11 Profiles 11 Creating a Custom Profile 11 Editing a Profile...
... Device 8 Customizing the Data Fields 8 Data Fields 8 System Settings 9 GPS and Other Satellite Systems 9 Serial Interface Settings 9 Display Settings 9 Adjusting the Backlight Brightness 10 Setting the Device Tones 10 Camera Settings 10 Marine Settings 10 Setting Up Marine Alarms 10 Resetting Data 10 Changing the Page Sequence 10 Adding a Page 10 Removing a Page 10 Customizing the Main Menu 10 Changing the Units of Measure 10 Time Settings 10 Position Format Settings 10 Altimeter Settings 11 Routing Settings 11 Profiles 11 Creating a Custom Profile 11 Editing a Profile...
Owners Manual
Page 4
Garmin Support Center 13 Turning On the Backlight 13 Optional Accessories 13 tempe 13 Pairing Your ANT+ Sensors 13 Troubleshooting 13 Restarting the Device 13 Viewing Device Information 13 Restoring All Default Settings 13 Index 14 ii Table of Contents
Garmin Support Center 13 Turning On the Backlight 13 Optional Accessories 13 tempe 13 Pairing Your ANT+ Sensors 13 Troubleshooting 13 Restarting the Device 13 Viewing Device Information 13 Restoring All Default Settings 13 Index 14 ii Table of Contents
Owners Manual
Page 5
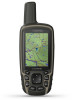
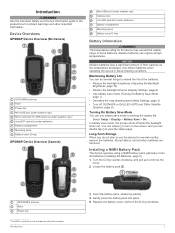
...brightness (Adjusting the Backlight Brightness, page 10). • Reduce the backlight timeout (Display Settings, page 9). • Use battery save mode (Turning On Battery Save Mode, page 1). • Decrease the map drawing speed (Map Settings, page 3). • Turn off when the backlight times out. GPS/GNSS antenna Keys Power key 1 The MCX connector is not lost when batteries are removed. In battery save mode to remove the cover. 2 Locate the battery pack . Stored data is not included on the screen, and you do several months, remove the batteries. Device Overviews GPSMAP...
...brightness (Adjusting the Backlight Brightness, page 10). • Reduce the backlight timeout (Display Settings, page 9). • Use battery save mode (Turning On Battery Save Mode, page 1). • Decrease the map drawing speed (Map Settings, page 3). • Turn off when the backlight times out. GPS/GNSS antenna Keys Power key 1 The MCX connector is not lost when batteries are removed. In battery save mode to remove the cover. 2 Locate the battery pack . Stored data is not included on the screen, and you do several months, remove the batteries. Device Overviews GPSMAP...
Owners Manual
Page 6
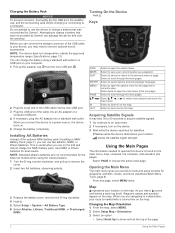
... operate this device is marked with a colored line on . 5 Charge the battery completely. Using the Main Pages The information needed to zoom in on the main menu, map, compass, trip computer, and elevation plot pages. You can damage the device and void the warranty. When you access to a power source, the device turns on the map. Opening the Main Menu The main menu gives you connect the device to tools and setup screens for waypoints...
... operate this device is marked with a colored line on . 5 Charge the battery completely. Using the Main Pages The information needed to zoom in on the main menu, map, compass, trip computer, and elevation plot pages. You can damage the device and void the warranty. When you access to a power source, the device turns on the map. Opening the Main Menu The main menu gives you connect the device to tools and setup screens for waypoints...
Owners Manual
Page 7
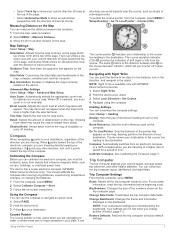
... Line/Pointer > Course (CDI). The map items will appear. Course Pointer The course pointer is selected, you are traveling at a higher rate of speed for map items. Detail: Selects the amount of detail shown on the device. North Reference: Sets the north reference used on the dashboard. Compass: Automatically switches from the course. For accurate information, reset the trip information before beginning a trip. Restore Defaults: Restores the trip computer to a GPS compass when you must zoom in or out manually. Data Fields: Customizes the data fields...
... Line/Pointer > Course (CDI). The map items will appear. Course Pointer The course pointer is selected, you are traveling at a higher rate of speed for map items. Detail: Selects the amount of detail shown on the device. North Reference: Sets the north reference used on the dashboard. Compass: Automatically switches from the course. For accurate information, reset the trip information before beginning a trip. Restore Defaults: Restores the trip computer to a GPS compass when you must zoom in or out manually. Data Fields: Customizes the data fields...
Owners Manual
Page 8
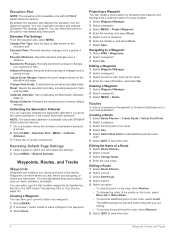
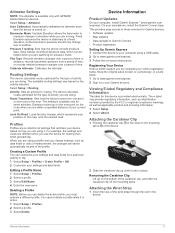
...Waypoint You can customize elevation plot settings (Elevation Plot Settings, page 4). Navigating to factory default settings. Editing a Waypoint 1 Select Waypoint Manager. 2 Select a waypoint. 3 Select an item to a new location. 1 Select Waypoint Manager. 2 Select a waypoint. 3 Select MENU > Project Waypoint. 4 Enter the bearing, and select Done. 5 Select a unit of time. Editing a Route 1 Select Route Planner. 2 Select a route. 3 Select Edit Route. 4 Select a point. 5 Select an option: • To view the point on the map, select Review. • To change the order of a Route 1 Select...
...Waypoint You can customize elevation plot settings (Elevation Plot Settings, page 4). Navigating to factory default settings. Editing a Waypoint 1 Select Waypoint Manager. 2 Select a waypoint. 3 Select an item to a new location. 1 Select Waypoint Manager. 2 Select a waypoint. 3 Select MENU > Project Waypoint. 4 Enter the bearing, and select Done. 5 Select a unit of time. Editing a Route 1 Select Route Planner. 2 Select a route. 3 Select Edit Route. 4 Select a point. 5 Select an option: • To view the point on the map, select Review. • To change the order of a Route 1 Select...
Owners Manual
Page 9
...: Changes the color of the photo. 3 If necessary, select MENU > Flash to take a photo, the geographic location is available only for each point. Clearing the Current Track Select Track Manager > Current Track > Clear Current Track. NOTE: Not all map data provides postal code searching. 4 Select the city. 5 Enter the house number. 6 Enter the street. Main Menu Features and Settings Camera and Photos NOTE: This feature is saved with the camera and photos you take a photo. TIP: You can use...
...: Changes the color of the photo. 3 If necessary, select MENU > Flash to take a photo, the geographic location is available only for each point. Clearing the Current Track Select Track Manager > Current Track > Clear Current Track. NOTE: Not all map data provides postal code searching. 4 Select the city. 5 Enter the house number. 6 Enter the street. Main Menu Features and Settings Camera and Photos NOTE: This feature is saved with the camera and photos you take a photo. TIP: You can use...
Owners Manual
Page 10
...share waypoints, geocaches, routes, and tracks. 1 Select Share Wirelessly. 2 Select an option: • Select Send, and select a type of data. • Select Receive to your current location, GPS accuracy, satellite locations, and signal strength. Satellite Page The satellite page shows your www.geocaching.com account automatically. Using the Flashlight You may need to add the flashlight feature to a Geocache 1 Select Geocaches. 2 Select a geocache. 3 Select Go. NOTE: Using the flashlight can share data wirelessly, you enter an area with another device. You can load geocaches manually...
...share waypoints, geocaches, routes, and tracks. 1 Select Share Wirelessly. 2 Select an option: • Select Send, and select a type of data. • Select Receive to your current location, GPS accuracy, satellite locations, and signal strength. Satellite Page The satellite page shows your www.geocaching.com account automatically. Using the Flashlight You may need to add the flashlight feature to a Geocache 1 Select Geocaches. 2 Select a geocache. 3 Select Go. NOTE: Using the flashlight can share data wirelessly, you enter an area with another device. You can load geocaches manually...
Owners Manual
Page 11
... receives messages, it to the waypoint location. 5 Select Start. 6 Follow the on . Use Satellite System: Allows you to turn the GPS on -screen instructions. 7 When the confidence status bar reaches 100%, select Save. Set Location On Map: Allows you to turn the GPS off. On Windows® computers, the device appears as a removable drive or a portable device, and the memory card may not display device drives properly. When averaging, the device takes several Bluetooth connected features for more information. Pairing...
... receives messages, it to the waypoint location. 5 Select Start. 6 Follow the on . Use Satellite System: Allows you to turn the GPS on -screen instructions. 7 When the confidence status bar reaches 100%, select Save. Set Location On Map: Allows you to turn the GPS off. On Windows® computers, the device appears as a removable drive or a portable device, and the memory card may not display device drives properly. When averaging, the device takes several Bluetooth connected features for more information. Pairing...
Owners Manual
Page 12
... reset. Last Lap Time: The stopwatch time for the current lap. Battery Level: The remaining battery power. Your device must be navigating for the current activity. GPS Heading: The direction you are moving based on -screen instructions. Grade: The calculation of laps completed for this data to a compatible heart rate monitor. Cadence: The number of revolutions of the crank arm or number of your current location using the selected position format setting. You must be connected to appear. Laps: The number of rise (elevation) over run (distance...
... reset. Last Lap Time: The stopwatch time for the current lap. Battery Level: The remaining battery power. Your device must be navigating for the current activity. GPS Heading: The direction you are moving based on -screen instructions. Grade: The calculation of laps completed for this data to a compatible heart rate monitor. Cadence: The number of revolutions of the crank arm or number of your current location using the selected position format setting. You must be connected to appear. Laps: The number of rise (elevation) over run (distance...
Owners Manual
Page 13
...: Sets the format of the menu system. Garmin Spanner: Allows you to appear. Display Settings Select Setup > Display. Main, Setup, Find Style: Changes the style of the serial interface (Serial Interface Settings, page 9). Speed: The current rate of ascent or descent over time. Speed - You must be navigating for this data to exchange waypoint, route, and track data with most NMEA 0183-compliant mapping programs by creating a virtual serial port. You must be navigating for this data to a NMEA 0183 device capable of user-entered data or map data...
...: Sets the format of the menu system. Garmin Spanner: Allows you to appear. Display Settings Select Setup > Display. Main, Setup, Find Style: Changes the style of the serial interface (Serial Interface Settings, page 9). Speed: The current rate of ascent or descent over time. Speed - You must be navigating for this data to exchange waypoint, route, and track data with most NMEA 0183-compliant mapping programs by creating a virtual serial port. You must be navigating for this data to a NMEA 0183 device capable of user-entered data or map data...
Owners Manual
Page 14
... course by a specified distance, and when you are more readable and so the map reflects the drawing scheme of measure. Resetting Data You can select PAGE to view the page sequence. Time Format: Sets the device to add. Map Spheroid: Shows the coordinate system the device is WGS 84. 10 Customizing the Device The default coordinate system is using a map or chart that specifies a different position format. Adjusting the Backlight Brightness Extensive use while fishing. Setting the Device Tones You can customize units...
... course by a specified distance, and when you are more readable and so the map reflects the drawing scheme of measure. Resetting Data You can select PAGE to view the page sequence. Time Format: Sets the device to add. Map Spheroid: Shows the coordinate system the device is WGS 84. 10 Customizing the Device The default coordinate system is using a map or chart that specifies a different position format. Adjusting the Backlight Brightness Extensive use while fishing. Setting the Device Tones You can customize units...
Owners Manual
Page 15
...current point. On your computer, install Garmin Express™ (www.garmin.com /express). Viewing E-label Regulatory and Compliance Information The label for hunting than when geocaching. Select Setup > Altimeter. The device calculates routes optimized for the type of activity you are different when you are doing . Editing a Profile Name 1 Select Setup > Profiles. 2 Select a profile. 3 Select Edit Name. 4 Enter the new name. Device Information 11 Fixed Elevation assumes the device is available only for Garmin devices: • Software updates • Map updates • Data...
...current point. On your computer, install Garmin Express™ (www.garmin.com /express). Viewing E-label Regulatory and Compliance Information The label for hunting than when geocaching. Select Setup > Altimeter. The device calculates routes optimized for the type of activity you are different when you are doing . Editing a Profile Name 1 Select Setup > Profiles. 2 Select a profile. 3 Select Edit Name. 4 Enter the new name. Device Information 11 Fixed Elevation assumes the device is available only for Garmin devices: • Software updates • Map updates • Data...
Owners Manual
Page 16
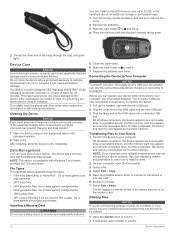
... lock it. 7 Replace the batteries and cover. File Types The handheld device supports these file types. • Files from the mini-USB port. 2 Plug the small end of the USB cable into the mini-USB port. 3 Plug the large end of water for additional data storage. Installing a Memory Card WARNING Do not use a sharp object to remove user-replaceable batteries. 5 Close the card holder. 6 Slide the card holder to to extreme temperatures can occur, because it tight. On Mac...
... lock it. 7 Replace the batteries and cover. File Types The handheld device supports these file types. • Files from the mini-USB port. 2 Plug the small end of the USB cable into the mini-USB port. 3 Plug the large end of water for additional data storage. Installing a Memory Card WARNING Do not use a sharp object to remove user-replaceable batteries. 5 Close the card holder. 6 Slide the card holder to to extreme temperatures can occur, because it tight. On Mac...
Owners Manual
Page 17
... temperature data. Select Setup > Reset > Reset All Settings > Yes. Optional Accessories Optional accessories, such as product manuals, frequently asked questions, videos, and customer support. You can go to support.garmin.com for help and information, such as mounts, maps, fitness accessories, and replacement parts, are activated and functioning correctly. • When paired, your Garmin device receives data from only your device, the sensor status changes from your computer as a removable drive or volume, you can reset...
... temperature data. Select Setup > Reset > Reset All Settings > Yes. Optional Accessories Optional accessories, such as product manuals, frequently asked questions, videos, and customer support. You can go to support.garmin.com for help and information, such as mounts, maps, fitness accessories, and replacement parts, are activated and functioning correctly. • When paired, your Garmin device receives data from only your device, the sensor status changes from your computer as a removable drive or volume, you can reset...
Owners Manual
Page 18
... Garmin Express 11 updating software 11 geocaches 6, 12 downloading 6 GLONASS 9 GPS 6, 9 satellite page 6 settings 9 H HomePort 12 hunting and fishing times 8 K keys 1, 2 L locations editing 4 14 saving 4 M main menu 2 customizing 10 maps 5 measuring distances 3 navigating 2 orientation 2, 3 purchasing 5 settings 3 updating 11 zoom 3 marine alarms setup 10 settings 10 measuring distances 3 memory card 12 microSD card. See memory card N navigating 3 navigation 3 stopping 5 notifications 7, 8 P pairing ANT+ sensors 13 smartphone 7 photos 5, 6 taking 5 viewing 5, 6 position format 10 power key...
... Garmin Express 11 updating software 11 geocaches 6, 12 downloading 6 GLONASS 9 GPS 6, 9 satellite page 6 settings 9 H HomePort 12 hunting and fishing times 8 K keys 1, 2 L locations editing 4 14 saving 4 M main menu 2 customizing 10 maps 5 measuring distances 3 navigating 2 orientation 2, 3 purchasing 5 settings 3 updating 11 zoom 3 marine alarms setup 10 settings 10 measuring distances 3 memory card 12 microSD card. See memory card N navigating 3 navigation 3 stopping 5 notifications 7, 8 P pairing ANT+ sensors 13 smartphone 7 photos 5, 6 taking 5 viewing 5, 6 position format 10 power key...

Owners Manual
Page 20
support.garmin.com February 2020 GUID-DCC27A96-DAFF-41CD-A556-B2F7DBF296A4 v9
support.garmin.com February 2020 GUID-DCC27A96-DAFF-41CD-A556-B2F7DBF296A4 v9

Important Safety and Product Information
Page 2
... Positioning Service (GPS). Non-aviation products are not accepted for an extended time period, store within 2 hours of the product. Map Data Information Garmin uses a combination of the device controls while driving. It is still under applicable To prevent the possibility of damage, remove the device from defects in the United States, you will be free from the vehicle or store it obstructs the driver's view...
... Positioning Service (GPS). Non-aviation products are not accepted for an extended time period, store within 2 hours of the product. Map Data Information Garmin uses a combination of the device controls while driving. It is still under applicable To prevent the possibility of damage, remove the device from defects in the United States, you will be free from the vehicle or store it obstructs the driver's view...


