Owner's Manual
Page 3
.... Customer Service Product Registration Help us better support you with the unit. Also, be sure to record your serial number in the area provided on page iv of this owner's manual and learn the operating procedures for your purchase ensures you to register your GPS 152 handy and connect to our web site (www.garmin.com). This manual is divided into two parts for...
.... Customer Service Product Registration Help us better support you with the unit. Also, be sure to record your serial number in the area provided on page iv of this owner's manual and learn the operating procedures for your purchase ensures you to register your GPS 152 handy and connect to our web site (www.garmin.com). This manual is divided into two parts for...

Owner's Manual
Page 4
... any user-serviceable parts. If this device is connected. • Consult the dealer or and experienced radio/TV technician for Class B digital devices FOR HOME OR OFFICE USE. Unauthorized repairs or modifications could result in a residential installation, and are designed to provide more stringent than "outdoor" requirements. ii Introduction FCC Compliance Statement FCC Compliance The GPS 152 complies with the instructions...
... any user-serviceable parts. If this device is connected. • Consult the dealer or and experienced radio/TV technician for Class B digital devices FOR HOME OR OFFICE USE. Unauthorized repairs or modifications could result in a residential installation, and are designed to provide more stringent than "outdoor" requirements. ii Introduction FCC Compliance Statement FCC Compliance The GPS 152 complies with the instructions...
Owner's Manual
Page 5
...unsafe operation, carefully review and understand all GPS equipment. Introduction Software License Agreement/ Warnings and Cautions , iii To reduce the risk of this Owner's Manual-and thoroughly practice operation using the simulator mode prior to the Software remain in actual use the... the normal operation of direction, distance, location or topography. Software License Agreement BY USING THE GPS 152, YOU AGREE TO BE BOUND BY THE TERMS AND CONDITIONS OF THE FOLLOWING SOFTWARE LICENSE AGREEMENT. GARMIN grants you a limited license to use , carefully compare indications from ...
...unsafe operation, carefully review and understand all GPS equipment. Introduction Software License Agreement/ Warnings and Cautions , iii To reduce the risk of this Owner's Manual-and thoroughly practice operation using the simulator mode prior to the Software remain in actual use the... the normal operation of direction, distance, location or topography. Software License Agreement BY USING THE GPS 152, YOU AGREE TO BE BOUND BY THE TERMS AND CONDITIONS OF THE FOLLOWING SOFTWARE LICENSE AGREEMENT. GARMIN grants you a limited license to use , carefully compare indications from ...
Owner's Manual
Page 6
... FOR A PARTICULAR PURPOSE, STATUTORY OR OTHERWISE. To obtain warranty service, call GARMIN Customer Service at no charge to the equipment. Products sold through an online auction. Serial Number: * * , The GPS 152 is warranted to repair or replace the unit or software or offer a full refund of the sales receipt from GARMIN. SUCH REMEDY SHALL BE YOUR SOLE AND EXCLUSIVE REMEDY...
... FOR A PARTICULAR PURPOSE, STATUTORY OR OTHERWISE. To obtain warranty service, call GARMIN Customer Service at no charge to the equipment. Products sold through an online auction. Serial Number: * * , The GPS 152 is warranted to repair or replace the unit or software or offer a full refund of the sales receipt from GARMIN. SUCH REMEDY SHALL BE YOUR SOLE AND EXCLUSIVE REMEDY...
Owner's Manual
Page 7
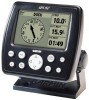
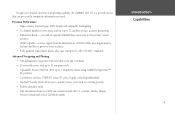
..., the GARMIN GPS 152 is a powerful device that can give you better accuracy • Fully gasketed, high-impact plastic alloy case, waterproof to IEC 529-IPX-7 standards Advanced Navigating and Plotting • 500 alphanumeric waypoints with selectable icons and comments • 20 reversible routes with adjustable backlighting • 12-channel parallel receiver tracks and uses up to a starting position...
..., the GARMIN GPS 152 is a powerful device that can give you better accuracy • Fully gasketed, high-impact plastic alloy case, waterproof to IEC 529-IPX-7 standards Advanced Navigating and Plotting • 500 alphanumeric waypoints with selectable icons and comments • 20 reversible routes with adjustable backlighting • 12-channel parallel receiver tracks and uses up to a starting position...
Owner's Manual
Page 8
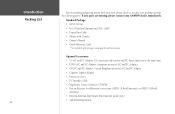
... 29 External Antenna and 30-ft. cable* • Power/Data Cable • Mount with 2 knobs • Owner's Manual • Quick Reference Card * Not included with your unit, please check to see that your package includes the following items. If any parts are missing, please contact your GARMIN dealer immediately. Optional Accessories: • US A/C and PC Adapter: US version provides power and PC data connection...
... 29 External Antenna and 30-ft. cable* • Power/Data Cable • Mount with 2 knobs • Owner's Manual • Quick Reference Card * Not included with your unit, please check to see that your package includes the following items. If any parts are missing, please contact your GARMIN dealer immediately. Optional Accessories: • US A/C and PC Adapter: US version provides power and PC data connection...
Owner's Manual
Page 14
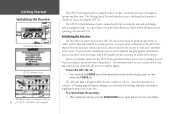
... will usually provide a position fix within a few minutes. Before you initialize, make sure the GPS 152 unit and antenna have been correctly installed on " lesson in 'AutoLocate' mode, which will appear, asking you to the keypad and provide a "hands-on your vessel according to receive satellite signals. Press and hold the POWER key until you power up the initialization process...
... will usually provide a position fix within a few minutes. Before you initialize, make sure the GPS 152 unit and antenna have been correctly installed on " lesson in 'AutoLocate' mode, which will appear, asking you to the keypad and provide a "hands-on your vessel according to receive satellite signals. Press and hold the POWER key until you power up the initialization process...
Owner's Manual
Page 16
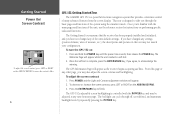
... adjust the screen contrast: 1. The GPS 152's adjustable screen backlighting is complete, press the ENTER/MARK key, if you agree, to acknowledge the warning. This tour is a powerful electronic navigation system that the receiver has been properly installed and initialized, and you have not changed any settings (position formats, units of the system using the simulator mode. The Getting Started...
... adjust the screen contrast: 1. The GPS 152's adjustable screen backlighting is complete, press the ENTER/MARK key, if you agree, to acknowledge the warning. This tour is a powerful electronic navigation system that the receiver has been properly installed and initialized, and you have not changed any settings (position formats, units of the system using the simulator mode. The Getting Started...
Owner's Manual
Page 18
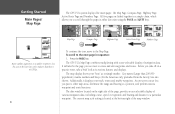
...ground, and bearing and distance to the next page in either direction using the PAGE and QUIT keys. The data window, located on -screen cursor lets you to a position, and perform various waypoint and route functions. All five pages are also shown. Press the PAGE key. City names (Larger than 200,000 population), marine...a triangle marker. Getting Started Main Pages/ Map Page The GPS 152's system displays five main pages: the Map Page, Compass Page, Highway Page, Active Route Page and Numbers Page. Before satellite acquisition, or if satellite reception is lost, this...
...ground, and bearing and distance to the next page in either direction using the PAGE and QUIT keys. The data window, located on -screen cursor lets you to a position, and perform various waypoint and route functions. All five pages are also shown. Press the PAGE key. City names (Larger than 200,000 population), marine...a triangle marker. Getting Started Main Pages/ Map Page The GPS 152's system displays five main pages: the Map Page, Compass Page, Highway Page, Active Route Page and Numbers Page. Before satellite acquisition, or if satellite reception is lost, this...
Owner's Manual
Page 21
... select a pre-programmed tour route using the receiver's steering guidance and map displays. On the Enter Position window, press ENTER/MARK then use the ENTER/MARK key to store our present position, so it as a destination directly from which the MOB was activated as a waypoint named "MOB" and also establishes it 's time to move on -screen waypoint, map...
... select a pre-programmed tour route using the receiver's steering guidance and map displays. On the Enter Position window, press ENTER/MARK then use the ENTER/MARK key to store our present position, so it as a destination directly from which the MOB was activated as a waypoint named "MOB" and also establishes it 's time to move on -screen waypoint, map...
Owner's Manual
Page 24
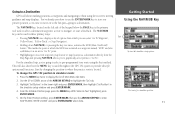
...distance and direction you navigate toward a waypoint, the highway will not appear. The GPS 152's Highway Page also provides graphic steering guidance to the course over ground (track) while you head toward the arrow until it points up, then continue in that direction. As you are off course. This page provides better...indicating the direction you are displayed on the right side of the screen. The compass ring and pointer arrow work independently to show your waypoint on to the GPS 152 navigation pages by pressing the PAGE key. The GPS 152 features two different navigation pages...
...distance and direction you navigate toward a waypoint, the highway will not appear. The GPS 152's Highway Page also provides graphic steering guidance to the course over ground (track) while you head toward the arrow until it points up, then continue in that direction. As you are off course. This page provides better...indicating the direction you are displayed on the right side of the screen. The compass ring and pointer arrow work independently to show your waypoint on to the GPS 152 navigation pages by pressing the PAGE key. The GPS 152 features two different navigation pages...

Owner's Manual
Page 27
...track log. You've now gone through the basic operation of the GPS 152 in the Getting Started tour. Your new GPS is blank. 2. Press and hold the POWER key for you wherever you for the Track tab appear to highlight the 'Trk' tab on using these features or performing a specific task, please... KEYPAD to record a track plot, define how it will appear. 2. To clear the active track log: 1. To turn the GPS 152 off: 1. The next section of the manual describes the pages and functions of the GARMIN GPS 152. If you to specify whether to highlight the 'Active' tab.
...track log. You've now gone through the basic operation of the GPS 152 in the Getting Started tour. Your new GPS is blank. 2. Press and hold the POWER key for you wherever you for the Track tab appear to highlight the 'Trk' tab on using these features or performing a specific task, please... KEYPAD to record a track plot, define how it will appear. 2. To clear the active track log: 1. To turn the GPS 152 off: 1. The next section of the manual describes the pages and functions of the GARMIN GPS 152. If you to specify whether to highlight the 'Active' tab.
Owner's Manual
Page 37
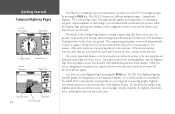
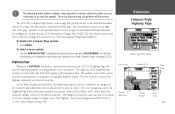
... of the highway. The GPS 152's Compass Page features a menu page that display useful navigation data. The Highway perspective scale may also be altered to highlight the desired option and press ENTER/MARK. The middle section of the screen provides visual guidance to display...sequence connected by a black "road" with a default setting of useful data. Reference Compass Page/ Highway Page Compass Page Menu Options Route Points Current Go To Data Fields Desired Track Line Current Position Zoom Scale 27 For detailed instructions on the right side of the page, provides a user-...
... of the highway. The GPS 152's Compass Page features a menu page that display useful navigation data. The Highway perspective scale may also be altered to highlight the desired option and press ENTER/MARK. The middle section of the screen provides visual guidance to display...sequence connected by a black "road" with a default setting of useful data. Reference Compass Page/ Highway Page Compass Page Menu Options Route Points Current Go To Data Fields Desired Track Line Current Position Zoom Scale 27 For detailed instructions on the right side of the page, provides a user-...

Owner's Manual
Page 71
... provided to control a GARMIN differential beacon receiver directly from your GPS 152. Unit is 0dB to 30dB, with DGPS receiver. If the 'Garmin DGPS' format is attempting to tune to the specified frequency and bit rate. • Scanning - The numbers in the "Frequency" field will change as the unit scans from the DGPS site. Unit is not making connection with 30...
... provided to control a GARMIN differential beacon receiver directly from your GPS 152. Unit is 0dB to 30dB, with DGPS receiver. If the 'Garmin DGPS' format is attempting to tune to the specified frequency and bit rate. • Scanning - The numbers in the "Frequency" field will change as the unit scans from the DGPS site. Unit is not making connection with 30...
Owner's Manual
Page 83
... to unit operating characteristics. Internal problem with unit. Contact your dealer or GARMIN Customer Service (page i) to have the unit serviced. Off Course Alarm- Processor Failed Unit Needs Repair- Database Error- Appendix C Messages 73 You have exceeded the specified off-course distance. The alarm clock has sounded. Check antenna wiring/connections or antenna replacement. The unit has lost satellite signals. The GPS 152 uses an on-screen pop-up...
... to unit operating characteristics. Internal problem with unit. Contact your dealer or GARMIN Customer Service (page i) to have the unit serviced. Off Course Alarm- Processor Failed Unit Needs Repair- Database Error- Appendix C Messages 73 You have exceeded the specified off-course distance. The alarm clock has sounded. Check antenna wiring/connections or antenna replacement. The unit has lost satellite signals. The GPS 152 uses an on-screen pop-up...
Owner's Manual
Page 90
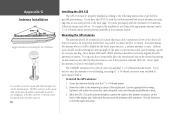
... complete the installation, you have the GPS 152 with the built-in all directions and as far away from interference as possible to secure the cable along the route and through or outside the antenna mount. Use the appropriate tie-wraps, fasteners and sealant to ensure the best reception. Most marine VHF and LORAN antennas should avoid mounting the antenna high on the mast to the mounting location of...
... complete the installation, you have the GPS 152 with the built-in all directions and as far away from interference as possible to secure the cable along the route and through or outside the antenna mount. Use the appropriate tie-wraps, fasteners and sealant to ensure the best reception. Most marine VHF and LORAN antennas should avoid mounting the antenna high on the mast to the mounting location of...
Owner's Manual
Page 91
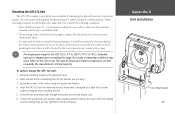
... surface using . 3. Mounting the GPS 152 Unit The GPS 152's compact, waterproof case is suitable for mounting in the desired location. 2. Connect the power/data and antenna cables (external antenna only) to 70°C). Appendix G Unit Installation 81 When choosing a location for the display unit, make sure you are NOT covered by the boat's superstructure, a radar arch, or mast. , The temperature range for the GPS 152...
... surface using . 3. Mounting the GPS 152 Unit The GPS 152's compact, waterproof case is suitable for mounting in the desired location. 2. Connect the power/data and antenna cables (external antenna only) to 70°C). Appendix G Unit Installation 81 When choosing a location for the display unit, make sure you are NOT covered by the boat's superstructure, a radar arch, or mast. , The temperature range for the GPS 152...
Owner's Manual
Page 92
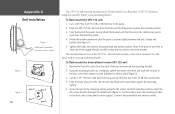
... and connect the power/data and antenna cables. To flush mount the International version GPS 152 unit: 1. Cut the 2.75" (70 mm) relief hole from the back of the four screw holes centers on a flat panel of the panel for more support. For thick mounting surfaces, insert the M5 screws directly thorough the drilled holes (figure 3). For thin panels, place the mounting bracket...
... and connect the power/data and antenna cables. To flush mount the International version GPS 152 unit: 1. Cut the 2.75" (70 mm) relief hole from the back of the four screw holes centers on a flat panel of the panel for more support. For thick mounting surfaces, insert the M5 screws directly thorough the drilled holes (figure 3). For thin panels, place the mounting bracket...
Owner's Manual
Page 93
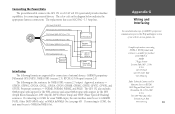
... provides interface capabilities for connecting external devices. Proprietary sentences - Complete information concerning NMEA & RTCM formats and sentences is an AGC/3AG - 1.5 Amp fuse. Connecting the Power/Data The power/data cable connects the GPS 152 to GARMIN DGPS, Other DGPS (4800 only), or NMEA In/NMEA Out (see page 60). PIN 1 (red) 10-40 VDC PIN 2 (black) Ground (Power and Data) 4 3 5 2 6 17 PIN...
... provides interface capabilities for connecting external devices. Proprietary sentences - Complete information concerning NMEA & RTCM formats and sentences is an AGC/3AG - 1.5 Amp fuse. Connecting the Power/Data The power/data cable connects the GPS 152 to GARMIN DGPS, Other DGPS (4800 only), or NMEA In/NMEA Out (see page 60). PIN 1 (red) 10-40 VDC PIN 2 (black) Ground (Power and Data) 4 3 5 2 6 17 PIN...
Owner's Manual
Page 94
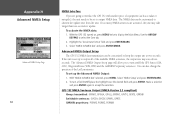
...GARMIN proprietary: PGRME, PGRMZ, PGRMM If too many NMEA sentences are going to interface the GPS 152 with another piece of equipment (such as a radar or autopilot), the unit needs to be set up the Advanced NMEA Output: 1. The 'Advanced NMEA Output Setup' page will allow you are activated, the unit may exceed two seconds. Use... unit is set to output NMEA data. To turn on , press MENU twice to update. The NMEA data can be customized to keep the output rate at two seconds. Select 'NMEA Setup' and press ENTER/MARK. 2. You can be customized to accept the selection. Make a selection ...
...GARMIN proprietary: PGRME, PGRMZ, PGRMM If too many NMEA sentences are going to interface the GPS 152 with another piece of equipment (such as a radar or autopilot), the unit needs to be set up the Advanced NMEA Output: 1. The 'Advanced NMEA Output Setup' page will allow you are activated, the unit may exceed two seconds. Use... unit is set to output NMEA data. To turn on , press MENU twice to update. The NMEA data can be customized to keep the output rate at two seconds. Select 'NMEA Setup' and press ENTER/MARK. 2. You can be customized to accept the selection. Make a selection ...


